This is the multi-page printable view of this section. Click here to print.
Block Storage
- 1: Overview
- 1.1: Monitoring Metrics
- 1.2: ServiceWatch metric
- 2: How-to guides
- 2.1: Connect to Server
- 2.2: Using Snapshots
- 2.3: Transfer volume
- 3: API Reference
- 4: CLI Reference
- 5: Release Note
1 - Overview
Service Overview
Block Storage is a high-performance storage that stores data in block units arranged in a fixed size and order.
Suitable for large-scale, high-performance requirements such as databases and mail servers, and users can directly allocate volumes to the server.
Features
- Large Volume Provisioning: OS configuration volumes are created with at least the minimum size per image and can be expanded up to 12TB, and data storage volumes outside the OS can be created and expanded from a minimum of 8GB to a maximum of 12TB. * Capacity expansion is carried out reliably while online.
- Full SSD-based high performance: Provides high durability and availability based on redundant Controllers and Disk Array RAID. * Full SSD disks are provided by default, making them suitable for high‑speed data processing tasks such as database workloads.
- Snapshot Backup: Image snapshot functionality allows recovery of changed and deleted data. * The user selects the snapshot created at the desired recovery point from the list and performs the recovery.
Service architecture diagram
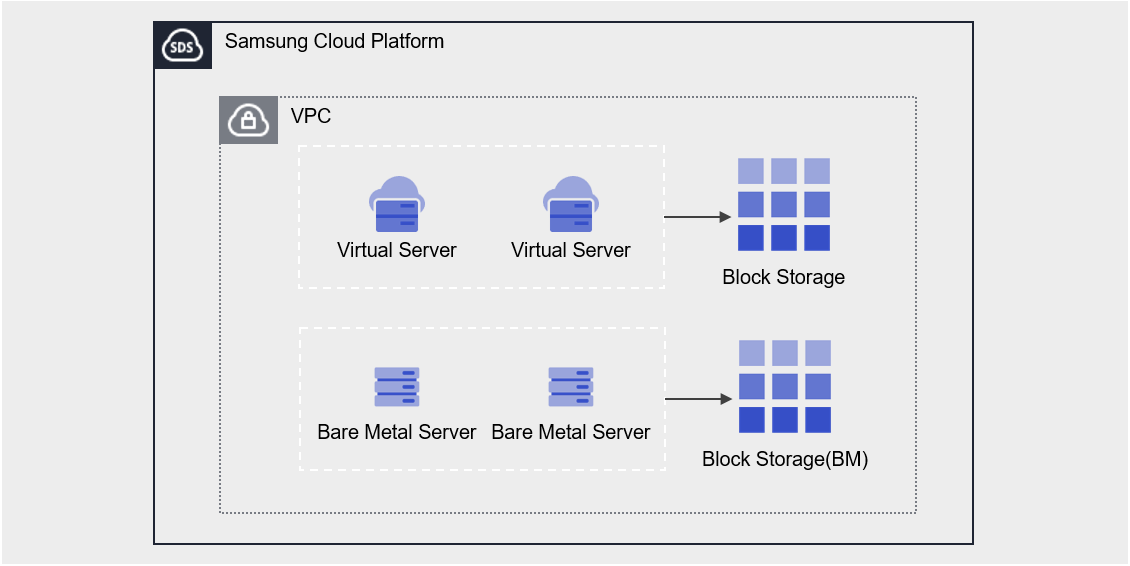
Provided features
Block Storage provides the following features.
- Volume Name: Users can set or edit the name for each volume.
- Capacity: Volumes can be created with capacities ranging from a minimum of 8 GB up to a maximum of 12 TB, and can be expanded while in use. * The default OS volume can be created with a size no less than the minimum required for each image.
- Connection Server: You can select a Virtual Server to connect or disconnect.
- Multi-Server Connection (Multi Attach): Connects to two or more servers, with no limit on the number of servers per volume, and a Virtual Server can connect up to 26 volumes
- Encryption: All volumes of Block Storage have AES-256 algorithm encryption applied by default, and when a volume is of HDD/SSD_KMS disk type, additional in‑transit encryption is provided for the Block Storage segment connected to the instance.
- snapshot: Through the image snapshot feature, recovery of modified and deleted data is possible. * The user selects a snapshot created at the desired recovery point from the list and restores it.
- Volume Transfer: Using the volume transfer feature, you can transfer a volume to another Account.
- Monitoring: IOPS, Latency, Throughput, etc. monitoring information can be viewed through the ServiceWatch service.
Components
You can create a volume by entering the capacity and selecting the disk type according to the user’s service scale and performance requirements. When using the snapshot feature, you can restore data to the desired point in time.
Volume
A volume (Volume) is the basic creation unit of the Block Storage service and is used as data storage space. The user selects a name, size, and disk type to create a volume, then attaches it to a Virtual Server for use.
The volume name creation rules are as follows.
-, _) within 255 characters.Snapshot
A snapshot (Snapshot) is an image backup of a volume at a specific point in time. The user can view the snapshot name and creation time in the snapshot list, select the snapshot they wish to restore, and recover data that was modified or deleted using that snapshot.
The following are considerations when using snapshots.
- The snapshot creation time is based on Asia/Seoul (GMT +09:00).
- Select the snapshot recovery button to restore the Block Storage volume to the latest snapshot.
- If you select a specific snapshot from the snapshot list, you can recover by creating a new volume based on that snapshot.
- Snapshots are billed based on the size of the original Block Storage, so please delete any unnecessary snapshots.
Preceding Service
This is a list of services that must be pre-configured before creating the service. Refer to the guide provided for each service for detailed information and prepare in advance.
| Service Category | service | Detailed description |
|---|---|---|
| Compute | Virtual Server | Virtual server optimized for cloud computing |
1.1 - Monitoring Metrics
According to Samsung Cloud Platform’s policy, the Cloud Monitoring service is scheduled to be discontinued in September 2026.
Accordingly, after the September 2026 release, resource monitoring of the Samsung Cloud Platform via Cloud Monitoring will no longer be possible.
With the new alternative service, you can continuously perform resource monitoring by leveraging ServiceWatch released in October 2025.
ServiceWatch provides more modern and powerful features, replacing Cloud Monitoring to deliver a seamless monitoring environment.
Block Storage planned to be integrated with ServiceWatch from the July 2026 release onward is.
Detailed information about ServiceWatch is available in the ServiceWatch Overview.
Block Storage Monitoring Metrics
The table below shows the monitoring metrics for Block Storage that can be viewed in Cloud Monitoring. For detailed usage of Cloud Monitoring, refer to the Cloud Monitoring guide.
| Performance Item Name | Explanation | unit |
|---|---|---|
| Volume Total | Total byte count | bytes |
| IOPS [Read] | iops(read) | iops |
| IOPS [Write] | iops(write) | iops |
| Latency Time [Read] | Read latency | usec |
| Latency Time [write] | Latency (write) | usec |
| Throughput [Read] | Throughput (read) | bytes/s |
| Throughput [Write] | Throughput (write) | bytes/s |
1.2 - ServiceWatch metric
Block Storage VM sends metrics to ServiceWatch. The metrics provided by basic monitoring are data collected at 1‑minute intervals.
basic metrics
The following are the basic metrics for the Block Storage VM namespace.
The indicators whose names are displayed in bold below are the key indicators selected from the basic metrics provided by Block Storage VM. The key metrics are used to configure service dashboards that are automatically built for each service in ServiceWatch.
Each metric offers guidance in the user guide on which statistical value is meaningful when viewing it, and the service dashboard allows you to view key metrics using their primary statistical values.
| Indicator name | Detailed description | unit | meaningful statistics |
|---|---|---|---|
| Volume Total | Block Storage size | Gigabytes | - |
| IOPS [Read] | Block Storage volume IOPS (read) | - |
|
| IOPS [Write] | Block Storage volume IOPS (write) | - |
|
| Latency Time [Read] | Block Storage volume latency (read) | Milliseconds |
|
| Latency Time [write] | Block Storage volume latency (write) | Millisecond |
|
| Throughput [Read] | Block Storage volume throughput (read) | Megabytes/Second |
|
| Throughput [Write] | Block Storage volume throughput (write) | Megabytes/Second |
|
2 - How-to guides
Users can create the service by entering the required Block Storage information and selecting detailed options through the Samsung Cloud Platform Console.
Create Block Storage
You can create and use the Block Storage service from the Samsung Cloud Platform Console. To create Block Storage, follow these steps.
All Services > Compute > Virtual Server menu, click it. 1. Navigate to the Service Home page of the Virtual Server.
Click the Block Storage menu. 2. Go to the Block Storage List page.
Block Storage on the page, click the Create Service button. 3. Go to the Create Block Storage page.
On the Block Storage Creation page, enter the information required to create the service and select detailed options.
구분 Required statusDetailed description Volume name Required Volume name - English letters, numbers, spaces, and special characters (
-,_) up to 255 characters
Disk type Required Select Disk Type - SSD_Provisioned: SSD volume with configurable IOPS and throughput
- SSD/HDD: Standard SSD/HDD volume
- SSD/HDD_KMS: Additional encrypted volume
- SSD/HDD_MultiAttach: Volume that can be attached to more than one server
- Cannot be modified after service creation
- When creating the service via snapshot restore volume creation, it is set identical to the original and cannot be modified
capacity Selection Capacity setting - Can be created within 8~12,228 GB
- Enter the number of units provided in 8 GB increments
- When creating a service via snapshot recovery volume creation, input a capacity that is equal to or larger than the original
Max IOPS Required Enter the maximum IOPS value between 5,000 and 20,000 - disk type can be set only when it is SSD_Provisioned
Max Throughput Required Enter the maximum Throughput value between 250 and 1,000 - disk type can be set only when it is SSD_Provisioned
Availability Zone Required Select the Availability Zone to create resources within the region Snapshot Selection Select the snapshot to use when creating a volume from a snapshot - Use item after checking, snapshot selection is possible
- When creating a service via snapshot recovery volume creation, provide the recovery snapshot name
- If not selected, an empty volume is created
Table. Block Storage service information input items- English letters, numbers, spaces, and special characters (
Summary Verify the detailed information and estimated charges generated in the panel, then click the Create button.
- When creation is complete, verify the created resource on the Block Storage List page.
- You can only attach a volume to a Virtual Server in the same Availability Zone.
- The performance metrics (IOPS, Throughput) of the configured storage are based on maximum values and do not guarantee consistent values.
- All volumes of Block Storage are encrypted by default using the AES-256 algorithm.
- Virtual Servers based on Windows cannot use MultiAttach disks. * Use a separate replication method or solution.
- If the volume is of the HDD/SSD_KMS disk type, additional in‑transit encryption is provided for the instance and the Block Storage segment attached to the instance.
Check Block Storage detailed information
You can view and edit the full resource list and detailed information of the Block Storage service. Block Storage Details page consists of Detailed Information, Snapshot List, Tags, Operation History tabs.
To view detailed information about the Block Storage service, follow these steps.
- All Services > Compute > Virtual Server menu, click it. 1. Navigate to the Service Home page of the Virtual Server.
- Click the Block Storage menu. 2. Navigate to the Block Storage List page.
- Block Storage List page, click the resource to view detailed information. 3. Block Storage Details Navigate to the page.
- Block Storage Details page displays status information and additional feature information, and consists of Details, Snapshot List, Tags, Activity Log tabs.
Category Detailed description Volume status Volume status - Creating: Creating
- Downloading: Creating (applying OS image)
- Available: Created, server connection available
- Reserved: Server connection pending
- Attaching: Connecting to server
- Detaching: Detaching from server
- In Use: Server connection established
- Deleting: Terminating service
- Awaiting Transfer: Waiting for volume transfer
- Extending: Extending capacity
- Error Extending: Abnormal state during capacity extension
- Backing Up: Backing up volume
- Restoring Backup: Restoring volume backup
- Error Backing Up: Abnormal state during volume backup
- Error Restoring: Error restoring volume backup
- Error Deleting: Error deleting
- Error Managing: Abnormal state
- Error: Abnormal state
- Maintenance: Temporary maintenance
- Reverting: Reverting snapshot
Volume Transfer Move the volume to another Account - For details on volume migration, see 볼륨 이전
Create snapshot Immediately create a snapshot at the time of creation - For detailed information on snapshot creation, see 스냅샷 생성하기
Snapshot recovery Recover the volume using the latest snapshot in Available state - For detailed information on snapshot recovery, see 스냅샷 복구하기
Delete Block Storage Button to delete the service Table. Status information and additional features
- Block Storage Details page displays status information and additional feature information, and consists of Details, Snapshot List, Tags, Activity Log tabs.
Detailed Information
Block Storage List page lets you view detailed information of the selected resource and modify it if needed.
| Category | Detailed description |
|---|---|
| service | service group |
| Resource Type | Resource Type |
| SRN | Unique resource ID in Samsung Cloud Platform
|
| Resource Name | Resource name
|
| Resource ID | Service’s unique resource ID |
| Constructor | User who created the service |
| Creation date and time | Service creation date and time |
| Modifier | User who modified the service |
| Modification date and time | Service modification date and time |
| Volume name | Volume name
|
| Volume ID | Volume unique ID |
| Availability Zone | Availability Zone information |
| Disk type | Disk type |
| type | Classification by volume creation method and usage |
| capacity | Volume capacity
|
| Max IOPS | Required |
| Max Throughput | Required |
| Connection server | Connected Virtual Server
|
Snapshot List
Block Storage List page allows you to view the snapshot of the selected resource.
| Category | Detailed description |
|---|---|
| Snapshot name | Snapshot name |
| Explanation | Snapshot description |
| Volume capacity | Capacity of the original Block Storage volume for the snapshot target
|
| Creation date and time | Snapshot creation time |
| Status | Snapshot status
|
| Additional features > More | Snapshot management button
|
| Delete | Select the snapshots to delete from the snapshot list and delete them all at once. |
- Snapshots can affect volume capacity management. * Delete unnecessary snapshots after use.
- Snapshot recovery can be performed while the server is not connected.
- The snapshot creation time is based on Asia/Seoul (GMT +09:00).
- When you click the snapshot recovery button, the volume is restored to the latest snapshot in the Available state.
- When you select to create a recovery volume on the snapshot list page, a new volume based on the snapshot is created without modifying the existing volume.
Tag
On the Block Storage list page, you can view the tag information of the selected resource and add, modify, or delete it.
| Category | Detailed description |
|---|---|
| Tag list | Tag list
|
Operation History
Block Storage List page allows you to view the operation history of the selected resource.
| Category | Detailed description |
|---|---|
| Task History List | Resource Change History
|
Block Storage Resource Management
If you need to modify the settings of a created Block Storage or add or remove a connected server, you can perform the operation on the Block Storage Details page.
Edit volume name
You can edit the volume name. To modify the volume name, follow these steps.
- Click the All Services > Compute > Virtual Server menu. 1. Go to the Service Home page of the Virtual Server.
- Click the Block Storage menu. 2. Go to the Block Storage List page.
- On the Block Storage List page, click the resource whose volume name you want to edit. 3. Go to the Block Storage Details page.
- Click the Edit button of the Volume Name. 4. Edit Volume Name The popup window opens.
- Enter the volume name and click the Confirm button.
-, _) within 255 characters.Expand Capacity
You can expand the volume capacity. To increase capacity, follow the steps below.
- All Services > Compute > Virtual Server menu, click it. 1. Go to the Service Home page of the Virtual Server.
- Click the Block Storage menu. 2. Go to the Block Storage List page.
- On the Block Storage List page, click the resource to increase capacity. 3. Block Storage Details page.
- Click the Edit button of Capacity. 4. Capacity Modification popup window opens.
- Enter the capacity and click the Confirm button.
연결 서버 수정하기 {#update-1} 서버를 연결하거나 연결 해제할 수 있습니다. 연결 서버를 수정 하려면 다음 절차를 따르세요. 모든 서비스 > Compute > Virtual Server 메뉴를 클릭하세요. Virtual Server의 Service Home 페이지로 이동합니다. Block Storage 메뉴를 클릭하세요. Block Storage 목록 페이지로 이동합니다. Block Storage 목록 페이지에서 연결 서버를 수정할 자원을 클릭하세요. 3. Block Storage Details Navigate to the page. 4. When adding a Virtual Server connection, click the Add button in the Connection Server item. 4. Add Connection Server The popup window opens. 5. After selecting the Virtual Server you want to connect to, click the Confirm button. 6. If you disconnect the Virtual Server, click the Disconnect button in the Connection Server item. * Be sure to perform the disconnect operation (Umount, Disk Offline) on the server before proceeding with the disconnection.
- You can connect a Virtual Server created in the same location as the Block Storage.
- Virtual servers that use a Partition with a Server Group policy cannot be connected.
- For HDD/SSD_MultiAttach disk types, they can be attached to two or more Virtual Servers, and there is no limit on the number of connections.
- Virtual Servers based on Windows cannot use MultiAttach disks and must use a separate replication method or solution.
- Virtual Server can connect up to 26 volumes, including the OS default.
- The OS default volume cannot be modified on the connected server, nor can its service be deleted.
- When adding a connected server, it can be used after performing the connection tasks (Mount, Disk Online) on the server. * For detailed information about server connections, refer to 서버 연결하기.
Delete Block Storage
You can reduce operating costs by deleting unused Block Storage. Note that deleting a service may cause the running service to stop immediately, so you should proceed with the deletion only after fully considering the impact of service interruption.
- Be careful, as the data cannot be recovered after deletion.
- In the following case, the Block Storage volume cannot be deleted.
- Connecting to server
- OS default volume
- Connect to the Virtual Server’s custom image
- When the volume status is not Available, Error, Error Extending, Error Restoring, or Error Managing.
- When selecting and deleting two or more volumes, only the deletable volumes will be deleted.
To delete Block Storage, follow these steps.
- Click the All Services > Compute > Virtual Server menu. 1. Navigate to the Service Home page of the Virtual Server.
- Click the Block Storage menu. 2. Go to the Block Storage List page.
- On the Block Storage List page, select the resource to delete, and click the Delete button.
- After navigating to the detailed page of the resource to be deleted, you can click the Block Storage Delete button to delete it individually.
- When the deletion notification pop-up appears, type Delete and click the Confirm button.
- After the deletion is complete, verify on the Block Storage List page that the resource has been removed.
2.1 - Connect to Server
When using a volume on the server, a connect or disconnect operation is required.
On the Block Storage Details page, add a connected server, then access the server to perform connection operations (Mount, Disk Online). After use, perform disconnection operations (Umount, Disk Offline) and then remove the connected server.
Connect to Server (Mount, Disk Online)
To use the volume added to the connected server, you must log into the server and perform the connection tasks (Mount, Disk Online). Follow the steps below.
Linux operating system
- Server OS: LINUX
- Mount location: /data
- Volume size: 24 GB
- File system: ext3, ext4, xfs etc
- Additional allocated disk: /dev/vdb
- Click the All Services > Compute > Virtual Server menu. Navigate to the Service Home page of Virtual Server.
- Click the Block Storage menu. Go to the Block Storage List page.
- On the Block Storage List page, click the resource to be used on the connected server. Navigate to the Block Storage Details page.
- After verifying the server in the Connection Server item, connect.
- Refer to the steps below to mount the volume (Mount).
Switch to root privileges
$ sudo -iCheck Disk
# lsblk
NAME    MAJ:MIN  RM   SIZE RO TYPE MOUNTPOINT
vda       252:0   0    24G  0 disk
├─vda1    252:1   0  23.9G  0 part [SWAP]
└─vda14   252:14  0     4M  0 part /
└─vda15   252:15  0   106M  0 part /boot/efi
vdb       252:16  0    24G  0 disk
Create partition
# fdisk /dev/vdb
Command (m for help): n

Partition type:
   p   primary (0 primary, 0 extended, 4 free)
   e   extended
Select (default p): p
Partition number (1-4, default 1): 1
First sector (2048-50331646, default 2048):
Last sector, +/-sectors or +/-size{K,M,G,T,P} (2048-50331646, default 50331646):

Created a new partition 1 of type 'Linux' and of size 24 GiB.

Command (m for help): w
The partition table has been altered!
Calling ioctl() to re-read partition table.
Syncing disks.
Partition format setting (example: ext4)
# lsblk
NAME    MAJ:MIN  RM   SIZE RO TYPE MOUNTPOINT
vda       252:0   0    24G  0 disk
├─vda1    252:1   0  23.9G  0 part [SWAP]
└─vda14   252:14  0     4M  0 part /
└─vda15   252:15  0   106M  0 part /boot/efi
vdb       252:16  0    24G  0 disk
└─vdb1    252:17  0    24G  0 part

# mkfs.ext4 /dev/vdb1
mke2fs 1.46.5 (30-Dec-2021)
...
Writing superblocks and filesystem accounting information: done
Volume Mount
# mkdir /data

# mount /dev/vdb1 /data

# lsblk
NAME    MAJ:MIN  RM   SIZE RO TYPE MOUNTPOINT
vda       252:0   0    24G  0 disk
├─vda1    252:1   0  23.9G  0 part [SWAP]
└─vda14   252:14  0     4M  0 part /
└─vda15   252:15  0   106M  0 part /boot/efi
vdb       252:16  0    24G  0 disk
└─vdb1    252:17  0    24G  0 part /data

# vi /etc/fstab
(추가) /dev/vdb1     /data       ext4     defaults   0 0
| Item | Explanation |
|---|---|
| cat /etc/fstab | File system information file
|
| df -h | Check the total disk usage of mounted disks |
| fdisk -l | Check partition information
|
| command | Explanation |
|---|---|
| m | Check the usage of the fdisk command |
| n | Create a new partition |
| p | Verify the updated partition information |
| t | Change the system ID of the partition |
| w | Save partition information and exit fdisk. |
Windows operating system
- Click the All Services > Compute > Virtual Server menu. Navigate to the Virtual Server Service Home page.
- Click the Block Storage menu. You will be taken to the Block Storage List page.
- On the Block Storage List page, click the resource to be used on the connected server. You will be taken to the Block Storage Details page.
- Connection Server item, verify the server and then connect.
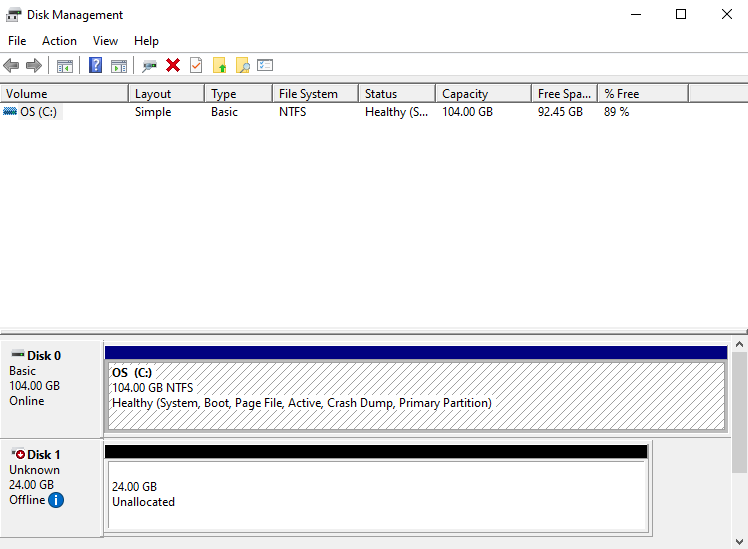
- Refer to the steps below to connect the volume (Disk Online).
After right-clicking the Windows Start icon, run
Computer Management.In the Computer Management tree structure, select
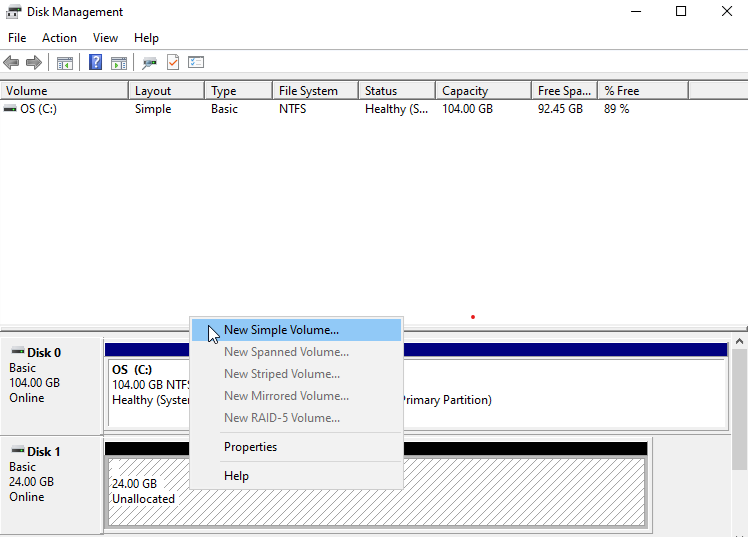
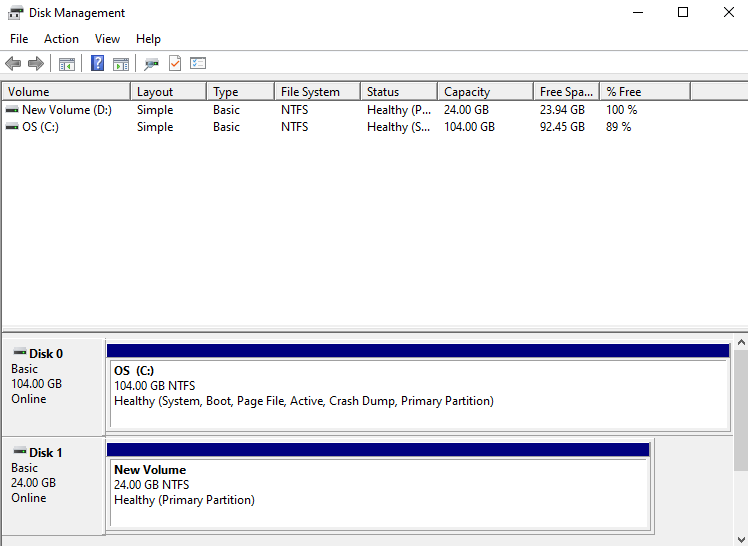
Storage > Disk ManagementCheck Disk
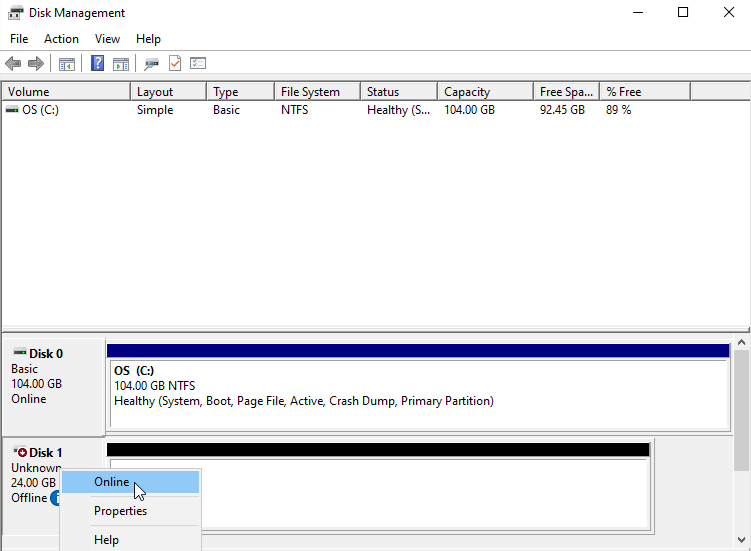
Disk Online
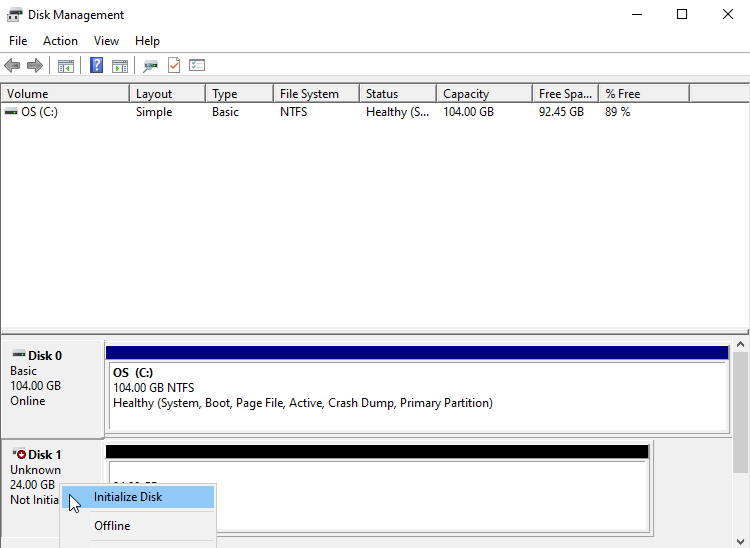
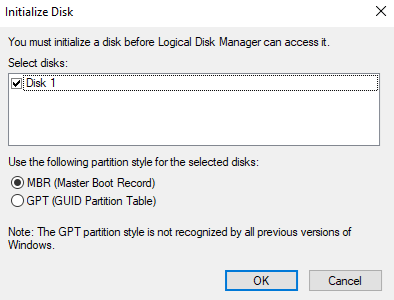
Disk initialization
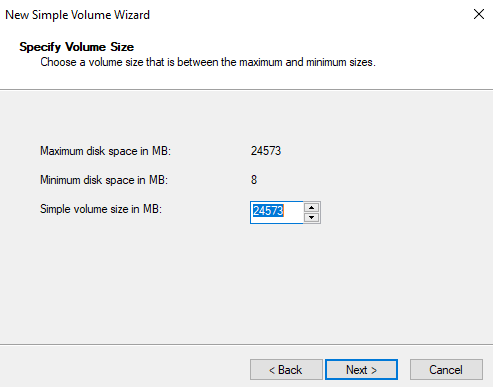
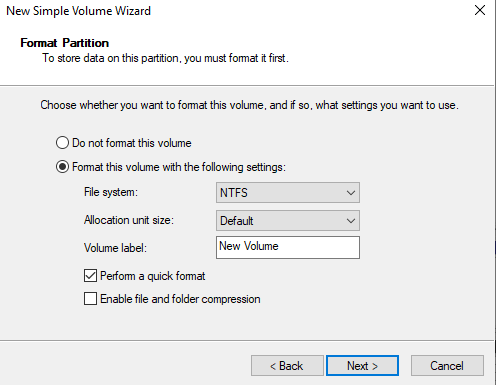
Partition format
Check volume
Disconnect server (Umount, Disk Offline)
Access the server, perform the disconnect operations (Umount, Disk Offline), and then disconnect the server from the Console.
Follow the next procedure.
- If you disconnect the server from the console without performing the disconnect operations (Umount, Disk Offlline) on the server, a server state error (Hang) may occur.
- Be sure to perform the OS tasks first.
- For the OS default volume, you cannot modify the connected server or cancel the service.
Linux operating system
- Click the All Services > Compute > Virtual Server menu. Navigate to the Service Home page of Virtual Server.
- Click the Block Storage menu. Navigate to the Block Storage List page.
- On the Block Storage List page, click the resource to detach the attached server. You will be taken to the Block Storage Details page.
- After verifying the server in the Connection Server item, connect.
- Refer to the steps below to unmount the volume(Umount).
- Volume Umount
  # umount /dev/vdb1 /data

  # lsblk
  NAME    MAJ:MIN  RM   SIZE RO TYPE MOUNTPOINT
  vda       252:0   0    24G  0 disk
  ├─vda1    252:1   0  23.9G  0 part [SWAP]
  └─vda14   252:14  0     4M  0 part /
  └─vda15   252:15  0   106M  0 part /boot/efi
  vdb       252:16  0    24G  0 disk
  └─vdb1    252:17  0    24G  0 part

  # vi /etc/fstab
  (삭제) /dev/vdb1     /data       ext4     defaults   0 0
Windows operating system
Click the All Services > Compute > Virtual Server menu. Navigate to the Service Home page of Virtual Server.
Click the Block Storage menu. Go to the Block Storage List page.
Block Storage List page, click the resource to detach the connected server. Navigate to the Block Storage Details page.
In the Connection Server field, verify the server before connecting.
Unmount the mounted file system.
Please follow the procedure below to detach the volume (Disk Offline).
Right-click the Windows Start icon, then run
Computer Management.In the Computer Management tree structure, select
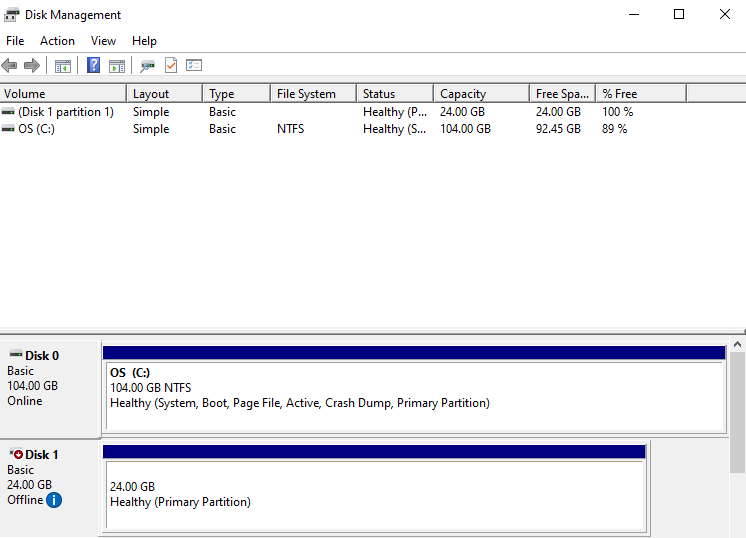
Storage > Disk ManagementRight-click the disk to be removed, then run
Offline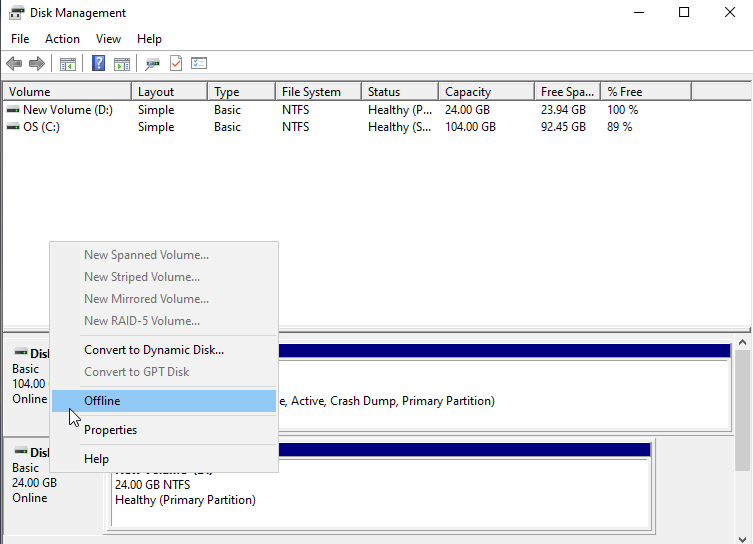
Check disk status
2.2 - Using Snapshots
You can create a snapshot of the created Block Storage, delete it, or recover using the snapshot. You can perform actions on the Block Storage Details page and the Snapshot List page.
Create Snapshot
You can create a snapshot of the current point in time. To create a snapshot, follow these steps.
- Click the All Services > Compute > Virtual Server menu. 1. Navigate to the Service Home page of the Virtual Server.
- Block Storage Click the menu. 2. Block Storage List navigate to the page.
- On the Block Storage List page, click the resource to create a snapshot. 3. Block Storage Details Navigate to the page.
- Click the Create Snapshot button. 4. Create Snapshot The popup window opens.
- Enter the Snapshot Name and Description, then click the Create button.
- When the popup notifying snapshot creation opens, click the Confirm button. 6. Creates a snapshot of the current point in time.
- Click the Snapshot List button. 7. Navigate to the Block Storage Snapshot List page.
- Check the generated snapshot.
Edit Snapshot
You can modify snapshot information. To modify the snapshot name or description, follow these steps.
- All Services > Compute > Virtual Server Click the menu. 1. Go to the Service Home page of the Virtual Server.
- Click the Block Storage menu. 2. Go to the Block Storage List page.
- On the Block Storage List page, click the resource to edit the snapshot information. 3. Block Storage Details Navigate to the page.
- Click the Snapshot List button. 4. Navigate to the Block Storage Snapshot List page.
- After confirming the snapshot to edit, click the More button.
- Edit Click the button. 6. Snapshot Edit The popup window opens.
- Enter the Snapshot name or Description, then click the Confirm button.
Restore Snapshot
You can restore a Block Storage volume to the latest snapshot in the Available state. To restore a snapshot, follow these steps.
- All Services > Compute > Virtual Server menu, please click. 1. Navigate to the Service Home page of the Virtual Server.
- Block Storage Click the menu. 2. Go to the Block Storage List page.
- On the Block Storage List page, click the resource you want to restore from a snapshot. 3. Navigate to the Block Storage Details page.
- If there is a server added in the Connection Server item, after connecting to the server, perform the disconnect operations (Umount, Disk Offline).
- For detailed information about disconnecting the server, please refer to 서버 연결 해제하기.
- On the Block Storage Details page, click the Disconnect button in the Connected Server item to remove the server. 5. The connection server will be removed.
- For detailed information on disconnecting the server, see 연결 서버 수정하기.
- Click the Snapshot List button. 6. Block Storage Snapshot List Navigate to the page.
- Check the latest snapshot in the Available state. 7. The volume will be restored from this snapshot.
- Click the Snapshot Recovery button. 8. Snapshot Recovery popup window opens.
- After checking the snapshot name and creation timestamp, click the Confirm button.
- When recovery starts, it becomes Reverting, and when completed, it becomes Available.
- Click the Details page button. 10. Go to the Block Storage Detail Page.
- Click the Add button of the Connection Server. 11. Reconnect the Virtual Server.
- For detailed information on adding a connection server, see 연결 서버 수정하기.
- After connecting to the added server, perform the connection tasks (Mount, Disk Online) according to the operating system.
- For detailed information about server connections, refer to 서버 연결하기.
- Snapshot recovery can be performed while the server is not connected.
- If you need to restore from a snapshot that is not the latest, you can recover by creating a recovery volume.
- Recovery is not possible in the following situations.
- When a Block Storage volume is not in the Available state
- If a server is attached to the Block Storage volume
- If there are no recoverable snapshots.
- If the latest snapshot changes while creating a recovery.
- If the latest snapshot is not in the Available state.
- When the snapshot’s volume size differs from the Block Storage volume size (in case the volume was expanded)
Create a snapshot recovery volume
You can create a volume using a snapshot. To create a snapshot recovery volume, follow these steps.
All Services > Compute > Virtual Server Click the menu. 1. Navigate to the Service Home page of the Virtual Server.
Click the Block Storage menu. 2. Go to the Block Storage List page.
On the Block Storage List page, click the resource to create a snapshot recovery volume. 3. Navigate to the Block Storage Details page.
Click the Snapshot List button. 4. Navigate to the Block Storage Snapshot List page.
After verifying the snapshot name, description and creation date and time, click the More button of the snapshot you wish to restore.
Click Create recovery volume. 6. Create snapshot recovery volume A popup window opens.
Click the Create button. 7. Go to the Create Block Storage page.
On the Block Storage Creation page, enter the information required to create the service and select detailed options.
- Enter the volume name and capacity. * You can input a capacity that is greater than or equal to the original volume.
- The disk type is set to match the original and cannot be modified.
Category Required상세 설명 볼륨명 필수 볼륨 이름 - 영문, 숫자, 공백과 특수문자(
-,_) 사용하여 255자 입력
디스크 유형 필수 디스크 유형 선택 - SSD_Provisioned: IOPS, Throughput 설정이 가능한 SSD 볼륨
- SSD/HDD: 일반 SSD/HDD 볼륨
- SSD/HDD_KMS: 추가 암호화 볼륨
- SSD/HDD_MultiAttach: 2개 이상의 서버 연결이 가능한 볼륨
- 서비스 생성 후 수정 불가
- 스냅샷 복구 볼륨 생성을 통해 서비스 생성 시 원본과 동일하게 설정되며 수정이 불가함
용량 선택 용량 설정 - 8~12,228GB 이내로 생성 가능
- 8GB 단위로 제공되는 Unit 개수 입력
- 스냅샷 복구 볼륨 생성을 통해 서비스 생성 시 원본보다 크거나 같은 용량으로 입력
Max IOPS 필수 Enter the maximum IOPS value between 5,000 and 20,000 - Disk type can be set only when it is SSD_Provisioned
Max Throughput Required Enter the maximum Throughput value between 250 and 1,000 - Can be set only when Disk type is SSD_Provisioned
Recovery snapshot name Selection Name of the recovery snapshot used when creating the volume - Provide the recovery snapshot name when creating a service via snapshot recovery volume creation
Table. Block Storage service information entry items - 영문, 숫자, 공백과 특수문자(
Summary Verify the detailed information and estimated charges generated in the panel, then click the Create button.
- When creation is complete, check the created resources on the Block Storage List page.
Delete Snapshot
You can select a snapshot and delete it. To delete a snapshot, follow these steps.
- All Services > Compute > Virtual Server Click the menu. 1. Go to the Service Home page of the Virtual Server.
- Click the Block Storage menu. 2. Go to the Block Storage List page.
- On the Block Storage List page, click the resource to delete the snapshot. 3. Block Storage Details Navigate to the page.
- Click the Snapshot List button. 4. Navigate to the Block Storage Snapshot List page.
- After verifying the snapshot name, description and creation date and time, click the More button of the snapshot you wish to delete.
- Click the Delete button. 6. Snapshot List page removes snapshots.
2.3 - Transfer volume
You can transfer the volume to another account, and when you do so, the volume is removed from its original location. You can perform volume migration on the Block Storage List or Block Storage Details page.
Previous volume
You can transfer the volume to another Account. To migrate the volume, follow these steps.
- Click the All Services > Compute > Virtual Server menu. 1. Navigate to the Service Home page of Virtual Server.
- Click the Block Storage menu. 2. Block Storage List Navigate to the page.
- On the Block Storage List page, after selecting the resource to migrate, click the More > Migrate Volume button at the top left of the list.
- Or click the Volume Transfer button at the top of the Block Storage Details page of the resource to be transferred.
- When the popup notifying volume transfer opens, verify the volume name you want to transfer, then click the Confirm button.
- When the previous completion popup opens, click the Confirm button. 5. Volume Transfer ID and Approval Key information will be downloaded as a text file.
- The volume changes to Awaiting Transfer status.
- You can attach the volume only to a Virtual Server in the same Availability Zone as the migrated volume.
- Volume migration is possible only when the volume is in Available state. * If it is In Use, disconnect all connected servers.
Cancel previous volume
You can cancel after creating a volume transfer. To cancel the volume transfer, follow these steps.
- Click the All Services > Compute > Virtual Server menu. 1. Navigate to the Service Home page of the Virtual Server.
- Click the Block Storage menu. 2. Navigate to the Block Storage List page.
- On the Block Storage List page, click the resource to cancel the volume migration. 3. Go to the Block Storage Details page.
- If the volume is in Awaiting Transfer status, it can be canceled.
- Click the Cancel previous volume button. 4. Cancel previous volume A popup window opens.
- After confirming the volume name for which you want to cancel the volume transfer, click the Confirm button.
- The volume changes to Available state.
Receive previous volume
You can receive a volume transfer from another Account. To receive a volume transfer, follow the steps below.
- All Services > Compute > Virtual Server menu, click it. 1. Navigate to the Service Home page of the Virtual Server.
- Click the Block Storage menu. 2. Go to the Block Storage List page.
- On the Block Storage List page, click the More > Receive Volume Transfer button at the top left of the list. 3. Receive previous volume A popup window opens.
- Volume Migration Enter the provided Volume Migration ID and Approval Key.
- A volume is created on the Block Storage List page.
- It takes time for the changes to take effect.
- In the account that initiated the volume transfer, the transferred volume is removed.
3 - API Reference
4 - CLI Reference
5 - Release Note
Block Storage
- ServiceWatch service has been integrated.
- You can view monitoring information such as IOPS, latency, and throughput via the ServiceWatch service.
- You can select an Availability Zone when creating a resource.
- A text input feature has been added when deleting resources.
- To prevent accidentally deleting resources, you must verify the deletion information and enter Delete when deleting to proceed with the deletion operation.
- An SSD volume with configurable IOPS and Throughput has been added.
- When creating Block Storage, you can select the SSD_Provisioned disk type.
- You can set the IOPS and Throughput range.
- IOPS: 5,000 ~ 20,000
- Throughput: 250 ~ 1,000
- During the preview period, there is no additional charge; charges will be applied in the future.
- Snapshots are billed based on the size of the original Block Storage.
- Integrated with Cloud Monitoring.
- You can view IOPS, latency, and throughput information in Cloud Monitoring.
- Block Storage feature change
- HDD disk types have been added, allowing you to select the added type (HDD, HDD_MultiAttach, HDD_KMS) according to the purpose.
- Samsung Cloud Platform Common Feature Change
- Account, IAM, Service Home, tags, and other common CX changes have been reflected.
- Added SSD_KMS disk type.
- When SSD_KMS is selected, encryption using KMS (Key Management Service) encryption keys is added.
- We have launched a high-performance storage service suitable for handling large-scale data and database workloads.
- We have launched a high-performance storage service suitable for handling large-scale data and database workloads.