This is the multi-page printable view of this section. Click here to print.
Virtual Server Auto-Scaling
- 1: Overview
- 1.1: Monitoring Metrics
- 1.2: ServiceWatch Metrics
- 2: How-to guides
- 2.1: Launch Configuration
- 2.2: Manage Policy
- 2.3: Manage Schedule
- 2.4: Manage Notification
- 3: API Reference
- 4: CLI Reference
- 5: Release Note
1 - Overview
Service Overview
Virtual Server Auto-Scaling is a service that automatically scales resources up or down based on demand. You can add or terminate servers running the application according to predefined conditions or schedules.
An Auto-Scaling Group uses a pre-created Launch Configuration as a configuration template to launch servers, and can adjust and manage the number of servers. It adjusts to ensure the number of servers does not fall below the specified minimum or exceed the specified maximum.
If you register a schedule with an Auto-Scaling Group, you can set the number of servers according to the specified schedule. If you register a policy, you can increase or decrease the number of servers based on predefined conditions.
Features
Easy and convenient computing environment setup: Through a web-based Console, users can easily configure the required computing environment themselves via Self Service, from creating Launch Configurations to creating/modifying/deleting Auto-Scaling Groups.
Elastic Resource Usage: Computing resources can be used elastically according to the service load and usage. Users can schedule resource usage for predictable specific time periods, and can adjust resource consumption to accommodate temporary access by an unspecified large number of users.
Availability Improvement: Virtual Server Auto-Scaling provides a function that adjusts resources to match variable demand so that the traffic required by the user can always be handled. Through this, users can achieve improved application performance and availability.
Maximize Cost Savings: You can reduce unnecessary expenses by using resources only as needed according to demand fluctuations. By flexibly allocating resources in response to traffic increases or decreases during specific periods such as nights, weekends, and month-ends, you can maximize cost-saving effects.
Service Architecture Diagram
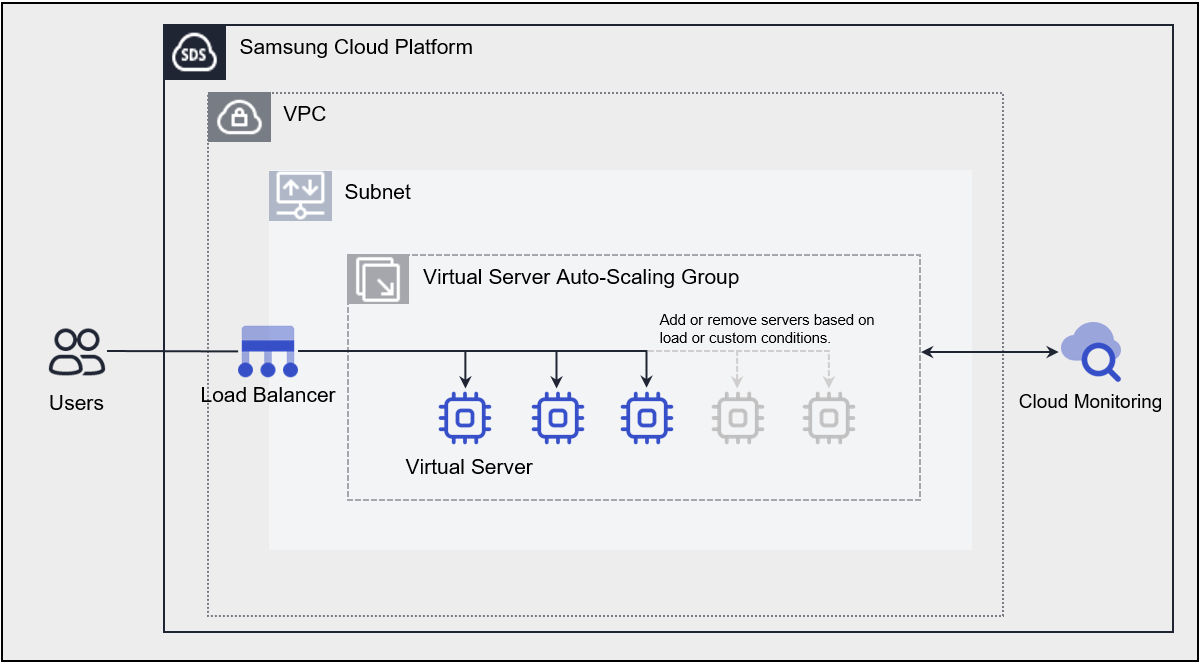
Provided features
Virtual Server Auto-Scaling provides the following features.
- Launch Configuration: It is a configuration template used to create a Virtual Server in an Auto-Scaling Group. When creating a Launch Configuration, you set information about the Virtual Server such as the image, server type, Key Pair, Block Storage, etc.
- Server Count Adjustment: Provides several ways to adjust the number of servers. By using policies, you can add a Virtual Server when load exceeds a threshold and release the Virtual Server when demand is low, maintaining application availability while reducing costs. You can also add and release Virtual Servers according to a predefined schedule, and manually adjust the number of servers in an Auto-Scaling Group as needed.
- Load Balancer Integration: You can use a Load Balancer to evenly distribute application traffic across Virtual Servers. Whenever a Virtual Server is added or removed, it is automatically registered with or deregistered from the Load Balancer.
- Network Connection: You can connect the Auto-Scaling Group’s standard subnet, automatic IP allocation, and Public NAT IP. Provides a local subnet connection for inter-server communication.
- Security Group Application: Security Group is a virtual logical firewall that controls inbound/outbound traffic generated on a Virtual Server. Inbound rules control incoming traffic to the Virtual Server, and outbound rules control outgoing traffic from the Virtual Server.
- Monitoring: You can view monitoring data such as CPU, Memory, and Disk of Virtual Servers created in an Auto-Scaling Group via the ServiceWatch service. Based on the monitoring data, you can set load thresholds using Auto-Scaling policies, and when thresholds are exceeded, you can add or remove servers.
Component
Virtual Server Auto-Scaling creates an Auto-Scaling Group through a Launch Configuration and monitors and manages the servers.
Launch Configuration
This is a Configuration template used to create a Virtual Server in an Auto-Scaling Group. The main features are as follows.
- Image: Provides OS standard images and Custom images created by the user. Users can select and use them according to the service they wish to configure.
- Keypair: Provides the Keypair method for secure OS access.
- Init script: Users can define a script to be executed when the Virtual Server starts.
- For more details, refer to Launch Configuration Create.
Auto-Scaling Group
Launch Configuration is used as a pre-configuration template for creating servers. By creating an Auto-Scaling Group, you can adjust and manage the number of servers. The main features are as follows.
- Launch Configuration: A Configuration template used to create a Virtual Server in an Auto-Scaling Group.
- Server Count Setting: Virtual Server Auto-Scaling provides several ways to adjust the number of servers in an Auto-Scaling Group.
- Fixed Server Count Method: When creating an Auto-Scaling Group, this method keeps the default settings using the configured number of servers without any additional schedules or policies. Refer to Create Auto-Scaling Group to set the Min, Desired, and Max server counts.
- Server Count Manual Adjustment Method: In an Auto-Scaling Group, you can increase or decrease the number of servers by modifying the server count to the desired amount. You can choose whether to manually set the desired server count. Please refer to 서버 수 수정하기.
- Schedule reservation method: You can schedule daily, weekly, monthly, or one-time, and set the desired number of servers at the specified time. This is useful when you can predict when to scale the number of servers up or down. If you use the schedule method, please refer to Manage Schedules to add and manage schedules.
- Policy Mode: You can use a policy to dynamically adjust servers. When a monitoring metric exceeds a configured threshold, the number of servers is adjusted. At this time, you can choose one of three methods to adjust the server count: increase or decrease by a specified number, increase or decrease by a specified percentage, or fix the server count to a given value. When servers are started or terminated due to a policy, the monitoring metric (CPU utilization) may temporarily exceed the threshold registered in the policy. However, because this is a brief moment, a cooldown period is set to avoid treating it as an abnormal situation. If you want to use the policy mode, see Managing Policies.
- Load Balancer: Automatically connects and disconnects to the Load Balancer registered in the Auto-Scaling Group whenever a Virtual Server is added or terminated.
- Refer to Auto-Scaling Group Detailed Information for detailed information about the Load Balancer of an Auto-Scaling Group.
Constraints
The constraints of Virtual Server Auto-Scaling are as follows.
| Category | Explanation |
|---|---|
| Number of Virtual Servers per Auto-Scaling Group | 50 or fewer |
| Number of policies per Auto-Scaling Group | 12 or fewer |
| Number of schedules per Auto-Scaling Group | 20 or fewer |
| Number of LB server groups and ports per Auto-Scaling Group | 3 or fewer |
- If the Image you are using is a discontinued standard Image, Scale-out will not work.
If the Image you are using is Custom Image, Scale out will continue to operate correctly even after that version is discontinued. - We recommend replacing the Launch Configuration with the latest version of the Image or a Custom Image before the current Image reaches end of support.
- For detailed information about the OS Image provided by Virtual Server, see OS Image Provided Versions.
Prior Service
This is a list of services that must be pre-configured before creating the service. Please refer to the guide provided for each service and prepare in advance.
| Service Category | service | Detailed description |
|---|---|---|
| Networking | VPC | A service that provides an isolated virtual network in a cloud environment |
| Networking | Security Group | Virtual firewall that controls server traffic |
1.1 - Monitoring Metrics
According to Samsung Cloud Platform’s policy, the Cloud Monitoring service is scheduled to be discontinued in September 2026.
Accordingly, after the September 2026 release, resource monitoring of the Samsung Cloud Platform via Cloud Monitoring will no longer be possible.
With the new alternative service, you can continuously perform resource monitoring by using ServiceWatch, released in October 2025.
ServiceWatch provides more modern and powerful features, replacing Cloud Monitoring to deliver a smooth monitoring environment.
Detailed information about ServiceWatch is available in the ServiceWatch Overview.
Virtual Server Auto-Scaling is a service provided for Virtual Servers that offers individual Virtual Server monitoring metrics and monitoring metrics provided by policies based on Cloud Monitoring.
Virtual Server Monitoring Metrics
The table below shows the monitoring metrics of Virtual Server that can be viewed through Cloud Monitoring. For detailed usage of Cloud Monitoring, refer to the Cloud Monitoring guide.
Memory-related metrics are not provided for Windows OS.
| Performance items | Detailed description | unit |
|---|---|---|
| Memory Total [Basic] | bytes of usable memory | bytes |
| Memory Used [Basic] | bytes of currently used memory | bytes |
| Memory Swap In [Basic] | bytes of the replaced memory | bytes |
| Memory Swap Out [Basic] | bytes of the replaced memory | bytes |
| Memory Free [Basic] | bytes of unused memory | bytes |
| Disk Read Bytes [Basic] | Read bytes | bytes |
| Disk Read Requests [Basic] | Number of read requests | cnt |
| Disk Write Bytes [Basic] | write bytes | bytes |
| Disk Write Requests [Basic] | Number of write requests | cnt |
| CPU Usage [Basic] | Average system CPU usage over 1 minute | % |
| Instance State [Basic] | Instance status | state |
| Network In Bytes [Basic] | Received bytes | bytes |
| Network In Dropped [Basic] | Incoming packet drop | cnt |
| Network In Packets [Basic] | Number of received packets | cnt |
| Network Out Bytes [Basic] | sent bytes | bytes |
| Network Out Dropped [Basic] | Transmit packet drop | cnt |
| Network Out Packets [Basic] | Number of transmitted packets | cnt |
Monitoring metrics provided by Cloud Monitoring-based policies
The table below shows the monitoring metrics provided by the policy of a Cloud Monitoring‑based Auto‑Scaling Group. For detailed information on policy settings based on Cloud Monitoring, see 정책 관리하기.
| Performance items | Detailed description | unit |
|---|---|---|
| CPU Usage [Basic] | Average system CPU usage over 1 minute | % |
| Memory Used [Basic] | bytes of currently used memory | bytes |
| Network In Bytes [Basic] | Received bytes | bytes |
| Network In Packets [Basic] | Number of received packets | cnt |
| Network Out Bytes [Basic] | sent bytes | bytes |
| Network Out Packets [Basic] | Number of transmitted packets | cnt |
1.2 - ServiceWatch Metrics
Virtual Server Auto-Scaling is a service provided for Virtual Servers that offers individual Virtual Server monitoring metrics and monitoring metrics supplied by ServiceWatch-based policies.
Virtual Server Monitoring Metrics
The basic metrics provided by Virtual Server can be found in ServiceWatch > Virtual Server Basic Metrics.
ServiceWatch monitoring metrics provided by the Auto-Scaling Group policy
The table below shows the ServiceWatch monitoring metrics provided by the Auto-Scaling Group policy. For detailed information on configuring Auto-Scaling Group policies, see Managing Policies.
| Performance items | Detailed description | unit |
|---|---|---|
| CPU Usage | CPU usage | Percent |
| Network In Bytes | Received bytes on the network interface | Bytes |
| Network In Packets | Number of packets received on the network interface | Count |
| Network Out Bytes | Data transmitted on the network interface (bytes) | Bytes |
| Network Out Packets | Number of packets transmitted on the network interface | Count |
2 - How-to guides
Users can create the service by entering the required information for the Auto-Scaling Group and selecting detailed options through the Samsung Cloud Platform Console.
Create Auto-Scaling Group
You can create and use the Auto-Scaling Group service from the Samsung Cloud Platform Console.
To create an Auto-Scaling Group, follow the steps below.
Click the All Services > Compute > Virtual Server menu. 1. Navigate to the Service Home page of the Virtual Server.
Click the Auto-Scaling Group menu. 2. Auto-Scaling Group List Navigate to the page.
On the Auto-Scaling Group List page, click the Create Auto-Scaling Group button. 3. Auto-Scaling Group Creation Navigate to the page.
On the Auto-Scaling Group creation page, enter the information required to create the service.
- In the Launch Configuration area, select the Launch Configuration.
- Click the Launch Configuration creation button to create a new Launch Configuration.
- Enter or select the required information in the Service Information Input area.
Category required statusDetailed description Auto-Scaling Group name Required Auto-Scaling Group name - manage servers of the same type and purpose as a group
Server name Required Server name to be created within the Auto-Scaling Group - Automatically assign a server name by combining the entered server name, which serves as an identifier to distinguish servers created within the Auto-Scaling Group, with a sequence
Number of servers Required Number of servers to create in the Auto-Scaling Group - Enter a value between 0 and 20 (Min≤Desired≤Max)
- Min: Set the minimum number of servers the Auto-Scailg Group should maintain
- Desired: Set the target number of servers within the Auto-Scailg Group; also indicates the number of servers initially created when the Auto-Scailg Group is created
- Max: Set the maximum number of servers the Auto-Scailg Group can maintain
- After creating the Auto-Scaling Group, you can adjust the settings using the Edit button. For details, see 서버 수 수정하기
Desired server count manual setting Selection Select whether to manually change the Desired server count - Even after creating the Auto-Scaling Group, set it via the Edit button. For details, see Desired 서버 수 수동 설정 수정하기
Network Settings > Network Settings Required Network settings for Auto-Scaling Group - Select the desired VPC and standard Subnet
- IP can only be auto-generated.
- When you select local Subnet, you can choose the desired local Subnet, and IP can only be auto-generated
Network Settings > Security Group Selection To allow required connections, you need to configure a Security Group - If you do not configure a Security Group, all inbound and outbound traffic will be blocked according to the default rule (Any/Deny)
- For Linux servers, allow SSH traffic
- For Windows servers, allow RDP traffic
- Even after creating an Auto-Scaling Group, configure it via the Edit button. For more details, see Security Group 설정하기
Load Balancer Selection Connect the Auto-Scaling Group to a Load Balancer - Register the Auto-Scaling Group’s servers as members of the LB server group
- LB server group: Select the LB server group that exists in the chosen VPC
- Port: Enter a value between 1 and 65,534
- Press the + button to add an LB server group (up to a total of three LB server groups and ports are allowed)
- LB server groups that use Weighted Round Robin or Weighted Least Connection load balancing cannot be selected
- Draining Timeout value: After checking Draining Timeout as Enabled, you can set the Draining Timeout value
- Draining Timeout: The waiting period before removing a server from the Load Balancer
- Since sessions may remain connected to the server, setting a Draining Timeout and waiting allows safe session cleanup
- If the Load Balancer is unused, Draining Timeout cannot be configured
- The default is 300 seconds; you can enter values from a minimum of 1 second up to a maximum of 3,600 seconds.
- Draining Timeout: The waiting period before removing a server from the Load Balancer
- Changes can be made after creating the Auto-Scaling Group; for details, refer to Auto-Scaling Group Load Balancer 사용하기.
Table. Auto-Scaling Group service information entry items - In the Scaling policy configuration area, set the Scaling policy.
- For detailed information on policy settings, see 정책 추가하기.
Category required statusDetailed description Current setting Selection Set the Scaling policy now - Add Policy button click displays policy information input fields
Set later Selection After creating an Auto-Scaling Group, set the policy on the details page Table. Auto-Scaling Group Scaling policy configuration items
- For detailed information on policy settings, see 정책 추가하기.
- In the Notification Settings area, configure the notification recipients and notification method.
- For detailed information about notification settings, refer to 알림 추가하기.
Category required statusDetailed description Current setting Selection Set the notification recipients and notification method now - Click the Add Notification button to open the Add Notification popup
- For detailed information on notification settings, refer to the details
- You can modify notification information by clicking the Edit button in the notification recipients list
Set later Selection After creating an Auto-Scaling Group, set the notification recipients and notification method on the details page. Table. Auto-Scaling Group notification configuration items
- For detailed information about notification settings, refer to 알림 추가하기.
- In the Additional Information Input area, enter or select the required information.
Category required statusDetailed description Status check Selection Check the status of Virtual Server and Load Balancer and replace servers that are in an Unhealthy state - Virtual Server status check: Enabled is the default and cannot be changed
- Load Balancer status check: Enabled only when a Load Balancer is connected in the service information input area
- Grace period: Set the time to defer status checks until the newly added server operates normally
- Enter 0 to disable the status check grace period
tag Selection Add Tag - Up to 50 per resource can be added
- Add Tag button after clicking, enter or select Key, Value values
Table. Auto-Scaling Group additional information input fieldsCautionA server that the user changes to Stop is not considered Unhealthy, so even when using the health check feature, the server will not be replaced.
- In the Launch Configuration area, select the Launch Configuration.
Summary Check the detailed information and estimated billing amount generated in the panel, and click the Create button.
- When creation is complete, verify the created Auto-Scaling Group on the Auto-Scaling Group list page.
Auto-Scaling Group Check detailed information
The Auto-Scaling Group service allows you to view and edit the full resource list and detailed information. Auto-Scaling Group Details page is organized into Detailed Information, Policies, Schedule, Virtual Server, Load Balancer, Tags, Operation History tabs.
To view detailed information about the Auto-Scaling Group, follow these steps.
- All Services > Compute > Virtual Server menu, click. 1. Navigate to the Service Home page of the Virtual Server.
- Click the Auto-Scaling Group menu. 2. Navigate to the Auto-Scaling Group List page.
- Auto-Scaling Group List page, click the resource to view detailed information. 3. Go to the Auto-Scaling Group Details page.
- Auto-Scaling Group Details The page displays status information and additional feature information, and Details, Policies, Schedule, Virtual Server, Load Balancer, Tags, Operation History are organized as tabs.
Category Detailed description Auto-Scaling Group status Status of the Auto-Scaling Group created by the user - Creating: Creating Auto-Scaling Group
- In Service: In Service
- Scale In: Scale In in progress
- Scale Out: Scale Out in progress
- Cool Down: Cooling down
- Terminating: Terminating Auto-Scaling Group
- Attach to LB: Attaching to Load Balancer
- Detach from LB: Detaching from Load Balancer
Delete Auto-Scaling Group Button to delete Auto-Scaling Group Table. Auto-Scaling Group status information and additional features
- Auto-Scaling Group Details The page displays status information and additional feature information, and Details, Policies, Schedule, Virtual Server, Load Balancer, Tags, Operation History are organized as tabs.
Detailed Information
Auto-Scaling Group list page allows you to view detailed information of the selected resource and, if needed, modify the information.
| Category | Detailed description |
|---|---|
| service | service name |
| Resource Type | Resource Type |
| SRN | Unique resource ID in Samsung Cloud Platform
|
| Resource name | Resource name
|
| Resource ID | Unique resource ID in the service |
| Constructor | User who created the service |
| Creation date and time | Service creation date and time |
| Modifier | User who edited the service information |
| Modification date and time | Date and time the service information was modified |
| Auto-Scaling Group name | Auto-Scaling Group name |
| Launch Configuration name | When creating an Auto-Scaling Group, the selected Launch Configuration name
|
| Number of servers | Current number of servers created in the Auto-Scaling Group and the configured Min, Desired, Max server counts
|
| Desired server count manual setting | Desired server count manual setting enable/disable
|
| VPC | Auto-Scaling Group VPC information |
| Standard Subnet | General Subnet and NAT IP usage information for Auto-Scaling Group |
| Local Subnet | Local Subnet of Auto-Scaling Group |
| Security Group | Auto-Scaling Group’s Security Group
|
| Status check | Whether to use the replacement function for Virtual Server and Load Balancer in an Unhealthy state
|
Policy
On the Auto-Scaling Group List page, you can view the list of policies for the selected resource and, if needed, add or manage policies.
| Category | Detailed description |
|---|---|
| Category | Policy Type
|
| Policy Name | Name for policy classification |
| Execution conditions | Conditions to trigger the policy
|
| execution unit | Policy execution method
|
| Cooldown | The waiting time (seconds) when a server is started or terminated due to a policy
|
| More > Edit | Modify the policy information
|
| More > Activate | Enable this policy
|
| More > Disable | Disable this policy
|
Schedule
Auto-Scaling Group List page allows you to view the schedule list of the selected resources and, if necessary, add or manage schedules.
| Category | Detailed description |
|---|---|
| name | Schedule name |
| Min | Minimum number of servers set in the schedule |
| Desired | Number of target servers set in the schedule |
| Max | Maximum number of servers set in the schedule |
| Period | Schedule execution frequency
|
| Date/Day | Schedule execution date or day of week
|
| Execution time | Schedule execution time |
| Time zone | Schedule execution time window |
| status | Schedule status |
| More > Edit | Edit the schedule information |
| More > Activate | Activate this schedule
|
| More > Disable | Disable this schedule
|
| Add schedule | Add a new schedule |
| Delete | Delete the selected schedule from the list |
Virtual Server
On the Auto-Scaling Group List page, you can view the Virtual Server list of the selected resource.
| Category | Detailed description |
|---|---|
| Server name | Server name created in the Auto-Scaling Group
|
| IP | IP assigned to the server |
| Creation date and time | The date and time the server was created |
| status | Result of status check for Virtual Server and Load Balancer
|
Load Balancer
Auto-Scaling Group List page allows you to view the Load Balancer list of the selected resources, and, if necessary, you can add or manage Load Balancers.
| Category | Detailed description |
|---|---|
| Draining Timeout | Whether to use Draining Timeout
|
| Load Balancer | Load Balancer usage
|
| Load Balancer > Load Balancer name | Load Balancer name to attach to the Auto-Scaling Group |
| Load Balancer > LB server group | Load Balancer’s LB server group
|
| Load Balancer > Port | Port registered as a Member in the LB server group |
- The LB server group member information set in the Auto-Scaling Group can also be checked in LB 서버 그룹 연결된 자원.
- Also, if manual connection/disconnection between the server and Load Balancer is required, please refer to LB 서버 그룹 Member 추기하기.
Notification
On the Auto-Scaling Group List page, you can view the notification recipients and notification methods for the selected resource.
| Category | Detailed description |
|---|---|
| Notification recipient | Name of the notification recipient |
| Notification recipient’s email | |
| Create Server | Whether to send a notification when a server creation-related alert occurs
|
| Server termination | Whether to send a notification when a server termination-related alert occurs
|
| When the policy execution condition is met | Whether a notification is triggered when the policy execution conditions are met |
| status | Notification activation status
|
| More > Edit | Edit the notification information |
| More > Activate | Enable this notification information
|
| More > Disable | Disable the notification information
|
| Add notification | Add a new notification |
| Delete | Delete the selected notification from the list |
Tag
On the Auto-Scaling Group List page, you can view the tag information of the selected resource, and you can add, modify, or delete it.
| Category | Detailed description |
|---|---|
| Tag list | Tag list
|
Operation History
Auto-Scaling Group List page allows you to view the operation history of the selected resource.
| Category | Detailed description |
|---|---|
| Task History List | Resource Change History
|
Auto-Scaling Group Managing Resources
If you need management functions for the created Auto-Scaling Group, you can perform tasks on the Auto-Scaling Group Details page.
Edit Launch Configuration
You can modify the Launch Configuration of an Auto-Scaling Group.
To modify the Launch Configuration of an Auto-Scaling Group, follow these steps.
All Services > Compute > Virtual Server Click the menu. 1. Navigate to the Service Home page of the Virtual Server.
Click the Auto-Scaling Group menu. 2. Go to the Auto-Scaling Group List page.
On the Auto-Scaling Group List page, click the resource to edit the Launch Configuration. 3. Auto-Scaling Group Details Navigate to the page.
Click the Edit button for the Launch Configuration name. 4. Launch Configuration Edit The popup window opens. 4. You can view the list of selectable Launch Configurations.
CategoryDetailed description Launch Configuration name Launch Configuration name Image Launch Configuration OS Image Server type Launch Configuration server type Block Storage Launch Configuration Block Storage Settings Auto-Scaling Group count Number of Auto-Scaling Groups with a Launch Configuration applied View Details Button to view Launch Configuration details Table. Launch Configuration list itemsLaunch Configuration Edit In the popup window, select the Launch Configuration to change, then click the Confirm button. 5. Launch Configuration Modification Notification A popup window opens. 5. Launch Configuration Modification Notification Check the message in the popup window and click the Confirm button.
Modify server count
You can modify the number of servers in the Auto-Scaling Group.
To modify the number of servers in an Auto-Scaling Group, follow these steps.
- All Services > Compute > Virtual Server Click the menu. 1. Navigate to the Service Home page of the Virtual Server.
- Click the Auto-Scaling Group menu. 2. Navigate to the Auto-Scaling Group List page.
- On the Auto-Scaling Group List page, click the resource to modify the server count. 3. Go to the Auto-Scaling Group Details page.
- Click the Edit server count button. 4. Edit Server Count popup window opens.
- Edit Server Count After entering the required fields in the popup window, click the Confirm button.
Category required statusDetailed description Number of servers > Min Required Minimum number of servers to modify - Set the number of servers that the Auto-Scaling Group maintains at a minimum
Number of servers > Desired Required Number of target servers to modify - Set the number of target servers within the Auto-Scaling Group
- Desired server count manual setting is disabled, you cannot modify the Desired server count. To modify the Desired server count, refer to Desired server count manual setting modification
Number of servers > Max Required Target number of servers to modify - Set the number of servers that the Auto-Scailg Group can maintain at maximum
Table. Auto-Scailg Group server count modification items
Terminate Virtual Server Created by Auto-Scaling Group
Virtual Server created in the Auto-Scaling Group can be terminated by clicking the Terminate button on its detail page or by modifying the server count.
- Please note that data cannot be recovered after terminating the service.
- To cancel the service, first disconnect the File Storage and disable the Lock. * If the File Storage is connected or a lock is set, the Virtual Server cannot be terminated.
- If you terminate a Virtual Server created in the Auto-Scaling Group, the associated Load Balancer is automatically detached.
- When a Virtual Server is terminated, the status of the attached Storage is as follows.
- If Delete on termination is not set: the volume will not be deleted even if the Virtual Server is terminated.
- When Delete on termination is set: If you terminate the Virtual Server, the volume will be deleted. * However, if a Snapshot exists, it will not be deleted even if Delete on termination is set.
- Multi-attach volume: It can only be deleted when the server you are trying to delete is the last remaining server attached to the volume.
Cancel on the Virtual Server detail page
To cancel a Virtual Server on the Virtual Server detail page, follow these steps.
- Click the All Services > Compute > Virtual Server menu. 1. Navigate to the Service Home page of the Virtual Server.
- On the Service Home page, click the Virtual Server menu. 2. Go to the Virtual Server List page.
- On the Virtual Server List page, select the Virtual Server created by the Auto-Scaling Group. 3. Navigate to the Virtual Server Details page.
- On the Virtual Server Details page, click the Service Cancellation button. 4. A popup window announcing the server termination opens.
- Confirm Click the button. 5. Server termination is complete.
Terminate by adjusting the server count
To terminate a Virtual Server by adjusting the server count, follow the steps below.
- All Services > Compute > Virtual Server Click the menu. 1. Navigate to the Service Home page of the Virtual Server.
- Click the Auto-Scaling Group menu. 2. Go to the Auto-Scaling Group List page.
- Auto-Scaling Group List page, click the resource to terminate the Virtual Server. 3. Auto-Scaling Group Details page.
- Click the Edit button for the Server Count item. 4. Edit Server Count popup window opens.
- Server Count Modification In the popup window, after reducing the Desired count, click the Confirm button. 5. When the desired number of servers is adjusted, the Virtual Server is terminated.
- Desired server count manual setting is unused, you cannot modify the Desired server count. * To modify the Desired server count, refer to Desired 서버 수 수동 설정 수정하기.
- When a Virtual Server is terminated, the Desired server count remains unchanged, and scale-out proceeds according to the Desired check batch.
Manually modify the desired number of servers
You can manually change the Desired server count setting of the Auto-Scaling Group.
To modify the manual setting of the Desired server count for an Auto-Scaling Group, follow these steps.
- All Services > Compute > Virtual Server Click the menu. 1. Navigate to the Service Home page of the Virtual Server.
- Click the Auto-Scaling Group menu. 2. Navigate to the Auto-Scaling Group List page.
- Auto-Scaling Group List page, click the resource to manually change the Desired server count. 3. Auto-Scaling Group Details Navigate to the page.
- Click the Edit server count button. 4. Desired server count manual setting The popup window opens.
- Desired server count manual setting After selecting whether to use it in the popup window, click the Confirm button.
Setting up Security Group
You can configure the Security Group of an Auto-Scaling Group.
Follow these steps to configure the Security Group of an Auto-Scaling Group.
All Services > Compute > Virtual Server Click the menu. 1. Navigate to the Service Home page of the Virtual Server.
Click the Auto-Scaling Group menu. 2. Go to the Auto-Scaling Group List page.
Auto-Scaling Group List page, click the resource to configure the Security Group. 3. Go to the Auto-Scaling Group Details page.
Click the Edit button for Security Group. 4. Security Group Edit The popup window opens. 4. You can view the list of selectable Security Groups.
Category Detailed description Security Group name Security Group name Table. Security Group list itemsSecurity Group Edit In the popup window, after selecting the Security Group, click the Confirm button. 5. Security Group Modification Notification A popup window opens. 5. Security Group Modification Alert Check the message in the popup window and click the Confirm button.
Change status check
You can configure it to automatically replace servers that are in an Unhealthy state by checking the status of Virtual Server and Load Balancer.
- The Load Balancer status check feature can be used only when a Load Balancer is in use.
- A server that the user changes to Stop is not considered Unhealthy, so even when using the health check feature, the server will not be replaced.
- All Services > Compute > Virtual Server Click the menu. 1. Navigate to the Service Home page of the Virtual Server.
- Click the Auto-Scaling Group menu. 2. Go to the Auto-Scaling Group List page.
- On the Auto-Scaling Group List page, click the resource to modify the Load Balancer health check feature. 3. Navigate to the Auto-Scaling Group Details page.
- Click the Edit button of Status Check. 4. Edit Status Check The popup window opens.
- Status Check Edit In the popup, choose whether to enable Load Balancer Status Check.
- After entering the Grace period, click the Confirm button.
- If you do not want to use the grace period, set the grace period to 0.
Auto-Scaling Group Manage Additional Information
You can set the Auto-Scaling Group’s Load Balancer to enabled and select the LB server group. For an Auto-Scaling Group that uses a Load Balancer, you can set it to unused.
Load Balancer Draining Timeout Edit
You can set the Load Balancer Draining Timeout of an Auto-Scaling Group.
Draining Timeout is the time to wait before removing a server from the Load Balancer.
- Because sessions may remain connected to the server, setting a Draining Timeout and waiting can clean up sessions more safely.
- If the Load Balancer is unused, the Draining Timeout cannot be set.
- The default is 300 seconds, and it can be set from a minimum of 1 second up to a maximum of 3,600 seconds.
To set the Load Balancer Draining Timeout for an Auto-Scaling Group, follow these steps.
- All Services > Compute > Virtual Server menu, click it. 1. Navigate to the Service Home page of the Virtual Server.
- Click the Auto-Scaling Group menu. 2. Go to the Auto-Scaling Group List page.
- Auto-Scaling Group List page, click the resource to configure the Load Balancer Draining Timeout. 3. Auto-Scaling Group Details Navigate to the page.
- Load Balancer Click the tab. 4. Load Balancer Navigate to the list page.
- Click the Edit button of Draining Timeout. 5. Draining Timeout Edit A popup window opens.
- Edit Draining Timeout In the popup window, select whether to use Draining Timeout, and enter the Draining Timeout duration (seconds).
- Draining Timeout Edit After checking the input value in the popup window, click the Confirm button. 7. Draining Timeout Modification Notification A popup window opens. 7. Check the message in the notification popup and click the Confirm button.
Using Load Balancer
You can modify the Load Balancer of an Auto-Scaling Group. To configure the Load Balancer of an Auto-Scaling Group, follow these steps.
- When a server in the Auto-Scaling Group is created, it is automatically added as a member of the selected Load Balancer’s LB server group, and when the server is terminated, it is removed from the LB server group’s members.
- If Draining Timeout is in use, after waiting for the Draining Timeout (seconds), the server is removed from the LB server group’s members.
- In the case of Member separation due to Load Balancer modification, it waits in Detach from LB state, and in the case of Member separation due to Scale In, it waits in Scale In state.
- All Services > Compute > Virtual Server Click the menu. 1. Navigate to the Service Home page of the Virtual Server.
- Click the Auto-Scaling Group menu. 2. Navigate to the Auto-Scaling Group List page.
- Auto-Scaling Group List page, click the resource to use with Load Balancer. 3. Go to the Auto-Scaling Group Details page.
- Load Balancer Click the tab. 3. Load Balancer Navigate to the list page.
- Click the Edit button of the Load Balancer. 4. Load Balancer Edit The popup window opens.
- Edit Load Balancer Please select whether to use it in the popup window. 5. If you select Use, you can select a Load Balancer.
Category Detailed description LB server group LB server group name - Select the LB server group that is created in the selected VPC
- LB server groups that use Weighted Round Robin or Weighted Least Connection load balancing cannot be selected
Port Port information of the LB server group - When registering as a member of the LB server group, enter the required port information in the registration details.
- Enter a value between 1 and 65,534
Table. Load Balancer list items- Click the + button to add an LB server group. * A maximum of three is allowed. * You can remove the Load Balancer you added by clicking the X button.
- Check the Load Balancer list and click the Confirm button. 6. Load Balancer Modification Notification A popup window opens. 6. Check the message in the notification popup and click the Confirm button.
- Please be aware that separating or connecting servers from the Load Balancer may impact the service.
- If the Draining Timeout is in use, setting the Load Balancer to unused or removing some of the connected Load Balancers with the X button will not disconnect them immediately. * After waiting for the Draining Timeout (seconds), the server is detached from the Load Balancer. * At this point, the Auto-Scaling Group waits in the Detach from LB state.
- The LB server group member information set in the Auto-Scaling Group can also be checked in LB 서버 그룹 연결된 자원.
- If manual connection/disconnection between the server and Load Balancer is required, refer to LB 서버 그룹 Member 등록하기.
Load Balancer Not Used
You can modify the Auto-Scaling Group’s Load Balancer to be disabled. To configure an Auto-Scaling Group without using a Load Balancer, follow these steps.
- Please be aware that separating or connecting servers from the Load Balancer may impact the service.
- If the Draining Timeout is in use, setting the Load Balancer to not used or removing some of the connected Load Balancers with the X button will not detach them immediately. * After waiting for Draining Timeout(seconds), the server is detached from the Load Balancer. * At this point, the Auto-Scaling Group waits in the Detach from LB state.
- All Services > Compute > Virtual Server Click the menu. 1. Navigate to the Service Home page of the Virtual Server.
- Click the Auto-Scaling Group menu. 2. Auto-Scaling Group List Navigate to the page.
- On the Auto-Scaling Group List page, click the resource to set the Load Balancer to unused. 3. Auto-Scaling Group Details page.
- Load Balancer Click the tab. 4. Load Balancer Navigate to the list page.
- Click the Edit button of Load Balancer. 5. Load Balancer Edit The popup window opens.
- Edit Load Balancer Select whether to use it in the popup window. 6. If you deselect 사용, you will no longer use the Load Balancer.
- Uncheck the Use option and click the Confirm button. 7. Load Balancer Modification Notification A popup window opens. 7. Check the notification popup message and click the Confirm button.
Delete Auto-Scaling Group
Deleting unused Auto-Scaling Groups can reduce operating costs. However, if you terminate the Auto-Scaling Group, the running service may be stopped immediately, so you should proceed with the termination only after fully considering the impact of service interruption.
To terminate the Auto-Scaling Group, follow these steps.
- All Services > Compute > Virtual Server menu, click it. 1. Navigate to the Service Home page of the Virtual Server.
- Click the Auto-Scaling Group menu. 2. Go to the Auto-Scaling Group List page.
- Auto-Scaling Group List page, click the resource to terminate. 3. Go to the Auto-Scaling Group Details page.
- Click the Auto-Scaling Group Delete button.
- After the deletion is complete, verify on the Auto-Scaling Group List page that the resource has been deleted.
2.1 - Launch Configuration
To create an Auto-Scaling Group, a Launch Configuration must be created in advance.
Create Launch Configuration
You can create and use the Launch Configuration service in the Samsung Cloud Platform Console.
To create a Launch Configuration, follow these steps.
All Services > Compute > Virtual Server menu, please click. 1. Navigate to the Service Home page of the Virtual Server.
Click the Launch Configuration menu. 2. Go to the Launch Configuration List page.
On the Launch Configuration List page, click the Create Launch Configuration button. 3. Go to the Launch Configuration creation page.
On the Launch Configuration creation page, in the Image and version selection area, select the required information and click the Next button.
Reference- Refer to the Virtual Server OS Image 제공 버전 for the images selectable in the Launch Configuration.
- In Custom Image, you can select Image-Based and Snapshot-Based images.
- Snapshot-Based type Image does not support future features such as distributed disk deployment, so for a stable Auto-Scaling configuration, we recommend using Image-Based type Image.
- Image-Based type Image generation details can be found in Image-Based 유형의 Image 생성하기.
Enter the required information in the Service Information Input area of the Launch Configurationp creation page.
Category Required statusDetailed description Launch Configuration name Essential Launch Configuration name - a name to distinguish the Launch Configuration
Service Type > Server Type Essential Server type of Launch Configuration - Standard: Standard specification commonly used
- High Capacity: Large‑capacity server specification above Standard
- Refer to Virtual Server 서버 타입 for selectable server types
- Since supported Availability Zones may differ by server type, verification is required via Support Center > Contact Us
Block Storage Required Configure Block Storage according to the purpose of the Launch Configuration - Basic OS: The area where the OS is installed and used
- Enter the size in Units; the minimum size varies depending on the OS Image type
- Alma Linux: Enter a value between 2 and 1,536
- Oracle Linux: Enter a value between 5 and 1,536
- RHEL: Enter a value between 2 and 1,536
- Rocky Linux: Enter a value between 2 and 1,536
- Ubuntu: Enter a value between 1 and 1,536
- Windows: Enter a value between 4 and 1,536
- SSD: High‑performance general volume
- HDD: General volume
- SSD/HDD_KMS: Additional encrypted volume using Samsung Cloud Platform KMS (Key Management System) encryption keys
- Encryption can be applied only at initial creation and cannot be changed afterward
- Using the SSD_KMS disk type may result in performance degradation
- Enter the size in Units; the minimum size varies depending on the OS Image type
- Additional: Use when extra space beyond the OS area is needed
- After selecting Use, enter the storage type and size
- Click the + button to add storage, or the x button to delete (up to 25 can be added)
- Enter the size in Units, with a value between 1 and 1,536
- Since 1 Unit equals 8 GB, this creates 8 ~ 12,288 GB
- SSD: High‑performance general volume
- HDD: General volume
- SSD/HDD_KMS: Additional encrypted volume using Samsung Cloud Platform KMS (Key Management System) encryption keys
- Encryption can be applied only at initial creation and cannot be changed afterward
- Using the SSD_KMS disk type may result in performance degradation
- SSD_MultiAttach: Volume that can be attached to more than one server
- For details on each Block Storage type, refer to Create Block Storage ___HTML_MARKER***
Keypair Essential Select the user authentication method for the Launch Configuration - Server authentication information for accessing the servers created by generating an Auto-Scaling Group with a Launch Configuration
- New creation: Create a new one if a new Keypair is needed
- Refer to Keypair 생성하기 for how to create a new Keypair
- Default login account list by OS
- Alma Linux: almalinux
- RHEL: cloud-user
- Rocky Linux: rocky
- Ubuntu: ubuntu
- Windows: sysadmin
File Storage Settings Selection When performing Scale-out/Scale-in, you can configure File Storage to be automatically attached - Volume: After clicking the Select button, choose the Volume to use in the File Storage selection popup
- You can select up to a maximum of 5
- Only Volumes intended as source that can be attached to a Virtual Server can be selected
- High‑performance SSDs are disabled because they cannot be attached to a Virtual Server
- The selected Volume can be removed by clicking the X button
Table. Launch Configuration service information input itemsOn the Launch Configuration Creation page, after entering information in the Additional Information Input area, click the Next button.
Category required statusDetailed description Init Script Selection The script that runs when a server in an Auto-Scaling Group using a Launch Configuration starts - Enter within 45,000 bytes
- The Init Script must be a batch script for Windows, a shell script for Linux, or cloud‑init, depending on the selected image.
tag Selection Add Tag - Up to 50 per resource can be added
- Add Tag After clicking the Add Tag button, enter or select Key, Value values
Table. Launch Configuration additional information entry fieldsOn the Check Creation Information page, verify the entered information and the estimated amount, then click the Create button.
- When creation is complete, verify the created Launch Configuration on the Launch Configuration list page.
Launch Configuration View detailed information
The Launch Configuration service lets you view and edit the complete list of resources and their detailed information. On the Launch Configuration Details page, it consists of Detailed Information, Tags, Operation History tabs.
To view the detailed information of the Launch Configuration, follow these steps.
- All Services > Compute > Virtual Server Click the menu. 1. Navigate to the Service Home page of the Virtual Server.
- Click the Launch Configuration menu. 2. Go to the Launch Configuration list page.
- Launch Configuration List On the page, click the resource to view detailed information. 3. Launch Configuration Details Navigate to the page.
- Launch Configuration Details At the top of the page, status information and additional feature information are displayed, and it consists of Details, Tags, Activity History tabs.
Category Detailed description Launch Configuration status The status of the user-created Launch Configuration - Active: available
Delete Launch Configuration Delete Launch Configuration button Table. Launch Configuration status information and additional features
- Launch Configuration Details At the top of the page, status information and additional feature information are displayed, and it consists of Details, Tags, Activity History tabs.
Detailed Information
Launch Configuration List page allows you to view detailed information of the selected resource and, if necessary, modify the information.
| Category | Detailed description |
|---|---|
| service | Service name |
| Resource Type | Resource Type |
| SRN | Unique resource ID in Samsung Cloud Platform
|
| Resource name | resource name
|
| Resource ID | Unique resource ID in the service |
| Constructor | User who created the service |
| Creation Date/Time | Service creation date and time |
| Modifier | User who edited the service information |
| Modification date and time | Date and time the service information was modified |
| Launch Configuration name | Launch Configuration name |
| Image | When creating a Launch Configuration, the selected Image name
|
| Auto-Scaling Group count | Number of Auto-Scaling Groups using a Launch Configuration |
| Server type | Server type set in the Launch Configuration |
| Block Storage | Block Storage information per server set in the Launch Configuration
|
| Keypair | Server authentication information set in the Launch Configuration
|
| Init Script | Init Script set in the Launch Configuration
|
| File Storage Settings | File Storage Volume name set in the Launch Configuration
|
Tag
On the Launch Configuration list page, you can view the tag information of the selected resource, and add, modify, or delete it.
| Category | Detailed description |
|---|---|
| Tag list | Tag list
|
Operation History
Launch Configuration List page allows you to view the operation history of the selected resource.
| Category | Detailed description |
|---|---|
| Task History List | Resource change history
|
Launch Configuration Resource Management
Explains the resource management function of Launch Configuration.
Generate Image-Based type Image
To create an Image of the Image-Based type, follow the steps below.
- If the image type is Snapshot-Based, it does not support future features such as distributed disk deployment. * We recommend using an Image with Image type set to Image-Based for a stable Auto-scaling configuration.
- When generating an Image of the Image-Based type, only one OS area disk volume is included in the target. * Note that additionally attached data volumes are not included in the Image.
- An Image can be created as an Image-Based type only if its Visibility is private and it has snapshot information.
- If the OS disk size is 500 GB or more, you cannot create an Image of the Image-Based type.
- Object Storage fees for Image storage will be billed.
To create an Image of the Image-Based type, follow the steps below.
- Click the All Services > Compute > Virtual Server menu. 1. Navigate to the Service Home page of the Virtual Server.
- On the Service Home page, click the Image menu. 2. Go to the Image list page.
- On the Image List page, click the Image to create an Image of the Image-Based type. 3. Image Details go to the page.
- Create Image for Sharing button, click it. 4. A popup window opens to notify the creation of a shared Image. 4. The popup’s ‘Share to another Account’ content will not be processed. 4. If you only proceed with ‘Create Image for sharing’, an Image-Based type Image will be generated.
- After reviewing the contents of the popup window, click the Confirm button.
Delete Launch Configuration
Deleting unused Launch Configurations can reduce operating costs. However, terminating the Launch Configuration may cause the running service to stop immediately, so you should proceed with the termination only after fully considering the impact of service interruption.
To delete a Launch Configuration, follow these steps.
- Click the All Services > Compute > Virtual Server menu. 1. Navigate to the Service Home page of the Virtual Server.
- Click the Launch Configuration menu. 2. Go to the Launch Configuration List page.
- Launch Configuration List On the page, click the resource to be terminated. 3. Navigate to the Launch Configuration Details page.
- Click the Delete Launch Configuration button.
- After the deletion is complete, verify on the Launch Configuration list page that the resource has been deleted.
2.2 - Manage Policy
You can dynamically adjust the number of servers in an Auto-Scaling Group based on monitoring metrics. When the metric exceeds the threshold you set, the server count is adjusted. At that time, you can choose one of three methods to adjust the server count: increase or decrease by a specified number, increase or decrease by a specified percentage, or fix the server count to a given value. When servers are launched or terminated due to a policy, the monitoring metric, such as CPU utilization, may temporarily exceed the threshold registered in the policy. However, because this is a brief moment, a cooldown period is set to avoid treating it as an abnormal condition. You can add and manage policies for an Auto-Scaling Group created in the Samsung Cloud Platform Console.
Add Policy
You can add policies to an Auto-Scaling Group. To add a policy to an Auto-Scaling Group, follow these steps.
Click the All Services > Compute > Virtual Server menu. Navigate to the Service Home page of Virtual Server.
Click the Auto-Scaling Group menu. You will be taken to the Auto-Scaling Group List page.
Auto-Scaling Group List page, click the resource you want to view detailed information for. You will be taken to the Auto-Scaling Group Details page.
Click the Policy Tab. You will be taken to the Policy Tab page.
Click the Add Policy button. The Add Policy popup window opens.
Category RequiredDetailed description Category Required Policy Category - Scale In: return server count
- Scale Out: increase server count
Policy Name Required Name for policy-specific categorization Execution conditions Required Conditions to execute the policy - Statistic: How to calculate the Metric Type
- Average: Average of servers in the Auto-Scaling Group
- Min: Minimum value among servers in the Auto-Scaling Group
- Max: Maximum value among servers in the Auto-Scaling Group
- Metric Type: CPU Usage, Network In(bytes), Network Out(bytes), Network In(Packets), Network Out(Packets)
- Operator:
>=><=<
- Threshold: Threshold corresponding to the Metric Type
- Period: Continuous duration required to trigger the condition (the condition must be continuously satisfied for N minutes for the policy to execute)
execution unit Required Policy execution method - Policy Type: Select the type of policy to execute.
- Increase or decrease the number of servers by a specified count: Increase or decrease the server count to the Target Value
- Increase or decrease the number of servers by a specified ratio: Increase or decrease by the Target Value ratio
- Fix the number of servers to the entered value: Fix the server count according to the Target Value
- Target Value: The number or ratio to apply for the selected Policy Type
cooldown Required The waiting time (seconds) when a server is started or terminated due to a policy - The default is 300 seconds, and it can be set between a minimum of 60 seconds and a maximum of 3,600 seconds.
Table. Add Policy Popup ItemsReferencePolicy > Cooldown Settings
- When a server is started or terminated due to a policy, it waits for the configured cooldown period. Temporarily, the monitoring metric CPU utilization may exceed the threshold defined in the policy. However, because this is a transient moment rather than a condition for adjusting the number of servers, it is not considered an abnormal situation, and the system waits by applying the cooldown time.
guidePolicy execution operates within the configured Min/Max server count range.
- Even if you input values outside the Min/Max server count range—such as increasing, returning, or fixing the number of servers—it operates within the configured Min/Max server count.
- Example: When the minimum number of servers is 3, even if you set the server count fixed to 1, the server count does not drop to 1 and remains at the minimum of 3.
Add Policy After entering the required values in the popup window, click the Confirm button. The added policy can be viewed in the Policy List.
Policy creation example
The following is an explanation of the policy example. Please refer to it when creating a policy.
| Category | Execution Conditions | execution unit | cooldown |
|---|---|---|---|
| Scale Out | Average CPU Usage >= 60% occurs for 1 minute | Increase the server count by the specified number, incrementing by one unit. | 300 seconds |
- If the average CPU usage of the servers in the Auto-Scaling Group exceeds 60% for one minute, a server is added one at a time.
- When a server is added, the cooldown period is 300 seconds, and during this time, no server addition or removal due to policy occurs.
- After the cooldown period ends, the policy execution conditions are checked again.
| Category | Execution Conditions | execution unit | cooldown |
|---|---|---|---|
| Scale In | Min CPU Usage <= 5% occurs for 1 minute | Scale the number of servers up or down by the specified ratio, returning 50%. | 300 seconds |
- If the minimum CPU usage of servers in the Auto-Scaling Group remains below 5% for 1 minute, 50% of the current servers will be terminated.
- When a server is terminated, the cooldown period is 300 seconds, and during this time, no server additions or removals occur due to policy.
- After the cooldown period ends, the policy execution conditions are checked again.
| Category | Execution Conditions | Execution Unit | cooldown |
|---|---|---|---|
| Scale Out | Max CPU Usage >= 90% occurs for 1 minute | Fix the number of servers to 5 based on the entered value | 300 seconds |
- If the maximum CPU usage among the servers in the Auto-Scaling Group exceeds 90% for 1 minute and the current number of servers is less than 5, servers will be created up to a total of 5.
- During server creation, the cooldown period is 300 seconds, and no server additions or removals due to policy occur during the cooldown period.
- After the cooldown period ends, the policy execution conditions are checked again.
Edit Policy
You can modify the policies of an Auto-Scaling Group. To modify the policies of an Auto-Scaling Group, follow these steps.
Click the All Services > Compute > Virtual Server menu. Navigate to the Service Home page of Virtual Server.
Click the Auto-Scaling Group menu. Navigate to the Auto-Scaling Group List page.
Auto-Scaling Group List page, click the resource to view detailed information. You will be taken to the Auto-Scaling Group Details page.
Click the Policy Tab. You will be taken to the Policy Tab page.
Click the More > Edit button for the policy you want to modify. The Policy Edit Popup opens.
Category RequiredDetailed description Category Required Policy Classification - Scale In: Return server count
- Scale Out: Increase server count
Policy Name Required Name for policy-specific categorization Execution conditions Required Conditions to execute the policy - Statistic: Method to calculate the Metric Type
- Average: Average of servers in the Auto-Scaling Group
- Min: Minimum value among servers in the Auto-Scaling Group
- Max: Maximum value among servers in the Auto-Scaling Group
- Metric Type: CPU Usage, Network In(bytes), Network Out(bytes), Network In(Packets), Network Out(Packets)
- Operator:
>=><=<
- Threshold: Threshold corresponding to the Metric Type
- Period: Continuous duration (in minutes) that triggers the execution condition
execution unit Required Policy execution method - Policy Type: Select the type of policy to execute.
- Increase or decrease the number of servers by a specified count: Increase or reduce the server count to the Target Value
- Increase or decrease the number of servers by a specified ratio: Increase or reduce by the Target Value ratio
- Fix the number of servers to the entered value: Fix the server count according to the Target Value
- Target Value: The number or ratio to execute the selected Policy Type
Cool down Required The waiting time (seconds) when a server is started or terminated due to a policy - The default is 300 seconds, and it can be set from a minimum of 1 second up to a maximum of 3,600 seconds
Table. Policy edit popup itemsEdit Policy In the popup window, after entering the required values, click the Confirm button.
Policy addition and modification constraints
When adding or modifying a policy, constraints exist based on the policy classification, execution conditions, and the scope of those conditions. Below is an example of constraints for the policy. Refer to the constraint examples to add or modify the policy.
Example 1 - Need to check for duplicate registration of policy classification/execution conditions
Policy classification (Scale Out or Scale In) and execution condition (Metric type) cannot be registered redundantly with the same values.
| Policy classification | Policy Name | Execution Condition(Statistic) | Execution condition(Metric type) | Execution condition range |
|---|---|---|---|---|
Scale Out | ScaleOutPolicy | Average | CPU Usage | >= 60% |
If a policy is registered as above, you cannot add a policy with the category (Scale Out) execution condition (Metric type=CPU Usage) or modify it to that condition.
Example 2 - Need to verify the execution condition range for execution conditions (Metric type) and execution conditions (Statistic) according to policy classification
When the policy type (Scale Out or Scale In) differs, duplicate registration of the execution condition range (Comparison operator + Threshold) is not allowed for the same execution condition (Metric type) and execution condition (Statistic).
| Policy classification | Policy Name | Execution condition(Statistic) | Execution condition(Metric type) | Execution condition range |
|---|---|---|---|---|
Scale Out | ScaleOutPolicy | Average | CPU Usage | >= 60% |
If a policy is registered as shown above, you cannot add a policy as below or modify it under the following conditions.
If the average CPU Usage is 60% or higher, a Scale Out policy is already registered; therefore, registering a Scale In policy when the average CPU Usage is 60% or lower would duplicate the 60% execution condition and cannot be added.
| Policy Classification | Policy Name | Execution Condition(Statistic) | Execution condition(Metric type) | Execution condition range |
|---|---|---|---|---|
Scale In | AddUpdatePolicy | Average | CPU Usage | <= 60% |
Example 3 - Need to verify the execution condition range for execution conditions (Metric type) and execution conditions (Statistic) according to policy classification
When the policy classification (Scale Out or Scale In) differs, duplicate registration of the execution condition range (Comparison operator + Threshold) is not allowed for the same execution condition (Metric type) and execution condition (Statistic).
| Policy classification | Policy Name | Execution condition(Statistic) | Execution condition (Metric type) | Execution condition range |
|---|---|---|---|---|
Scale In | ScaleInPolicy | Average | CPU Usage | <= 10% |
If a policy is registered as shown above, you cannot add a policy as below or modify it under the following conditions.
When the average CPU Usage is 10% or less, a Scale In policy is already registered; therefore, if the average CPU Usage is less than 60% / 60% or less / 10% or more / exceeds 9%, you cannot register a Scale Out policy because the execution condition ranges would overlap.
| Policy classification | Policy Name | Execution Condition(Statistic) | Execution condition(Metric type) | Execution condition range |
|---|---|---|---|---|
Scale Out | AddUpdatePolicy1 | Average | CPU Usage | < 60% |
Scale Out | AddUpdatePolicy2 | Average | CPU Usage | <= 60% |
Scale Out | AddUpdatePolicy3 | Average | CPU Usage | >= 10% |
Scale Out | AddUpdatePolicy4 | Average | CPU Usage | > 9% |
Example 4 - Execution conditions (Metric type) and execution conditions (Statistic) can be registered according to the execution condition range based on policy classification
If the policy type (Scale Out or Scale In) differs, you can register when the execution condition (Metric type) is the same but the execution condition (Statistic) is different, or when the execution condition range (Comparison operator + Threshold) does not overlap.
| Policy classification | Policy Name | Execution Condition(Statistic) | Execution condition (Metric type) | Execution Condition Range |
|---|---|---|---|---|
Scale Out | ScaleOutPolicy | Average | CPU Usage | >= 60% |
If a policy is already registered as shown above, you can add a policy as below or modify it with the following conditions. Registration is possible when the execution condition ranges do not overlap, or when the execution condition (Statistic) differs.
| Policy classification | Policy Name | Execution Condition(Statistic) | Execution condition (Metric type) | Execution condition range |
|---|---|---|---|---|
Scale In | AddUpdatePolicy1 | Average | CPU Usage | <= 10% |
Scale In | AddUpdatePolicy2 | Min | CPU Usage | <= 60% |
Delete Policy
You can delete a policy of an Auto-Scaling Group. To delete a policy of an Auto-Scaling Group, follow these steps.
- Click the All Services > Compute > Virtual Server menu. Navigate to the Service Home page of Virtual Server.
- Click the Auto-Scaling Group menu. Navigate to the Auto-Scaling Group List page.
- Auto-Scaling Group List page: click the resource you want to view details for. You will be taken to the Auto-Scaling Group Details page.
- Click the Policy Tab. You will be taken to the Policy Tab page.
- Select the policy to delete and click the Delete button. The Policy Deletion Confirmation popup opens.
- Policy Deletion Confirmation Check the popup window and click the Confirm button.
2.3 - Manage Schedule
You can schedule reservations daily, weekly, monthly, or one-time, and set the desired number of servers at the specified time. This is useful when you can predict when you need to decrease or increase the number of servers.
Add schedule
You can add a schedule to an Auto-Scaling Group. To add a schedule to an Auto-Scaling Group, follow these steps.
- Click the All Services > Compute > Virtual Server menu. Navigate to the Service Home page of Virtual Server.
- Click the Auto-Scaling Group menu. Navigate to the Auto-Scaling Group List page.
- Auto-Scaling Group List page, click the resource you want to view detailed information for. You will be taken to the Auto-Scaling Group Details page.
- Click the Schedule Tab. You will be taken to the Schedule Tab page.
- Click the Add Schedule button. The Add Schedule popup window opens.
Category requiredDetailed description Schedule name Required Name to distinguish by schedule Select server count Required Select the number of servers to adjust when executing the schedule - Min: The minimum number of servers the Auto-Scailg Group should maintain
- Desired: The target number of servers within the Auto-Scailg Group
- Max: The maximum number of servers the Auto-Scailg Group can maintain
Enter the number of servers Required Enter the value for the selected number of servers - Min value: Enter a value between 0 and 50. (Min≤Desired≤Max)
- Desired value: Enter a value between 0 and 50. (Min≤Desired≤Max)
- Max value: Enter a value between 0 and 50. (Min≤Desired≤Max)
Period Required Schedule execution frequency - Daily: You can set the Start date, End date, and Permanent options for a daily schedule. You can also set the Time and Time zone
- Weekly: You can set the Start date, End date, Permanent options, and the Time and Time zone. You can also select the Day of week on which the weekly schedule will run.
- Monthly: You can set the Start date, End date, Permanent options, and the Time and Time zone. You can also enter the Date on which the monthly schedule will run
- One-time: You can set the Time and Time zone. You can also set the Date on which the one-time schedule will run
Start date Selection Set schedule start date - Cannot set a date earlier than the current date. The default is the current date.
End date Selection Set schedule end date - Cannot set a date earlier than the current date. The default is the current date plus 7 days.
permanent Selection When configuring permanently, set the schedule end date to 9999-12-31 time Required Schedule execution time setting - Can be set in 30‑minute increments. Times earlier than the current date or current time cannot be set
time zone Required Schedule execution time zone (example: Asia/Seoul (GMT +09:00)) day of the week Required When Period is set to Weekly, select the Day of the week to execute the schedule Date Required - When Period is set to Monthly, enter the Date on which the schedule will run
- Enter one or more values from -31 to 31, excluding 0. (Example: 3,4,5)
- When Period is set to Once, set the Date on which the schedule will run
- Setting a date earlier than the current date is not allowed. The default is the current date.
Table. Schedule addition popup items - Add Schedule After entering the required values in the popup window, click the Confirm button.
- Add Schedule Confirmation After checking the message in the popup window, click the Confirm button.
If you select the schedule frequency as monthly, you must enter the schedule execution date, Date. Refer to the information below to register the schedule.
- If you input a number greater than 0, it represents the day of the month.
- Example: If you enter 1, you get August 1, September 1, …, December 1
- If you enter a number less than 0, the calculation starts from the end of each month.
- Entering -1 means the last day of each month.
- Example: August 31, September 30, …, December 31
- If you enter -2, it means the day before the last day of each month.
- Example: August 30, September 29, …, December 30
- Since the last day of each month varies—31, 30, 29, or 28 days—we allow calculation from the end of the month using negative numbers, as shown above, to handle schedules that need to run on the month’s final day.
- Entering -1 means the last day of each month.
- When the schedule runs, if the Min server count set in the schedule is greater than the Desired server count, or if the Max server count is less than the Desired server count, the Desired server count is also adjusted.
- If there are schedules with overlapping execution times, they may not run correctly. Please try to avoid overlapping execution times as much as possible.
Modify schedule
You can modify the schedule of an Auto-Scaling Group. To modify the schedule of an Auto-Scaling Group, follow these steps.
- Click the All Services > Compute > Virtual Server menu. Navigate to the Service Home page of Virtual Server.
- Click the Auto-Scaling Group menu. Navigate to the Auto-Scaling Group List page.
- On the Auto-Scaling Group List page, click the resource for which you want to view detailed information. You will be taken to the Auto-Scaling Group Details page.
- Click the Schedule Tab. You will be taken to the Schedule Tab page.
- Click the More > Edit button of the schedule you want to modify. The Edit Schedule popup window will open.
Category requiredDetailed description Schedule name Required Name to distinguish by schedule Select number of servers Required Select the number of servers to adjust when executing the schedule - Min: The minimum number of servers the Auto-Scailg Group should maintain
- Desired: The target number of servers within the Auto-Scailg Group
- Max: The maximum number of servers the Auto-Scailg Group can maintain
Enter number of servers Required Enter the value for the selected number of servers - Min value: Enter a value between 0 and 50. (Min≤Desired≤Max)
- Desired value: Enter a value between 0 and 50. (Min≤Desired≤Max)
- Max value: Enter a value between 0 and 50. (Min≤Desired≤Max)
period Required Schedule execution frequency - Daily: You can set the Start Date and End Date, and Permanent setting for the daily schedule. You can also set the Time and Time Zone
- Weekly: You can set the Start Date and End Date, Permanent setting, and the Time and Time Zone. You can also select the Day of Week for the Weekly schedule to run.
- Monthly: You can set the Start Date and End Date, Permanent setting, and the Time and Time Zone. You can also enter the Date for the Monthly schedule to run.
- Once: You can set the Time and Time Zone. You can also set the Date for the Once schedule to run
Start date Selection Set schedule start date - Cannot set a date earlier than the current date. The default is the current date.
End date Selection Set schedule end date - Cannot set a date earlier than the current date. The default is the current date plus 7 days.
Permanent Selection When configuring permanently, set the schedule end date to 9999-12-31. time Required Schedule execution time setting - Can be set in 30‑minute increments. Times earlier than the current date or current time cannot be set
time zone Required Schedule execution time zone (example: Asia/Seoul (GMT +09:00)) day of the week Required When Period is weekly, select the day of the week to run the schedule. Date Required - When Period is set to Monthly, enter the Date on which the schedule will run
- Enter one or more values from -31 to 31, excluding 0. (Example: 3,4,5)
- When Period is set to Once, set the Date on which the schedule will run
- Cannot set a date earlier than the current date. The default is the current date.
Table. Schedule edit popup items - Schedule Edit After entering the required values in the popup window, click the Confirm button.
- Schedule Modification Confirmation After checking the message in the popup window, click the Confirm button.
Delete schedule
You can delete the schedule of an Auto-Scaling Group. To delete the schedule of an Auto-Scaling Group, follow these steps.
- Click the All Services > Compute > Virtual Server menu. Navigate to the Service Home page of Virtual Server.
- Click the Auto-Scaling Group menu. You will be taken to the Auto-Scaling Group List page.
- On the Auto-Scaling Group List page, click the resource for which you want to view detailed information. You will be taken to the Auto-Scaling Group Details page.
- Click the Schedule Tab. You will be taken to the Schedule Tab page.
- Select the schedule to delete and click the Delete button. Schedule Deletion Confirmation popup will open.
- Schedule Deletion Confirmation Check the popup window and click the Confirm button.
2.4 - Manage Notification
You can designate a notification recipient and send alert messages via E‑mail or SMS for specific situations.
- The notification method (E-mail or SMS) can be set on the Notification Settings page by selecting Notification Target as Service > Virtual Server Auto-Scaling.
- For details on editing notification settings, refer to Edit Notification Settings.
Add notification
You can add notifications to an Auto-Scaling Group. To add notifications to an Auto-Scaling Group, follow these steps.
- Click the All Services > Compute > Virtual Server menu. Navigate to the Service Home page of Virtual Server.
- Click the Auto-Scaling Group menu. You will be taken to the Auto-Scaling Group List page.
- On the Auto-Scaling Group List page, click the resource to which you want to add notification information. You will be taken to the Auto-Scaling Group Details page.
- Click the Notification Tab. You will be taken to the Notification Tab page.
- Click the Add Notification button. The Add Notification popup opens.
- Add Notification After entering the required values in the popup window, click the Confirm button.
Category Detailed description Notification timing Notification timing when an Auto-Scaling Group alert occurs - Server creation, Server termination, Server creation failure, Server termination failure, When policy execution conditions are met
- Multiple selection allowed
Notification recipient User who will receive the notification when an alert occurs - Click the Add Notification Recipient button to select a user
- Only Samsung Cloud Platform users can be selected as recipients
Table. Notification items
- Add Notification Confirmation After checking the message in the popup window, click the Confirm button.
Edit Notification
You can modify the notification settings of an Auto-Scaling Group. To modify the notification settings of an Auto-Scaling Group, follow these steps.
- Click the All Services > Compute > Virtual Server menu. Navigate to the Service Home page of Virtual Server.
- Click the Auto-Scaling Group menu. Navigate to the Auto-Scaling Group List page.
- On the Auto-Scaling Group List page, click the resource to edit the notification information. You will be taken to the Auto-Scaling Group Details page.
- Click the Notification Tab. You will be taken to the Notification Tab page.
- In the notification list, click the More > Edit button for the notification you want to modify. The Edit Notification popup window will open.
- Edit Notification After editing the notification information in the popup window, click the Confirm button.
Category Detailed description Notification timing Notification timing when an Auto-Scaling Group alert occurs - Server creation, Server termination, Server creation failure, Server termination failure, When policy execution conditions are met
- Multiple selection allowed
Table. Notification edit items - Edit Notification Confirmation After checking the message in the popup window, click the Confirm button.
Delete Notification
You can delete notifications for an Auto-Scaling Group. To delete notifications for an Auto-Scaling Group, follow these steps.
- Click the All Services > Compute > Virtual Server menu. Navigate to the Service Home page of Virtual Server.
- Click the Auto-Scaling Group menu. You will be taken to the Auto-Scaling Group List page.
- On the Auto-Scaling Group List page, click the resource to edit the notification information. You will be taken to the Auto-Scaling Group Details page.
- Click the Notification Tab. You will be taken to the Notification Tab page.
- In the notification list, select the notification you want to delete, then click the Delete button. The Delete Notification Confirmation popup will open.
- Delete Notification Confirmation Review the popup window and click the Confirm button.
3 - API Reference
4 - CLI Reference
5 - Release Note
Virtual Server Auto-Scaling
- Virtual Server and Load Balancer status check functionality has been added.
- Check the status of Virtual Server and Load Balancer and automatically replace servers that are in an Unhealthy state.
- You can attach File Storage to a Launch Configuration.
- When creating a Launch Configuration, you can attach up to five File Storage Volumes.
- You can monitor data by integrating with the ServiceWatch service.
- When setting the execution conditions of the policy, Memory Usage was excluded from the Metric Type.
- The termination functionality for Virtual Servers created by the Auto-Scaling Group has been improved.
- When a Virtual Server is terminated, the Load Balancer is automatically detached.
- The desired number of servers remains unchanged, and scale-out is performed according to the desired check batch.
- Added a notification feature to Virtual Server Auto-Scaling.
- You can add notification settings in the creation or detail screen of an Auto-Scaling Group.
- You can set scaling policies when creating an Auto-Scaling Group.
- Added the Metric Type to the Auto-Scaling Group policy.
- Additional: Memory Usage, Network In(bytes), Network Out(bytes), Network In(Packets), Network Out(Packets)
- You can set the Draining Timeout when connecting to a Load Balancer.
- An Auto-Scaling Group can connect up to 50 Virtual Servers, and up to three LB server groups and ports.
- Virtual Server Auto-Scaling feature change
- It will be released in conjunction with the Load Balancer service launching in February 2025.
- NAT configuration functionality has been added to Auto-Scaling Group.
- Samsung Cloud Platform Common Feature Change
- Account, IAM, Service Home, tags, etc., have been updated to reflect common CX changes.
- Virtual Server Auto-Scaling creates an Auto-Scaling Group through a Launch Configuration and monitors and manages the servers.
- Provides a scheduling method that allows setting the desired number of servers at a specified time, and a policy method that adjusts the number of servers based on CPU utilization.