This is the multi-page printable view of this section. Click here to print.
Queue Service
1 - Overview
Service Overview
Queue Service efficiently manages and delivers messages or tasks, supporting message transmission between systems.
This service facilitates the data flow between a Producer that generates messages and a Consumer that receives them, and provides a FIFO (First-In-First-Out) feature that guarantees message order. By doing so, it distributes system load caused by messages, enabling efficient message management in microservice architectures or event-driven systems.
Features
- Efficient Message Processing : Allows efficient handling and management of large volumes of messages sent and received simultaneously, enabling the user system’s message processing tasks to be performed efficiently.
- Fast Service Processing : Producer and Consumer operate independently, allowing improved responsiveness and processing speed.
- Message Order Guarantee : Ensures the order of received messages to maintain data consistency.
- Strong security and reliability : It protects sensitive information by encrypting messages during transmission and storage, and provides reliable message management.
Service Architecture Diagram
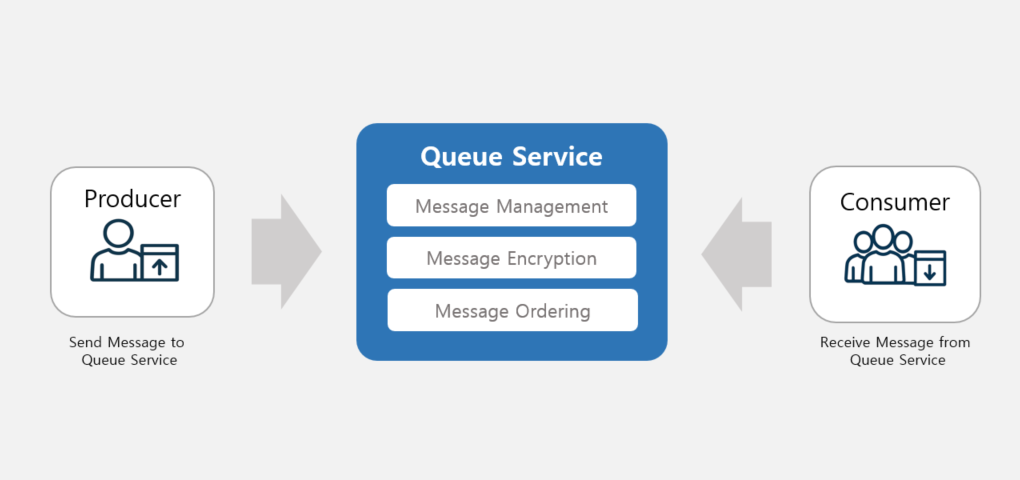
Provided features
The Queue Service provides the following features.
- Queue creation: Depending on the message reception handling method, create a basic or FIFO type Queue that guarantees message order.
- When using the FIFO type, the Queue Service orders messages in the order they were received.
- Message Transmission: Producer sends the message intended for Consumer to the Queue.
- Message Reception: Consumer receives the Producer’s message from the Queue.
- Message Management: Check and manage messages stored in the Queue.
- Message Encryption: Encrypt messages within the Queue by integrating with the KMS service.
- We support blocking message exposure through message encryption settings.
- ServiceWatch service integration provided: You can monitor data through the ServiceWatch service.
Component
Producer
Create and send messages using the Queue Service.
Consumer
Receive and process messages from the Queue Service.
Message Manager
You can view the loaded messages in the Queue Service and manage them, such as deleting them.
Provision status by region
The Queue Service is available in the following environments.
| region | Provision status |
|---|---|
| Korea West 1 (kr-west1) | Provide |
| Korea East 1 (kr-east1) | Provide |
| South Korea South 1 (kr-south1) | Not provided |
| South Korea South 2 (kr-south2) | Not provided |
| South Korea 3 (kr-south3) | Not provided |
Preliminary Service
The Queue Service has no preceding service.
1.1 - ServiceWatch Metrics
The Queue Service sends metrics to ServiceWatch. The metrics provided by default monitoring are data collected at a 1‑minute interval.
Basic Metrics
The following are the basic metrics for the Queue Service namespace.
The indicators whose names are displayed in bold below are the key indicators selected from the basic metrics provided by Queue Service. Key metrics are used to compose service dashboards that are automatically built for each service in ServiceWatch.
Each metric indicates through the user guide which statistical value is meaningful when viewing that metric, and among the meaningful statistics, the values displayed in bold are the primary statistics. In the service dashboard, you can view key metrics using these primary statistical values.
| Performance items | Detailed description | unit | meaningful statistics |
|---|---|---|---|
| NumberOfMessagesSent | Number of messages added to the queue | Count |
|
| SentMessageSize | Size of the message added to the queue | Bytes |
|
| NumberOfMessagesReceived | Number of messages returned by the call to the ReceiveMessage operation (number of polled messages) | Count |
|
| NumberOfEmptyReceives | Number of ReceiveMessage API calls that did not return a message | Count |
|
| NumberOfMessagesDeleted | Number of messages deleted from the queue | Count |
|
2 - How to guides
Create Queue Service
You can create and use a Queue Service from the Samsung Cloud Platform Console.
To create a Queue Service, follow these steps.
Click the All Services > Application > Queue Service menu. 1. Go to the Service Home page of the Queue Service.
On the Service Home page, click the Create Queue button. 2. Go to the Create Queue page.
On the Queue creation page, enter the information required to create the service and select detailed options.
- Enter or select the required information in the service information input area.
Category RequiredDetailed description type Required Select service type - Default: No message ordering
- FIFO: First-in-first-out message delivery and message retention
Queue name Required Enter the queue name - Start with a lowercase English letter and enter 3 ~ 64 characters consisting of lowercase English letters, numbers, and the special character (-)
- Standard type: The name cannot use the ‘.fifo’ suffix
- FIFO type: Include the .fifo suffix in the name
- Start with a lowercase English letter
- Enter 3 ~ 64 characters using lowercase English letters and the special character (-)
Duplicate removal range Essential Select duplicate removal scope - Messages in queue: Remove duplicate items among messages in the queue
- Group-level messages: Remove duplicate items within group-level messages
- FIFO can be set only when the FIFO type is selected
Content-based deduplication Selection Hash the message body content to remove duplicate messages - FIFO can be set only when the FIFO type is selected
Explanation Select Enter the service description within 100 characters. Table. Create Queue – Enter Service Information - Enter or select the required information in the configuration settings area.
Category Required statusDetailed description Message size Essential Enter the message size value (KB) between 1 and 256 - Up to 50 can be added per resource
Message retention period Essential Enter the message retention period - After selecting the unit, enter the desired value
- seconds: 60 ~ 1,209,600
- minutes: 1 ~ 20,160
- hours: 1 ~ 336
- days: 1 ~ 14
Encryption Required Select encryption usage - New creation: Go to the KMS page and create a new KMS encryption
- Do not use: Do not use encryption
- KMS encryption: Select when using KMS
- Data Key reuse period: After selecting a unit period, enter the desired value
- Minutes: 5 ~ 1,440
- Hours: 1 ~ 24
- Data Key reuse period: After selecting a unit period, enter the desired value
Table. Queue creation - configuration setting items - Enter or select the required information in the additional information input area.
Category RequiredDetailed description Tag Selection Add tag - Up to 50 can be added per resource
- After clicking the Add Tag button, enter or select Key, Value values
Table. Queue creation - additional information input fields
- Enter or select the required information in the service information input area.
Summary Verify the detailed information and estimated charges generated in the panel, then click the Create button.
- Once creation is complete, check the resources you created on the page.
- When using a FIFO type Queue, up to 100 message groups are supported.
- If the maximum number of message groups is exceeded, message transmission may fail.
View Queue Service details
You can view detailed information and messages for the Queue Service.
To view detailed information about the Queue Service, follow these steps.
- Click the All Services > Application > Queue Service menu. 1. Go to the Service Home page of Queue Service.
- On the Service Home page, click the Queue menu. 2. Go to the Queue List page.
- On the Queue list page, click the resource to view detailed information. 3. Navigate to the Queue Details page.
- Queue Details page displays status information and additional feature information, and consists of Details, Message Management, Tags, Job History tabs.
Category Detailed description Queue Service status Queue Service status representation - Creating: In progress
- Available: Creation completed, server connection available
- Deleting: Service termination in progress
- Error Deleting: Abnormal state during deletion
- Inactive: Abnormal state
- Error: Abnormal state during creation
Service termination Service cancellation button Table. Queue Service status information and additional features
- Queue Details page displays status information and additional feature information, and consists of Details, Message Management, Tags, Job History tabs.
Detailed Information
On the Queue list page, you can view detailed information of the selected resource and, if necessary, edit the information.
| Category | Detailed description |
|---|---|
| service | Service name |
| Resource Type | Resource Type |
| SRN | Unique resource ID in Samsung Cloud Platform
|
| Resource name | Resource name
|
| Resource ID | Service’s unique resource ID |
| Constructor | User who created the service |
| Creation date and time | Service creation date and time |
| Modifier | User who modified the service |
| Modification date | Service modification date and time |
| type | Queue type |
| Duplicate removal range | Deduplication Scope
|
| Content-based duplicate removal | Whether to use content-based duplicate removal feature
|
| Configuration Settings | Queue configuration information
|
| PrivateLink Service ID | PrivateLink service ID |
| Explanation | Queue description
|
| IP access allowlist | List of IPs allowed to access the Queue service
|
Message Management
On the Queue list page, you can view and manage the message list of the selected resource.
- A maximum of 10 messages will be displayed.
- If there are no messages in the list, you can click the Message Polling button to retrieve messages.
- Refer to Manage Messages for how to manage messages.
| Category | Detailed description |
|---|---|
| Message polling | After polling messages from the Queue to the Console, refresh the message list. |
| More | Message sending, deletion, and removal possible
|
| Message List | Message ID, message send timestamp, message receive timestamp, and message size (byte) can be viewed
|
Tag
Queue List page lets you view the tag information of the selected resource, and you can add, modify, or delete it.
| Category | Detailed description |
|---|---|
| Tag list | Tag list
|
Operation History
You can view the operation history of the selected resource on the Queuee list page.
| Category | Detailed description |
|---|---|
| Task History List | Resource Change History
|
Configure Queue
You can reconfigure the settings you specified when creating the Queue Service.
To reconfigure the Queue, follow these steps.
- All Services > Application > Queue Service Click the menu. 1. Go to the Service Home page of the Queue Service.
- On the Service Home page, click the Queue menu. 2. Go to the Queue list page.
- On the Queue List page, click the resource to reconfigure the Queue. 3. Go to the Queue Details page.
- Click the Edit button of the Configuration Settings item. 4. Configuration Settings Edit The popup window opens.
- Edit Configuration Settings In the popup window, edit the configuration information, then click the OK button.
Category Required statusDetailed description Message size Essential Enter the message size value (KB) between 1 and 256 - Up to 50 can be added per resource
Message retention period Essential Enter the message retention period - After selecting the unit, enter the desired value
- seconds: 60 ~ 1,209,600
- minutes: 1 ~ 20,160
- hours: 1 ~ 336
- days: 1 ~ 14
Encryption Essential Select encryption usage - Create new: Go to the KMS page to create a new KMS encryption
- Do not use: Do not use encryption
- KMS encryption: Select when using KMS
- Data key reuse period: Select a unit period and then enter the desired value
- minutes: 5 ~ 1,440
- hours: 1 ~ 24
- Data key reuse period: Select a unit period and then enter the desired value
Table. Queue configuration setting edit input items
Managing IP Access Permissions
You can manage IPs that can access the Queue Service.
Add allowed IP
To add an allowed IP, follow these steps.
- All Services > Application > Queue Service Click the menu. 1. Go to the Service Home page of Queue Service.
- On the Service Home page, click the Queue menu. 2. Go to the Queue list page.
- On the Queue List page, click the resource to add an allowed IP. 3. Go to the Queue Details page.
- Click the Add IP Address button of the IP Access Allow List item. 4. Add IP Address The popup window opens.
- Enter the IP to add to the IP Access Allow List, then click the Confirm button.
- Click the + button to add multiple IPs simultaneously (up to 10).
- When the popup that notifies an IP addition opens, click the Confirm button.
Exclude accessible IP
To exclude the IPs registered in IP access allow list, follow these steps.
- Click the All Services > Application > Queue Service menu. 1. Go to the Service Home page of Queue Service.
- On the Service Home page, click the Queue menu. 2. Go to the Queue List page.
- On the Queue list page, click the resource to exclude the allowed IP. 3. Go to the Queue Details page.
- After selecting the IPs to exclude from the IP Access Allow List, click the Delete button at the top of the list.
- You can also individually exclude an IP from the IP Access Allow List by clicking its Delete button.
- When the pop-up notifying IP deletion opens, click the Confirm button.
Manage messages
You can send or manage queue messages.
Send Message
To send a Queue message, follow these steps.
- All Services > Application > Queue Service Click the menu. 1. Go to the Service Home page of Queue Service.
- On the Service Home page, click the Queue menu. 2. Go to the Queue list page.
- On the Queue List page, click the resource to send a Queue message. 3. Queue Details Go to the page.
- Click the Message Management tab on the Queue Details page.
- Click the More > Send Message button at the top of the message list. 5. Send Message popup window opens.
- Send Message After entering the message information to be sent in the popup window, click the Confirm button.
Category Whether requiredDetailed description Message body Essential Enter the message to send - Up to 262,244 bytes can be entered
Message Group ID Required Enter using letters, numbers, and special characters within 128 characters - FIFO displayed only when using the FIFO type
Message deduplication ID Required/Optional Enter within 128 characters using letters, numbers, and special characters - FIFO type is displayed only when used
- When using the Content-based deduplication feature, input is optional
Meta information Selection Select whether to use meta information to add to the message - When used, you can enter up to 10 Key, Value entries
Encryption Essential Select encryption usage - Create new: Go to the KMS page to create a new KMS encryption
- Do not use: Do not use encryption
- KMS encryption: Select when using KMS
- Data key reuse period: Select a unit period and then enter the desired value
- minutes: 5 ~ 1,440
- hours: 1 ~ 24
- Data key reuse period: Select a unit period and then enter the desired value
Table. Message sending input fields
Check message details
You can view the content and detailed information of the Queue message. To view the detailed message information, follow these steps.
- Click the All Services > Application > Queue Service menu. 1. Go to the Service Home page of Queue Service.
- On the Service Home page, click the Queue menu. 2. Go to the Queue List page.
- On the Queue list page, click the resource to view the Queue messages. 3. Go to the Queue Details page.
- Click the Message Management tab on the Queue Details page.
- Click the message ID to view detailed information in the message list. 5. Message Details The popup window opens.
Category Detailed description Message ID Message unique ID Message size Message size Message transmission timestamp Message transmission date and time Message Received Date/Time Message receipt date and time Message Group ID Message group ID - displayed only when the FIFO type is used
Message deduplication ID Deduplication ID set in the message - is displayed only when using the FIFO type
Message body message content Meta definition Message meta information (Key, Value) Table. Message detail information items
Delete individual messages
Queue messages can be deleted individually. To delete a message, follow these steps.
- Click the All Services > Application > Queue Service menu. 1. Go to the Service Home page of the Queue Service.
- On the Service Home page, click the Queue menu. 2. Go to the Queue list page.
- On the Queue List page, click the resource to delete the Queue message. 3. Queue Details page is opened.
- Click the Message Management tab on the Queue Details page.
- After selecting all messages to delete in the message list, click the More > Delete button at the top of the list.
- You can also delete individually by clicking the Delete button at the far right of the message you want to delete in the message list.
- When the popup notifying message deletion opens, click the Confirm button.
Clear all messages in the queue
You can delete all messages in the Queue by emptying the Queue.
- Messages deleted via Empty Queue cannot be recovered.
- If the same request is already in progress, it will not be deleted. * In a moment, clear the queue again.
To delete all messages, follow the steps below.
- Click the All Services > Application > Queue Service menu. 1. Go to the Service Home page of Queue Service.
- On the Service Home page, click the Queue menu. 2. Go to the Queue list page.
- On the Queue List page, click the resource to remove the Queue message. 3. Go to the Queue Details page.
- Click the Message Management tab on the Queue Details page.
- Click the More > Clear Queue button at the top of the message list.
- When the popup notifying message deletion opens, click the Confirm button.
Cancel Queue Service
You can reduce operating costs by terminating the unused Queue Service.
However, if you terminate the service, the running service may be stopped immediately, so you should proceed with the termination only after fully considering the impact that may occur when the service is discontinued.
To cancel the Queue Service, follow these steps.
- Click the All Services > Application > Queue Service menu. 1. Go to the Service Home page of Queue Service.
- On the Service Home page, click the Queue menu. 2. Go to the Queue list page.
- On the Queue list page, select the resource to cancel, then click the Cancel service button.
- After navigating to the Queue Details page of the resource to be terminated, you can also terminate it individually by clicking the Terminate Service button.
- When the pop-up notifying service termination opens, click the Confirm button.
Integrating PrivateLink Service
The Queue Service can communicate directly by integrating with the PrivateLink Service without using internet communication. When integrated with PrivateLink Service, communication with the Queue Service occurs directly from the user’s VPC, enhancing security.
Creating and Connecting a PrivateLink Endpoint
Follow the steps below to integrate the Queue Service with the PrivateLink Service.
- Check the PrivateLink Service ID of the Queue Service for creating a PrivateLink Endpoint.
- The PrivateLink Service ID of the Queue Service can be found on the Queue Details page’s PrivateLink Service ID.
- Create a PrivateLink Endpoint.
- Refer to PrivateLink Endpoint 생성하기 for how to create a PrivateLink Endpoint.
- When connecting to a PrivateLink Service, usage approval is processed automatically.
- Check the Security Group of the PrivateLink Endpoint to verify whether the target VM IP is registered.
3 - Message API reference
Overview
The Queue Service provided by Samsung Cloud Platform can send, receive, and delete messages.
This guide provides an overview of the Queue Service API and how to invoke it.
Queue Service Call Procedure
The Queue Service API URL must be changed according to the operating environment and region. Please check the operating environment and Region information in the table below.
| Production Environment | Region | Queue Service URL |
|---|---|---|
| For Samsung | kr-west1 | https://queueservice.service.kr-west1.s.samsungsdscloud.com |
| For Samsung | kr-east1 | https://queueservice.service.kr-east1.s.samsungsdscloud.com |
| For Enterprise | kr-west1 | https://queueservice.service.kr-west1.e.samsungsdscloud.com |
| For Enterprise | kr-east1 | https://queueservice.service.kr-east1.e.samsungsdscloud.com |
Calling the API
AUTH PARAMS
Header Description
Scp-Accesskey      : 삼성 클라우드 플랫폼 포털에서 발급받은 Access Key
Scp-Signature      : 호출 API 요청을 Access Key와 매핑되는 Access Secret Key로 암호화한 서명. HMAC 암호화 알고리즘은 HmacSHA256 사용
Scp-Target         : Queue Service에 요청하는 행위. ScpQS.SendMessage, ScpQS.SendMessageBatch, ScpQS.ReceiveMessage, ScpQS.DeleteMessage, ScpQS.DeleteMessageBatch 중 하나
Scp-Timestamp      : 1970년 1월 1일 00:00:00 협정 세계시(UTC)부터의 경과 시간을 밀리초(Millisecond)로 정의합니다.
Scp-ClientType     : user-api 명시
Create Signature
- Generate the string to be signed from the request, encrypt it with the HmacSHA256 algorithm using the Access and Secret keys, and then encode it in Base64.
- To call the Sqeue Service via the Messaging API, you must authenticate with the “authentication key” in authentication key mode from a valid allowed IP address.
- Use this value as the Scp-Signature.
- The generated Signature is valid for 15 minutes.1. - Click the All Services > Application > Queue Service menu. - Go to the Service Home page of the Queue Service.
Signature generation Sample Code (Java)
public static String makeHmacSignature(String method,
                                       String url,
                                       String timestamp,
                                       String accessKey,
                                       String accessSecretKey,
                                       String clientType) {

    String body = method + url + timestamp + accessKey + clientType;

    String encodeBase64Str;

    try {
        byte[] message = body.getBytes("UTF-8");
        byte[] secretKey = accessSecretKey.getBytes("UTF-8");

        Mac mac = Mac.getInstance("HmacSHA256");
        SecretKeySpec secretKeySpec = new SecretKeySpec(secretKey, "HmacSHA256");
        mac.init(secretKeySpec);
        byte[] hmacSha256 = mac.doFinal(message);
        encodeBase64Str = Base64.getEncoder().encodeToString(hmacSha256);
    } catch (Exception e) {
        throw new RuntimeException("Failed to calculate hmac-sha256", e);
    }

    return encodeBase64Str;
}
Signature generation Sample Code (JavaScript)
<script src="https://cdnjs.cloudflare.com/ajax/libs/crypto-js/3.1.2/rollups/hmac-sha256.js"></script>
<script src="https://cdnjs.cloudflare.com/ajax/libs/crypto-js/3.1.2/components/enc-base64-min.js"></script>
<script type="text/javascript">
function makeSignature() {
    var method = "POST"; // Method
    var url = "{url}"; // url
    var timestamp = Date.now(); // timestamp
    var accessKey = "{accessKey}"; // access key
    var secretKey = "{secretKey}"; // secret key
    var clientType= "user-api"; // client type

    url = encodeURI(url); // 한글, 특수 문자 처리

    var message = method + url + timestamp + accessKey + clientType;

    var hash = CryptoJS.HmacSHA256(message, secretKey);
    return CryptoJS.enc.Base64.stringify(hash);
}
</script>
Example of calling the Queue Service API
Curl
curl -i -X GET
-H "Scp-Accesskey:2sd2gg=2agbdSD26svcD"
-H "Scp-Signature:fsfsdf235f9U35sdgf35Xsf/qgsdgsdg326=sfsdr23rsef="
-H "Scp-Timestamp:1605290625682"
-H "Scp-ClientType:user-api"
-H "Scp-Target:ScpQS.SendMessage"
--data '{"MessageBody": "sample message",  "QueueUrl": "https://queueservice.kr-west1.e.samsungsdscloud.com/33ff0000a8a345d78cdf163673f3da11/samplequeue"}'
'https://queueservice.service.kr-west1.e.samsungsdscloud.com'
Python
import requests

url = "https://queueservice.service.kr-west1.e.samsungsdscloud.com"
payload = {
   'MessageBody': 'sample message',
   'QueueUrl': 'https://queueservice.kr-west1.e.samsungsdscloud.com/33ff0000a8a345d78cdf163673f3da11/samplequeue'
}
headers = {
  'Scp-Accesskey': '2sd2gg=2agbdSD26svcD',
  'Scp-Signature': 'fsfsdf235f9U35sdgf35Xsf/qgsdgsdg326=sfsdr23rsef=',
  'Scp-Timestamp': '1605290625682',
  'Scp-ClientType': 'user-api',
  'Scp-Target': 'ScpQS.SendMessage'
}

response = requests.request("GET", url, headers=headers, data=payload)

if response.status_code == 200:
    contents = response.text
    return contents
else:
    raise Exception(f"Failed to GET API: {response.status_code}, {response.text}")
Java
String apiUrl = "https://queueservice.service.kr-west1.e.samsungsdscloud.com";
String accessKey = "2sd2gg=2agbdSD26svcD"
String signature = "fsfsdf235f9U35sdgf35Xsf/qgsdgsdg326=sfsdr23rsef="
String timestamp = "1605290625682"
String clientType = "user-api"
String scpTarget = "ScpQS.SendMessage"

public static String getAPI(String token, String apiUrl) throws IOException {
        CloseableHttpClient httpClient = HttpClients.createDefault();
        HttpGet getRequest = new HttpGet(apiUrl);
        getRequest.addHeader("Scp-Accesskey", accessKey);
        getRequest.addHeader("Scp-Signature", signature);
        getRequest.addHeader("Scp-Timestamp", timestamp);
        getRequest.addHeader("Scp-ClientType", clientType);
        getRequest.addHeader("Scp-Target", scpTarget);

        HttpResponse response = httpClient.execute(getRequest);
        int statusCode = response.getStatusLine().getStatusCode();

        if (statusCode == 200) {
            String responseBody = EntityUtils.toString(response.getEntity());
            httpClient.close();
            return responseBody;
        } else {
            String responseBody = EntityUtils.toString(response.getEntity());
            httpClient.close();
            throw new RuntimeException("Failed to Request: " + statusCode + ", " + responseBody);
        }
    }
Queue Service API
SendMessage
POST https://queueservice.service.kr-west1.e.samsungsdscloud.com
Description
Send message
Parameters
| Field name | Required or not | type | Explanation |
|---|---|---|---|
| MessageAttributes | false | MessageAttribute | |
| MessageBody | true | string | |
| MessageDeduplicationId | false | string | FIFO Queue |
| MessageGroupId | false | string | FIFO Queue |
| QueueUrl | true | string |
MessageAttribute
| Field name | Whether required | type | Explanation |
|---|---|---|---|
| BinaryValue | false | string | |
| DataType | false | string | |
| StringValue | false | string |
Responses
| HTTP Code | Description | Schema |
|---|---|---|
| 200 | Created | |
| 400 | Bad Request | |
| 403 | Forbidden |
Example HTTP request
Request Header
"Scp-Accesskey:2sd2gg=2agbdSD26svcD",
"Scp-Signature:fsfsdf235f9U35sdgf35Xsf/qgsdgsdg326=sfsdr23rsef=",
"Scp-Timestamp:1605290625682",
"Scp-ClientType:user-api",
"Scp-Target:ScpQS.SendMessage"
Request Body
{
  "QueueUrl": "https://queueservice.kr-west1.e.samsungsdscloud.com/123e54b7303749f38ca59a5c6d419a75/test",
  "MessageBody": "Hello SQS!",
  "MessageAttributes": {
    "Special": {
      "DataType": "string",
      "StingValue": "testBodyString12345678910!/wow$#@!"
    }
  }
}
Example HTTP response
200 Response
{
  "MD5OfMessageAttributes": "139818cac45117a07428826a8c533c01",
  "MD5OfMessageBody": "098f6bcd4621d373cade4e832627b4f6",
  "MessageId": "14b37b86-8117-484a-aea4-1eae3b98d5d0",
  "SequenceNumber": "11764568839"
}
SendMessageBatch
POST https://queueservice.service.kr-west1.e.samsungsdscloud.com
Description
Mass message sending
Parameters
| Field name | Required or not | type | Explanation |
|---|---|---|---|
| Entries | true | array of SendMessageBatchRequestEntry | |
| QueueUrl | true | string |
SendMessageBatchRequestEntry
| Field name | Required or not | type | Explanation |
|---|---|---|---|
| Id | true | string | |
| MessageAttributes | false | MessageAttribute | |
| MessageBody | true | string | |
| MessageDeduplicationId | false | string | FIFO Queue |
| MessageGroupId | false | string | FIFO Queue |
Responses
| HTTP Code | Description | Schema |
|---|---|---|
| 200 | Created | |
| 400 | Bad Request | |
| 403 | Forbidden |
Example HTTP request
Request Header
"Scp-Accesskey:2sd2gg=2agbdSD26svcD",
"Scp-Signature:fsfsdf235f9U35sdgf35Xsf/qgsdgsdg326=sfsdr23rsef=",
"Scp-Timestamp:1605290625682",
"Scp-ClientType:user-api",
"Scp-Target:ScpQS.SendMessageBatch"
Request Body
{
   "QueueUrl": "https://queueservice.kr-west1.dev3.samsungsdscloud.com/123e54b7303749f38ca59a5c6d419a75/test",
   "Entries": [
      {
         "Id": "1",
         "MessageBody": "test-body-1"
      },
      {
         "Id": "2",
         "MessageBody": "test-body-2"
      }
   ]
}
Example HTTP response
200 Response
{
   "Failed": [],
   "Successful": [
      {
         "Id": "2",
         "MD5OfMessageAttributes": "d41d8cd98f00b204e9800998ecf8427e",
         "MD5OfMessageBody": "82ddf04637119b9a77e9b44095f5ba11",
         "MessageId": "68aa4629-bfbc-4bb0-898b-52db94438526",
         "SequenceNumber": "31764583416"
      },
      {
         "Id": "1",
         "MD5OfMessageAttributes": "d41d8cd98f00b204e9800998ecf8427e",
         "MD5OfMessageBody": "8344ca2f91203b151e4d0aafc9248a8b",
         "MessageId": "3523740f-9e7c-429e-8514-5ec21b1d3cd8",
         "SequenceNumber": "41764583416"
      }
   ]
}
ReceiveMessage
POST https://queueservice.service.kr-west1.e.samsungsdscloud.com
Description
Message reception
Parameters
| Field name | Required status | type | Explanation |
|---|---|---|---|
| MaxNumberOfMessages | false | string | |
| MessageAttributeNames | false | array of string | |
| MessageSystemAttributeNames | false | array of string | |
| QueueUrl | true | string | |
| WaitTimeSeconds | false | string |
Responses
| HTTP Code | Description | Schema |
|---|---|---|
| 200 | Created | |
| 400 | Bad Request | |
| 403 | Forbidden |
Example HTTP request
Request Header
"Scp-Accesskey:2sd2gg=2agbdSD26svcD",
"Scp-Signature:fsfsdf235f9U35sdgf35Xsf/qgsdgsdg326=sfsdr23rsef=",
"Scp-Timestamp:1605290625682",
"Scp-ClientType:user-api",
"Scp-Target:ScpQS.ReceiveMessage"
Request Body
{
   "QueueUrl": "https://queueservice.kr-west1.dev3.samsungsdscloud.com/123e54b7303749f38ca59a5c6d419a75/test",
   "MaxNumberOfMessages": "2"
}
Example HTTP response
200 Response
{
   "messages": [
      {
         "MessageId": "14b37b86-8117-484a-aea4-1eae3b98d5d0",
         "Body": "sample-body-1",
         "Attributes": {},
         "MessageAttributes": {
            "Special": {
               "DataType": "string",
               "StingValue": "testBodyString12345678910!/wow$#@!"
            }
         },
         "MD5OfBody": "098f6bcd4621d373cade4e832627b4f6",
         "MD5OfMessageAttributes": "139818cac45117a07428826a8c533c01",
         "ReceiptHandle": "400tf1nY4HbXEP7UX4OtxPVIPlq9vw1eeKDFwNMeNiEuZvMSbvdPCBOF/P96FUF9XT7TALMzP91ViCxQjnOIyBWw+fr4EhihdJ0Z2QHau1LMHbxD+GngcM2Pv6d5HM4KCmBgB2GxFA5qpUFBPPI="
      },
      {
         "MessageId": "aee85517-1437-4877-8de8-00eee69e11dc",
         "Body": "sample-body-2",
         "Attributes": {},
         "MD5OfBody": "ad0234829205b9033196ba818f7a872b",
         "MD5OfMessageAttributes": "139818cac45117a07428826a8c533c01",
         "ReceiptHandle": "400tf1nY4HbXEP7UX4OtxPVIPlq9vw1eeKDFwNMeNiEuZvMSbvdPCBPVrfhxFxZ0XD7aBbEzP91Vi3pQ13KMxBWxrP74REyhKcgd2VLauFLMHbxD+GngcM2Pv6d5HCzyqhEoB9DHI5NmOhgaOJ4="
      }
   ]
}
DeleteMessage
POST https://queueservice.service.kr-west1.e.samsungsdscloud.com
Description
Delete message
Parameters
| Field name | Whether required | type | Explanation |
|---|---|---|---|
| QueueUrl | true | string | |
| ReceiptHandle | true | string |
Responses
| HTTP Code | Description | Schema |
|---|---|---|
| 200 | Created | |
| 400 | Bad Request | |
| 403 | Forbidden |
Example HTTP request
Request Header
"Scp-Accesskey:2sd2gg=2agbdSD26svcD",
"Scp-Signature:fsfsdf235f9U35sdgf35Xsf/qgsdgsdg326=sfsdr23rsef=",
"Scp-Timestamp:1605290625682",
"Scp-ClientType:user-api",
"Scp-Target:ScpQS.DeleteMessage"
Request Body
{
   "QueueUrl": "https://queueservice.kr-west1.dev3.samsungsdscloud.com/123e54b7303749f38ca59a5c6d419a75/test",
   "ReceiptHandle": "400tf1nY4HbXEP7UX4OtxPVIPlq9vw1eeKDFwNMeNiEuZvMSbvdPCBPVrfhxFxZ0XD7aBbEzP91Vi3pQ13KMxBWxrP74REyhKcgd2VLauFLMHbxD+GngcM2Pv6d5HCzyqhEoB9DHI5NmOhgaOJ4="
}
Example HTTP response
200 Response
DeleteMessageBatch
POST https://queueservice.service.kr-west1.e.samsungsdscloud.com
Description
Bulk message deletion
Parameters
| Field name | Whether required | type | Explanation |
|---|---|---|---|
| Entries | true | array of DeleteMessageBatchRequestEntry | |
| QueueUrl | true | string |
DeleteMessageBatchRequestEntry
| Field name | Whether required | type | Explanation |
|---|---|---|---|
| Id | true | string | |
| ReceiptHandle | true | string |
Responses
| HTTP Code | Description | Schema |
|---|---|---|
| 200 | Created | |
| 400 | Bad Request | |
| 403 | Forbidden |
Example HTTP request
Request Header
"Scp-Accesskey:2sd2gg=2agbdSD26svcD",
"Scp-Signature:fsfsdf235f9U35sdgf35Xsf/qgsdgsdg326=sfsdr23rsef=",
"Scp-Timestamp:1605290625682",
"Scp-ClientType:user-api",
"Scp-Target:ScpQS.DeleteMessageBatch"
Request Body
{
   "QueueUrl": "https://queueservice.kr-west1.dev3.samsungsdscloud.com/123e54b7303749f38ca59a5c6d419a75/test",
   "Entries": [
      {
         "Id": "1",
         "ReceiptHandle": "400tf1nY4HbXEP7UX4OtxPVIPlq9vw1eeKDFwNMeNiEuZvMSbvdPCBOF/P96FUF9XT7TALMzP91ViCxQjnOIyBWw+fr4EhihdJ0Z2QHau1LMHbxD+GngcMyJvqN5F17gym/YF4JoroeBXMSvIG0="
      },
      {
         "Id": "2",
         "ReceiptHandle": "400tf1nY4HbXEP7UX4OtxPVIPlq9vw1eeKDFwNMeNiEuZvMSbvdPCBOC8PwoFhV3Uj6JV+BnP90P3n1Q1y/RnhW0rv//GE6sf8EZjwfauVLMHbxD+GngcMyJvqN5F1Hs5T3vAZxgIV20IPdscTQ="
      }
   ]
}
Example HTTP response
200 Response
{
   "Failed": [],
   "Successful": [
      {
         "Id": "1"
      },
      {
         "Id": "2"
      }
   ]
}
4 - API Reference
5 - CLI Reference
6 - Release Note
Queue Service
- You can configure additional features when selecting a FIFO type.
- Content-based deduplication: Hash the message body content to remove duplicate messages.
- Duplicate removal scope setting: Set the scope (within the queue / per group) for removing duplicate messages.
- When sending FIFO-type messages, you can manage them by entering Message Group ID and Message Deduplication ID information.
- ServiceWatch service integration provided: You can monitor data through the ServiceWatch service.
- The Queue service feature has been added.
- Provides Private Service link ID information.
- Message retention and data key reuse period setting units have been refined, and a CIDR‑based modification feature for allowed IP addresses has been added.
- The Queue Service has been officially launched.
- Through the Queue Service, you can distribute system load caused by messages, enabling efficient message management in microservice architectures or event-driven systems.
- Message transmission and reception operate independently, improving responsiveness and processing speed.