This is the multi-page printable view of this section. Click here to print.
API Gateway
- 1: Overview
- 2: How-to guides
- 3: API Reference
- 4: CLI Reference
- 5: Release Note
1 - Overview
Service Overview
API Gateway is a service that easily creates, manages, and monitors APIs. It defines resources and methods related to APIs in a consistent manner, and can apply built-in security access. Additionally, it can easily and conveniently monitor API usage status and performance metrics.
Features
- Convenient API Management: Through the console, you can conveniently register and manage APIs, and provide JWT (Json Web Token) for access permission management. It is also linked with SCP Cloud Functions, allowing Cloud Functions function calls via API Gateway.
- Stable Traffic Handling: API Gateway can manage backend system traffic through usage plans. Usage plans can set the maximum number of calls per hour (hour/day/month), and this prevents excessive traffic from entering, enabling stable service usage.
- Easy and convenient monitoring: Provides a dashboard that allows you to manage various functions such as API version management that links different deployment versions per stage, and to monitor API usage status. Through this, you can easily and quickly identify performance metrics such as API calls, response times, and error counts.
Service Architecture Diagram
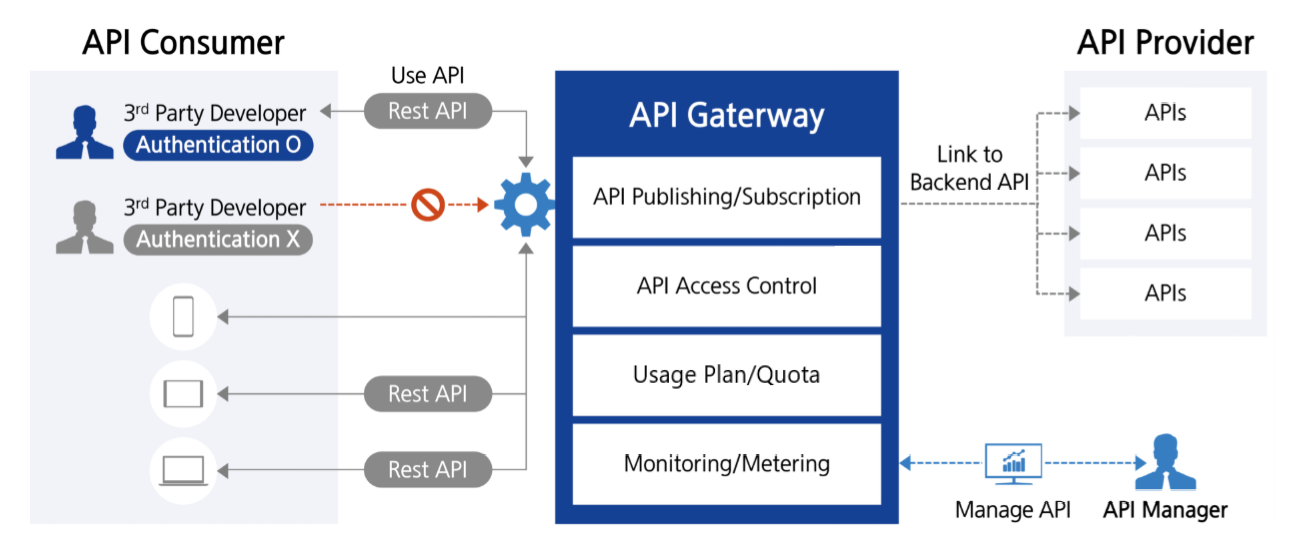
- The developer (3rd party Developer) can access various backend services via a single endpoint (API Gateway) using Rest API.
- API Gateway can route the request to an appropriate backend service or Cloud Function.
- If authentication and authorization are required, the user is verified with JWT.
- Request data is transformed as needed, or responses from multiple services are aggregated into one through the API Gateway.
- When traffic is high, you can apply load balancing and rate limiting to improve service stability.
- Supports web clients to call APIs from other domains through CORS settings.
- All requests and responses are logged and monitored in the API Gateway service, allowing rapid detection of failures and anomalies.
- By separating stages for each environment such as development, testing, and production, you can manage API versions and utilize the required version. API management, security policy application, etc., can be handled consistently centrally through the API Gateway service.
Provided Features
API Gateway provides the following features.
API Management and Operations
- Custom Domain Name: Connect a custom domain to the API to provide a unique URL for the user
- REST API creation and management: Define resources and methods (GET, POST, etc.) and set authentication method
- API version and stage management: Operate the same API in multiple versions simultaneously and manage changes
- Routing: Routing requests to various backend services based on the URI path or request headers
- Monitoring and Logging: API performance monitoring and logging possible (available December 2025)
API security
- IP ACL setting: Control to allow only specific IPs to access, enhancing security
Cloud Functions integration: Execute business logic in response to external requests by integrating with serverless computing
- CORS support: Set Cross-Origin Resource Sharing (CORS) to allow resource access from other domains
Components
API
An API is a collection of resources and methods integrated with backend HTTP endpoints, Cloud Functions, or other SCP services. APIs provide a logical interface to the actual service and are deployed across multiple stages, allowing use in various environments (development, production, etc.).
Resources
Resources are logical units that represent specific endpoints (URI paths) within an API. Each resource can be organized in a tree structure and can have multiple HTTP methods. For example, paths such as
/users
,
/orders
become individual resources.
Method
The method defines the HTTP actions (e.g., GET, POST, PUT, DELETE, etc.) that can be performed on each resource. Each method is integrated with a specific backend to process actual data or execute functionality.
Stage
The stage is a named reference to a specific point in time (snapshot) of an API deployment, distinguishing environments in the API lifecycle such as development (dev), testing (test), and production (prod). Each stage has its own unique URL, and separate settings per environment are possible for caching, logging, throttling, stage variables, etc. Stages support various operational scenarios such as environment-specific configurations and traffic segregation.
Endpoint
The endpoint is a unique URL address used by the client to access the API. A separate endpoint is created for each stage.
Integration
Integration defines how API methods connect to the actual backend (HTTP endpoints, Functions). Through request and response data transformation, authentication, mapping templates, etc., you can finely control the integration with the backend.
JWT (Json Web Token)
It is a token-based web standard (RFC 7519) used for authentication and authorization. JWT encodes a JSON object composed of three parts (Header, Payload, Signature) in Base64 URL-safe format, and prevents tampering by digitally signing with a secret key or public key. When securely exchanging authentication information and permissions between a server and client, or between services, it is used by placing them in the HTTP header, allowing stateless authentication without session storage.
CORS (Cross-Origin Resource Sharing)
It is a mechanism that bypasses the Same-Origin Policy applied in web browsers for security reasons, allowing resource sharing between servers of different origins (when protocol, domain, or port differ). The server specifies which origins’ requests are allowed through HTTP response headers (e.g., Access-Control-Allow-Origin, etc.), enabling the client (browser) to safely perform cross-origin requests. If CORS is not properly configured, the browser blocks requests for resources from other origins, which is a web standard security policy that must be considered when using various resources such as external API calls, fonts, images, and videos.
Regional Provision Status
API Gateway can be provided in the environments below.
| Region | Availability |
|---|---|
| Korea West 1 (kr-west1) | Provided |
| Korea East1 (kr-east1) | Provided |
| South Korea 1(kr-south1) | Not provided |
| South Korea 2(kr-south2) | Not provided |
| South Korea 3(kr-south3) | Not provided |
Preliminary Service
This is a list of services that can be optionally configured before creating the service. Please refer to the guide provided for each service for details and prepare in advance.
| Service Category | Service | Detailed Description |
|---|---|---|
| Compute | Cloud Functions | A service that runs application code in a serverless computing environment
|
2 - How-to guides
The user can enter the required information for the API Gateway service through the Samsung Cloud Platform Console, select detailed options, and create the service.
Create API
API is a collection of resources and methods integrated with backend HTTP endpoints, Cloud Functions, or other SCP services. API provides a logical interface to the actual service and can be deployed across multiple stages for use in various environments (development, production, etc).
You can create and use APIs from the Samsung Cloud Platform Console.
To create an API, follow these steps.
- All Services > Application Service > API Gateway Click the menu. Navigate to the Service Home page of API Gateway.
- Click the API Creation button on the Service Home page. You will be taken to the API Creation page.
- API creation On the page, enter the information required to create the service, and select detailed options.
- Service Information Input Select the required information in the area.
Category Required or notDetailed description API name Required Enter API name - Start with a lowercase English letter and ensure it does not end with a special character (
-); use lowercase letters, numbers, and the special character (-) to input 3 ~ 50 characters
API creation method Required Select API creation method - Create new, Duplicate existing API choose from
API to duplicate Required If you select Existing API Clone as the API creation method, select from already created APIs Description Optional Enter additional information or description about the API within 50 characters API endpoint type Required Path to access the API - Region: Request handling within the region where the API is deployed
- Private: Exposed so that the API can only be requested privately from other VPCs
- Selecting Private applies JWT activation
Table. API Service Information Input Items - Start with a lowercase English letter and ensure it does not end with a special character (
- Service Information Input Select the required information in the area.
- Additional Information Input Enter or select the required information in the area.
Category Required or notDetailed description Tag Select Add Tag - Add Tag button can be clicked to create and add a tag, or add an existing tag
- Up to 50 tags can be added
- Added new tags are applied after the service creation is completed
Table. API additional information input items
- Summary Check the detailed information and estimated billing amount generated in the panel, and click the Complete button.
- Once creation is complete, check the created resources on the API List page.
Check API detailed information
You can view and edit the full list of resources and detailed information of the API service. API Details page consists of Details, Tags, Activity Log tabs.
To view detailed information about the API service, follow these steps.
- Click the All Services > Application Service > API Gateway menu. Go to the Service Home page of API Gateway.
- Click the API menu on the Service Home page. Navigate to the API List page.
- Click the resource to view detailed information on the API List page. You will be taken to the API Details page.
- API Details page displays status information and additional feature information, and consists of Details, Tags, Activity History tabs.
Category Detailed description Status Display Status of user-created API - Creating: API being created
- Active: API operating normally
- Deleting: API being deleted
- Error: API internal error occurred, operation not possible
Service Termination Button to cancel the service Table. API status information and additional functions
- API Details page displays status information and additional feature information, and consists of Details, Tags, Activity History tabs.
Detailed Information
API Details page에서 선택한 자원의 상세 정보를 확인하고, 필요한 경우 정보를 수정할 수 있습니다.
| Category | Detailed description |
|---|---|
| Service | Service Name |
| Resource Type | Resource Type |
| SRN | Unique resource ID in Samsung Cloud Platform |
| Resource Name | Resource Name |
| Resource ID | Unique resource ID in the service |
| Creator | User who created the service |
| Creation Date/Time | Service Creation Date/Time |
| Editor | User who modified the service information |
| Modification Date/Time | Date/Time Service Information Was Modified |
| API name | API name |
| API endpoint type | API endpoint type |
| DNS status | DNS status
|
| Description | Additional information or description about the API |
Connection Management
Connection Management page allows you to manage connection requests for the PrivateLink Service for API Gateway.
| Category | Detailed description |
|---|---|
| Request Endpoint ID | Requested Endpoint ID |
| Creation Time | Service Creation Time |
| Status | Resource status value |
| Reject | PrivateLink Service connection request denied |
| Approval | PrivateLink Service connection request approval |
| Block | Block connected PrivateLink Endpoint |
| Reconnect | Reconnect blocked PrivateLink Endpoint |
- If the connection status is Rejected, Error, requests such as approval/rejection are not possible.
Tag
API Details page allows you to view the tag information of the selected resource, and you can add, modify, or delete it.
| Category | Detailed description |
|---|---|
| Tag List | Tag List
|
Work History
You can view the operation history of the selected resource on the API Details page.
| Category | Detailed description |
|---|---|
| Work History List | Resource Change History
|
PrivateLink Service Integration
By linking the API Gateway service with the PrivateLink service, you can connect ‘API Gateway and VPC’ or ‘API Gateway and other SCP services’ without external internet. Data uses only the internal network, so security is high, and public IP, NAT, VPN, internet gateway, etc. are not required.
Create PrivateLink service for API Gateway
When creating an API, select the endpoint type as Private. This allows you to expose the API so it can be accessed privately from other VPCs or services.
- You can designate it as the target of a Private Endpoint to use the internal network. For how to create a PrivateLink Endpoint in your VPC, refer to Create PrivateLink Endpoint.
- For connection management of PrivateLink Service for API Gateway, see Check API Details > Connection Management.
Creating PrivateLink Endpoint
You can create it to use the Entry Point for accessing other PrivateLinks in the API Gateway service.
To create a PrivateLink Endpoint, follow these steps.
All Services > Application Service > API Gateway Click the menu. Go to the Service Home page of API Gateway.
Click the PrivateLink Endpoint menu on the Service Home page. Navigate to the PrivateLink Endpoint List page.
On the PrivateLink Endpoint List page, click the Create PrivateLink Endpoint button. You will be taken to the Create PrivateLink Endpoint page.
- Please enter or select the required information.
Category Required or notDetailed description PrivateLink Endpoint name Required Enter PrivateLink Endpoint name - Enter using English letters and numbers, 3 to 20 characters
Description Selection Enter additional information or description within 50 characters PrivateLink Service ID Required Enter the ID of the PrivateLink Service to connect - Confirm the Service ID with the PrivateLink Service provider in advance, and after creating the Endpoint, provide the Endpoint ID to the provider
- Enter using English letters and numbers, 3 to 60 characters
Table. PrivateLink Endpoint Creation Information Input Items
- Please enter or select the required information.
When the information entry or selection is completed, click the Confirm button.
After checking the message in the notification popup, click the Confirm button.
- When creation is complete, check the created resource in the PrivateLink Endpoint list.
- To delete the PrivateLink Endpoint list, select the resource to delete from the list and click the Delete button.
- To request a connection to the service provider via PrivateLink, you must go through an approval process.
- When applying for a service connection, you must verify the PrivateLink Service ID of the target in advance.
- Before applying for the service, an agreement on usage with the service provider must be completed.
- After the user creates a PrivateLink Endpoint, they must deliver the Endpoint ID to the service provider. The service provider can verify the user’s Endpoint ID and quickly proceed with usage approval.
PrivateLink Endpoint Detailed Information Check
PrivateLink Endpoint’s full resource list and detailed information can be viewed and edited. PrivateLink Endpoint Details page consists of Details and Operation History tabs.
To view detailed information about the API service, follow these steps.
- All Services > Application Service > API Gateway menu. Go to the Service Home page of API Gateway.
- Click the PrivateLink Endpoint menu on the Service Home page. PrivateLink Endpoint List page로 이동합니다.
- PrivateLink Endpoint List page, click the resource to view detailed information. PrivateLink Endpoint Details page will be opened.
- PrivateLink Endpoint Details page displays status information and additional feature information, and consists of Detail Information and Operation History tabs.
Category Detailed description Status Display Status of PrivateLink Endpoint - Requesting: Connection request/approval pending, Cancel Request button displayed
- Active: Creation completed, operating
- Creating: Creating
- Deleting: Deleting
- Disconnected: Connection blocked
- Rejected: Connection rejected, Re-request Approval button displayed
- Error: Error occurred
- Canceled: Connection request canceled, Re-request Approval button displayed
Cancel request Cancel connection request Approval Re-request Re-request connection after the connection request was canceled Table. PrivateLink Endpoint status information and additional features
Detailed Information
PrivateLink Endpoint Details page allows you to view detailed information of the selected resource.
| Category | Detailed description |
|---|---|
| Service | Service Name |
| Resource Type | Resource Type |
| SRN | Unique resource ID in Samsung Cloud Platform |
| Resource Name | Resource Name |
| Resource ID | Unique resource ID in the service |
| Creator | User who created the service |
| Creation Date/Time | Service Creation Date/Time |
| Editor | User who modified the service information |
| Modification Time | Date/Time Service Information Modified |
| PrivateLink Endpoint name | PrivateLink Endpoint name |
| PrivateLink Endpoint ID | PrivateLink Endpoint ID |
| PrivateLink Service ID | Connected PrivateLink Service ID |
| API endpoint type | API endpoint type |
| Description | Additional information or description about the PrivateLink Endpoint |
Work History
You can view the operation history of the selected resource on the PrivateLink Endpoint Details page.
| Category | Detailed description |
|---|---|
| Work History List | Resource Change History
|
Create Resource
The resource is a logical unit representing a specific endpoint (URI path) within an API. Each resource can be organized in a tree structure and can have multiple HTTP methods.
To create a resource, follow the steps below.
All Services > Application Service > API Gateway Click the menu. Navigate to the Service Home page of API Gateway.
Click the API Gateway > Resources menu on the Service Home page. Navigate to the Resources page.
On the Resource page, click the Create Resource button. You will be taken to the Create Resource popup.
- Please enter or select the required information.
Category RequiredDetailed description Resource Name Required Enter Resource Name - Start with a lowercase English letter and use lowercase letters, numbers, and special characters (
-{}) to input 3 ~ 50 characters
- When using braces, only the
{character}format is allowed and it cannot be left empty
Resource Path Required Select the path chosen from the resource menu tree Table. Resource creation information input items - Start with a lowercase English letter and use lowercase letters, numbers, and special characters (
- Please enter or select the required information.
If the information entry and selection are completed, click the Confirm button.
After checking the message in the notification popup, click the Confirm button.
- Once creation is complete, check the created resource in the resource list.
- To delete a resource, select the resource to delete from the list and click the Delete button.
- Resources can be created up to a maximum of 300.
- The depth of resources is up to 30, including the Root.
Create Method
Methods define the HTTP actions (e.g., GET, POST, PUT, DELETE, etc.) that can be performed on each resource. Each method is integrated with a specific backend to process actual data or execute functionality.
To create a method, follow these steps.
All Services > Application Service > API Gateway Click the menu. Navigate to the API Gateway’s Service Home page.
Service Home page, click the API Gateway > Resources menu. Navigate to the Resources page.
Click the Create Method button on the Resources page. It moves to the Create Method popup.
- Please enter or select the required information.
Category Required or notDetailed description Method Type Required Select Method Type - Previously generated values are not displayed in the list.
- Selecting ANY creates methods of all types.
Integration Type Required Endpoint Type Selection - Choose from HTTP, Cloud Function, PrivateLink
Endpoint URL Required HTTP type is selected, enter endpoint URL - An endpoint is a unique URL used by the client to access the API. A separate endpoint is created for each stage. Various types such as Regional, Edge-Optimized, Private, etc.
- Must be a valid URL starting with http:// or https://, entered within 500 characters using English letters and special characters (
$-_.+!*’:(){}/)
Endpoint Required Cloud Function type selected case endpoint selection - Region is provided as the current region and cannot be changed
URL query string parameter Select Use after checking, enter Name - Enter using English letters, numbers, special character (
_)
HTTP request header Select After checking Use, enter Name - Enter using English letters, numbers, and special characters (
-)
API Key usage status Select Check Use to limit usage through usage policy Table. Method creation information input items
- Please enter or select the required information.
When the information input and selection are completed, click the Save button.
After checking the message in the notification popup, click the Confirm button.
- Once creation is complete, check the created resource in the method list.
- To delete a method, select the resource to delete from the list and click the Delete button.
Methods can be generated up to a maximum of 7, one per type. When generated as Any, it creates methods of all types.
| Category | Detailed description |
|---|---|
| Service | Service Name |
| GET | Resource retrieval (read) |
| POST | Resource creation (registration) |
| PUT | Replace entire resource (update) |
| PATCH | Partially modify only part of the resource |
| DELETE | Delete Resource |
| OPTIONS | Retrieve list of HTTP methods supported by this endpoint |
| HEAD | Retrieve only headers without body (return only metadata without response body) |
Deploy API
To reflect a developing API in the actual service environment, API deployment is required.
To deploy the generated API, follow the steps below.
Click the All Services > Application Service > API Gateway menu. You will be taken to the Service Home page of API Gateway.
Click the API Gateway > Resources menu on the Service Home page. Navigate to the Resources page.
Click the Resources page API Deploy button. It will navigate to the API Deploy popup window.
- Please enter or select the required information.
Category Required or notDetailed description Stage Required Select stage to deploy API - New Stage: Deploy by creating a new stage
- None Stage: Deploy without selecting a stage
Stage Name Required If New Stage is selected, enter new stage name - Start with a lowercase English letter and ensure it does not end with a special character (
-); use lowercase letters, numbers, and the special character (-) to input 3 to 30 characters
Deployment Description Optional Enter additional information or description about the API deployment within 50 characters Table. API deployment information input items
- Please enter or select the required information.
If the information input and selection are completed, click the Deploy button.
After checking the message in the notification popup, click the Confirm button.
Create Stage
The stage is a named reference to a specific point in time (snapshot) of an API deployment, distinguishing environments in the API lifecycle such as development (dev), testing (test), production (prod). Each stage has a unique URL, and separate settings per environment are possible, such as caching, logging, throttling, stage variables, etc. Through stages, various operational scenarios are supported, including Canary releases, environment-specific configurations, and traffic segregation.
To create a stage for deploying the API, follow the steps below.
Click the All Services > Application Service > API Gateway menu. Go to the Service Home page of API Gateway.
Service Home page, click the API Gateway > Stage menu. Navigate to the Stage page.
Click the Create Stage button on the Stage page. It moves to the Create Stage popup window.
- Please enter or select the required information.
Category RequiredDetailed description Stage Name Required If New Stage is selected, enter new stage name - Start with a lowercase English letter and do not end with a special character (
-); use lowercase letters, numbers, and the special character (-) to input 3 to 50 characters
Stage Description Select Enter additional information or description about the stage within 100 characters API deployment version Required Select API version to deploy - Enter 3 ~ 50 characters using lowercase letters, numbers and hyphens (
-), starting with a lowercase letter and not ending with a hyphen
Table. Stage creation information input items - Start with a lowercase English letter and do not end with a special character (
- Please enter or select the required information.
If the information entry and selection are completed, click the Confirm button.
After checking the message in the notification popup, click the Confirm button.
- Once creation is complete, check the created resources in the stage list.
Check Stage Detailed Information
You can view and edit the stage list and detailed information. The detail page consists of Stage Details information and API Deployment Version Management, CORS, Usage Policy tabs.
To view the detailed information of the stage, follow the steps below.
- All Services > Application Service > API Gateway menu. Go to the Service Home page of API Gateway.
- Click the API Gateway > 스테이지 menu on the Service Home page. Navigate to the 스테이지 page.
- Click the resource to view detailed information in the stage list.
- Stage Details displays status information and information about additional features, and consists of API Deployment Version Management, CORS, Usage Policy tabs.
- To delete a stage, select the resource to delete from the list and click the Delete button.
- To edit the stage, select the resource to edit from the list and click the Edit button.
Stage Details
Stage Details page allows you to view detailed information of the selected resource.
| Category | Detailed description |
|---|---|
| Stage name | Stage name |
| CORS | CORS operation status |
| Stage Description | Stage Information |
| JWT | JSON Web Token usage status |
| API Key | API Key usage |
| Invoke URL | URL for API call |
| Activation Date/Time | Stage Activation Date/Time |
| Deployment ID | API Deployment ID |
API deployment version management
You can view the API deployment history in the API Deployment Version Management tab.
| Category | Detailed description |
|---|---|
| API Deployment Version Management List | API Deployment History
|
| Deployment Change | After selecting the resource to change deployment from the list, click the Deployment Change button. In the notification popup, click the Confirm button to immediately update the active deployment ID. |
CORS (Cross-Origin Resource Sharing)
You can check the CORS list in the CORS tab.
| Category | Detailed description |
|---|---|
| Name | CORS Name |
| Mapping Value | Mapping value applied to CORS |
Usage Policy
Usage Policy tab, you can view the usage policies attached to the stage.
| Category | Detailed description |
|---|---|
| Usage Policy Name | Usage Policy Name |
| Usage Policy ID | Usage Policy ID |
| Quota | Quota set in the usage policy |
| Connected API Key Name | API Key name linked to usage policy |
- When calling the API, you must call with the ‘x-scp-apikey’ header using the Key value of the API Key connected to the stage.
- The usage policy is linked per stage, but the quota is calculated per method checked for API Key usage.
Create Authentication
JWT (JSON Web Token) is an open standard (RFC 7519) used for user authentication. JWT is a claim-based web token that uses JSON format to store user information as an encrypted token.
To create a JWT, follow these steps.
All Services > Application Service > API Gateway Click the menu. Navigate to the Service Home page of API Gateway.
On the Service Home page, click the API Gateway > Authentication menu. Navigate to the Authentication List page.
On the Authentication List page, click the Create JSON Web Token button. You will be taken to the Create JSON Web Token popup.
- Please enter or select the required information.
Category RequiredDetailed description JWT name Required Enter token name - Enter 3 ~ 50 characters using lowercase letters, numbers, and the special character (
-), starting with a lowercase English letter and not ending with the special character (-)
Stage to connect Select After checking Use, select the stage Table. Authentication Creation Information Input Items - Enter 3 ~ 50 characters using lowercase letters, numbers, and the special character (
- Please enter or select the required information.
If the information entry and selection are completed, click the Confirm button.
After checking the message in the notification popup, click the Confirm button. Move to the Access Token notification popup.
- Tokens can only be viewed in the Access Token notification popup. If needed, download the Access Token file.
Access Token After checking the message in the notification popup, click the Confirm button.
- When creation is complete, check the created resource in the certification list.
- To delete a token, select the resource to delete from the list and click the Delete button.
- To edit a token, select Edit from the context menu of the resource you want to edit.
Create Access Control
You can add an allowed IP to restrict API calls to only be made from a specific IP.
- The stage is connected to a single access control. When the stage is first created, the default access control is applied by default, blocking access for all IPs (All deny). If you create a new access control and connect it to the stage, you can configure it to be called only from specific IPs.
- Access control cannot be created in the following cases.
- If you exceed the available service quota limit: Check the current allocated value and the additional possible value in the Quota Service.
- If there is no available API: create the API first.
- If the API endpoint type is Private: access control is not supported, but JWT activation is required on the stage of that API.
To create access control, follow the steps below.
All Services > Application Service > API Gateway menu, click it. Go to the Service Home page of API Gateway.
Click the API Gateway > Access Control menu on the Service Home page. Navigate to the Access Control List page.
Access Control List page, click the Create Access Control button. It will navigate to the Create Access Control popup.
- Please enter or select the required information.
Category Required or notDetailed description Access Control Name Required Enter Access Control Name - Start with a lowercase English letter and ensure it does not end with a special character (
-); use lowercase letters, numbers, and the special character (-) to input 3 ~ 50 characters
Public Access Allowed IP Required Enter IP(s) to allow access - You can enter up to 100 using ‘,’
Stage to connect Select After checking Use, select the stage Description Select Enter additional information or description about access control within 50 characters Table. Access Control Creation Information Input Items - Start with a lowercase English letter and ensure it does not end with a special character (
- Please enter or select the required information.
If the information entry and selection are completed, click the Confirm button.
After checking the message in the notification popup, click the Confirm button.
- When creation is complete, check the created resource in the access control list.
- To delete an access control list, select the resource to delete from the list and click the Delete button. Default access control cannot be deleted.
- To modify access control, select Edit from the context menu of the resource you want to modify.
Cancel API
You can cancel the unused service to reduce operating costs. However, if you cancel the service, the service currently in operation may be stopped immediately, so you should proceed with the cancellation after fully considering the impact that may occur when the service is discontinued.
To cancel the API, follow the steps below.
- Click the All Services > Application Service > API Gateway menu. Go to the Service Home page of API Gateway.
- On the Service Home page, click the API menu. Navigate to the API List page.
- API List page, select the resource to cancel, and click the Cancel Service button.
- When the termination is complete, check on the API List page whether the resource has been terminated.
Using Report
You can check API traffic, performance, and error status.
To use Report, follow these steps.
- Click the All Services > Application Service > API Gateway menu. Go to the Service Home page of API Gateway.
- Click the API Gateway > Report menu on the Service Home page. Go to the Report page.
- Please enter or select the required information.
| Category | Detailed description |
|---|---|
| Inquiry period | Select date to query (default 1 week from current date, up to one month possible) |
| Stage Name | Stage name under API |
- Once the information input and selection are completed, you can check the Report information.
| Category | Detailed description |
|---|---|
| TOP Resource 5 | Among the resources called by the user, the top 5 most frequently called where the API status code is 2XX (in case of ties, duplicate rankings are not shown) |
| API call count | Number of calls with API status code 2XX |
| Latency | Time taken from when the user sends a request to the API Gateway until receiving a response |
| Integration Latency | The time taken from the moment API Gateway sends a request to the backend server until it receives a response from the backend. |
| 4XX Error | Number of calls with API status code 4XX |
| 5XX Error | Number of calls with API status code 5XX |
- If the stage is deleted, it cannot be viewed in the Report.
- Report shows data from one hour ago from the current point in time.
Create usage policy
The usage policy is established to ensure efficient distribution of server resources, secure service stability, prevent unnecessary traffic, and prevent misuse.
To create a usage policy, follow the steps below.
- All Services > Application Service > API Gateway Click the menu. Go to the Service Home page of API Gateway.
- Service Home page, click the API Gateway > Usage Policy menu. Usage Policy page will be opened.
- Click the Create Usage Policy button on the Usage Policy page. You will be taken to the Create Usage Policy page.
- Please enter or select the required information.
| Category | Required or not | Detailed description |
|---|---|---|
| API name to connect | Required | Select from created AIP |
| Usage Policy Name | Required | Enter 3 ~ 50 characters, starting with a lowercase English letter, not ending with a hyphen, using lowercase letters, numbers, and hyphens |
| Quota | Required | Enter a value between 1 ~ 2,000,000,000 based on monthly/daily/hourly basis |
| Description | Select | Enter a description of the usage policy within 50 characters |
- If the information input and selection are completed, click the Complete button.
- After checking the message in the notification popup, click the Confirm button.
- Once creation is complete, check the created resource in the usage policy list.
Create API Key
API keys are used to identify which user or app is calling the API. They are primarily used to limit usage according to usage policies.
To create an API Key, follow the steps below.
- All Services > Application Service > API Gateway Click the menu. Navigate to the Service Home page of API Gateway.
- Click the API Gateway > Usage Policy menu on the Service Home page. You will be taken to the Usage Policy page.
- Click the usage policy in the list. Go to the Usage Policy Details page.
- Usage Policy Details page, click the Create API Key button. You will be taken to the Add API Key popup.
- Please enter or select the required information.
| Category | Required or not | Detailed description |
|---|---|---|
| API Key name | Required | Enter 3 ~ 50 characters using lowercase letters, numbers, and hyphens, starting with a lowercase English letter and not ending with a hyphen |
| Description | Select | Enter a description of the API Key within 50 characters |
- When the information entry and selection are completed, click the Confirm button.
- After checking the message in the notification popup, click the Confirm button.
- When creation is complete, check the created resources on the Usage Policy Details page.
- Usage policies can be created up to 10, and API Keys up to 5.
- Quota is calculated per API Key.