You can easily manage and monitor APIs for integration with applications, and efficiently consolidate the management of corporate assets such as data, software, and applications.
This is the multi-page printable view of this section. Click here to print.
Application Service
- 1: API Gateway
- 1.1: Overview
- 1.1.1: ServiceWatch metric
- 1.2: How-to guides
- 1.2.1: Resource-Based Policy Guide
- 1.3: API Reference
- 1.4: CLI Reference
- 1.5: Release Note
- 2: Queue Service
- 2.1: Overview
- 2.1.1: ServiceWatch Metrics
- 2.2: How to guides
- 2.3: Message API reference
- 2.4: API Reference
- 2.5: CLI Reference
- 2.6: Release Note
1 - API Gateway
1.1 - Overview
Service Overview
API Gateway is a service that makes it easy to create, manage, and monitor APIs. It allows you to define API-related resources and methods in a consistent format and apply built-in security access. Additionally, you can easily and conveniently monitor API usage and performance metrics.
Features
- Convenient API Management: You can conveniently register and manage APIs through the console, and it provides JWT (Json Web Token) for access permission management. It is also integrated with SCP Cloud Functions, allowing Cloud Functions to be invoked via the API Gateway.
- Stable Traffic Handling: API Gateway can manage backend system traffic through usage plans. Usage plans allow you to set the maximum number of calls per hour (hourly/daily/monthly), and by doing so, they prevent excessive traffic from entering, enabling stable service usage.
- Easy and convenient monitoring: Provides a dashboard with various management features, including API version management that links different deployment versions per stage, and allows you to monitor API usage. Through this, you can quickly and easily understand performance metrics such as API calls, response times, and error counts.
Service Diagram
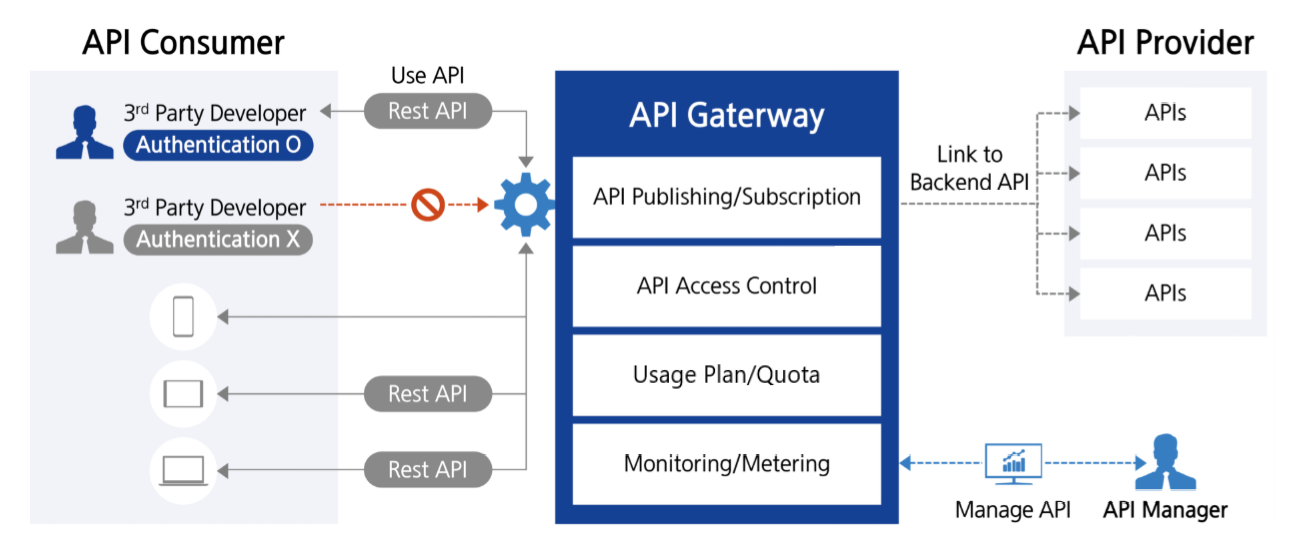
- A developer (3rd party Developer) can access various backend services via a single endpoint (API Gateway) using Rest API.
- API Gateway can route the request to the appropriate backend service or Cloud Function.
- When authentication and authorization are required, the user is verified with JWT.
- Request data is transformed as needed, and responses from multiple services are aggregated into a single result through the API Gateway.
- When traffic is high, you can improve service reliability by applying load balancing and rate limiting (rate limiting).
- Supports web clients calling APIs from other domains via CORS configuration.
- All requests and responses are logged and monitored by the API Gateway service, enabling rapid detection of failures and anomalies.
- You can separate stages by environment—development, testing, production—to manage API versions and utilize the required version. API management, security policy enforcement, and related tasks can be handled consistently from a central point through the API Gateway service.
Provided features
API Gateway provides the following features.
API Management and Operations
- Custom Domain Name: Connect a custom domain to the API to provide a unique URL for the user
- REST API Creation and Management: Define resources and methods (GET, POST, etc.) and configure authentication methods
- API version and stage management: Operate the same API in multiple versions simultaneously and manage changes.
- Routing: Route requests to various backend services based on the URI path or request headers.
- Monitoring and Logging: API performance monitoring and log recording possible(‘available in December 2025)
API security
- IP ACL configuration: Control access so that only specific IPs can connect, enhancing security.
- Cloud Functions Integration: Integrate with serverless computing to execute business logic in response to external requests
- CORS Support: Set Cross-Origin Resource Sharing(CORS) to allow resource access from other domains
Component
API
An API is a collection of resources and methods integrated with backend HTTP endpoints, Cloud Functions, or other SCP services. An API provides the logical interface of the actual service and can be deployed to multiple stages for use in various environments (development, production, etc.).
resource
Resources are logical units that represent specific endpoints (URI paths) within an API. Each resource can be organized in a tree structure and can have multiple HTTP methods. For example,
/users
,
/orders
become individual resources.
Method
Methods define the HTTP actions (e.g., GET, POST, PUT, DELETE, etc.) that can be performed on each resource. Each method is integrated with a specific backend to process actual data or execute functionality.
Stage
The stage is a named reference to a specific point in time (snapshot) of an API deployment, distinguishing environments in the API lifecycle such as development (dev), testing (test), and production (prod). Each stage has its own unique URL, and separate settings can be configured per environment, including caching, logging, throttling, stage variables, and so on. Stages support various operational scenarios such as environment-specific configurations and traffic segregation.
endpoint
An endpoint is a unique URL address that a client uses to access the API. A separate endpoint is created for each stage.
Integration
Integration defines how API methods connect to the actual backend (HTTP endpoint, Function). By transforming request and response data, handling authentication, and using mapping templates, you can finely control the integration with the backend.
JWT (Json Web Token)
It is a token-based web standard (RFC 7519) used for authentication and authorization. JWT encodes a JSON object composed of three parts (Header, Payload, Signature) using Base64 URL‑safe encoding, and applies an electronic signature with a secret key or public key to prevent tampering. When securely exchanging authentication information and permissions between a server and client, or between services, it is placed in the HTTP header, enabling stateless (Stateless) authentication without session storage.
CORS (Cross-Origin Resource Sharing)
It is a mechanism that bypasses the Same-Origin Policy applied in web browsers for security reasons, allowing resource sharing between servers of different origins (when the protocol, domain, or port differs). The server specifies which origins are allowed via HTTP response headers (e.g., Access-Control-Allow-Origin, etc.), enabling the client (browser) to safely perform cross-origin requests. If CORS is not properly configured, the browser blocks requests for resources from other origins, which is a web-standard security policy that must be considered when using various resources such as external API calls, fonts, images, and videos.
Provision status by region
API Gateway is available in the environments below.
| region | Provision status |
|---|---|
| Korea West 1 (kr-west1) | Provide |
| Korea East 1 (kr-east1) | Provide |
| South Korea 1 (kr-south1) | Not provided |
| South Korea South 2 (kr-south2) | Not provided |
| South Korea South 3 (kr-south3) | Not provided |
Table. API Gateway regional availability status
Preliminary Service
This is a list of services that can be optionally configured before creating the service. Please refer to the guide provided for each service and prepare in advance.
| Service Category | service | Detailed description |
|---|---|---|
| Compute | Cloud Functions | A service that runs application code in a serverless computing environment
|
Table. API Gateway pre-service
1.1.1 - ServiceWatch metric
API Gateway sends metrics to ServiceWatch. The metrics provided by basic monitoring are data collected at 1‑minute intervals.
Reference
Refer to the ServiceWatch guide for checking metrics in ServiceWatch.
Basic Metrics
The following are the default metrics for the API Gateway namespace.
The metrics whose names are displayed in bold below are the key metrics selected from the default metrics provided by API Gateway. Key metrics are used to configure service dashboards that are automatically built for each service in ServiceWatch.
Each metric guides users via the user guide on which statistical value is meaningful when querying that metric, and among the meaningful statistics, the values displayed in bold are the primary statistics. In the service dashboard, you can view key metrics using primary statistical values.
| Performance items | Detailed description | unit | meaningful statistics |
|---|---|---|---|
| API Total Requests | Total number of calls for this API | Count |
|
| 4XX Error | Number of calls that received a 4XX error response from the API | Count |
|
| 5XX Error | Number of calls that received a 5XX error response from the API | Count |
|
| Latency | Total latency of the API (ms) | Milliseconds |
|
| Integration Latency | Latency (ms) from the API to the backend | Milliseconds |
|
Table. API Gateway basic metrics
1.2 - How-to guides
Through the Samsung Cloud Platform Console, users can enter the required information for the API Gateway service and select detailed options to create the service.
Create API
An API is a collection of resources and methods integrated with backend HTTP endpoints, Cloud Functions, or other SCP services. An API provides the logical interface of the actual service and can be deployed across multiple stages for use in various environments (development, production, etc.).
You can create an API in the Samsung Cloud Platform Console and use it.
To create an API, follow these steps.
- Click the All Services > Application Service > API Gateway menu. Navigate to the Service Home page of API Gateway.
- On the Service Home page, click the Create API button. Navigate to the Create API page.
- On the API creation page, enter the information required to create a service and select detailed options.
- Select the required information in the Service Information Input area.
Category RequiredDetailed description API name Required Enter API name - must start with a lowercase English letter and must not end with a special character (
-), using lowercase letters, numbers, and special characters (-) to enter 3 ~ 50 characters
How to create an API Required Select API creation method - Select Create new or Clone existing API
API to clone Required If you select Existing API Replication as the API creation method, choose from the APIs that have already been created. Explanation Selection Enter additional information or description about the API within 50 characters. API endpoint type Required Path to access the API - Region: Process requests within the region where the API is deployed
- Private: Expose the API so it can only be requested privately from other VPCs
- Selecting Private enables JWT activation
Table. API Service Information Input Items - must start with a lowercase English letter and must not end with a special character (
- Select the required information in the Service Information Input area.
- In the Additional Information Input area, enter or select the required information.
Category Required statusDetailed description tag Selection Add Tag - Click the Add Tag button to create and add a new tag, or to add an existing tag.
- You can add up to 50 tags.
- The newly added tags are applied after the service creation is completed.
Table. API additional information input fields
- Summary Check the detailed information and estimated billing amount generated in the panel, and click the Complete button.
- When creation is complete, check the created resource on the API List page.
Check API detailed information
You can view and edit the complete list of resources and detailed information for the API service. The API Details page consists of Details, Tags, Activity Log tabs.
To view detailed information about the API service, follow these steps.
- Click the All Services > Application Service > API Gateway menu. Navigate to the Service Home page of API Gateway.
- On the Service Home page, click the API menu. You will be taken to the API List page.
- On the API List page, click the resource you want to view detailed information for. You will be taken to the API Details page.
- API Details page displays status information and additional feature information, and consists of Details, Tags, Activity History tabs.
Category Detailed description Status display Status of the API created by the user - Creating: API creation in progress
- Active: API operating normally
- Deleting: API deletion in progress
- Error: API is in an unavailable state due to an internal error
Service termination Cancel service button Table. API status information and additional features
- API Details page displays status information and additional feature information, and consists of Details, Tags, Activity History tabs.
Detailed Information
On the API Details page, you can view the detailed information of the selected resource and, if needed, edit the information.
| Category | Detailed description |
|---|---|
| service | Service name |
| Resource Type | Resource Type |
| SRN | Unique resource ID in Samsung Cloud Platform |
| Resource name | Resource name |
| Resource ID | Unique resource ID in the service |
| constructor | User who created the service |
| Creation date and time | Service creation date and time |
| editor | User who edited the service information |
| Modification date | Date and time the service information was modified |
| API name | API name |
| API endpoint type | API endpoint type |
| DNS status | DNS status
|
| description | Additional information or description about the API |
Table. API Details Tab Items
Connection Management
Connection Management page lets you manage connection requests for the PrivateLink Service for API Gateway.
| Category | Detailed description |
|---|---|
| Request Endpoint ID | Requested endpoint ID |
| Creation date and time | Service creation date and time |
| status | Resource status value |
| Reject | PrivateLink Service connection request denied |
| Approval | Approve PrivateLink Service connection request |
| Block | Block connected PrivateLink Endpoint |
| Reconnect | Reconnect the blocked PrivateLink Endpoint |
Table. API Connection Management Tab Items
Reference
- When the connection status is Rejected or Error, requests such as approval or denial are not possible.
tag
API Details page lets you view the tag information of the selected resource, and add, modify, or delete it.
| Category | Detailed description |
|---|---|
| Tag list | Tag list
|
Table. API Tag Tab Detailed Information Items
Job History
On the API Details page, you can view the operation history of the selected resource.
| Category | Detailed description |
|---|---|
| Task History List | Resource Change History
|
Table. API operation history tab detailed information items
Integrating PrivateLink Service
By integrating the API Gateway service with the PrivateLink service, you can connect ‘API Gateway and VPC’ or ‘API Gateway and other SCP services’ without using the external internet. Data uses only the internal network, enhancing security, and no public IP, NAT, VPN, or internet gateway is required.
Create a PrivateLink service for API Gateway
When creating an API, select the endpoint type as Private. This allows you to expose the API for private access from other VPCs or services.
Reference
- Private Endpoint can be designated as a target to use the internal network. For instructions on creating a PrivateLink Endpoint in a user VPC, refer to Create PrivateLink Endpoint.
- For managing connections to the PrivateLink Service for API Gateway, refer to API 상세 정보 확인하기 > 연결 관리.
Create PrivateLink Endpoint
You can create it to use the Entry Point for accessing other PrivateLinks in the API Gateway service.
To create a PrivateLink Endpoint, follow these steps.
Click the All Services > Application Service > API Gateway menu. Navigate to the Service Home page of API Gateway.
Click the PrivateLink Endpoint menu on the Service Home page. You will be taken to the PrivateLink Endpoint List page.
On the PrivateLink Endpoint List page, click the PrivateLink Endpoint Create button. You will be taken to the PrivateLink Endpoint Create page.
- Enter or select the required information.
Category RequiredDetailed description PrivateLink Endpoint name Required Enter PrivateLink Endpoint name - Enter using English letters and numbers, 3 to 20 characters
description Selection Enter additional information or description within 50 characters. PrivateLink Service ID Required Enter the ID of the PrivateLink Service to connect - Check the Service ID with the PrivateLink Service provider in advance, and after creating the Endpoint, provide the Endpoint ID to the provider
- Enter using letters and numbers, 3 to 60 characters
Table. PrivateLink Endpoint creation information input items
- Enter or select the required information.
When data entry or selection is complete, click the Confirm button.
After checking the message in the notification popup, click the Confirm button.
- Once creation is complete, verify the created resource in the PrivateLink Endpoint list.
- To delete a PrivateLink Endpoint list, select the resource to delete from the list and click the Delete button.
Reference
- To request a connection to the service provider via PrivateLink, you must go through an approval process.
- When applying for a service connection, you must verify the PrivateLink Service ID of the target in advance.
- Before applying for the service, an agreement on usage with the service provider must be completed.
- After the user creates a PrivateLink Endpoint, they must provide the Endpoint ID to the service provider. The service provider can verify the user’s Endpoint ID and promptly approve its use.
Check detailed information of PrivateLink Endpoint
You can view and edit the full list of resources and detailed information for a PrivateLink Endpoint. The PrivateLink Endpoint Details page consists of Detailed Information and Operation History tabs.
To view detailed information about the API service, follow these steps.
- Click the All Services > Application Service > API Gateway menu. Navigate to the Service Home page of API Gateway.
- Click the PrivateLink Endpoint menu on the Service Home page. You will be taken to the PrivateLink Endpoint List page.
- On the PrivateLink Endpoint List page, click the resource to view detailed information. You will be taken to the PrivateLink Endpoint Details page.
- PrivateLink Endpoint Details page displays status information and additional feature information, and consists of Details and Activity Log tabs.
Category Detailed description Status display PrivateLink Endpoint status - Requesting: connection request pending approval, Cancel request button displayed
- Active: creation completed, operating
- Creating: in progress
- Deleting: deletion in progress
- Disconnected: connection blocked
- Rejected: connection denied, Request re-approval button displayed
- Error: error occurred
- Canceled: connection request canceled, Request re-approval button displayed
Cancel request Cancel connection request Re-request approval Re-requesting a connection after the original request was canceled Table. PrivateLink Endpoint status information and additional features
- PrivateLink Endpoint Details page displays status information and additional feature information, and consists of Details and Activity Log tabs.
Detailed Information
PrivateLink Endpoint Details page lets you view detailed information of the selected resource.
| Category | Detailed description |
|---|---|
| service | Service name |
| Resource Type | Resource Type |
| SRN | Unique resource ID in Samsung Cloud Platform |
| Resource name | Resource name |
| Resource ID | Unique resource ID in the service |
| constructor | User who created the service |
| Creation date and time | Service creation date and time |
| editor | User who edited the service information |
| Modification date | Date and time the service information was modified |
| PrivateLink Endpoint name | PrivateLink Endpoint name |
| PrivateLink Endpoint ID | PrivateLink Endpoint ID |
| PrivateLink Service ID | Connected PrivateLink Service ID |
| API endpoint type | API endpoint type |
| description | Additional information or description about the PrivateLink Endpoint |
Table. PrivateLink Endpoint detailed information tab items
Job History
On the PrivateLink Endpoint Details page, you can view the operation history of the selected resource.
| Category | Detailed description |
|---|---|
| Task History List | Resource Change History
|
Table. PrivateLink Endpoint operation history tab detailed information items
Create Resource
A resource is a logical unit that represents a specific endpoint (URI path) within an API. Each resource can be organized in a tree structure and can have multiple HTTP methods.
To create a resource, follow these steps.
Click the All Services > Application Service > API Gateway menu. Navigate to the Service Home page of API Gateway.
On the Service Home page, click the API Gateway > Resources menu. Navigate to the Resources page.
Click the Create Resource button on the Resource page. You will be taken to the Create Resource popup.
- Enter or select the required information.
Category RequiredDetailed description resource name Required Enter the resource name - It must start with a lowercase English letter and be 3 to 50 characters using lowercase letters, numbers, and special characters (
-{})
- When using braces, only the format
{character}is allowed and it cannot be left empty
resource path Required Select the path chosen in the resource menu tree Table. Resource creation information input fields - It must start with a lowercase English letter and be 3 to 50 characters using lowercase letters, numbers, and special characters (
- Enter or select the required information.
Click the Confirm button after completing data entry and selection.
After checking the message in the notification popup, click the Confirm button.
- Once creation is complete, verify the created resource in the resource list.
- To delete a resource, select the resource to delete from the list and click the Delete button.
Reference
- A maximum of 300 resources can be created.
- The depth of a resource can be up to 30, including the Root.
Create Method
Methods define the HTTP actions (e.g., GET, POST, PUT, DELETE, etc.) that can be performed on each resource. Each method is integrated with a specific backend to process actual data or execute functionality.
To create a method, follow these steps.
Click the All Services > Application Service > API Gateway menu. Navigate to the Service Home page of API Gateway.
On the Service Home page, click the API Gateway > Resources menu. You will be taken to the Resources page.
Click the Create Method button on the Resource page. It navigates to the Create Method popup.
- Enter or select the required information.
Category RequiredDetailed description Method type Required Select method type - The generated value is not displayed in the list.
- Selecting ANY creates methods of all types.
Integration type Required Select endpoint type - Select from HTTP, Cloud Function, PrivateLink
Endpoint URL Required Enter the endpoint URL when HTTP type is selected - The endpoint is a unique URL that the client uses to access the API. Create a separate endpoint for each stage. Various types such as Regional, Edge-Optimized, Private, etc.
- It must be a valid URL starting with http:// or https://, and you must enter it within 500 characters using English letters and special characters (
$-_.+!*’:(){}/)
endpoint Required When Cloud Function type is selected, choose the endpoint - The region is provided as the current region and cannot be changed
URL query string parameter Selection After checking use, enter name - using English letters, numbers, and special characters(
_)
HTTP request header Selection After checking use, enter name - using English letters, numbers, and special characters (
-) to input
Whether to use API Key Selection To limit usage through the usage policy, check Use Table. Method creation information input fields
- Enter or select the required information.
When the information entry and selection are complete, click the Save button.
After checking the message in the notification popup, click the Confirm button.
- After creation is complete, check the created resource in the method list.
- To delete a method, select the resource to delete from the list and click the Delete button.
Reference
Methods can be created up to a maximum of 7, with one per type. When created as Any, all types of methods are generated.
| Category | Detailed description |
|---|---|
| service | Service name |
| GET | Resource retrieval (read) |
| POST | Resource creation (registration) |
| PUT | Full resource update (refresh) |
| PATCH | Modify only part of the resource. |
| DELETE | Delete resource |
| OPTIONS | Retrieve the list of HTTP methods supported by this endpoint |
| HEAD | Retrieve only headers without a body (return only metadata, no response body) |
Table. Method Types
Deploy API
To apply a developing API to the live service environment, API deployment is required.
To deploy the generated API, follow these steps.
Click the All Services > Application Service > API Gateway menu. Navigate to the Service Home page of API Gateway.
On the Service Home page, click the API Gateway > Resources menu. You will be taken to the Resources page.
Click the API Deployment button on the Resources page. It opens the API Deployment popup.
- Enter or select the required information.
Category RequiredDetailed description Stage Required Select the stage to deploy the API - New Stage: Create a new stage and deploy
- None Stage: Deploy without selecting a stage
Stage name Required When New Stage is selected, enter a new stage name - that starts with a lowercase English letter and does not end with a special character (
-), using lowercase letters, numbers, and special characters (-) for 3 to 30 characters
Deployment description Selection Enter up to 50 characters describing API deployment. Table. API deployment information input fields
- Enter or select the required information.
Click the Deploy button once information entry and selection are complete.
After checking the message in the notification popup, click the Confirm button.
Create Stage
The stage is a named reference to a specific point in time (snapshot) of an API deployment, distinguishing environments in the API lifecycle such as development (dev), testing (test), and production (prod). Each stage has its own unique URL, and separate settings can be configured per environment for caching, logging, throttling, stage variables, and so on. Stages support various operational scenarios, including Canary releases, environment-specific configurations, and traffic segregation.
To create a stage for deploying the API, follow these steps.
Click the All Services > Application Service > API Gateway menu. Navigate to the Service Home page of API Gateway.
On the Service Home page, click the API Gateway > Stage menu. You will be taken to the Stage page.
On the Stage page, click the Create Stage button. You will be taken to the Create Stage popup.
- Enter or select the required information.
Category RequiredDetailed description Stage name Required When New Stage is selected, enter a new stage name - that starts with a lowercase English letter and does not end with a special character (
-), using lowercase letters, numbers, and special characters (-) with a length of 3 ~ 50 characters
Stage description Selection Enter additional information or description about the stage within 100 characters. API deployment version Required Select the API version to deploy - Must start with a lowercase English letter and must not end with a special character (
-), using lowercase letters, numbers, and special characters (-) enter 3 to 50 characters
Table. Stage creation information input fields - that starts with a lowercase English letter and does not end with a special character (
- Enter or select the required information.
Click the Confirm button after completing data entry and selection.
After checking the message in the notification popup, click the Confirm button.
- Once creation is complete, check the created resources in the stage list.
Reference
A maximum of 10 stages can be created.
Check stage detailed information
You can view and edit the stage list and detailed information. The detail page consists of the Stage Details information and the API Deployment Version Management, CORS, Usage Policy tabs.
To view the detailed information of the stage, follow these steps.
- Click the All Services > Application Service > API Gateway menu. Navigate to the Service Home page of API Gateway.
- From the Service Home page, click the API Gateway > Stage menu. You will be taken to the Stage page.
- Click the resource to view detailed information in the stage list.
- Stage Details displays status information and additional feature information, and consists of API Deployment Version Management, CORS, Usage Policy tabs.
- To delete a stage, select the resource to delete from the list and click the Delete button.
- To edit a stage, select the resource to modify from the list and click the Edit button.
Stage Details
You can view detailed information of the selected resource on the Stage Details page.
| Category | Detailed description |
|---|---|
| Stage name | Stage name |
| CORS | CORS operation status |
| Stage description | Stage information |
| JWT | JSON Web Token usage status |
| API Key | Whether to use API Key |
| Invoke URL | URL for API call |
| Activation date and time | Stage activation date and time |
| Deployment ID | API deployment ID |
Table. Stage detailed items
API deployment version management
API deployment version management tab allows you to view the API deployment history.
| Category | Detailed description |
|---|---|
| API Deployment Version Management List | API deployment history
|
| Deployment change | After selecting the resource to change the deployment from the list, click the Change Deployment button. When you click the Confirm button in the notification popup, the active deployment ID is updated immediately. |
Table. API Deployment Version Management Tab Detailed Information Items
CORS (Cross-Origin Resource Sharing)
Reference
For detailed information about CORS (Cross-Origin Resource Sharing), see Components > CORS.
You can view the CORS list in the CORS tab.
| Category | Detailed description |
|---|---|
| Name | CORS name |
| Mapping Value | Mapping value applied to CORS |
Table. CORS tab detailed information items
Usage Policy
On the Usage Policy tab, you can view the usage policy attached to the stage.
| Category | Detailed description |
|---|---|
| Usage Policy Name | Usage policy name |
| Usage Policy ID | Usage Policy ID |
| Quota | Quota set in the usage policy |
| Linked API Key Name | API Key name linked to the usage policy |
Table. Usage policy tab detailed information items
Reference
- When calling the API, you must use the key value of the API Key associated with the stage in the ‘x-scp-apikey’ header.
- Usage policies are linked at the stage level, while quotas are calculated per method that is checked for API Key usage.
Create authentication
JWT (JSON Web Token) is an open standard (RFC 7519) used for user authentication. JWT is a claim-based web token that stores user information as an encrypted token using JSON format.
To generate a JWT, follow these steps.
Click the All Services > Application Service > API Gateway menu. Navigate to the Service Home page of API Gateway.
On the Service Home page, click the API Gateway > Authentication menu. You will be taken to the Authentication List page.
On the Authentication List page, click the Create JSON Web Token button. You will be taken to the Create JSON Web Token popup.
- Enter or select the required information.
Category RequiredDetailed description JWT name Required Enter token name - that starts with a lowercase English letter and does not end with a special character (
-), using lowercase letters, numbers, and special characters (-) to input 3 to 50 characters
Stage to connect Selection After checking Use, select the stage Table. Authentication creation information input items - that starts with a lowercase English letter and does not end with a special character (
- Enter or select the required information.
After entering information and making selections, click the Confirm button.
After reviewing the message in the notification popup, click the Confirm button. Navigate to the Access Token notification popup.
- Tokens can be viewed only in the Access Token notification popup. If needed, download the Access Token file.
Access Token After checking the message in the notification popup, click the Confirm button.
- After creation is complete, check the created resource in the authentication list.
- To delete a token, select the resource to delete from the list and click the Delete button.
- To edit a token, select Edit from the context menu of the resource you want to modify.
Create Access Control
You can add an allowed IP to restrict API calls to a specific IP address.
Reference
- The stage is linked to a single access control. When a stage is first created, the Default access control is applied by default, blocking access from all IPs (All deny). By creating a new access control and attaching it to the stage, you can configure it to be callable only from specific IPs.
- In the following case, access control cannot be created.
- If you exceed the available service quota limit: Check the current allocated value and the additional possible value in the Quota Service.
- If there is no available API, create the API first.
- When the API endpoint type is Private: access control is not supported, but JWT activation is required on that API’s stage.
To create an access control, follow these steps.
Click the All Services > Application Service > API Gateway menu. Navigate to the Service Home page of API Gateway.
From the Service Home page, click the API Gateway > Access Control menu. Navigate to the Access Control List page.
Access Control List page, click the Create Access Control button. You will be taken to the Create Access Control popup.
- Enter or select the required information.
Category RequiredDetailed description Access control name Required Enter the access control name - that starts with a lowercase English letter, does not end with a special character (
-), and uses lowercase letters, numbers, and special characters (-) within 3 to 50 characters
Public access allowed IP Required Enter IP addresses to allow access - ’,’ you can input up to 100 using ‘,’
Stage to connect Selection After checking Use, select the stage description Selection Enter additional information or description about access control within 50 characters. Table. Access control creation information input fields - that starts with a lowercase English letter, does not end with a special character (
- Enter or select the required information.
After entering information and making selections, click the Confirm button.
After checking the message in the notification popup, click the Confirm button.
- Once creation is complete, verify the created resource in the access control list.
- To delete an access control list, select the resource to remove from the list and click the Delete button. The default access control cannot be deleted.
- To modify access control, select Edit from the context menu of the resource you want to modify.
Terminate API
You can cancel the unused service to reduce operating costs. However, canceling the service may cause the running service to stop immediately, so you should consider the impact of service interruption thoroughly before proceeding with the cancellation.
To cancel the API, follow these steps.
- Click the All Services > Application Service > API Gateway menu. Navigate to the Service Home page of API Gateway.
- On the Service Home page, click the API menu. You will be taken to the API List page.
- On the API List page, select the resource to cancel and click the Cancel Service button.
- When the termination is complete, verify on the API List page that the resource has been terminated.
Using Report
You can check API traffic, performance, and error status.
To use the Report, follow these steps.
- Click the All Services > Application Service > API Gateway menu. Navigate to the Service Home page of API Gateway.
- On the Service Home page, click the API Gateway > Report menu. You will be taken to the Report page.
- Enter or select the required information.
| Category | Detailed description |
|---|---|
| Search period | Select date to view (default 1 week from today, up to 1 month) |
| Stage name | Stage name under API |
Table. Report information entry fields
- After entering the information and making selections, you can view the Report information.
| Category | Detailed description |
|---|---|
| TOP Resources 5 | Among the resources invoked by the user, the top five most frequently called with an API status code of 2XX (ties are not shown as duplicate ranks). |
| API call count | Number of calls with API status code 2XX |
| Latency | The time elapsed from when the user sends a request to the API Gateway until a response is received. |
| Integration Latency | The time elapsed from when the API Gateway sends a request to the backend server until it receives a response from the backend. |
| 4XX Error | Number of calls with API status code 4XX |
| 5XX Error | Number of calls with API status code 5XX |
Table. Report detailed information items
Reference
- If a stage is deleted, it cannot be accessed in the Report.
- The report displays data from one hour ago relative to the current time.
Create Usage Policy
The usage policy is established to ensure efficient allocation of server resources, maintain service stability, prevent unnecessary traffic, and avoid misuse.
To create a usage policy, follow these steps.
- Click the All Services > Application Service > API Gateway menu. Navigate to the Service Home page of API Gateway.
- On the Service Home page, click the API Gateway > Usage Policy menu. You will be taken to the Usage Policy page.
- On the Usage Policy page, click the Create Usage Policy button. You will be taken to the Create Usage Policy page.
- Enter or select the required information.
| Category | Required | Detailed description |
|---|---|---|
| API name to connect | Required | Select from the generated AIPs |
| Usage Policy Name | Required | Start with a lowercase English letter and ensure it does not end with a hyphen; use lowercase letters, numbers, and hyphens, and enter 3 to 50 characters. |
| Quota | Required | Enter a value between 1 and 2,000,000,000 per month/day/hour. |
| description | Selection | Enter usage policy description (max 50 chars). |
Table. Input fields for usage policy information
- When the information entry and selection are complete, click the Complete button.
- After checking the message in the notification popup, click the Confirm button.
- Once creation is complete, check the created resource in the usage policy list.
Create API Key
An API key is used to identify which user or app is calling the API. It is primarily used to limit usage according to usage policies.
To create an API Key, follow these steps.
- Click the All Services > Application Service > API Gateway menu. Navigate to the Service Home page of API Gateway.
- On the Service Home page, click the API Gateway > Usage Policy menu. You will be taken to the Usage Policy page.
- In the list, click the usage policy. It navigates to the Usage Policy Details page.
- On the Usage Policy Details page, click the Create API Key button. You will be taken to the Add API Key popup.
- Enter or select the required information.
| Category | Required | Detailed description |
|---|---|---|
| API Key name | Required | Start with a lowercase English letter and ensure it does not end with a hyphen; use lowercase letters, numbers, and hyphens, and enter 3 to 50 characters. |
| description | Selection | Enter a description of the API Key within 50 characters. |
Table. API Key information input fields
- Click the Confirm button after completing data entry and selection.
- After checking the message in the notification popup, click the Confirm button.
- When creation is complete, check the created resources on the Usage Policy Details page.
Reference
- You can create up to 10 usage policies and 5 API keys.
- Quota is calculated per API Key.
Create Resource Policy
You can fundamentally block unauthorized access with resource-based policies and increase the service’s security level.
To create a resource policy, follow these steps.
- Click the All Services > Application Service > API Gateway menu. Navigate to the Service Home page of API Gateway.
- On the Service Home page, click the API Gateway > Resource Policy menu. You will be taken to the Resource Policy page.
- On the Resource Policy page, click the Create Resource Policy button. You will be taken to the Create Resource Policy page.
- Enter or select the required information in the Service Information Input area.
| Category | Required | Detailed description |
|---|---|---|
| Policy template | Required | Select Policy Template
|
Table. Resource policy information input items
- Click the Complete button after entering information and making selections.
- After checking the message in the notification popup, click the Confirm button.
- Once creation is complete, you can view, modify, or delete the resource policy.
1.2.1 - Resource-Based Policy Guide
Resource-based policy overview
API Gateway’s resource-based policy (Resource-based Policy) is a policy attached to a resource that can decide to allow or deny (Effect) an action (Action) on a specific resource only for a principal (Principal). You can directly define the principal that can call the API by using resource-based policies.
Reference
While a typical IAM policy (Identity-based) grants permissions to users, a resource-based policy is applied to the API itself to allow external access.
Through resource-based policies, you can define the following to allow secure API calls.
- User of the specified Samsung Cloud Platform account
- Specified source IP address range or CIDR block
A source policy is defined as a JSON policy document attached to the API, which controls whether a specified security principal (typically an IAM role or group) can call the API.
| Category | description | example |
|---|---|---|
| Principal(Principal) | Specify the entity that will call the API | - |
| Task(Action) | Define the allowed features | - |
| Condition(Condition) | Restrict to allow only in specific situations | Allow only requests originating from a specific SRN. |
Table. Entity that controls whether an API call is made
Reference
- API Gateway’s resource-based policies leverage the rules of IAM’s resource-based policies.
- Please refer to the JSON Writing Guide for how to create or modify policies using JSON.
Resource-based policy usage scenario
The primary use cases for resource-based policies are as follows.
Resource-based policy scenario
The resource-based policy scenario used when a specific function of API Gateway operates is as follows.
| Category | description | Reference example |
|---|---|---|
| Default policy | This is the DEFAULT resource policy that is created by default when an API is created.
| Basic Policy Example |
| Allowed Account List | You can define account(s) that can call the API. | Account Allowlist Example |
| IP range blocklist | You can define IP ranges that are not allowed to call the API. | IP range blocklist example |
Table. Resource-based policy scenario
User addition usage scenario
It is not automatically registered as a resource‑based policy of API Gateway, but users can add and use it as needed. The scenarios that users can add and utilize are as follows.
- Cross-Account Access
- If an IAM user in account A wants to invoke the API of account B, register account A in the function policy of account B.
- Hybrid Access Control
- It can be configured so that access is allowed only when both conditions are met—a specific user and a specific IP range—rather than simply restricting by account or IP alone.
Resource-based policy management for API Gateway
To view and set resource-based policies for API Gateway, follow these steps.
- Click the All Services > Application Service > API Gateway menu. Go to the Service Home page of API Gateway.
- On the Service Home page, click the API Gateway > Resource Policy menu. You will be taken to the Resource Policy page.
- Click the Edit button of the Policy Details item. The Edit Resource Policy popup opens.
- Click the Delete button to delete the registered policy.
- Edit Resource Policy In the popup window, select Policy Template, then write the policy.
- For policy examples by policy template, refer to Resource-based policy example.
- When the writing is complete, click the Done button.
Example of resource-based policy
Users can define additional resource-based policies as needed or modify existing policies for use.
Reference
- For some features, a resource-based policy (or credentials) must be registered to use them in API Gateway.
- In the resource-based policy examples described in this guide, API Gateway automatically registers the example resource-based policies when each feature is enabled or linked.
Default Policy
This is a policy that is automatically registered when creating an API.
Policy Template
Color mode
{
  "Statement": [
    {
      "Action": [
        "apigateway:InvokeApigatewayRegion"
      ],
      "Effect": "Allow",
      "Principal": "*",
      "Resource": [
        "srn:{{Offering}}::{{AccountID}}:kr-west1::apigateway:api/{{ApiId}}"
      ],
      "Sid": "DefaultStatement"
    }
  ],
  "Version": "2024-07-01"
}
{
"Statement": [
{
"Action": [
"apigateway:InvokeApigatewayRegion"
],
"Effect": "Allow",
"Principal": "*",
"Resource": [
"srn:{{Offering}}::{{AccountID}}:kr-west1::apigateway:api/{{ApiId}}"
],
"Sid": "DefaultStatement"
}
],
"Version": "2024-07-01"
}Policy Example
Color mode
{
  "Statement": [
    {
      "Action": [
        apigateway:InvokeApigatewayRegion
      ],
      "Effect": "Allow",
      "Principal": "*"
      "Resource": [
        "srn:e::accountId1:kr-west1::apigateway:api/apiId1"
      ],
      "Sid": "DefaultStatement"
    }
  ],
  "Version": "2024-07-01"
}
{
"Statement": [
{
"Action": [
apigateway:InvokeApigatewayRegion
],
"Effect": "Allow",
"Principal": "*"
"Resource": [
"srn:e::accountId1:kr-west1::apigateway:api/apiId1"
],
"Sid": "DefaultStatement"
}
],
"Version": "2024-07-01"
}Color mode
{
  "Statement": [
    {
      "Action": [
        apigateway:InvokeApigatewayRegion
      ],
      "Effect": "Allow"
      "Principal": "*",
      "Resource": [
        "srn:s::accountId1:kr-west1::apigateway:api/apiId1"
      ],
      "Sid": "DefaultStatement"
    }
  ],
  "Version": "2024-07-01"
}
{
"Statement": [
{
"Action": [
apigateway:InvokeApigatewayRegion
],
"Effect": "Allow"
"Principal": "*",
"Resource": [
"srn:s::accountId1:kr-west1::apigateway:api/apiId1"
],
"Sid": "DefaultStatement"
}
],
"Version": "2024-07-01"
}Account allowlist
This is a policy that allows only users of a specific SCP account (Root user or IAM Role) to call the API.
Policy Template
Color mode
{
  "Version": ""
  "Statement": [
    {
      "Action": [
        apigateway:InvokeApigatewayRegion
      ],
      "Condition": {
        "SrnLike": {
          "scp:RequestAttribute/body['method-srn']": [
            srn:{{Offering}}::{{AccountID}}:kr-west1::apigateway:method/{{ApiId}}/{{stageNameOrWildcard*}}/{{httpVerbOrWildcard*}}/{{resourcePathOrWildcard*}}
          ]
        }
      },
      "Effect": "Allow",
      "Principal": {
        "scp": [
          srn:{{Offering}}::{{AccountID}}:::iam:user/{{UserSrn}}
        ]
      },
      "Resource": [
        srn:{{Offering}}::{{AccountID}}:kr-west1::apigateway:api/{{ApiId}}
      ],
      "Sid": "Statement1"
    }
  ]
}
{
"Version": ""
"Statement": [
{
"Action": [
apigateway:InvokeApigatewayRegion
],
"Condition": {
"SrnLike": {
"scp:RequestAttribute/body['method-srn']": [
srn:{{Offering}}::{{AccountID}}:kr-west1::apigateway:method/{{ApiId}}/{{stageNameOrWildcard*}}/{{httpVerbOrWildcard*}}/{{resourcePathOrWildcard*}}
]
}
},
"Effect": "Allow",
"Principal": {
"scp": [
srn:{{Offering}}::{{AccountID}}:::iam:user/{{UserSrn}}
]
},
"Resource": [
srn:{{Offering}}::{{AccountID}}:kr-west1::apigateway:api/{{ApiId}}
],
"Sid": "Statement1"
}
]
}Policy Example
Color mode
{
  "Version": ""
  "Statement": [
    {
      "Action": [
        apigateway:InvokeApigatewayRegion
      ],
      "Condition": {
        "SrnLike": {
          "scp:RequestAttribute/body['method-srn']": [
            srn:e::accountId1:kr-west1::apigateway:method/apiId1/stage1/GET/resource1
          ]
        }
      },
      "Effect": "Allow",
      "Principal": {
        "scp": [
          srn:e::accountId1:::iam:user/userId1
        ]
      },
      "Resource": [
        "srn:e::accountId1:kr-west1::apigateway:api/apiId1"
      ],
      "Sid": "Statement1"
    }
  ]
}
{
"Version": ""
"Statement": [
{
"Action": [
apigateway:InvokeApigatewayRegion
],
"Condition": {
"SrnLike": {
"scp:RequestAttribute/body['method-srn']": [
srn:e::accountId1:kr-west1::apigateway:method/apiId1/stage1/GET/resource1
]
}
},
"Effect": "Allow",
"Principal": {
"scp": [
srn:e::accountId1:::iam:user/userId1
]
},
"Resource": [
"srn:e::accountId1:kr-west1::apigateway:api/apiId1"
],
"Sid": "Statement1"
}
]
}Color mode
{
  "Version": ""
  "Statement": [
    {
      "Action": [
        apigateway:InvokeApigatewayRegion
      ],
      "Condition": {
        "SrnLike": {
          "scp:RequestAttribute/body['method-srn']": [
            srn:s::accountId1:kr-west1::apigateway:method/apiId1/stage1/GET/resource1
          ]
        }
      },
      "Effect": "Allow",
      "Principal": {
        "scp": [
          "srn:s::accountId1:::iam:user/userId1"
        ]
      },
      "Resource": [
        "srn:s::accountId1:kr-west1::apigateway:api/apiId1"
      ],
      "Sid": "Statement1"
    }
  ]
}
{
"Version": ""
"Statement": [
{
"Action": [
apigateway:InvokeApigatewayRegion
],
"Condition": {
"SrnLike": {
"scp:RequestAttribute/body['method-srn']": [
srn:s::accountId1:kr-west1::apigateway:method/apiId1/stage1/GET/resource1
]
}
},
"Effect": "Allow",
"Principal": {
"scp": [
"srn:s::accountId1:::iam:user/userId1"
]
},
"Resource": [
"srn:s::accountId1:kr-west1::apigateway:api/apiId1"
],
"Sid": "Statement1"
}
]
}IP range blocklist
It is a policy that allows or blocks only specific IP addresses or CIDR ranges.
Policy Template
Color mode
{
  "Version": ""
  "Statement": [
    {
      "Action": [
        apigateway:InvokeApigatewayRegion
      ],
      "Condition": {
        "SrnLike": {
          "scp:RequestAttribute/body['method-srn']": [
            srn:{{Offering}}::{{AccountID}}:kr-west1::apigateway:method/{{ApiId}}/{{stageNameOrWildcard*}}/{{httpVerbOrWildcard*}}/{{resourcePathOrWildcard*}}
          ]
        },
        "NotIpAddress": {
          "scp:SourceIp": [
            {{sourceIpOrCIDRBlock}}
            {{sourceIpOrCIDRBlock}}
          ]
        }
      },
      "Effect": "Allow",
      "Principal": "*"
      "Resource": [
        srn:{{Offering}}::{{AccountID}}:kr-west1::apigateway:api/{{ApiId}}
      ],
      "Sid": "Statement1"
    }
  ]
}
{
"Version": ""
"Statement": [
{
"Action": [
apigateway:InvokeApigatewayRegion
],
"Condition": {
"SrnLike": {
"scp:RequestAttribute/body['method-srn']": [
srn:{{Offering}}::{{AccountID}}:kr-west1::apigateway:method/{{ApiId}}/{{stageNameOrWildcard*}}/{{httpVerbOrWildcard*}}/{{resourcePathOrWildcard*}}
]
},
"NotIpAddress": {
"scp:SourceIp": [
{{sourceIpOrCIDRBlock}}
{{sourceIpOrCIDRBlock}}
]
}
},
"Effect": "Allow",
"Principal": "*"
"Resource": [
srn:{{Offering}}::{{AccountID}}:kr-west1::apigateway:api/{{ApiId}}
],
"Sid": "Statement1"
}
]
}Policy example
Color mode
{
  "Version": ""
  "Statement": [
    {
      "Action": [
        apigateway:InvokeApigatewayRegion
      ],
      "Condition": {
        "SrnLike": {
          "scp:RequestAttribute/body['method-srn']": [
            srn:e::accountId1:kr-west1::apigateway:method/apiId1/stage1/GET/resource1
          ]
        },
        "NotIpAddress": {
          "scp:SourceIp": [
            "1.2.3.4/24"
            5.6.7.8/32
          ]
        }
      },
      "Effect": "Allow",
      "Principal": "*",
      "Resource": [
        "srn:e::accountId1:kr-west1::apigateway:api/apiId1"
      ],
      "Sid": "Statement1"
    }
  ]
}
{
"Version": ""
"Statement": [
{
"Action": [
apigateway:InvokeApigatewayRegion
],
"Condition": {
"SrnLike": {
"scp:RequestAttribute/body['method-srn']": [
srn:e::accountId1:kr-west1::apigateway:method/apiId1/stage1/GET/resource1
]
},
"NotIpAddress": {
"scp:SourceIp": [
"1.2.3.4/24"
5.6.7.8/32
]
}
},
"Effect": "Allow",
"Principal": "*",
"Resource": [
"srn:e::accountId1:kr-west1::apigateway:api/apiId1"
],
"Sid": "Statement1"
}
]
}Color mode
{
  "Version": ""
  "Statement": [
    {
      "Action": [
        apigateway:InvokeApigatewayRegion
      ],
      "Condition": {
        "SrnLike": {
          "scp:RequestAttribute/body['method-srn']": [
            "srn:s::accountId1:kr-west1::apigateway:method/apiId1/stage1/GET/resource1"
          ]
        },
        "NotIpAddress": {
          "scp:SourceIp": [
            "1.2.3.4/24"
            5.6.7.8/32
          ]
        }
      },
      "Effect": "Allow",
      "Principal": "*"
      "Resource": [
        "srn:s::accountId1:kr-west1::apigateway:api/apiId1"
      ],
      "Sid": "Statement1"
    }
  ]
}
{
"Version": ""
"Statement": [
{
"Action": [
apigateway:InvokeApigatewayRegion
],
"Condition": {
"SrnLike": {
"scp:RequestAttribute/body['method-srn']": [
"srn:s::accountId1:kr-west1::apigateway:method/apiId1/stage1/GET/resource1"
]
},
"NotIpAddress": {
"scp:SourceIp": [
"1.2.3.4/24"
5.6.7.8/32
]
}
},
"Effect": "Allow",
"Principal": "*"
"Resource": [
"srn:s::accountId1:kr-west1::apigateway:api/apiId1"
],
"Sid": "Statement1"
}
]
}Cross-Account Access
This is a resource policy that allows a user of account B to call a specific API resource of account A.
Policy Example
Color mode
{
  "Version": ""
  "Statement": [
    {
      "Action": [
        apigateway:InvokeApigatewayRegion
      ],
      "Condition": {
        "SrnLike": {
          "scp:RequestAttribute/body['method-srn']": [
            srn:e::accountId1:kr-west1::apigateway:method/apiId1/*/*/*
          ]
        }
      },
      "Effect": "Allow",
      "Principal": {
        "scp": [
          srn:e::accountId1:::iam:user/userId1
          "srn:e::accountId2:::iam:user/userId2"
        ]
      },
      "Resource": [
        "srn:e::accountId1:kr-west1::apigateway:api/apiId1"
      ],
      "Sid": "Statement1"
    }
  ]
}
{
"Version": ""
"Statement": [
{
"Action": [
apigateway:InvokeApigatewayRegion
],
"Condition": {
"SrnLike": {
"scp:RequestAttribute/body['method-srn']": [
srn:e::accountId1:kr-west1::apigateway:method/apiId1/*/*/*
]
}
},
"Effect": "Allow",
"Principal": {
"scp": [
srn:e::accountId1:::iam:user/userId1
"srn:e::accountId2:::iam:user/userId2"
]
},
"Resource": [
"srn:e::accountId1:kr-west1::apigateway:api/apiId1"
],
"Sid": "Statement1"
}
]
}Color mode
{
  "Version": ""
  "Statement": [
    {
      "Action": [
        apigateway:InvokeApigatewayRegion
      ],
      "Condition": {
        "SrnLike": {
          "scp:RequestAttribute/body['method-srn']": [
            srn:s::accountId1:kr-west1::apigateway:method/apiId1/*/*/*
          ]
        }
      },
      "Effect": "Allow"
      "Principal": {
        "scp": [
          srn:e::accountId1:::iam:user/userId1
          "srn:e::accountId2:::iam:user/userId2"
        ]
      },
      "Resource": [
        "srn:s::accountId1:kr-west1::apigateway:api/apiId1"
      ],
      "Sid": "Statement1"
    }
  ]
}
{
"Version": ""
"Statement": [
{
"Action": [
apigateway:InvokeApigatewayRegion
],
"Condition": {
"SrnLike": {
"scp:RequestAttribute/body['method-srn']": [
srn:s::accountId1:kr-west1::apigateway:method/apiId1/*/*/*
]
}
},
"Effect": "Allow"
"Principal": {
"scp": [
srn:e::accountId1:::iam:user/userId1
"srn:e::accountId2:::iam:user/userId2"
]
},
"Resource": [
"srn:s::accountId1:kr-west1::apigateway:api/apiId1"
],
"Sid": "Statement1"
}
]
}Hybrid Access Control
It is a resource policy that can define access control policies by combining user credentials (Account) and connection source (IP).
Policy Example
Color mode
{
  "Version": ""
  "Statement": [
    {
      "Action": [
        apigateway:InvokeApigatewayRegion
      ],
       "Condition": {
        "SrnLike": {
          "scp:RequestAttribute/body['method-srn']": [
            srn:e::accountId1:kr-west1::apigateway:method/apiId1/*/*/*
          ]
        },
        "NotIpAddress": {
          "scp:SourceIp": [
            "1.2.3.4/24"
            5.6.7.8/32
          ]
        }
      },
      "Effect": "Allow",
      "Principal": {
        "scp": [
          srn:e::accountId1:::iam:user/userId1
        ]
      },
      "Resource": [
        "srn:e::accountId1:kr-west1::apigateway:api/apiId1"
      ],
      "Sid": "Statement1"
    }
  ]
}
{
"Version": ""
"Statement": [
{
"Action": [
apigateway:InvokeApigatewayRegion
],
"Condition": {
"SrnLike": {
"scp:RequestAttribute/body['method-srn']": [
srn:e::accountId1:kr-west1::apigateway:method/apiId1/*/*/*
]
},
"NotIpAddress": {
"scp:SourceIp": [
"1.2.3.4/24"
5.6.7.8/32
]
}
},
"Effect": "Allow",
"Principal": {
"scp": [
srn:e::accountId1:::iam:user/userId1
]
},
"Resource": [
"srn:e::accountId1:kr-west1::apigateway:api/apiId1"
],
"Sid": "Statement1"
}
]
}Color mode
{
  "Version": ""
  "Statement": [
    {
      "Action": [
        apigateway:InvokeApigatewayRegion
      ],
       "Condition": {
        "SrnLike": {
          "scp:RequestAttribute/body['method-srn']": [
            srn:s::accountId1:kr-west1::apigateway:method/apiId1/*/*/*
          ]
        },
        "NotIpAddress": {
          "scp:SourceIp": [
            "1.2.3.4/24"
            5.6.7.8/32
          ]
        }
      },
      "Effect": "Allow",
      "Principal": {
        "scp": [
          srn:s::accountId1:::iam:user/userId1
        ]
      },
      "Resource": [
        "srn:e::accountId1:kr-west1::apigateway:api/apiId1"
      ],
      "Sid": "Statement1"
    }
  ]
}
{
"Version": ""
"Statement": [
{
"Action": [
apigateway:InvokeApigatewayRegion
],
"Condition": {
"SrnLike": {
"scp:RequestAttribute/body['method-srn']": [
srn:s::accountId1:kr-west1::apigateway:method/apiId1/*/*/*
]
},
"NotIpAddress": {
"scp:SourceIp": [
"1.2.3.4/24"
5.6.7.8/32
]
}
},
"Effect": "Allow",
"Principal": {
"scp": [
srn:s::accountId1:::iam:user/userId1
]
},
"Resource": [
"srn:e::accountId1:kr-west1::apigateway:api/apiId1"
],
"Sid": "Statement1"
}
]
}1.3 - API Reference
API Reference
1.4 - CLI Reference
CLI Reference
1.5 - Release Note
API Gateway
2026.03.19
FEATURE
Add resource-based policy feature- You can set resource-based policies on the API.
- Resource-based policies are policies applied directly to the API to allow external access.
- You can use resource-based policies to allow or deny actions on specific resources to specific principals.
2025.07.01
NEW
API Gateway service official version launch- The API Gateway service, which enables easy management and monitoring of APIs, has been launched.
- You can easily define resources and methods related to the API, and conveniently monitor API usage and performance metrics.
2 - Queue Service
2.1 - Overview
Service Overview
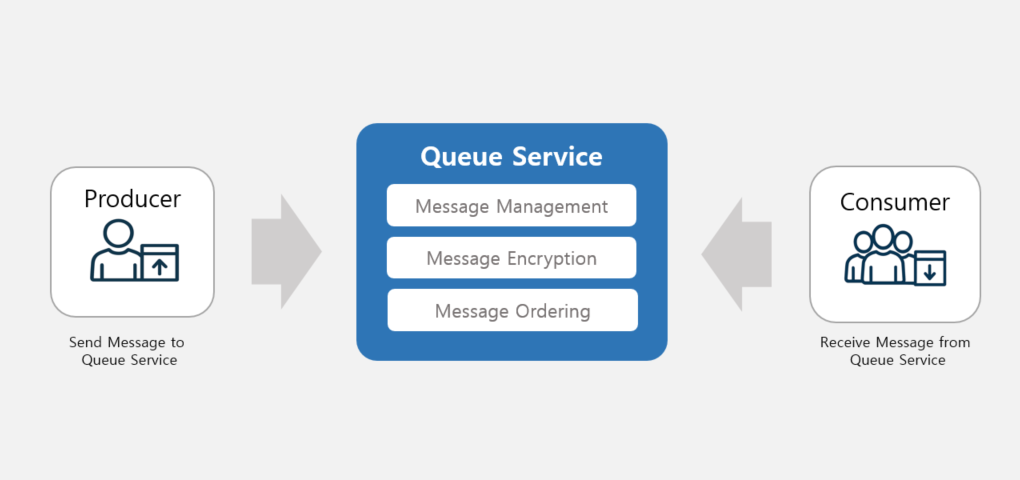
Queue Service efficiently manages and delivers messages or tasks, supporting message transmission between systems.
This service facilitates the data flow between a Producer that generates messages and a Consumer that receives them, and provides a FIFO (First-In-First-Out) feature that guarantees message order. By doing so, it distributes system load caused by messages, enabling efficient message management in microservice architectures or event-driven systems.
Features
- Efficient Message Processing : Allows efficient handling and management of large volumes of messages sent and received simultaneously, enabling the user system’s message processing tasks to be performed efficiently.
- Fast Service Processing : Producer and Consumer operate independently, allowing improved responsiveness and processing speed.
- Message Order Guarantee : Ensures the order of received messages to maintain data consistency.
- Strong security and reliability : It protects sensitive information by encrypting messages during transmission and storage, and provides reliable message management.
Service Architecture Diagram
Provided features
The Queue Service provides the following features.
- Queue creation: Depending on the message reception handling method, create a basic or FIFO type Queue that guarantees message order.
- When using the FIFO type, the Queue Service orders messages in the order they were received.
- Message Transmission: Producer sends the message intended for Consumer to the Queue.
- Message Reception: Consumer receives the Producer’s message from the Queue.
- Message Management: Check and manage messages stored in the Queue.
- Message Encryption: Encrypt messages within the Queue by integrating with the KMS service.
- We support blocking message exposure through message encryption settings.
- ServiceWatch service integration provided: You can monitor data through the ServiceWatch service.
Component
Producer
Create and send messages using the Queue Service.
Consumer
Receive and process messages from the Queue Service.
Message Manager
You can view the loaded messages in the Queue Service and manage them, such as deleting them.
Provision status by region
The Queue Service is available in the following environments.
| region | Provision status |
|---|---|
| Korea West 1 (kr-west1) | Provide |
| Korea East 1 (kr-east1) | Provide |
| South Korea South 1 (kr-south1) | Not provided |
| South Korea South 2 (kr-south2) | Not provided |
| South Korea 3 (kr-south3) | Not provided |
Table. Queue Service regional availability status
Preliminary Service
The Queue Service has no preceding service.
2.1.1 - ServiceWatch Metrics
The Queue Service sends metrics to ServiceWatch. The metrics provided by default monitoring are data collected at a 1‑minute interval.
Reference
For checking metrics in ServiceWatch, refer to the ServiceWatch guide.
Basic Metrics
The following are the basic metrics for the Queue Service namespace.
The indicators whose names are displayed in bold below are the key indicators selected from the basic metrics provided by Queue Service. Key metrics are used to compose service dashboards that are automatically built for each service in ServiceWatch.
Each metric indicates through the user guide which statistical value is meaningful when viewing that metric, and among the meaningful statistics, the values displayed in bold are the primary statistics. In the service dashboard, you can view key metrics using these primary statistical values.
| Performance items | Detailed description | unit | meaningful statistics |
|---|---|---|---|
| NumberOfMessagesSent | Number of messages added to the queue | Count |
|
| SentMessageSize | Size of the message added to the queue | Bytes |
|
| NumberOfMessagesReceived | Number of messages returned by the call to the ReceiveMessage operation (number of polled messages) | Count |
|
| NumberOfEmptyReceives | Number of ReceiveMessage API calls that did not return a message | Count |
|
| NumberOfMessagesDeleted | Number of messages deleted from the queue | Count |
|
Table. Queue Service Basic Metrics
2.2 - How to guides
Create Queue Service
You can create and use a Queue Service from the Samsung Cloud Platform Console.
To create a Queue Service, follow these steps.
Click the All Services > Application > Queue Service menu. 1. Go to the Service Home page of the Queue Service.
On the Service Home page, click the Create Queue button. 2. Go to the Create Queue page.
On the Queue creation page, enter the information required to create the service and select detailed options.
- Enter or select the required information in the service information input area.
Category RequiredDetailed description type Required Select service type - Default: No message ordering
- FIFO: First-in-first-out message delivery and message retention
Queue name Required Enter the queue name - Start with a lowercase English letter and enter 3 ~ 64 characters consisting of lowercase English letters, numbers, and the special character (-)
- Standard type: The name cannot use the ‘.fifo’ suffix
- FIFO type: Include the .fifo suffix in the name
- Start with a lowercase English letter
- Enter 3 ~ 64 characters using lowercase English letters and the special character (-)
Duplicate removal range Essential Select duplicate removal scope - Messages in queue: Remove duplicate items among messages in the queue
- Group-level messages: Remove duplicate items within group-level messages
- FIFO can be set only when the FIFO type is selected
Content-based deduplication Selection Hash the message body content to remove duplicate messages - FIFO can be set only when the FIFO type is selected
Explanation Select Enter the service description within 100 characters. Table. Create Queue – Enter Service Information - Enter or select the required information in the configuration settings area.
Category Required statusDetailed description Message size Essential Enter the message size value (KB) between 1 and 256 - Up to 50 can be added per resource
Message retention period Essential Enter the message retention period - After selecting the unit, enter the desired value
- seconds: 60 ~ 1,209,600
- minutes: 1 ~ 20,160
- hours: 1 ~ 336
- days: 1 ~ 14
Encryption Required Select encryption usage - New creation: Go to the KMS page and create a new KMS encryption
- Do not use: Do not use encryption
- KMS encryption: Select when using KMS
- Data Key reuse period: After selecting a unit period, enter the desired value
- Minutes: 5 ~ 1,440
- Hours: 1 ~ 24
- Data Key reuse period: After selecting a unit period, enter the desired value
Table. Queue creation - configuration setting items - Enter or select the required information in the additional information input area.
Category RequiredDetailed description Tag Selection Add tag - Up to 50 can be added per resource
- After clicking the Add Tag button, enter or select Key, Value values
Table. Queue creation - additional information input fields
- Enter or select the required information in the service information input area.
Summary Verify the detailed information and estimated charges generated in the panel, then click the Create button.
- Once creation is complete, check the resources you created on the page.
Caution
Queue is billed based on usage.
Reference
- When using a FIFO type Queue, up to 100 message groups are supported.
- If the maximum number of message groups is exceeded, message transmission may fail.
View Queue Service details
You can view detailed information and messages for the Queue Service.
To view detailed information about the Queue Service, follow these steps.
- Click the All Services > Application > Queue Service menu. 1. Go to the Service Home page of Queue Service.
- On the Service Home page, click the Queue menu. 2. Go to the Queue List page.
- On the Queue list page, click the resource to view detailed information. 3. Navigate to the Queue Details page.
- Queue Details page displays status information and additional feature information, and consists of Details, Message Management, Tags, Job History tabs.
Category Detailed description Queue Service status Queue Service status representation - Creating: In progress
- Available: Creation completed, server connection available
- Deleting: Service termination in progress
- Error Deleting: Abnormal state during deletion
- Inactive: Abnormal state
- Error: Abnormal state during creation
Service termination Service cancellation button Table. Queue Service status information and additional features
- Queue Details page displays status information and additional feature information, and consists of Details, Message Management, Tags, Job History tabs.
Detailed Information
On the Queue list page, you can view detailed information of the selected resource and, if necessary, edit the information.
| Category | Detailed description |
|---|---|
| service | Service name |
| Resource Type | Resource Type |
| SRN | Unique resource ID in Samsung Cloud Platform
|
| Resource name | Resource name
|
| Resource ID | Service’s unique resource ID |
| Constructor | User who created the service |
| Creation date and time | Service creation date and time |
| Modifier | User who modified the service |
| Modification date | Service modification date and time |
| type | Queue type |
| Duplicate removal range | Deduplication Scope
|
| Content-based duplicate removal | Whether to use content-based duplicate removal feature
|
| Configuration Settings | Queue configuration information
|
| PrivateLink Service ID | PrivateLink service ID |
| Explanation | Queue description
|
| IP access allowlist | List of IPs allowed to access the Queue service
|
Table. Queue Details - Detail Tab Items
Message Management
On the Queue list page, you can view and manage the message list of the selected resource.
Reference
- A maximum of 10 messages will be displayed.
- If there are no messages in the list, you can click the Message Polling button to retrieve messages.
- Refer to Manage Messages for how to manage messages.
| Category | Detailed description |
|---|---|
| Message polling | After polling messages from the Queue to the Console, refresh the message list. |
| More | Message sending, deletion, and removal possible
|
| Message List | Message ID, message send timestamp, message receive timestamp, and message size (byte) can be viewed
|
Table. Queue Details – Message Management Tab Items
Tag
Queue List page lets you view the tag information of the selected resource, and you can add, modify, or delete it.
| Category | Detailed description |
|---|---|
| Tag list | Tag list
|
Table. Queue Details - Tag Tab Items
Operation History
You can view the operation history of the selected resource on the Queuee list page.
| Category | Detailed description |
|---|---|
| Task History List | Resource Change History
|
Table. Queue Details - Job History Tab Items
Configure Queue
You can reconfigure the settings you specified when creating the Queue Service.
To reconfigure the Queue, follow these steps.
- All Services > Application > Queue Service Click the menu. 1. Go to the Service Home page of the Queue Service.
- On the Service Home page, click the Queue menu. 2. Go to the Queue list page.
- On the Queue List page, click the resource to reconfigure the Queue. 3. Go to the Queue Details page.
- Click the Edit button of the Configuration Settings item. 4. Configuration Settings Edit The popup window opens.
- Edit Configuration Settings In the popup window, edit the configuration information, then click the OK button.
Category Required statusDetailed description Message size Essential Enter the message size value (KB) between 1 and 256 - Up to 50 can be added per resource
Message retention period Essential Enter the message retention period - After selecting the unit, enter the desired value
- seconds: 60 ~ 1,209,600
- minutes: 1 ~ 20,160
- hours: 1 ~ 336
- days: 1 ~ 14
Encryption Essential Select encryption usage - Create new: Go to the KMS page to create a new KMS encryption
- Do not use: Do not use encryption
- KMS encryption: Select when using KMS
- Data key reuse period: Select a unit period and then enter the desired value
- minutes: 5 ~ 1,440
- hours: 1 ~ 24
- Data key reuse period: Select a unit period and then enter the desired value
Table. Queue configuration setting edit input items
Managing IP Access Permissions
You can manage IPs that can access the Queue Service.
Add allowed IP
To add an allowed IP, follow these steps.
- All Services > Application > Queue Service Click the menu. 1. Go to the Service Home page of Queue Service.
- On the Service Home page, click the Queue menu. 2. Go to the Queue list page.
- On the Queue List page, click the resource to add an allowed IP. 3. Go to the Queue Details page.
- Click the Add IP Address button of the IP Access Allow List item. 4. Add IP Address The popup window opens.
- Enter the IP to add to the IP Access Allow List, then click the Confirm button.
- Click the + button to add multiple IPs simultaneously (up to 10).
- When the popup that notifies an IP addition opens, click the Confirm button.
Reference
You can add up to 150 IP addresses.
Exclude accessible IP
To exclude the IPs registered in IP access allow list, follow these steps.
- Click the All Services > Application > Queue Service menu. 1. Go to the Service Home page of Queue Service.
- On the Service Home page, click the Queue menu. 2. Go to the Queue List page.
- On the Queue list page, click the resource to exclude the allowed IP. 3. Go to the Queue Details page.
- After selecting the IPs to exclude from the IP Access Allow List, click the Delete button at the top of the list.
- You can also individually exclude an IP from the IP Access Allow List by clicking its Delete button.
- When the pop-up notifying IP deletion opens, click the Confirm button.
Manage messages
You can send or manage queue messages.
Send Message
To send a Queue message, follow these steps.
- All Services > Application > Queue Service Click the menu. 1. Go to the Service Home page of Queue Service.
- On the Service Home page, click the Queue menu. 2. Go to the Queue list page.
- On the Queue List page, click the resource to send a Queue message. 3. Queue Details Go to the page.
- Click the Message Management tab on the Queue Details page.
- Click the More > Send Message button at the top of the message list. 5. Send Message popup window opens.
- Send Message After entering the message information to be sent in the popup window, click the Confirm button.
Category Whether requiredDetailed description Message body Essential Enter the message to send - Up to 262,244 bytes can be entered
Message Group ID Required Enter using letters, numbers, and special characters within 128 characters - FIFO displayed only when using the FIFO type
Message deduplication ID Required/Optional Enter within 128 characters using letters, numbers, and special characters - FIFO type is displayed only when used
- When using the Content-based deduplication feature, input is optional
Meta information Selection Select whether to use meta information to add to the message - When used, you can enter up to 10 Key, Value entries
Encryption Essential Select encryption usage - Create new: Go to the KMS page to create a new KMS encryption
- Do not use: Do not use encryption
- KMS encryption: Select when using KMS
- Data key reuse period: Select a unit period and then enter the desired value
- minutes: 5 ~ 1,440
- hours: 1 ~ 24
- Data key reuse period: Select a unit period and then enter the desired value
Table. Message sending input fields
Check message details
You can view the content and detailed information of the Queue message. To view the detailed message information, follow these steps.
- Click the All Services > Application > Queue Service menu. 1. Go to the Service Home page of Queue Service.
- On the Service Home page, click the Queue menu. 2. Go to the Queue List page.
- On the Queue list page, click the resource to view the Queue messages. 3. Go to the Queue Details page.
- Click the Message Management tab on the Queue Details page.
- Click the message ID to view detailed information in the message list. 5. Message Details The popup window opens.
Category Detailed description Message ID Message unique ID Message size Message size Message transmission timestamp Message transmission date and time Message Received Date/Time Message receipt date and time Message Group ID Message group ID - displayed only when the FIFO type is used
Message deduplication ID Deduplication ID set in the message - is displayed only when using the FIFO type
Message body message content Meta definition Message meta information (Key, Value) Table. Message detail information items
Delete individual messages
Queue messages can be deleted individually. To delete a message, follow these steps.
- Click the All Services > Application > Queue Service menu. 1. Go to the Service Home page of the Queue Service.
- On the Service Home page, click the Queue menu. 2. Go to the Queue list page.
- On the Queue List page, click the resource to delete the Queue message. 3. Queue Details page is opened.
- Click the Message Management tab on the Queue Details page.
- After selecting all messages to delete in the message list, click the More > Delete button at the top of the list.
- You can also delete individually by clicking the Delete button at the far right of the message you want to delete in the message list.
- When the popup notifying message deletion opens, click the Confirm button.
Clear all messages in the queue
You can delete all messages in the Queue by emptying the Queue.
Caution
- Messages deleted via Empty Queue cannot be recovered.
- If the same request is already in progress, it will not be deleted. * In a moment, clear the queue again.
To delete all messages, follow the steps below.
- Click the All Services > Application > Queue Service menu. 1. Go to the Service Home page of Queue Service.
- On the Service Home page, click the Queue menu. 2. Go to the Queue list page.
- On the Queue List page, click the resource to remove the Queue message. 3. Go to the Queue Details page.
- Click the Message Management tab on the Queue Details page.
- Click the More > Clear Queue button at the top of the message list.
- When the popup notifying message deletion opens, click the Confirm button.
Cancel Queue Service
You can reduce operating costs by terminating the unused Queue Service.
However, if you terminate the service, the running service may be stopped immediately, so you should proceed with the termination only after fully considering the impact that may occur when the service is discontinued.
Caution
All messages are deleted upon termination and cannot be recovered.
To cancel the Queue Service, follow these steps.
- Click the All Services > Application > Queue Service menu. 1. Go to the Service Home page of Queue Service.
- On the Service Home page, click the Queue menu. 2. Go to the Queue list page.
- On the Queue list page, select the resource to cancel, then click the Cancel service button.
- After navigating to the Queue Details page of the resource to be terminated, you can also terminate it individually by clicking the Terminate Service button.
- When the pop-up notifying service termination opens, click the Confirm button.
Integrating PrivateLink Service
The Queue Service can communicate directly by integrating with the PrivateLink Service without using internet communication. When integrated with PrivateLink Service, communication with the Queue Service occurs directly from the user’s VPC, enhancing security.
Creating and Connecting a PrivateLink Endpoint
Follow the steps below to integrate the Queue Service with the PrivateLink Service.
- Check the PrivateLink Service ID of the Queue Service for creating a PrivateLink Endpoint.
- The PrivateLink Service ID of the Queue Service can be found on the Queue Details page’s PrivateLink Service ID.
- Create a PrivateLink Endpoint.
- Refer to PrivateLink Endpoint 생성하기 for how to create a PrivateLink Endpoint.
Reference
- When connecting to a PrivateLink Service, usage approval is processed automatically.
- Check the Security Group of the PrivateLink Endpoint to verify whether the target VM IP is registered.
Caution
When connecting through a PrivateLink Endpoint, IAM policies and IP access control for the authentication key cannot be used.
2.3 - Message API reference
Overview
The Queue Service provided by Samsung Cloud Platform can send, receive, and delete messages.
This guide provides an overview of the Queue Service API and how to invoke it.
Queue Service Call Procedure
The Queue Service API URL must be changed according to the operating environment and region. Please check the operating environment and Region information in the table below.
| Production Environment | Region | Queue Service URL |
|---|---|---|
| For Samsung | kr-west1 | https://queueservice.service.kr-west1.s.samsungsdscloud.com |
| For Samsung | kr-east1 | https://queueservice.service.kr-east1.s.samsungsdscloud.com |
| For Enterprise | kr-west1 | https://queueservice.service.kr-west1.e.samsungsdscloud.com |
| For Enterprise | kr-east1 | https://queueservice.service.kr-east1.e.samsungsdscloud.com |
Calling the API
AUTH PARAMS
Header Description
Scp-Accesskey      : 삼성 클라우드 플랫폼 포털에서 발급받은 Access Key
Scp-Signature      : 호출 API 요청을 Access Key와 매핑되는 Access Secret Key로 암호화한 서명. HMAC 암호화 알고리즘은 HmacSHA256 사용
Scp-Target         : Queue Service에 요청하는 행위. ScpQS.SendMessage, ScpQS.SendMessageBatch, ScpQS.ReceiveMessage, ScpQS.DeleteMessage, ScpQS.DeleteMessageBatch 중 하나
Scp-Timestamp      : 1970년 1월 1일 00:00:00 협정 세계시(UTC)부터의 경과 시간을 밀리초(Millisecond)로 정의합니다.
Scp-ClientType     : user-api 명시
Create Signature
- Generate the string to be signed from the request, encrypt it with the HmacSHA256 algorithm using the Access and Secret keys, and then encode it in Base64.
- To call the Sqeue Service via the Messaging API, you must authenticate with the “authentication key” in authentication key mode from a valid allowed IP address.
- Use this value as the Scp-Signature.
- The generated Signature is valid for 15 minutes.1. - Click the All Services > Application > Queue Service menu. - Go to the Service Home page of the Queue Service.
Signature generation Sample Code (Java)
public static String makeHmacSignature(String method,
                                       String url,
                                       String timestamp,
                                       String accessKey,
                                       String accessSecretKey,
                                       String clientType) {

    String body = method + url + timestamp + accessKey + clientType;

    String encodeBase64Str;

    try {
        byte[] message = body.getBytes("UTF-8");
        byte[] secretKey = accessSecretKey.getBytes("UTF-8");

        Mac mac = Mac.getInstance("HmacSHA256");
        SecretKeySpec secretKeySpec = new SecretKeySpec(secretKey, "HmacSHA256");
        mac.init(secretKeySpec);
        byte[] hmacSha256 = mac.doFinal(message);
        encodeBase64Str = Base64.getEncoder().encodeToString(hmacSha256);
    } catch (Exception e) {
        throw new RuntimeException("Failed to calculate hmac-sha256", e);
    }

    return encodeBase64Str;
}
Signature generation Sample Code (JavaScript)
<script src="https://cdnjs.cloudflare.com/ajax/libs/crypto-js/3.1.2/rollups/hmac-sha256.js"></script>
<script src="https://cdnjs.cloudflare.com/ajax/libs/crypto-js/3.1.2/components/enc-base64-min.js"></script>
<script type="text/javascript">
function makeSignature() {
    var method = "POST"; // Method
    var url = "{url}"; // url
    var timestamp = Date.now(); // timestamp
    var accessKey = "{accessKey}"; // access key
    var secretKey = "{secretKey}"; // secret key
    var clientType= "user-api"; // client type

    url = encodeURI(url); // 한글, 특수 문자 처리

    var message = method + url + timestamp + accessKey + clientType;

    var hash = CryptoJS.HmacSHA256(message, secretKey);
    return CryptoJS.enc.Base64.stringify(hash);
}
</script>
Example of calling the Queue Service API
Curl
curl -i -X GET
-H "Scp-Accesskey:2sd2gg=2agbdSD26svcD"
-H "Scp-Signature:fsfsdf235f9U35sdgf35Xsf/qgsdgsdg326=sfsdr23rsef="
-H "Scp-Timestamp:1605290625682"
-H "Scp-ClientType:user-api"
-H "Scp-Target:ScpQS.SendMessage"
--data '{"MessageBody": "sample message",  "QueueUrl": "https://queueservice.kr-west1.e.samsungsdscloud.com/33ff0000a8a345d78cdf163673f3da11/samplequeue"}'
'https://queueservice.service.kr-west1.e.samsungsdscloud.com'
Python
import requests

url = "https://queueservice.service.kr-west1.e.samsungsdscloud.com"
payload = {
   'MessageBody': 'sample message',
   'QueueUrl': 'https://queueservice.kr-west1.e.samsungsdscloud.com/33ff0000a8a345d78cdf163673f3da11/samplequeue'
}
headers = {
  'Scp-Accesskey': '2sd2gg=2agbdSD26svcD',
  'Scp-Signature': 'fsfsdf235f9U35sdgf35Xsf/qgsdgsdg326=sfsdr23rsef=',
  'Scp-Timestamp': '1605290625682',
  'Scp-ClientType': 'user-api',
  'Scp-Target': 'ScpQS.SendMessage'
}

response = requests.request("GET", url, headers=headers, data=payload)

if response.status_code == 200:
    contents = response.text
    return contents
else:
    raise Exception(f"Failed to GET API: {response.status_code}, {response.text}")
Java
String apiUrl = "https://queueservice.service.kr-west1.e.samsungsdscloud.com";
String accessKey = "2sd2gg=2agbdSD26svcD"
String signature = "fsfsdf235f9U35sdgf35Xsf/qgsdgsdg326=sfsdr23rsef="
String timestamp = "1605290625682"
String clientType = "user-api"
String scpTarget = "ScpQS.SendMessage"

public static String getAPI(String token, String apiUrl) throws IOException {
        CloseableHttpClient httpClient = HttpClients.createDefault();
        HttpGet getRequest = new HttpGet(apiUrl);
        getRequest.addHeader("Scp-Accesskey", accessKey);
        getRequest.addHeader("Scp-Signature", signature);
        getRequest.addHeader("Scp-Timestamp", timestamp);
        getRequest.addHeader("Scp-ClientType", clientType);
        getRequest.addHeader("Scp-Target", scpTarget);

        HttpResponse response = httpClient.execute(getRequest);
        int statusCode = response.getStatusLine().getStatusCode();

        if (statusCode == 200) {
            String responseBody = EntityUtils.toString(response.getEntity());
            httpClient.close();
            return responseBody;
        } else {
            String responseBody = EntityUtils.toString(response.getEntity());
            httpClient.close();
            throw new RuntimeException("Failed to Request: " + statusCode + ", " + responseBody);
        }
    }
Queue Service API
SendMessage
POST https://queueservice.service.kr-west1.e.samsungsdscloud.com
Description
Send message
Parameters
| Field name | Required or not | type | Explanation |
|---|---|---|---|
| MessageAttributes | false | MessageAttribute | |
| MessageBody | true | string | |
| MessageDeduplicationId | false | string | FIFO Queue |
| MessageGroupId | false | string | FIFO Queue |
| QueueUrl | true | string |
MessageAttribute
| Field name | Whether required | type | Explanation |
|---|---|---|---|
| BinaryValue | false | string | |
| DataType | false | string | |
| StringValue | false | string |
Responses
| HTTP Code | Description | Schema |
|---|---|---|
| 200 | Created | |
| 400 | Bad Request | |
| 403 | Forbidden |
Example HTTP request
Request Header
"Scp-Accesskey:2sd2gg=2agbdSD26svcD",
"Scp-Signature:fsfsdf235f9U35sdgf35Xsf/qgsdgsdg326=sfsdr23rsef=",
"Scp-Timestamp:1605290625682",
"Scp-ClientType:user-api",
"Scp-Target:ScpQS.SendMessage"
Request Body
{
  "QueueUrl": "https://queueservice.kr-west1.e.samsungsdscloud.com/123e54b7303749f38ca59a5c6d419a75/test",
  "MessageBody": "Hello SQS!",
  "MessageAttributes": {
    "Special": {
      "DataType": "string",
      "StingValue": "testBodyString12345678910!/wow$#@!"
    }
  }
}
Example HTTP response
200 Response
{
  "MD5OfMessageAttributes": "139818cac45117a07428826a8c533c01",
  "MD5OfMessageBody": "098f6bcd4621d373cade4e832627b4f6",
  "MessageId": "14b37b86-8117-484a-aea4-1eae3b98d5d0",
  "SequenceNumber": "11764568839"
}
SendMessageBatch
POST https://queueservice.service.kr-west1.e.samsungsdscloud.com
Description
Mass message sending
Parameters
| Field name | Required or not | type | Explanation |
|---|---|---|---|
| Entries | true | array of SendMessageBatchRequestEntry | |
| QueueUrl | true | string |
SendMessageBatchRequestEntry
| Field name | Required or not | type | Explanation |
|---|---|---|---|
| Id | true | string | |
| MessageAttributes | false | MessageAttribute | |
| MessageBody | true | string | |
| MessageDeduplicationId | false | string | FIFO Queue |
| MessageGroupId | false | string | FIFO Queue |
Responses
| HTTP Code | Description | Schema |
|---|---|---|
| 200 | Created | |
| 400 | Bad Request | |
| 403 | Forbidden |
Example HTTP request
Request Header
"Scp-Accesskey:2sd2gg=2agbdSD26svcD",
"Scp-Signature:fsfsdf235f9U35sdgf35Xsf/qgsdgsdg326=sfsdr23rsef=",
"Scp-Timestamp:1605290625682",
"Scp-ClientType:user-api",
"Scp-Target:ScpQS.SendMessageBatch"
Request Body
{
   "QueueUrl": "https://queueservice.kr-west1.dev3.samsungsdscloud.com/123e54b7303749f38ca59a5c6d419a75/test",
   "Entries": [
      {
         "Id": "1",
         "MessageBody": "test-body-1"
      },
      {
         "Id": "2",
         "MessageBody": "test-body-2"
      }
   ]
}
Example HTTP response
200 Response
{
   "Failed": [],
   "Successful": [
      {
         "Id": "2",
         "MD5OfMessageAttributes": "d41d8cd98f00b204e9800998ecf8427e",
         "MD5OfMessageBody": "82ddf04637119b9a77e9b44095f5ba11",
         "MessageId": "68aa4629-bfbc-4bb0-898b-52db94438526",
         "SequenceNumber": "31764583416"
      },
      {
         "Id": "1",
         "MD5OfMessageAttributes": "d41d8cd98f00b204e9800998ecf8427e",
         "MD5OfMessageBody": "8344ca2f91203b151e4d0aafc9248a8b",
         "MessageId": "3523740f-9e7c-429e-8514-5ec21b1d3cd8",
         "SequenceNumber": "41764583416"
      }
   ]
}
ReceiveMessage
POST https://queueservice.service.kr-west1.e.samsungsdscloud.com
Description
Message reception
Parameters
| Field name | Required status | type | Explanation |
|---|---|---|---|
| MaxNumberOfMessages | false | string | |
| MessageAttributeNames | false | array of string | |
| MessageSystemAttributeNames | false | array of string | |
| QueueUrl | true | string | |
| WaitTimeSeconds | false | string |
Responses
| HTTP Code | Description | Schema |
|---|---|---|
| 200 | Created | |
| 400 | Bad Request | |
| 403 | Forbidden |
Example HTTP request
Request Header
"Scp-Accesskey:2sd2gg=2agbdSD26svcD",
"Scp-Signature:fsfsdf235f9U35sdgf35Xsf/qgsdgsdg326=sfsdr23rsef=",
"Scp-Timestamp:1605290625682",
"Scp-ClientType:user-api",
"Scp-Target:ScpQS.ReceiveMessage"
Request Body
{
   "QueueUrl": "https://queueservice.kr-west1.dev3.samsungsdscloud.com/123e54b7303749f38ca59a5c6d419a75/test",
   "MaxNumberOfMessages": "2"
}
Example HTTP response
200 Response
{
   "messages": [
      {
         "MessageId": "14b37b86-8117-484a-aea4-1eae3b98d5d0",
         "Body": "sample-body-1",
         "Attributes": {},
         "MessageAttributes": {
            "Special": {
               "DataType": "string",
               "StingValue": "testBodyString12345678910!/wow$#@!"
            }
         },
         "MD5OfBody": "098f6bcd4621d373cade4e832627b4f6",
         "MD5OfMessageAttributes": "139818cac45117a07428826a8c533c01",
         "ReceiptHandle": "400tf1nY4HbXEP7UX4OtxPVIPlq9vw1eeKDFwNMeNiEuZvMSbvdPCBOF/P96FUF9XT7TALMzP91ViCxQjnOIyBWw+fr4EhihdJ0Z2QHau1LMHbxD+GngcM2Pv6d5HM4KCmBgB2GxFA5qpUFBPPI="
      },
      {
         "MessageId": "aee85517-1437-4877-8de8-00eee69e11dc",
         "Body": "sample-body-2",
         "Attributes": {},
         "MD5OfBody": "ad0234829205b9033196ba818f7a872b",
         "MD5OfMessageAttributes": "139818cac45117a07428826a8c533c01",
         "ReceiptHandle": "400tf1nY4HbXEP7UX4OtxPVIPlq9vw1eeKDFwNMeNiEuZvMSbvdPCBPVrfhxFxZ0XD7aBbEzP91Vi3pQ13KMxBWxrP74REyhKcgd2VLauFLMHbxD+GngcM2Pv6d5HCzyqhEoB9DHI5NmOhgaOJ4="
      }
   ]
}
DeleteMessage
POST https://queueservice.service.kr-west1.e.samsungsdscloud.com
Description
Delete message
Parameters
| Field name | Whether required | type | Explanation |
|---|---|---|---|
| QueueUrl | true | string | |
| ReceiptHandle | true | string |
Responses
| HTTP Code | Description | Schema |
|---|---|---|
| 200 | Created | |
| 400 | Bad Request | |
| 403 | Forbidden |
Example HTTP request
Request Header
"Scp-Accesskey:2sd2gg=2agbdSD26svcD",
"Scp-Signature:fsfsdf235f9U35sdgf35Xsf/qgsdgsdg326=sfsdr23rsef=",
"Scp-Timestamp:1605290625682",
"Scp-ClientType:user-api",
"Scp-Target:ScpQS.DeleteMessage"
Request Body
{
   "QueueUrl": "https://queueservice.kr-west1.dev3.samsungsdscloud.com/123e54b7303749f38ca59a5c6d419a75/test",
   "ReceiptHandle": "400tf1nY4HbXEP7UX4OtxPVIPlq9vw1eeKDFwNMeNiEuZvMSbvdPCBPVrfhxFxZ0XD7aBbEzP91Vi3pQ13KMxBWxrP74REyhKcgd2VLauFLMHbxD+GngcM2Pv6d5HCzyqhEoB9DHI5NmOhgaOJ4="
}
Example HTTP response
200 Response
DeleteMessageBatch
POST https://queueservice.service.kr-west1.e.samsungsdscloud.com
Description
Bulk message deletion
Parameters
| Field name | Whether required | type | Explanation |
|---|---|---|---|
| Entries | true | array of DeleteMessageBatchRequestEntry | |
| QueueUrl | true | string |
DeleteMessageBatchRequestEntry
| Field name | Whether required | type | Explanation |
|---|---|---|---|
| Id | true | string | |
| ReceiptHandle | true | string |
Responses
| HTTP Code | Description | Schema |
|---|---|---|
| 200 | Created | |
| 400 | Bad Request | |
| 403 | Forbidden |
Example HTTP request
Request Header
"Scp-Accesskey:2sd2gg=2agbdSD26svcD",
"Scp-Signature:fsfsdf235f9U35sdgf35Xsf/qgsdgsdg326=sfsdr23rsef=",
"Scp-Timestamp:1605290625682",
"Scp-ClientType:user-api",
"Scp-Target:ScpQS.DeleteMessageBatch"
Request Body
{
   "QueueUrl": "https://queueservice.kr-west1.dev3.samsungsdscloud.com/123e54b7303749f38ca59a5c6d419a75/test",
   "Entries": [
      {
         "Id": "1",
         "ReceiptHandle": "400tf1nY4HbXEP7UX4OtxPVIPlq9vw1eeKDFwNMeNiEuZvMSbvdPCBOF/P96FUF9XT7TALMzP91ViCxQjnOIyBWw+fr4EhihdJ0Z2QHau1LMHbxD+GngcMyJvqN5F17gym/YF4JoroeBXMSvIG0="
      },
      {
         "Id": "2",
         "ReceiptHandle": "400tf1nY4HbXEP7UX4OtxPVIPlq9vw1eeKDFwNMeNiEuZvMSbvdPCBOC8PwoFhV3Uj6JV+BnP90P3n1Q1y/RnhW0rv//GE6sf8EZjwfauVLMHbxD+GngcMyJvqN5F1Hs5T3vAZxgIV20IPdscTQ="
      }
   ]
}
Example HTTP response
200 Response
{
   "Failed": [],
   "Successful": [
      {
         "Id": "1"
      },
      {
         "Id": "2"
      }
   ]
}
2.4 - API Reference
API Reference
2.5 - CLI Reference
CLI Reference
2.6 - Release Note
Queue Service
2026.05.21
CHANGED
FIFO type feature improvement- You can configure additional features when selecting a FIFO type.
- Content-based deduplication: Hash the message body content to remove duplicate messages.
- Duplicate removal scope setting: Set the scope (within the queue / per group) for removing duplicate messages.
- When sending FIFO-type messages, you can manage them by entering Message Group ID and Message Deduplication ID information.
2026.03.19
FEATURE
Provide ServiceWatch integration and add Queue service functionality- ServiceWatch service integration provided: You can monitor data through the ServiceWatch service.
- The Queue service feature has been added.
- Provides Private Service link ID information.
- Message retention and data key reuse period setting units have been refined, and a CIDR‑based modification feature for allowed IP addresses has been added.
2025.12.16
NEW
Official service version release- The Queue Service has been officially launched.
- Through the Queue Service, you can distribute system load caused by messages, enabling efficient message management in microservice architectures or event-driven systems.
- Message transmission and reception operate independently, improving responsiveness and processing speed.