This is the multi-page printable view of this section. Click here to print.
Data Flow
- 1: Overview
- 1.1: ServiceWatch metric
- 2: How-to guides
- 2.1: Data Flow Services
- 3: API Reference
- 4: CLI Reference
- 5: Release Note
1 - Overview
Service Overview
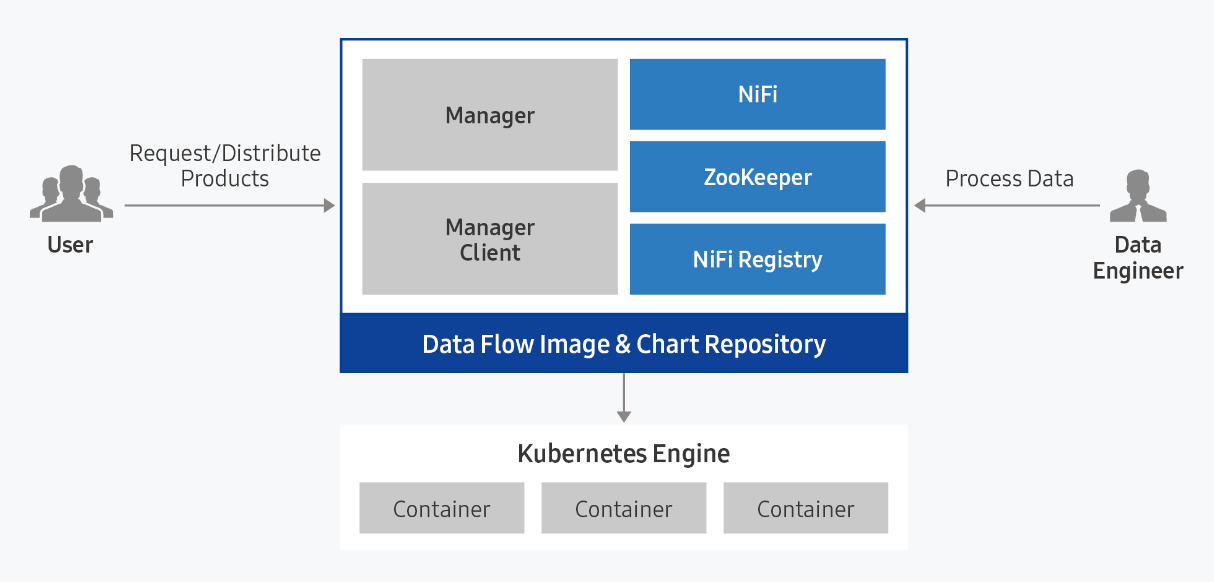
Data Flow is a data processing flow tool that visually creates processing flows for extracting large volumes of data from various data sources and for transforming/transferring stream or batch data, and provides the open-source Apache NiFi. Data Flow can be used independently in the Kubernetes Engine cluster environment of Samsung Cloud Platform, or together with other application software.
Provided Features
Data Flow provides the following features.
- Convenient Installation and Management: Data Flow can be easily installed in a standard Kubernetes cluster environment via the web-based Samsung Cloud Platform Console. * Automatically configure the architecture required for scalable clustering based on the open-source Apache NiFi, and automatically install ZooKeeper, Registry, and management modules. * Through Data Flow, you can configure and deploy the configuration files, NiFi templates, etc., needed for service connections.
- Easy Data Flow Management: You can easily create processing flows for stream/batch data in a GUI tailored to the user environment, and with GUI-based data processing flow creation, you can efficiently extract, transfer, and process data between systems.
- NiFi Template Gallery: You can share/distribute reference NiFi templates. * Data Flow provides work files for data processing flows commonly used in the field as a gallery, and users can share the data processing flow tasks they have created.
Component
Data Flow consists of Manager and Service modules, and is provided packaged with Apache NiFi.
Data Flow Manager
Data Flow Manager provides various managing features to enable more efficient use of NiFi.
- Through Data Flow Manager, you can upload the Nar File created by the customer for use in the Processor, and upload configuration files to share them.
- Frequently used NiFi templates are packaged as assets and offered in the Gallery, ready for use with a single click.
- Provides real-time monitoring of multiple services configured for the native NiFi service and resource status monitoring.
- You can easily provision configuration information for NiFi components within the cluster.
Data Flow Service
- We provide a data flow management service based on Apache NiFi.
- Automatically configures the architecture required for scalable clustering based on Apache NiFi, and automatically installs the Nifi, ZooKeeper, and Nifi Registry modules.
- When providing Nifi, you can set the Description, required resource size, connection ID/PW, and Host Alias.
- After creating the service, you can modify the Description, required resource size, connection password, Host Alias, and other settings, and apply the changes to the service.
Server spec type
When creating a Data Flow service, check the following.
- Recommended service installation specifications: CPU 21 core, Memory 57 GB, storage 100 GB or more
Provision status by region
Data Flow is available in the environments below.
| Region | Provision status |
|---|---|
| Korea West (kr-west1) | Provide |
| Korea East (kr-east1) | Provide |
| South Korea South 1 (kr-south1) | Not provided |
| South Korea South 2 (kr-south2) | Not provided |
| South Korea South 3 (kr-south3) | Not provided |
Preliminary Service
This is a list of services that must be pre-configured before creating the service. Please refer to the guide provided for each service and prepare in advance.
| Service Category | Service | Details |
|---|---|---|
| Storage | File Storage | Storage where multiple client servers share files via a network connection |
| Container | Kubernetes Engine | Kubernetes container orchestration service |
1.1 - ServiceWatch metric
In ServiceWatch, you can view Kubernetes Engine metrics for the Kubernetes Engine created by Data Flow. As with Kubernetes Engine, the metrics provided by default monitoring are data collected at one‑minute intervals.
Basic Metrics
The following are the default metrics for the Kubernetes Engine namespace.
The metrics whose names are displayed in bold below are the key metrics selected from the default metrics provided by Kubernetes Engine. Key metrics are used to build service dashboards that are automatically created for each service in ServiceWatch.
Each metric provides guidance in the user guide on which statistical values are meaningful when querying that metric, and among the meaningful statistics, the values shown in bold are the primary statistics. In the service dashboard, you can view key metrics using primary statistical values.
| Indicator name | Detailed description | unit | meaningful statistics |
|---|---|---|---|
| cluster_up | Cluster up | Count |
|
| cluster_node_count | Number of cluster nodes | Count |
|
| cluster_failed_node_count | Number of failed nodes in the cluster | Count |
|
| cluster_namespace_phase_count | Number of cluster namespace phases | Count |
|
| cluster_pod_phase_count | Cluster pod phase count | Count |
|
| node_cpu_allocatable | Node CPU allocatable | - |
|
| node_cpu_capacity | Node CPU capacity | - |
|
| node_cpu_usage | Node CPU usage | - |
|
| node_cpu_utilization | Node CPU usage | - |
|
| node_memory_allocatable | Node memory allocatable amount | Bytes |
|
| node_memory_capacity | Node memory capacity | Bytes |
|
| node_memory_usage | Node memory usage | Bytes |
|
| node_memory_utilization | Node memory usage rate | - |
|
| node_network_rx_bytes | Node network received bytes | Bytes/Second |
|
| node_network_tx_bytes | Node network transmitted bytes | Bytes/Second |
|
| node_network_total_bytes | Total bytes of the node network | Bytes/Second |
|
| node_number_of_running_pods | Number of pods running on a node | Count |
|
| namespace_number_of_running_pods | Number of running pods in the namespace | Count |
|
| namespace_deployment_pod_count | Namespace deployment pod count | Count |
|
| namespace_statefulset_pod_count | Namespace StatefulSet pod count | Count |
|
| namespace_daemonset_pod_count | Namespace daemonset pod count | Count |
|
| namespace_job_active_count | Active namespace job count | Count |
|
| namespace_cronjob_active_count | Number of active namespace cronjobs | Count |
|
| pod_cpu_usage | Pod CPU usage | - |
|
| pod_memory_usage | Pod memory usage | Bytes |
|
| pod_network_rx_bytes | Pod network received bytes | Bytes/Second |
|
| pod_network_tx_bytes | Pod network transmitted bytes | Bytes/Second |
|
| pod_network_total_bytes | Pod network total bytes | Count |
|
| container_cpu_usage | Container CPU usage | - |
|
| container_cpu_limit | Container CPU limit | - |
|
| container_cpu_utilization | Container CPU usage | - |
|
| container_memory_usage | Container memory usage | Bytes |
|
| container_memory_limit | Container memory limit | Bytes |
|
| container_memory_utilization | Container memory usage | - |
|
| node_gpu_count | Node GPU count | Count |
|
| gpu_temp | GPU temperature | - |
|
| gpu_power_usage | GPU power usage | - |
|
| gpu_util | GPU utilization | Percent |
|
| gpu_sm_clock | GPU SM clock | - |
|
| gpu_fb_used | GPU FB usage | Megabytes |
|
| gpu_tensor_active | GPU tensor utilization | - |
|
| pod_gpu_util | Pod GPU utilization | Percent |
|
| pod_gpu_tensor_active | Pod GPU Tensor Utilization Rate | - |
|
2 - How-to guides
Users can create the service by entering the required Data Flow information and selecting detailed options through the Samsung Cloud Platform Console.
Create Data Flow
You can create and use the Data Flow service from the Samsung Cloud Platform Console.
To create a Data Flow, follow these steps.
All Services > Data Analytics > Data Flow menu, click it. 1. Navigate to the Service Home page of Data Flow.
On the Service Home page, click the Create Data Flow button. 2. Navigate to the Create Data Flow page.
On the Data Flow creation page, enter the information required to create the service, and select detailed options.
- Select the required information in the Version Selection area.
Category required statusDetailed description Data Flow version Required Select version of the selected image - Provide a version list of the offered server image
Table. Data Flow version selection item - In the Cluster Selection area, enter or select the required information. * To install Data Flow, you first need to create nodes for the Kubernetes cluster and the work environment.
Category RequiredDetailed description Cluster name Required Select cluster to use Table. Data Flow cluster selection item - Service Information Input area, enter or select the required information.
Category RequiredDetailed description Data Flow name Required Enter Data Flow name - must start with a lowercase English letter and must not end with a special character (
-), use lowercase English letters, numbers, and special characters (-) to enter 3 to 30 characters
Storage Class Required Select the storage class used by the selected cluster Explanation Selection Enter additional information or description about Data Flow within 150 characters. Domain Settings Required Enter Data Flow domain - must start with a lowercase English letter and must not end with a special character (
-), enter using lowercase letters, numbers, and special characters (-) with a length of 3 to 50 characters
- {Data Flow명}.{설정한 도메인} becomes the Data Flow access URL.
Node Selector Required To install on a specific node, enter a distinguishable label among the node’s labels - If you enter an incorrect node label, installation errors may occur, so verify the node label in advance
- The node label can be found in the node’s yaml file
account Required Data Flow Manager account input - ID: Enter a value between 6 and 30 characters, starting with a lowercase English letter and using lowercase letters and numbers
- Password: Enter 8~50 characters including uppercase (English), lowercase (English), numbers, and special characters (
!@#$%^&*)
- Password Confirmation: Enter the password again to confirm
Host Alias Select Add host information to be connected with Data Flow (up to 20 total, including defaults) - Use after selecting, click the + button
- Hostname: Enter a host name or domain format using lowercase letters, numbers, and special characters (
-), 3~63 characters long
- IP: Enter in IP format
- Click the X button to delete
- The added host information can be used only if the firewall between the cluster and the server is open
Table. Data Flow service information input items - must start with a lowercase English letter and must not end with a special character (
- In the Additional Information Input area, enter or select the required information.
Category Required statusDetailed description tag Selection Add tag - Add tag Click the button to create and add a tag, or add an existing tag.
- You can add up to 50 tags.
- Added new tags are applied after the service creation is completed.
Table. Data Flow additional information input fields
- Select the required information in the Version Selection area.
Summary Check the detailed information and estimated charges generated in the panel, and click the Complete button.
- When creation is complete, check the created resources on the Data Flow List page.
Check detailed information of Data Flow
You can view and edit the complete list of resources and detailed information for the Data Flow. Data Flow Details page consists of Details, Tags, Activity History tabs.
Follow these steps to view detailed information of the Data Flow.
- All Services > Data Analytics > Data Flow menu, click it. 1. Go to the Service Home page of Data Flow.
- Click the Data Flow menu on the Service Home page. 2. Navigate to the Data Flow List page.
- On the Data Flow List page, click the resource to view detailed information. 3. Data Flow Details Navigate to the page.
- Data Flow Details At the top of the page, status information and additional feature information are displayed.
Category Detailed description Status display Data Flow status - Creating: Creating
- Running: Running, Data Flow Services can be created
- Updating: Updating settings
- Terminating: Terminating service
- Error: Error occurred during creation or service abnormal state
Hosts file setting information Button that checks and copies the host file information to access Data Flow Service termination Button to cancel the service Table. Data Flow status information and additional functions
- Data Flow Details At the top of the page, status information and additional feature information are displayed.
Detailed Information
Data Flow list page lets you view detailed information of the selected resource and, if needed, modify the information.
| Category | Detailed description |
|---|---|
| Service | Service Name |
| Resource Type | Resource Type |
| SRN | Unique resource ID in Samsung Cloud Platform
|
| Resource Name | Resource name
|
| Resource ID | Unique resource ID in the service |
| Constructor | User who created the service |
| Creation Date/Time | Service creation date and time |
| Modifier | User who edited the service information |
| Modification date and time | Date and time the service information was modified |
| Cluster name | Cluster name of the configured servers |
| Storage Class | The storage class used by the selected cluster |
| Explanation | Additional information or explanation about Data Flow |
| Domain Settings | Data Flow domain name |
| Node Selector | Node Label |
| Web Url | Data Flow URL |
| Account | Data Flow Manager account |
| Host Alias | Host information to be connected with Data Flow |
Tag
Data Flow List page lets you view the tag information of the selected resource, and add, modify, or delete it.
| Category | Detailed description |
|---|---|
| Tag List | Tag list
|
Job History
On the Data Flow List page, you can view the operation history of the selected resource.
| Category | Detailed description |
|---|---|
| Task History List | Resource Change History
|
Terminate Data Flow
You can cancel unused Data Flows to reduce operating costs. However, if you terminate the service, the running service may be discontinued immediately, so you should proceed with the termination only after fully considering the impact of any service interruption.
To cancel Data Flow, follow the steps below.
- All Services > Data Analytics > Data Flow click the menu. 1. Navigate to the Service Home page of Data Flow.
- On the Service Home page, click the Data Flow menu. 2. Go to the Data Flow List page.
- Data Flow List page, select the resource to terminate, and click the Terminate Service button.
- When the termination is complete, check on the Data Flow List page whether the resource has been terminated.
- Data Flow cancellation requires first deleting the connected Data Flow Services.
- If you cancel Data Flow, the created namespace will also be deleted.
2.1 - Data Flow Services
Users can create the service by entering the required information for Data Flow Services within the Data Flow service through the Samsung Cloud Platform Console and selecting detailed options.
Creating Data Flow Services
Users can add a service by selecting detailed options for Data Flow or by entering configuration values.
To create Data Flow Services, follow these steps.
Click the All Services > Data Analytics > Data Flow menu. You will be taken to the Data Flow Service Home page.
From the Service Home page, click Data Flow Servies. Navigate to the Data Flow Services list page.
On the Data Flow Services List page, click the Data Flow Services Create button. You will be taken to the Data Flow Services Create page.
Data Flow Services Creation page: enter the information required to create the service and select detailed options.
- Enter or select the required information in the Service Information Input area.
Category RequiredDetailed description Data Flow name Required Select Data Flow Flow Service name Required Enter Data Flow Services name - Start with a lowercase English letter and ensure it does not end with a special character (
-), using lowercase letters, numbers, and special characters (-) to enter 3 to 30 characters
Storage Class Required Select the storage class used by the selected cluster description Selection Enter additional information or description about Data Flow Services within 150 characters. Domain Settings Required Data Flow Services domain input - Start with a lowercase English letter and ensure it does not end with a special character (
-), using lowercase letters, numbers, and special characters (-) to enter 3 to 50 characters
- {Data Flow Services name}.{configured domain} becomes the Data Flow Services access URL.
Node Selector Required To install on a specific node, enter a distinguishable label among the node’s Labels - If you enter an incorrect node label, installation errors may occur, so verify the node label in advance
- The node label can be found in the node’s yaml file
Service Workload Required - Nifi: Module that provides Apache Nifi’s services and UI
- Nifi Registry: Module that configures and deploys Nifi templates
- Zookeeper: Module that supports proper distributed processing of Nifi across multiple nodes
account Required Enter Nifi account - ID: Enter a value between 6 and 30 characters, starting with a lowercase English letter and using lowercase letters and numbers
- Password: Enter 8 to 50 characters, including uppercase letters, lowercase letters, numbers, and special characters(
!@#$%^&*)
- Confirm Password: Re-enter the password exactly the same
Table. Data Flow Services service information input items - Start with a lowercase English letter and ensure it does not end with a special character (
- In the Additional Information Input area, enter or select the required information.
Category RequiredDetailed description Host Alias Selection Add host information to be linked with Data Flow (up to 20 total, including defaults) - Select Use, then click the + button
- Hostname: Enter a hostname or domain format using lowercase letters, numbers, and special characters (
-) with a length of 3 to 63 characters
- IP: Enter in IP format
- To delete, click the X button
- The added host information can be used only if the firewall between the cluster and the server is open
tag Selection Add Tag - Add Tag Click the button to create and add a tag, or add an existing tag.
- You can add up to 50 tags.
- The newly added tags will be applied after the service creation is completed.
Table. Data Flow additional information input fields
- Enter or select the required information in the Service Information Input area.
Summary Verify the detailed information and estimated billing amount generated in the panel, then click the Complete button.
- Once creation is complete, check the created resources on the Data Flow Services List page.
Data Flow Services Check detailed information
You can view and edit the complete list of resources and detailed information for Data Flow Services. Data Flow Services Details page consists of Details, Tags, Operation History tabs.
To view detailed information about Data Flow Services, follow these steps.
- Click the All Services > Data Analytics > Data Flow menu. Navigate to the Service Home page of Data Flow.
- On the Service Home page, click the Data Flow Services menu. You will be taken to the Data Flow Services list page.
- On the Data Flow Services List page, click the resource to view detailed information. You will be taken to the Data Flow Services Details page.
- Data Flow Services Details At the top of the page, status information and additional feature information are displayed.
Category Detailed description Status display Data Flow Services status - Creating: Creating
- Running: Running
- Updating: Updating configuration
- Terminating: Terminating service
- Error: Creation failed or service unavailable
Hosts file configuration information Button to view and copy the host file information needed to access Data Flow Services Delete Data Flow Services Cancel Service button Table. Data Flow Services status information and additional functions
- Data Flow Services Details At the top of the page, status information and additional feature information are displayed.
Detailed Information
Data Flow Services List page lets you view detailed information of the selected resource and edit the information if needed.
| Category | Detailed description |
|---|---|
| service | Service name |
| Resource Type | Resource Type |
| SRN | Unique resource ID in Samsung Cloud Platform
|
| Resource name | Resource name
|
| Resource ID | Unique resource ID in the service |
| constructor | User who created the service |
| Creation date and time | Service creation date and time |
| editor | User who edited the service information |
| Modification date | Date and time the service information was modified |
| Data Flow name | Data Flow name |
| Storage Class | Storage class used by the selected cluster |
| description | Additional information or explanation about Data Flow Services |
| Domain Settings | Data Flow Services domain name |
| Node Selector | Node Label |
| Web Url | Data Flow Services URL |
| account | Airflow account |
| Host Alias | Host information to be connected to Data Flow Services |
tag
Data Flow Services List page allows you to view the tag information of the selected resource, and you can add, modify, or delete it.
| Category | Detailed description |
|---|---|
| Tag list | Tag list
|
Job History
Data Flow Services List page lets you view the operation history of the selected resource.
| Category | Detailed description |
|---|---|
| Task History List | Resource Change History
|
Terminate Data Flow Services
You can cancel unused Data Flow Services to reduce operating costs. However, if you cancel the service, the running service may be stopped immediately, so you should thoroughly consider the impact of service interruption before proceeding with the cancellation.
To cancel Data Flow or Data Flow Services, follow the steps below.
- Click the All Services > Data Analytics > Data Flow menu. You will be taken to the Service Home page of Data Flow.
- On the Service Home page, click the Data Flow Services menu. You will be taken to the Data Flow Services list page.
- On the Data Flow Services List page, select the resource to cancel, and click the Data Flow Services Delete button.
- When termination is complete, check on the Data Flow Services list page whether the resource has been terminated.
- If you cancel Data Flow Services, the created namespace will also be deleted.