This is the multi-page printable view of this section. Click here to print.
Cloud Hadoop
- 1: Overview
- 1.1: ServiceWatch metric
- 2: How
- 3: API Reference
- 4: Release Note
1 - Overview
Service Overview
Cloud Hadoop is a service for easily and quickly analyzing large-scale data, providing a Hadoop cluster (computing resources, management tools, and applications) used for big data processing and analysis in the SCP environment.
Features
Cloud Hadoop provides an automated cluster creation service through the Hadoop Manager and the Hadoop Ecosystem(ecosystem) composed of Spark, HDFS(Hadoop distributed file system), Hive, etc., enabling anyone to easily build, optimize, or flexibly scale infrastructure for big data analysis.
Service Diagram
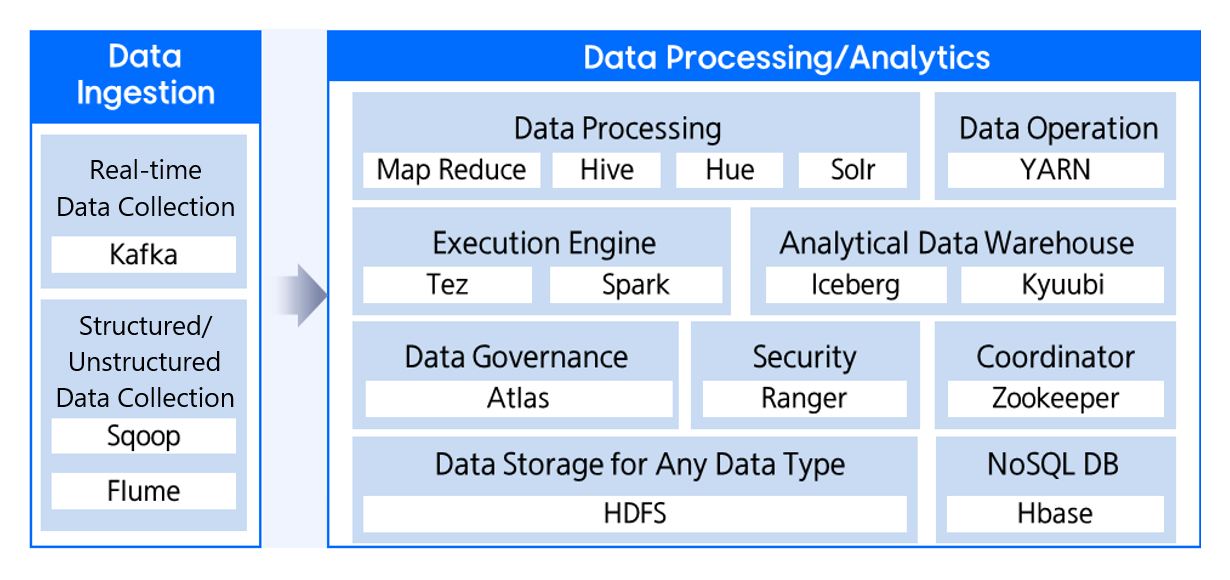
Provided features
Cloud Hadoop provides the following features.
Provide Hadoop Cluster as a cloud service
- Providing a Hadoop Cluster through automated cluster installation in the SDS Cloud environment
- Perform essential operational activities for cluster management (cluster operation/monitoring)
- Provides a Hadoop ecosystem with verified interoperability and allows users to access the server (VM)
Offer the Hadoop service stack as separate products (increase nodes per product)
- Minimum node allocation per product for stable service operation
- Providing diverse product selection opportunities to meet user needs and reduce costs
Providing user-friendly features for Hadoop services
- Provides installation and management functions for each Hadoop ecosystem, optimal configuration values, and version management features.
- Provide an integrated monitoring dashboard for system resources
- Provides Service Failure Alert feature
Component
We package the major components of the Hadoop ecosystem to deliver an enterprise data cloud.
Service Configuration
Cloud Hadoop provides the following services.
- Basic Installation Service
- HDFS 3.3.6
- YARN 3.3.6
- Hbase 2.4.17
- Hive 3.1.2
- Tez 0.9.1
- Hue 4.11.0
- Solr 8.11.4
- Spark 3.4.1
- Zookeeper 3.8.5
- Additional Option Service
- Data Governance: Atlas 2.1.0, Ranger 2.1.0
- Analytical Data Warehouse: Iceberg 1.8.0, Kyuubi 1.10.2
- Data Ingestion: Sqoop 1.4.7, Kafka 3.9.1, Flume 1.11.0
Server type
The server types supported by Cloud Hadoop are as follows.
Category | example | Detailed description |
|---|---|---|
| Server type | Standard | Provided server types
|
| Server size | s1v4m32 | Provided server specifications
|
The minimum specifications for using Cloud Hadoop are as follows.
Category | Algebra | Instance size (user-selected value) |
|---|---|---|
| Master | 2(fixed) | CPU: 4 Core Memory: 32 GB |
| Worker | 3(minimum) | CPU: 4 Core Memory: 32 GB |
| Data Governance | None | |
| Analytical Data Warehouse | None | |
| Ingestion | 3 (minimum) | CPU: 4 Core Memory: 32 GB |
Provision status by region
Cloud Hadoop is available in the following environments.
| region | Provision status |
|---|---|
| Korea West (kr-west1) | Provide |
| Korea East (kr-east1) | Provide |
| South Korea South1(kr-south1) | Not provided |
| South Korea South 2 (kr-south2) | Not provided |
| South Korea 3 (kr-south3) | Not provided |
Preliminary Service
This is a list of services that need to be pre-configured before creating the service. Please refer to the guide provided for each service and prepare in advance.
| Service Category | service | Detailed description |
|---|---|---|
| Networking | VPC | A service that provides an isolated virtual network in a cloud environment |
| Networking | Security Group | Virtual firewall that controls server traffic |
| Storage | Object Storage | Object storage that simplifies data storage and retrieval |
1.1 - ServiceWatch metric
You can view Virtual Server metrics in ServiceWatch for servers created in Cloud Hadoop. Like Virtual Server, the metrics provided by default monitoring are data collected at 5‑minute intervals. In the Virtual Server detailed view, enabling detailed monitoring allows you to view data collected at 1‑minute intervals. For more details, Virtual Server > Enable ServiceWatch Detailed Monitoring
- The basic monitoring and detailed monitoring of Cloud Hadoop are provided with the same metrics as Virtual Server, and the namespace is also provided as Virtual Server.
Basic Metrics
The following are the basic metrics for the Virtual Server namespace.
The indicators whose names are displayed in bold below are the key indicators selected from the basic metrics provided by Virtual Server. Key metrics are used to build service dashboards that are automatically created for each service in ServiceWatch.
Each metric provides guidance in the user guide on which statistical value is meaningful when viewing that metric, and among the meaningful statistics, the values shown in bold are the primary statistics. In the service dashboard, you can view key metrics using primary statistical values.
| Performance items | Detailed description | unit | meaningful statistics |
|---|---|---|---|
| Instance State | Instance status display
| None |
|
| CPU Usage | CPU usage | Percent |
|
| Disk Read Bytes | Bytes read from block device (bytes) | Bytes |
|
| Disk Read Requests | Number of read requests on a block device | Count |
|
| Disk Write Bytes | Write capacity (bytes) on block device | Bytes |
|
| Disk Write Requests | Number of write requests on block device | Count |
|
| Network In Bytes | Received bytes on the network interface | Bytes |
|
| Network In Dropped | Number of packet drops received on the network interface | Count |
|
| Network In Packets | Number of packets received on the network interface | Count |
|
| Network Out Bytes | Data transmitted from the network interface (bytes) | Bytes |
|
| Network Out Dropped | Number of packet drops transmitted from the network interface | Count |
|
| Network Out Packets | Number of packets transmitted on the network interface | Count |
|
2 - How
Users can create the service by entering the required Cloud Hadoop information and selecting detailed options through the Samsung Cloud Platform Console.
Create Cloud Hadoop
You can create and use the Cloud Hadoop service from the Samsung Cloud Platform Console.
To create Cloud Hadoop, follow the steps below.
All Services > Data Analytics > Cloud Hadoop Click the menu. 1. Go to the Service Home page of Cloud Hadoop.
On the Service Home page, click the Create Cloud Hadoop button. 2. Go to the Create Cloud Hadoop page.
Cloud Hadoop Creation page: enter the information required to create the service and select detailed options.
- In the Image and version selection area, select the required information.
Category RequiredDetailed description image Required Select the type of image provided - Cloud Hadoop With Ubuntu 22.04
Image version Required Select version of the selected image - Provide version list of the provided image
Table. Cloud Hadoop image and version selection options - In the Service Information Input area, enter or select the required information.
Category Required statusDetailed description Server name Prefix Required The server name on which Cloud Hadoop will be installed - must start with a lowercase English letter and be entered using lowercase letters, numbers, and the special character (
-) with a length of 3 to 13 characters
- A postfix such as 001, 002 is appended based on the server name to generate the actual server name
Cluster name Required Cluster name formed by the servers - Enter using English letters, 3 ~ 20 characters
- A cluster is a unit that groups multiple servers
Planned Compute Select For servers where Cloud Hadoop is installed, selecting a Planned Compute contract allows usage at a discounted price - All Services > Financial Management > Planned Compute menu can be requested
- For more details, refer to Planned Compute 신청하기
Master Node > Master Node Count Required Number of Master nodes - The number of Master nodes is fixed at two per Hadoop cluster
- A Master node is the node where Hadoop Master is installed and provides the default HA (high availability) configuration
- The Master node includes Hadoop Manager and various Hadoop ecosystem components installed together
Master Node > Server Type Required CPU and Memory types for distributed data processing - Standard-1: standard specifications commonly used
- High Capacity-2: large-capacity server with 24 vCores or more
- Recommended specifications: vCPU 8, Memory 64G
Master Node > Block Storage Required Block Storage type to be used for the Master node - Basic OS: Area where the engine is installed
- DATA: Data file storage area
- After selecting the storage type, enter the capacity (see Block Storage 생성하기 for details on each Block Storage type)
- SSD: High‑performance standard volume
- HDD: Standard volume
- Capacity can be entered in multiples of 8 within the range 25 to 1,536
- After selecting the storage type, enter the capacity (see Block Storage 생성하기 for details on each Block Storage type)
- Delete on termination: When the server is terminated, the volume is terminated as well, but volumes with snapshots are not deleted even when Delete on termination is enabled.
- Add Disk: Data storage area
- After selecting Use, enter the capacity of the storage
- Click the + button to add storage, or the x button to delete. Up to 9 can be added
- Capacity can be entered in multiples of 8 within the range 25 to 1,536
Worker Node > Worker Node count Required Number of Worker nodes - Worker nodes can be selected from 3 to 90
- Worker nodes are the nodes where Hadoop data nodes and the Resource Manager are installed, and they process and store distributed data
Worker Node > Server Type Required CPU and Memory types for distributed data processing - Standard-1: Standard specification commonly used
- High Capacity-2: Large server with 24 vCores or more
- Recommended specifications: vCPU 8, Memory 64G
- For detailed information about the server types provided by Cloud Hadoop, see Cloud Hadoop 서버 타입
Worker Node > Block Storage Required Block Storage type to be used on the Worker node - Basic OS: Area where the engine is installed
- DATA: Data file storage area
- After selecting the storage type, enter the capacity (refer to Block Storage creation for details on each Block Storage type)
- SSD: High‑performance standard volume
- HDD: Standard volume
- Capacity can be entered in multiples of 8 within the range 25 to 1,536
- After selecting the storage type, enter the capacity (refer to Block Storage creation for details on each Block Storage type)
- Delete on termination: When the server is terminated, the volume is terminated as well; volumes with snapshots are not deleted even when Delete on termination is enabled.
- Add Disk: Data storage area
- Select Use, then enter the capacity of the storage
- Click the + button to add storage, or the x button to delete. Up to 9 can be added
- Capacity can be entered in multiples of 8 within the range 25 to 1,536
Data Governance Select Additional Hadoop ecosystem installation for data governance - If you select Use, Atlas and Ranger are installed automatically
- Cannot be modified or removed after creation
Analytical Data Warehouse Selection Additional installation of Hadoop ecosystem for fast data analysis - If you select Use, Iceberg and Kyuubi will be installed automatically
- Cannot be modified or removed after creation
Data Ingestion Select Additional installation of Hadoop ecosystem for data collection and loading - If you select Use, Kafka, Flume, and Sqoop will be installed automatically
Data Ingestion > Ingestion Node count Select Number of Ingestion nodes - Ingestion nodes can be selected from 3 to 10
- Worker nodes are the nodes where Hadoop data nodes and the Resource Manager are installed, and they process and store distributed data
Data Ingestion > Server Type Select CPU and Memory types for distributed data processing - Standard-1: Standard specification commonly used
- High Capacity-2: Large server with 24 vCores or more
- Recommended specifications: vCPU 8, Memory 64G
- For detailed information about the server types provided by Cloud Hadoop, see Cloud Hadoop 서버 타입
Data Ingestion > Block Storage Select Block Storage type to be used for the Ingestion node - Basic OS: Area where the engine is installed
- DATA: Data file storage area
- After selecting the storage type, enter the capacity (see Block Storage 생성하기 for details on each Block Storage type)
- SSD: High‑performance general volume
- HDD: General volume
- Capacity can be entered in multiples of 8 within the range 25 to 1,536
- After selecting the storage type, enter the capacity (see Block Storage 생성하기 for details on each Block Storage type)
- Add Disk: Data storage area
- After selecting Use, enter the storage capacity
- Click the + button to add storage, or the x button to delete. Up to 9 can be added
- Capacity can be entered in multiples of 8 within the range 25 to 1,536, and up to 9 can be created
Object Storage bucket Selection Object Storage to be used in the cluster - After selecting Bucket selection, select the Object Storage bucket
- You can add up to 10, to delete click the x button
- After adding a bucket, to set access permission for that bucket, select server resources from the All Services > Object Storage list > the relevant Object Storage Details > Access Control > Allow Server Resources menu
Table. Cloud Hadoop Service Information Input Items - must start with a lowercase English letter and be entered using lowercase letters, numbers, and the special character (
- Required Information Input area: enter or select the required information.
Category RequiredDetailed description Enter PrivateLink information | Enter the authentication key for PrivateLink connection
- Create authentication key: IAM > My info > Authentication Key Management tab > Create Authentication Key button click
- Copy authentication key: IAM > My info > Authentication Key Management tab > Click the generated authentication key > Authentication Key Details > Basic Information tab > Authentication Key > View button click > Copy the authentication key from the popup window
- Access Key: Enter Access Key; can be entered only when first applying for the service
- Secret Key: Enter Secret Key; can be entered only when first applying for the service
| Enter the account and password to log in to Cloud Hadoop Manager
- Account Name: Enter the account to use for login
- Password: Enter the password to use for login
- Confirm Password: Re-enter the password
| Network settings for servers created by the service
- Select when you want to apply the same settings to all installed servers
- Select the pre‑created VPC, Availability Zone, and Subnet
- IP is generated automatically
- Public NAT: Available when the VPC is connected to an Internet Gateway and the Subnet is of type Public. If Use is checked, NAT IP can be configured
- Select when you want to apply different settings for each server being installed
- Select a pre‑created VPC, Availability Zone, and Subnet
- Displayed automatically based on the selected node
- Enter the IP for each server
- Public NAT: Available when the VPC is connected to an Internet Gateway and the Subnet is of Public type. Checking Use enables NAT IP configuration. For more information, see Public IP 생성하기
- Click the Select button to choose from the list
- Before the service creation is complete, you can delete the added Security Group by clicking the x button on the right
- Default login account per OS
- Alma Linux: almalinux
- Oracle Linux: cloud-user
- RHEL:cloud-user
- Rocky Linux: rocky
- Ubuntu: ubuntu
- Windows: sysadmin
Table. Cloud Hadoop required information entry fieldsCaution- For PrivateLink connections, you must enter an authentication key generated as a permanent key, and you must not delete that key. *
If the authentication key expires or is deleted, making the key invalid, it may cause issues with resource changes and service termination in the Cloud Hadoop service. - When using a public subnet and assigning a public IP, you may be exposed to security attacks such as external hacking and malware infection.
information- When creating a Cloud Hadoop service, only one Security Group can be selected, but after the service is created, up to four Security Groups can be selected, including the initially chosen Security Group. * However, the Security Group selected when creating the service for the first time cannot be modified or deleted.
- If Cloud Hadoop is installed correctly, API communication between the installed Cloud Hadoop service and the Samsung Cloud Platform Console may occur continuously for the following reasons.
- Changing resources of Cloud Hadoop service (adding nodes and resources)
- Changing the state of the Cloud Hadoop service (start, stop, restart, and termination)
- Check the status of the Cloud Hadoop service (Health Check)
- In the Additional Information Input area, enter or select the required information.
Category RequiredDetailed description time zone Select the time zone the Database will use tag Selection Add Tag - Add Tag Click the button to create and add a tag, or add an existing tag
- Up to 50 can be added
- The newly added tags are applied after the service creation is completed
Table. Cloud Hadoop additional information input items
- In the Image and version selection area, select the required information.
Summary Check the detailed information and estimated charges generated in the panel, and click the Complete button.
- Once creation is complete, check the created resource on the Resource List page.
Check Cloud Hadoop detailed information
The Cloud Hadoop service allows you to view and edit the full list of resources and detailed information. Cloud Hadoop Details page consists of Details, Tags, Job History tabs.
To view detailed information about the Cloud Hadoop service, follow these steps.
- All Services > Data Analytics > Cloud Hadoop Please click the menu. 1. Go to the Service Home page of Cloud Hadoop.
- On the Service Home page, click the Cloud Hadoop menu. 2. Go to the Cloud Hadoop List page.
- On the Cloud Hadoop List page, click the resource to view detailed information. 3. Cloud Hadoop Details Navigate to the page.
- Cloud Hadoop Details At the top of the page, status information and additional feature information are displayed.
Category Detailed description status Cloud Hadoop service status - Creating: Creating
- Running: Creation complete, service available
- Updating: Updating settings
- Stopping: Stopping
- Starting: Starting
- Stopped: Stopped
- Restarting: Restarting
- Terminating: Terminating service
- Error: Error during creation or service abnormal state
- Undeployed: Error during deployment
Start Start operating the discontinued service Stop Force terminate service Restart Restart the service Add Worker Node Add a server with the same specifications as the previously created Worker node to the cluster. Service termination Terminate the entire Cloud Hadoop service and server Table. Cloud Hadoop status information and additional features
- Cloud Hadoop Details At the top of the page, status information and additional feature information are displayed.
- The status indicator shows the status of the Cloud Hadoop service, and the server status can be checked in the server information.
- Start, Stop, Restart buttons control only the Cloud Hadoop service, while server control can be managed from the Compute > Virtual Server list.
Detailed Information
On the Cloud Hadoop List page, you can view detailed information of the selected resource and edit the information if needed.
| Category | Detailed description |
|---|---|
| Server Information | Server information configured in this cluster |
| service | Service name |
| Resource Type | Resource Type |
| SRN | Unique resource ID in Samsung Cloud Platform
|
| Resource name | Resource name
|
| Resource ID | Unique resource ID in the service |
| Constructor | User who created the service |
| Creation Date/Time | Service creation date and time |
| Modifier | User who edited the service information |
| Modification date and time | Date and time the service information was modified |
| Image version | OS and service image version |
| Cluster name | Cluster name of the configured servers |
| Planned Compute | Resource status with Planned Compute configured
|
| Manager access URL | Cloud Hadoop Manager access URL |
| time zone | The standard time zone for the service |
| PrivateLink information | Access Key, Secret Key information |
| Network | VPC, Availability Zone, Subnet information |
| Security Group | Security Group List |
| Keypair name | Created/Selected Keypair Name |
| Basic Service | Cloud Hadoop Basic Service Stack List |
| Option Service | Cloud Hadoop option service stack list
|
| Master | Server type, base OS, and Disk information for the Master node
|
| Worker | Server type, default OS, and disk information for the Worker node |
| Ingestion | Server type, default OS, and Disk information for the Ingestion node |
| Object Storage bucket | Object Storage List |
Tag
Cloud Hadoop List page lets you view the tag information of the selected resource, and add, modify, or delete it.
| Category | Detailed description |
|---|---|
| Tag List | Tag list
|
Job History
Cloud Hadoop List page allows you to view the operation history of the selected resource.
| Category | Detailed description |
|---|---|
| Task History List | Resource Change History
|
Managing Cloud Hadoop Resources
If you need to modify the existing configuration options of a created Cloud Hadoop resource or require additional configuration, you can perform the work on the Cloud Hadoop Details page.
If expansion of the Cloud Hadoop cluster is needed due to increased workload or other reasons, you can add Worker nodes with the same specifications as the existing Worker nodes.
- Each Cloud Hadoop cluster can use up to 10 Worker nodes.
- When adding nodes, all settings except the number of nodes to add and the IP/NAT IP are fixed to the configuration entered during the service application.
- If adding a node fails, contact the Samsung Cloud Platform service desk for troubleshooting.
Worker Node 추가 (네트워크 설정: 공통 설정) {#network}
You can add a Worker node to a Cloud Hadoop cluster whose network settings are created as common settings.
- Click the All Services > Data Analytics > Cloud Hadoop menu. 1. Navigate to the Service Home page of Cloud Hadoop.
- On the Service Home page, click the Cloud Hadoop menu. 2. Go to the Cloud Hadoop List page.
- Cloud Hadoop List On the page, click the resource where you want to add a node. 3. Cloud Hadoop Details Navigate to the page.
- Click the Add Worker Node button. 4. Go to the Add Worker Node page.
- After selecting Worker Node count, click the Complete button.
- All settings, including the server name of each Worker node, are fixed to the configuration entered when applying for the service.
Add Worker Node (Network configuration: per-server settings)
You can add Worker nodes to a Cloud Hadoop cluster whose network configuration is set as per-server settings.
To add a Worker node, follow the steps below.
- All Services > Data Analytics > Cloud Hadoop menu, please click. 1. Navigate to the Service Home page of Cloud Hadoop.
- On the Service Home page, click the Cloud Hadoop menu. 2. Cloud Hadoop List navigate to the page.
- Cloud Hadoop List page, click the resource you want to add a node to. 3. Cloud Hadoop Details Go to the page.
- Add Worker Node Click the button. 4. Go to the Add Worker Node page.
- Please select the Worker Node count. 5. The server configuration area is automatically added based on the number of selected nodes.
- In the added server configuration area, enter IP and NAT IP, then click the Complete button.
- All settings, including the server name of each Worker node, are fixed to the configuration entered when applying for the service.
Security Group Change
To change the Security Group of Cloud Hadoop, follow these steps.
- All Services > Data Analytics > Cloud Hadoop Click the menu. 1. Navigate to the Service Home page of Cloud Hadoop.
- On the Service Home page, click the Cloud Hadoop menu. 2. Go to the Cloud Hadoop List page.
- On the Cloud Hadoop List page, click the resource whose Security Group you want to change. 3. Cloud Hadoop Details Go to the page.
- Click the Edit button of Security Group on the detail information page. 4. Security Group selection The popup window opens.
- Search for the Security Group you want to add, then select the checkbox. 5. The selected Security Group is displayed in the list below.
- Click Confirm. 6. The selected Security Group will be applied.
- When creating a Cloud Hadoop service, you can select up to four Security Groups, including the Security Group you chose. * However, the Security Group selected when creating the service for the first time cannot be modified or deleted.
Add optional service
You can additionally install the Cloud Hadoop ecosystem (Data Governance, Analytical Data Warehouse, Data Ingestion).
Data Governance/Analytical Data Warehouse addition
To install Data Governance and Analytical Data Warehouse additionally, follow the steps below.
- All Services > Data Analytics > Cloud Hadoop Click the menu. 1. Navigate to the Service Home page of Cloud Hadoop.
- On the Service Home page, click the Cloud Hadoop menu. 2. Cloud Hadoop List navigate to the page.
- Cloud Hadoop List Click the resource on the page where you want to add an optional service. 3. Cloud Hadoop Details Go to the page.
- On the detail information page, click the Add button for the option service you want to add. 4. The notification popup opens.
- After reviewing the contents of the popup window, click the Confirm button. 5. The option service will be added automatically.
- It may take some time depending on the scale.
Data Ingestion addition
To install Data Ingestion additionally, follow the steps below.
- All Services > Data Analytics > Cloud Hadoop menu, please click. 1. Go to the Service Home page of Cloud Hadoop.
- On the Service Home page, click the Cloud Hadoop menu. 2. Go to the Cloud Hadoop List page.
- Cloud Hadoop List On the page, click the resource where you want to add an optional service. 3. Cloud Hadoop Details navigate to the page.
- On the detail information page, click the Add button of Data Ingestion. 4. Add Data Ingestion Navigate to the page.
- After selecting the number of Ingestion Nodes, server type, and storage type and capacity, click the Complete button. 5. The option service will be added automatically.
- It may take some time depending on the scale.
Change Server Type
You can change the server type of the Master node, Worker node, or Ingestion node in Cloud Hadoop.
To change the server type, follow the steps below.
- If the server type is configured as Standard, it cannot be changed to High Capacity. * If you want to change to High Capacity, create a new service.
- If you modify the server type, a server restart is required. * Please separately verify any software license modifications or software settings and their implementation due to specification changes.
- Click the All Services > Data Analytics > Cloud Hadoop menu. 1. Go to the Service Home page of Cloud Hadoop.
- On the Service Home page, click the Cloud Hadoop menu. 2. Go to the Cloud Hadoop List page.
- Cloud Hadoop List page, click the resource whose server type you want to change. 3. Cloud Hadoop Details Navigate to the page.
- On the detail information page, click the Edit button of the Server Type for the node you want to change. 4. Edit Server Type The popup window opens.
- After selecting the server type, click the Confirm button. 5. The notification popup opens.
- Scale-Down of server type is not allowed.
- After reviewing the contents of the popup window, click the Confirm button.
- The entire server on the node will be updated to the requested specifications, and the Cloud Hadoop cluster will restart.
Expanding Storage
Storage added to the data area can be expanded up to a maximum of 12 TB based on the initially allocated capacity. You can expand storage without stopping Cloud Hadoop operation, and if it is configured as a cluster, all nodes are expanded simultaneously.
- Storage capacity cannot be reduced and can only be expanded.
- It can be expanded up to a maximum of 12 TB, and if more than 12 TB is required, it can be expanded through a service request.
- It may take some time for the expansion to be completed after a request for expansion.
To increase storage capacity, follow the steps below.
- All Services > Data Analytics > Cloud Hadoop Click the menu. 1. Navigate to the Service Home page of Cloud Hadoop.
- On the Service Home page, click the Cloud Hadoop menu. 2. Cloud Hadoop List Navigate to the page.
- On the Cloud Hadoop List page, click the resource you want to expand capacity for. 3. Cloud Hadoop Details Go to the page.
- On the detail information page, click the Edit button of the node’s Disk you want to expand. 4. Disk Edit The popup window opens.
- After entering the number of units, click the Confirm button. 5. The notification popup opens.
- You can set the capacity by entering the number of units provided in 8 GB increments.
- After reviewing the contents of the popup window, click the Confirm button.
- It may take some time depending on the scale.
Add storage
If the storage space allocated to the data area exceeds 12 TB, additional storage can be added. When configured as a cluster, they are added simultaneously for each node type.
- The storage capacity can be set up to a maximum of 12 TB.
- It may take some time for a storage addition request to be fully completed.
Follow the steps below to add storage.
- All Services > Data Analytics > Cloud Hadoop Click the menu. 1. Navigate to the Service Home page of Cloud Hadoop.
- On the Service Home page, click the Cloud Hadoop menu. 2. Go to the Cloud Hadoop List page.
- On the Cloud Hadoop List page, click the resource where you want to add storage. 3. Cloud Hadoop Details Navigate to the page.
- On the detail information page, click the Add Disk button of the node you want to add storage to. 4. Add Disk The popup window opens.
- Select the disk type, enter the capacity, and then click the Confirm button. 5. The notification popup opens.
- If encryption is configured on the existing Block Storage, encryption will also be applied to the additional Disk.
- If you configure it by selecting HDD, performance degradation may occur.
- After reviewing the contents of the popup window, click the Confirm button.
- It may take some time depending on the scale.
Connecting to Cloud Hadoop
Follow these steps to access Cloud Hadoop.
- Check the IP of the Windows system (PC) that will connect to Cloud Hadoop.
- Since external access is required, you need to check the system’s NAT IP.
- Add the following content to the
hostsfile on Windows.- VM host IP of the Cloud Hadoop cluster
- VM host name of the Cloud Hadoop cluster
- Add the following rule to the Security Group you selected when applying for the Cloud Hadoop service.
- Category: Inbound
- Protocol: TCP
- Target address: Windows system IP
- Port: 7080
- On the Windows system you want to connect to, launch the Chrome browser and then access the Cloud Hadoop Manager URL.
Apache Hadoop Ecosystem Target IP/Port Information
Item | Protocol | Source | Target IP | Port | Remarks
| Item | Protocal | Source | Target IP | Port | Remarks |
|---|---|---|---|---|---|
| Manager | TCP | User IP | Manager | 7080 | Cloud Hadoop Manager |
| HDFS | CP | User IP | Master | 8042 | nodemanager web http |
| HDFS | TCP | User IP | Master | 8044 | nodemanager web https |
| HDFS | CP | User IP | Master | 8088 | resource manager web http |
| HDFS | TCP | User IP | Master | 8090 | resource manager web https |
| HDFS | TCP | User IP | Master | 8188 | timelneservice web http |
| HDFS | TCP | User IP | Master | 8190 | timelneservice web https |
| HDFS | TCP | User IP | Master | 9093 | alert manager |
| HDFS | TCP | User IP | Master | 17000 | hbase master |
| HDFS | TCP | User IP | Master | 17010 | hbase master web |
| HDFS | TCP | User IP | Master | 17030 | hbase regionserver info |
| HDFS | TCP | User IP | Master | 19090 | hbase thriftserver |
| HDFS | TCP | User IP | Master | 19095 | hbase thriftserver info |
| HDFS | TCP | User IP | Master | 19888 | Job History Server Web |
| HDFS | TCP | User IP | Master | 50070 | name node web http |
| HDFS | TCP | User IP | Master | 50075 | data node web http |
| Atlas | TCP | User IP | Master | 21000 | atlas web http |
| Atlas | TCP | User IP | Master | 21443 | atlas web https |
| Hive | TCP | User IP | Master | 10000 | Hive sever2 thrift binary |
| Hive | TCP | User IP | Master | 10001 | Hive sever2 thrift http |
| Hive | TCP | User IP | Master | 10004 | Hive sever2 web binary |
| Hive | TCP | User IP | Master | 10002 | Hive sever2 web http |
| Hive | TCP | User IP | Master | 10005 | Hive sever2 HA web http |
| Kerberos | TCP | User IP | Master | 88 | key distribution server |
| Kerberos | TCP | User IP | Master | 749 | kadmin server |
| Ranger | TCP | User IP | Master | 9292 | ranger kms http |
| Ranger | TCP | User IP | Master | 6080 | ranger web http |
| Solr | TCP | User IP | Master | 8983 | solr |
| Solr | TCP | User IP | Master | 8988 | solr HA web http |
| Spark | TCP | User IP | Master | 18080 | spark history server web http |
| Spark | TCP | User IP | Master | 18082 | spark history server web https |
| Tez | TCP | User IP | Master | 8780 | tez ui |
| Monitoring | TCP | User IP | Master | 7100 | prometheus web http |
| Cmak | TCP | User IP | Master | 19000 | cmak web http |
| HA Proxy | TCP | User IP | Master | 38404 | HA Proxy web http |
| Hue | TCP | User IP | Master | 8000 | HUE web http |
| Hue | TCP | User IP | Master | 8005 | Hue HA web http |
| LLAP | TCP | User IP | Master | 15002 | llap web http |
Terminate Cloud Hadoop
You can terminate unused Cloud Hadoop to reduce operating costs.
- Data cannot be recovered after the service is terminated.
- When the service is canceled, both the Cloud Hadoop service and the servers are terminated.
- If you cancel the service, the active service will be stopped immediately. * Proceed with the termination after fully considering the impact that may arise from service interruption.
To cancel the service, follow these steps.
- Click the All Services > Data Analytics > Cloud Hadoop menu. 1. Navigate to the Service Home page of Cloud Hadoop.
- On the Service Home page, click the Cloud Hadoop menu. 2. Cloud Hadoop List Navigate to the page.
- On the Cloud Hadoop List page, select the resource to be terminated, then click the Terminate Service button. 3. The notification popup opens.
- Check the contents of the popup window, enter the name of the resource to be terminated, and then click the Confirm button.
- When the termination request is completed, check on the Cloud Hadoop list page whether the resource has been terminated.
- It may take some time depending on the scale.