This is the multi-page printable view of this section. Click here to print.
Simple AI Training
- 1: Overview
- 1.1: Server type
- 1.2: ServiceWatch metric
- 2: How-to guides
- 3: Release Note
1 - Overview
Service Overview
Simple AI Training is a fully managed AI Training service that enables data scientists and machine learning engineers to train models at scale without the burden of infrastructure management. Through the Simple AI Training service, you can easily train models and obtain results by preparing only data and training code, without separate AI infrastructure or platforms for the environment.
Features
- Eliminate the complexity of infrastructure management: In the service background of Simple AI Training, elements required for the service are automatically provisioned, and after the service ends, resources are reclaimed, so separate infrastructure operation is not needed.
- Easy and fast model training: Instead of complex command-line interface (CLI), you can run model training tasks with just a few clicks through the web console interface. * The user only needs to specify the storage location of the training script and data, as well as the GPU instance.
- Highly Secure Data Transfer: It directly integrates with cloud data storage (Object Storage, etc.) to process large volumes of data while maintaining security without concerns of external leakage.
- Stable model training: Even if infrastructure errors occur during training, the system automatically detects and recovers from failures, providing an uninterrupted training environment.
- Efficient Cost Management: For lower‑priority training, you can use idle GPUs, or Samsung Cloud Platform automatically handles Spot interruption and resumption, enabling cost‑effective training.
Service configuration diagram
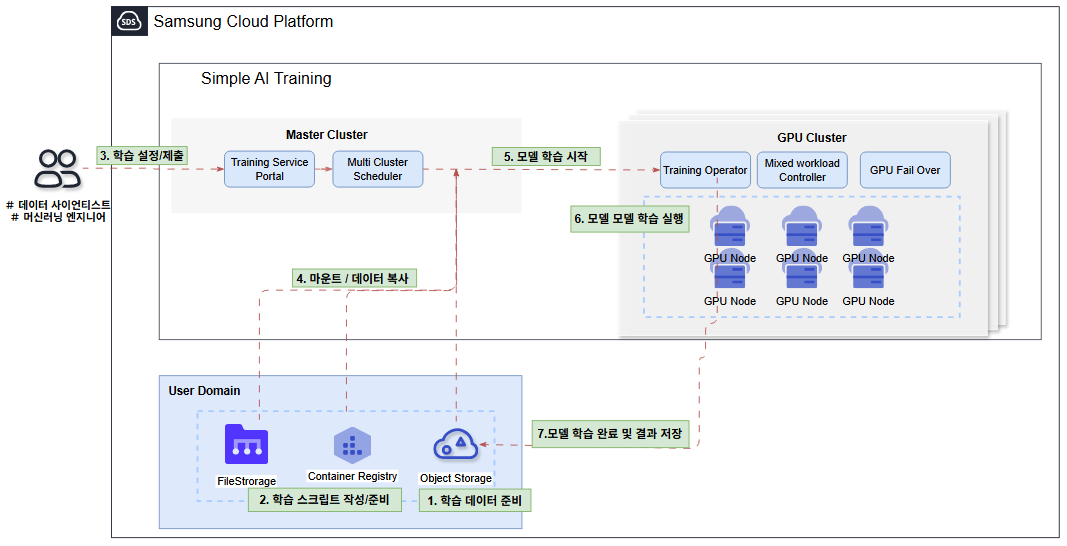
Provided features
Simple AI Training provides the following features.
- Serverless environment provision: Automate all processes from infrastructure setup, data loading, model training, to result storage, allowing you to focus solely on training.
- Distributed Training and Warm Pool Support: Automatically distribute large models or massive datasets across multiple instances, and during continuous training jobs, instantly reuse instances to reduce infrastructure provisioning time.
- Custom Container Support: You can import a user’s Docker container image for training (BYOC: Bring Your Own Container).
- Model Training Availability: Supports GPU Failover and Checkpointing, enabling smooth model training.
- GPU Failover: During training, if a GPU error occurs, the system automatically detects and recovers from the fault, preventing interruption caused by the error.
- Curcurrent Checkpointing: By storing intermediate training results in Object Storage, training can be resumed from the checkpoint if a failure occurs.
- Safe Data Access: Integrated with the cloud’s data storage (Object Storage), it can process data while maintaining security without worrying about external leaks.
- Providing Various Pricing Plans: By offering various pricing plans, you can reduce costs and conduct efficient training.
Provided server
Simple AI Training provides the g2 server type (H100) and the g3 server type (B300). For detailed specifications of the server type, refer to 서버 타입.
| Category | Instance type |
|---|---|
| g2 | at.g2v12h1, at.g2v24h2, at.g2v48h4, at.g2v96h8, at.g2.spot |
| g3 | at.g3v16b1, at.g3v16b2, at.g3v16b4, at.g3v16b8, at.g3.spot |
Provision status by region
The regions that provide the Simple AI Training service are as follows.
| Region | Provision status |
|---|---|
| Korea West (kr-west1) | Provide |
| Korea East (kr-east1) | Not provided |
| South Korea South 1 (kr-south1) | Not provided |
| South Korea South 2 (kr-south2) | Not provided |
| South Korea South 3 (kr-south3) | Not provided |
Preceding Service
This is a list of services that must be pre‑configured before creating the service. For detailed information, refer to the guide provided for each service and prepare in advance.
| Service Category | service | Detailed description |
|---|---|---|
| Storage | File Storage | Storage that enables multiple client servers to share files over a network connection. |
| Storage | Object Storage | Object storage that simplifies data storage and retrieval |
| Container | Container Registry | A service that easily stores, manages, and shares container images. |
1.1 - Server type
Simple AI Training is categorized according to the provided GPU type, and the GPU used for Simple AI Training is determined by the server type selected when creating a Training Job. Select the server type according to the specifications of the task you want to run in Simple AI Training. The server types supported by Simple AI Training are as follows.
at.g3v16b1
Category | Example | Detailed description |
|---|---|---|
| Service Category | at | Refers to the Simple AI Training service |
| Server generation | g3 | Provided server categories and generations
|
| CPU | v16 | vCore count
|
| GPU | b1 | GPU type and quantity
|
g2 server type
The g2 server type is a GPU Bare Metal Server that uses NVIDIA H100 SXM GPUs, making it suitable for large-scale high-performance AI computation.
- Provide 8 NVIDIA Hopper Architecture-based H100 GPUs
- Provides 1,979 TFLOPS of FP8 Tensor Core performance per GPU and 989 TFLOPS of FP16 Tensor Core performance.
- Supports up to 96 vCPUs and 2,048 GB of memory
- Supports up to 1,600 Gb/s NVIDIA InfiniBand RDMA network.
- Service network up to 100 Gbps
- 900 GB/s GPU P2P communication via NVSwitch within the node
| Instance classification | vCPU | Memory | GPU | Local Disk |
|---|---|---|---|---|
| at.g2v12h1 | 12 | 234 | 1 | 10 Gi |
| at.g2v24h2 | 24 | 468 | 2 | 20 Gi |
| at.g2v48h4 | 48 | 936 | 4 | 40 Gi |
| at.g2v96h8 | 96 | 1,872 | 8 | 80 Gi |
| at.g2.spot | 12 | 234 | 1 | 10 Gi |
g3 server type
The g3 server type is a GPU Bare Metal Server that uses the NVIDIA B300 SXM GPU, making it suitable not only for large-scale high-performance AI computation but also for LLM inference and AI deployment for generative AI.
- Provides 8 NVIDIA Blackwell Ultra Architecture-based B300 GPUs
- Provides 13.5 PFLOPS FP4 Tensor Core and 4.5 PFLOPS FP8 Tensor Core performance per GPU.
- Supports up to 128 vCPUs and 4,096 GB of memory
- Supports up to 6,400 Gb/s NVIDIA InfiniBand RDMA network.
- Service network up to 100 Gbps
- 1.8 TB/s GPU P2P communication via NVSwitch within a node
| Instance classification | vCPU | Memory | GPU | Local Disk |
|---|---|---|---|---|
| at.g3v16b1 | 16 | 480 | 1 | 10 Gi |
| at.g3v32b2 | 32 | 960 | 2 | 20 Gi |
| at.g3v64b4 | 64 | 1,920 | 4 | 40 Gi |
| at.g3v128b8 | 128 | 3,840 | 8 | 80 Gi |
| at.g3.spot | 16 | 480 | 1 | 10 Gi |
1.2 - ServiceWatch metric
Simple AI Training sends metrics to ServiceWatch. The metrics provided by default monitoring are data collected at 5‑minute intervals.
Basic Metrics
The following are the basic metrics for the Simple AI Training namespace. The indicators whose names are displayed in bold below are the key indicators selected from the basic indicators provided by Simple AI Training. The main metrics are used to build service dashboards that are automatically created for each service in ServiceWatch. Each metric guides users via the user guide on which statistical value is meaningful when querying the metric, and among the meaningful statistics, the values displayed in bold are the primary statistics.
In the service dashboard or monitoring tab, you can view key metrics through primary statistical values. Or you can also view the key metrics on the monitoring tab of the Simple AI Training detail page. In ServiceWatch’s metrics menu, you can also view utilization by GPU device.
| Performance Item (Metric Name) | Detailed description | unit | meaningful statistics |
|---|---|---|---|
| CPU Usage | Average number of CPU cores used by the Training Job Pod in the last 5 minutes | Cores |
|
| GPU Utilization | GPU utilization in the Training Job | Percent |
|
| Memory Usage | Memory currently used in the Training Job Pod | Bytes |
|
2 - How-to guides
You can create a Training Job for the Simple AI Training service, choose the AI training method, and proceed with training.
Creating a Training Job
To use the Simple AI Training service, you must first create a Training Job. To create a Trainging Job, follow these steps.
All Services > AI/ML > Simple AI Training Click the menu. 1. Go to the Service Home page of Simple AI Training.
On the Service Home page, click the Create Training Job button. 2. Create Training Job Go to the page.
On the Training Job creation page, enter the information required for service creation and select detailed options.
- Select the required information related to the Training Job in the Required Information Input area.
Category required statusDetailed description Learning type Required Select training mode - On-Demand Training: Securely conduct training by preempting a server at the desired time
- Concurrent Checkpointing feature applied to support efficient checkpoint storage
- Spot Training: Conduct cost‑effective training for lower‑priority jobs using idle GPUs
- Concurrent Checkpointing and Mixed workload features applied to support training continuity (automatic pause and resume)
- For detailed information on the Concurrent Checkpointing feature, see the Concurrent Checkpointing 개요 reference
Training Job name Required Enter the Training Job name - Enter using lowercase English letters, numbers, and special characters (-.) within 3 ~ 63 characters
- The name must start and end with a lowercase English letter or number
Distributed Framework Required Select version of the distributed Framework - PyTorch, DeepSpeed selectable
Table. Required input fields for Training Job - On-Demand Training: Securely conduct training by preempting a server at the desired time
- Select the options required to create a Training Job in the Service Information Input area.
Category required statusDetailed description Job Failover Selection Select whether to use the Job Failover feature - Spot Training cannot be used with Job Failover
- For detailed information about the Job Failover feature, see Job Failover 사용하기
Resource allocation Required Select the number of GPUs and memory size to use for training Number of nodes Required Set the scale of distributed training - Distributed training is possible from 2 nodes onward
Shared Memory Required Set the memory to be shared between processes for distributed training and distributed data processing. Table. Training Job service information input items - In the AI Training Image Information Input area, select the options required to create the service.
Category required statusDetailed description AI Training Image URL Required Enter the user’s container registry (SCR, Docker Hub, etc.) address User ID Selection User ID of the image repository Password Required Password for the image repository Table. Training Job AI Training Image Information Input Items - Training Command and Volume Information Input area, please input or select the required information.
Category required statusDetailed description Storage connection Selection Select whether to use an additional volume - When used, enter the additional volume mount path and training script URL
- File Storage Volume Mount Path: Data path to use when connecting to File Storage (e.g., /root)
- Import Training Script (Object Storage): Enter the script URL when connecting to Object Storage
Command Required Enter command information within 3 to 1,024. Table. Training Job AI Training Image Information Input Items - Additional Information Input area, please enter or select the required information.
Category required statusDetailed description tag Selection Add Tag - Up to 50 can be added per resource
- After clicking the Add Tag button, enter or select Key, Value values
Table. Training Job training command and volume information input items
- Select the required information related to the Training Job in the Required Information Input area.
Summary Check the detailed information generated in the panel, and click the Create button.
When the popup notifying creation opens, click the Confirm button.
- When creation is complete, check the created resources on the Training Job List page.
Check detailed information of Training Job
You can view and edit the complete resource list and detailed information of the Training Job service. To view the details of a Training Job, follow these steps.
- Click the All Services > AI/ML > Simple AI Training menu. 1. Go to the Service Home page of Simple AI Training.
- On the Service Home page, click the Training Job menu. 2. Navigate to the Training Job List page.
- On the Training Job List page, click the resource to view detailed information. 3. Navigate to the Training Job Details page.
- Training Job Details page consists of the Details, Monitoring, Logs, Tags tabs.
Category Detailed description Service status CloudML status - Creating: Creating
- Deployed: Created / operating normally
- Updating: Updating settings
- Terminating: Deleting
- Error: Error occurred
Delete Training Job Button to cancel the service Table. Training Job detail page items
- Training Job Details page consists of the Details, Monitoring, Logs, Tags tabs.
Detailed Information
Training Job List page allows you to view detailed information of the selected resource.
| Category | Detailed description |
|---|---|
| service | Service name |
| Resource Type | Resource Type |
| SRN | Unique resource ID in Samsung Cloud Platform |
| Resource name | Resource Name |
| Resource ID | Unique resource ID in the service |
| Constructor | User who created the service |
| Creation Date/Time | Service creation date and time |
| Modifier | User who edited the service information |
| Modification date | Date and time the service information was modified |
| Learning Type | AI Training learning method |
| Training Job name | Training Job name |
| Distributed Framework | Types of distributed frameworks |
| Job Failover | Whether to use the Job Failover feature |
| Resource allocation | GPU and memory information allocated as resources |
| Number of nodes | Number of nodes |
| Shared Memory | Shared memory information between processes |
| Command | Command information entered when creating a Training Job |
| Image URL | User’s container registry address |
| File Storage Volume Mount Point | Mount path of the connected File Storage when using an additional volume |
| Traing Script URL | Object Storage script URL connected when using an additional volume |
Monitoring
Training Job List page allows you to view the monitoring information of the selected resource.
| Category | Detailed description |
|---|---|
| Monitoring | Display ServiceWatch service’s monitoring information in conjunction
|
log
On the Training Job List page, you can view the log information of the selected resource.
| Category | Detailed description |
|---|---|
| Job log | Display ServiceWatch service log information linked
|
Tag
Training Job list page lets you view the tag information of the selected resource, and you can add, modify, or delete it.
| Category | Detailed description |
|---|---|
| Tag list | Tag list
|
Checking Training Job logs
You can view the logs of a Training Job in the ServiceWatch service. To view the logs of the Training Job, follow these steps.
- Click the All Services > AI/ML > Simple AI Training menu. 1. Go to the Service Home page of Simple AI Training.
- On the Service Home page, click the Training Job menu. 2. Go to the Training Job List page.
- Training Job list page: select the resource to view logs. 3. Navigate to the Training Job Details page.
- On the Training Job Details page, click the Log tab. 4. The log information for this job is displayed.
- Click the name below the Training Job name in the log information. 5. Navigate to the ServiceWatch Log Group Details page.
- Log Group Details page, click the Log Stream tab. 6. The list of log streams is displayed.
- Click the log stream name to verify (example: master). 7. The logs of the stream are displayed in chronological order.
- When a failover occurs, the logs of the training that was interrupted due to the failure and the logs of the training that was restarted after reallocation are recorded together in a single stream.
- If the initialization log displayed at the start of training (e.g., Starting dataset initialization) appears more than once, you can confirm that the training was rescheduled and restarted.
Delete Training Job
You can delete unused Training Jobs. To delete a Training Job, follow these steps.
- All Services > AI/ML > Simple AI Training Click the menu. 1. Go to the Service Home page of Simple AI Training.
- On the Service Home page, click the Training Job menu. 2. Go to the Training Job List page.
- On the Training Job List page, select the resources to delete, then click the Delete button at the top of the list.
- Click the resource to delete, go to the Training Job Details page, and you can also delete it individually.
- When a pop-up notifying deletion opens, click the Confirm button.
Using the Training Workspace
You can use the Simple AI Training service by using the Training Workspace.
Create Training Workspace
To create a Training Workspace, follow the steps below.
Click the All Services > AI/ML > Simple AI Training menu. 1. Go to the Service Home page of Simple AI Training.
Click the Training Workspace menu on the Service Home page. 2. Go to the Training Workspace List page.
On the Training Workspace List page, click the Create Service button. 3. Go to the Create Training Workspace page.
Enter the information required to create the service and select detailed options.
- In the Service Information Input area, select the options required to create a Training Workspace.
Category required statusDetailed description Training Workspace name Required Enter the Training Workspace name - Enter using lowercase English letters, numbers, and special characters (-.) within 63 characters
Resource allocation Required Select the number of GPUs and memory size to use for training Number of nodes Required Set the scale of distributed training - Distributed training is possible from 2 nodes onward
Contract period Required Select the service usage agreement period Table. Training Workspace service information input items
- In the Service Information Input area, select the options required to create a Training Workspace.
Summary Check the detailed information and estimated billing amount generated in the panel, and click the Create button.
When the popup notifying creation opens, click the Confirm button.
- When creation is complete, check the resources you created on the Training Workspace List page.
Edit Training Workspace
You can modify the number of nodes in the Training Workspace. To modify the Training Workspace, follow these steps.
- Click the All Services > AI/ML > Simple AI Training menu. 1. Go to the Service Home page of Simple AI Training.
- On the Service Home page, click the Training Workspace menu. 2. Navigate to the Training Workspace List page.
- On the Training Workspace List page, click the More > Edit button of the resource you want to modify. 3. Go to the Training Workspace Edit page.
- On the Training Workspace Edit page, check and modify the node count.
- When the edit is complete, click the Confirm button.
Delete Training Workspace
You can delete an unused Training Workspace. To delete the Training Workspace, follow these steps.
- All Services > AI/ML > Simple AI Training Click the menu. 1. Go to the Service Home page of Simple AI Training.
- On the Service Home page, click the Training Workspace menu. 2. Navigate to the Training Workspace List page.
- On the Training Workspace List page, select the resource to delete, then click the Cancel Service button at the top of the list.
- You can also delete the resource individually by clicking the More > Service Cancellation button.
- When a pop-up indicating deletion opens, click the Confirm button.
2.1 - Using Job Failover
Job Failover is a feature that automatically reallocates to normal resources to continue training, ensuring that training is not interrupted even if hardware failures such as GPUs occur while training with On-Demand Training. By using the Job Failover feature, you can ensure training continuity without the user having to manually detect failures or recreate the job when system errors or hardware faults are detected.
Job Failover Overview
During a Training Job, various hardware issues such as GPU errors or node failures can occur on the node where the training is deployed. When you use the Job Failover feature, the system automatically avoids the failed node when such hardware failures are detected, reassigns the Training Job to healthy resources, and resumes training. The main operation of Job Failover is as follows.
- Fault Detection: Continuously monitors the GPU and hardware status of nodes running training to detect anomalies.
- Automatic Reallocation: If a hardware failure is detected, the system excludes the failed node and reallocates the Training Job to healthy nodes, restarting the training.
- Unnecessary relocation prevention: User code errors, configuration errors, and similar issues that are not hardware failures are excluded from the Failover target.
- Retry Count Limit: Failover is performed only within the specified maximum number of attempts (3), and if this is exceeded, training ends in failure.
- Job Failover can be used only when the training type is selected as On-Demand Training when creating a Training Job. * When Spot Training is used, Job Failover cannot be used.
- You can select whether to use the Job Failover feature in the Service Information input area’s Job Failover item when creating a Training Job. * After creation, you can check its usage on the Training Job Details page’s Details tab.
- If training is reallocated to another resource due to failover, the memory state at the point where training was interrupted is not retained. * To continue training, we recommend configuring the training script to save checkpoints to shared storage (File Storage, Object Storage).
- Failover does not always guarantee immediate execution.
- Jobs that are reassigned by failover are set with a high priority, so they receive resources and run before other jobs that are waiting.
- However, depending on the priority and queue order of Jobs already in the queue at the time of reallocation, a reallocated Job may be executed later than those Jobs.
- While checking the node status to decide on Job relocation (up to 5 minutes), the Job may remain in Pending - failoverinprogress state.
Check error cause
When a training interruption occurs, the system checks the node’s GPU and hardware status to determine whether the cause is a hardware failure or a non‑hardware issue such as a user application or configuration. Whether to perform failover is determined based on this judgment result.
If it is judged to be a hardware failure
If a physical or hardware-level error that prevents normal GPU usage is detected, it is considered a hardware failure and a failover is performed. This error prevents further training on the affected node, so the failed node is excluded and the workload is reallocated to healthy resources to resume training. Examples of errors that are considered hardware failures are as follows.
| XID code | Error | Explanation |
|---|---|---|
| 48 | GPU memory (HBM) uncorrectable error (Uncorrectable Double Bit ECC) |
|
| 79 | GPU has been detached from the system (GPU fallen off the bus) |
|
| 94, 95 | GPU internal memory (SRAM) unrecoverable error |
|
| - | GPU overheating, power supply unit (PSU), PCIe, and other hardware component failures |
|
If it is judged to be an internal error
If the cause of the training interruption is determined to be user application code or configuration issues rather than a hardware failure, there is a high likelihood that the same problem will recur even after redeployment, so we reject the Failover and terminate in an internalerror state. Examples of errors that are considered internal errors are as follows.
| XID code | Error | Explanation |
|---|---|---|
| - | Forced termination due to insufficient memory (Out Of Memory) |
|
| 31 | GPU memory page fault |
|
| 43 | GPU processing halted |
|
| 13 | Graphics and Compute Engine Exception |
|
| - | GPU configuration warnings, software errors, etc. |
|
- XID code: a number assigned by the NVIDIA GPU driver to differentiate error types, which can be referenced to identify the cause of errors in GPU logs.
- In this case, check the training script, execution Command, input data, resource settings, etc. * For detailed information on how to check logs, see Job Failover 로그 확인하기.
Check Job Failover status
- Click the All Services > AI/ML > Simple AI Training menu. 1. Go to the Service Home page of Simple AI Training.
- On the Service Home page, click the Training Job menu. 2. Navigate to the Training Job List page.
- On the Training Job List page, check the Job’s status.
- The state flow based on whether failover is used and the hardware fault assessment result is as follows.
Category Detailed description Failover success When a hardware failure is detected and the resources have been successfully reallocated to normal resources - Running → Pending - failoverinprogress → Running If the status changes in this order, the failover is performed correctly and training resumes
Failover Rejection The training was halted, but since no hardware failure signal was detected, it was determined not to be a candidate for reallocation - Running → Pending - failoverinprogress → Pending - internalerror If the status changes in this order, the failover is rejected
- Since it may be caused by non-hardware reasons such as user code errors, checking the logs is necessary
Failover not configured When Job Failover is disabled - If a training interruption occurs, do not attempt reallocation and terminate the training in the Running → Failed order
Table. State flow according to Job Failover - The main status values displayed during failover are as follows.
status Detailed description Pending - failoverinprogress Detecting hardware failures and assessing failover feasibility, or currently reallocating to normal resources. Pending - maxretriesexceeded State in which failover exceeds the maximum number of attempts and no further reallocation is performed. Pending - imagepullbackoff Unable to load the container image, preventing training from starting (image URL and authentication information need to be verified) Pending - internalerror The failover was denied because it was determined that the system is not a failover candidate, such as when no hardware fault signal is detected. Table. Main status values during Job Failover
- The state flow based on whether failover is used and the hardware fault assessment result is as follows.
Check Job Failover logs
When a failover occurs, you can view the logs of the previous training that was interrupted by the failure and the logs of the training that resumed after reallocation together in a single log stream.
- Click the All Services > AI/ML > Simple AI Training menu. 1. Go to the Service Home page of Simple AI Training.
- On the Service Home page, click the Training Job menu. 2. Navigate to the Training Job List page.
- On the Training Job List page, select the resource whose logs you want to view. 3. Navigate to the Training Job Details page.
- On the Training Job Details page, click the Log tab. 4. The log information for this job is displayed.
- Click the name below the Training Job name in the log information. 5. Go to the ServiceWatch Log Group Details page.
- On the Log Group Details page, click the Log Stream tab. 6. The list of log streams is displayed.
- Click the log stream name to check (e.g., master). 7. The logs for this stream are displayed in chronological order.
- When a failover occurs, the logs of the training that was interrupted due to the failure and the logs of the training that was restarted after reallocation are recorded together in a single stream.
- If the initialization log displayed at the start of training (e.g., Starting dataset initialization) appears more than once, you can confirm that the training was rescheduled and restarted.
2.2 - Concurrent Checkpointing
Concurrent Checkpointing is a feature that asynchronously saves checkpoints even during Forward/Backward operations, unlike the traditional method. Therefore, by using this feature you can reduce the overhead of checkpoint saving, efficiently shorten the overall training time, and automatically save the training progress that might be lost if an unexpected interruption occurs.
Concurrent Checkpointing Overview
The Training Jobs provided by Simple AI Training include On-Demand Training type and Spot Training type. Concurrent Checkpointing can be used in both types, but the scope of its functionality differs by type. The scope of use for each type is as follows.
| type | Scope of use |
|---|---|
| On-Demand Training |
|
| Spot Training |
|
Using Concurrent Checkpointing
Preliminary preparation: Write script
The user can use the save method of Trainer and Concurrent Checkpoint simultaneously.
- The checkpoints saved by Concurrent Checkpoint are not in safetensor format. * Therefore, if you need the safetensor format in the future, we recommend also using the checkpointing feature of the Huggingface Trainer.
- The
output_diris shared among theTrainingArgument. - Concurrent Checkpoint maintains up to 3 checkpoints.
Spot Training Usage
The script example when using Spot Training is as follows.
|language = python | title = Training Script Example | collapse = true
// Written based on transformers==5.10.2.

import os
import torch
from transformers import (
    AutoTokenizer,
    AutoModelForCausalLM,
    Trainer,
    TrainingArguments,
    DataCollatorForLanguageModeling
)
from datasets import load_dataset
import json
from datastates.llm import DecoratedCheckpointing
import argparse
import logging
import time

def parse_args():
    parser = argparse.ArgumentParser()
    parser.add_argument(
        --local_rank
        type=int,
        default=-1,
        help="local rank passed from distributed launcher (Deepspeed, torchrun, etc.)"
    )
    return parser.parse_args()

if __name__ == "__main__":
    args = parse_args()

    model_path="/root/.cache/huggingface/hub/models--meta-llama--Llama-3.2-1B/snapshots/4e20de362430cd3b72f300e6b0f18e50e7166e08"

    # Load tokenizer and model
    tokenizer = AutoTokenizer.from_pretrained(model_path, local_files_only=True)

    # Set pad token to EOS if not already defined
    if tokenizer.pad_token is None:
        tokenizer.pad_token = tokenizer.eos_token

    # Load WikiText-2 dataset
    dataset = load_dataset("wikitext", "wikitext-2-raw-v1",cache_dir="/root/.cache/huggingface/datasets")

    # Tokenization function
    def tokenize_function(examples):
        return tokenizer(
            examples["text"],
            truncation=True,
            max_length=128,
            padding="max_length"
        )

    # Tokenize the dataset
    tokenized_dataset = dataset.map(
        tokenize_function,
        batched=True,
        remove_columns=["text"]
    )

    train_dataset = tokenized_dataset["train"]
    valid_dataset = tokenized_dataset["validation"]

    data_collator = DataCollatorForLanguageModeling(
        tokenizer=tokenizer,
        mlm=False  # Causal LM (not masked LM)
    )

    script_directory = os.path.dirname(os.path.abspath(__file__))
    ds_config_path = os.path.join(script_directory, "ds_config.json")

    training_args = TrainingArguments(
        output_dir="./results",
        num_train_epochs=3,
        per_device_train_batch_size=2,  # Adjust based on GPU memory
        gradient_accumulation_steps=4,  # Effective batch size = batch_size * gradient_accumulation_steps
        save_strategy="steps",
        save_steps=200,
        logging_steps=2,
        eval_strategy="steps",
        eval_steps=100,
        bf16=True,  # Enable BF16 mixed precision (use fp16 if unsupported)
        deepspeed=ds_config_path,  # Path to DeepSpeed config file
        report_to="none",
    )

    model = AutoModelForCausalLM.from_pretrained( model_path,  local_files_only=True, low_cpu_mem_usage=True, device_map=None)

    # Initialize Trainer
    trainer = Trainer(
        model=model,
        args=training_args,
        train_dataset=train_dataset,
        eval_dataset=valid_dataset,  # Optional: validation set for evaluation
        processing_class=tokenizer,
        data_collator=data_collator,
    )

       # ADD configuration for Concurrent CHECKPOINT ENGINE
    config = {
        "host_cache_size": 50,
        "parser_threads": 1,
        "pin_host_cache": True,
        "trainer": trainer,
    }

    ckpt_engine = DecoratedCheckpointing(runtime_config=config, rank=args.local_rank)

resume_from_checkpoint=False

if os.getenv("CKPT_LAST_STEP") != None :
resume_from_checkpoint=True

trainer.train(resume_from_checkpoint=resume_from_checkpoint)
// Written based on transformers==5.10.2.
import os
import torch
from transformers import (
AutoTokenizer,
AutoModelForCausalLM,
Trainer,
TrainingArguments,
DataCollatorForLanguageModeling
)
from datasets import load_dataset
import json
from datastates.llm import DecoratedCheckpointing
import argparse
import logging
import time
def parse_args():
parser = argparse.ArgumentParser()
parser.add_argument(
--local_rank
type=int,
default=-1,
help="local rank passed from distributed launcher (Deepspeed, torchrun, etc.)"
)
return parser.parse_args()
if __name__ == "__main__":
args = parse_args()
model_path="/root/.cache/huggingface/hub/models--meta-llama--Llama-3.2-1B/snapshots/4e20de362430cd3b72f300e6b0f18e50e7166e08"
# Load tokenizer and model
tokenizer = AutoTokenizer.from_pretrained(model_path, local_files_only=True)
# Set pad token to EOS if not already defined
if tokenizer.pad_token is None:
tokenizer.pad_token = tokenizer.eos_token
# Load WikiText-2 dataset
dataset = load_dataset("wikitext", "wikitext-2-raw-v1",cache_dir="/root/.cache/huggingface/datasets")
# Tokenization function
def tokenize_function(examples):
return tokenizer(
examples["text"],
truncation=True,
max_length=128,
padding="max_length"
)
# Tokenize the dataset
tokenized_dataset = dataset.map(
tokenize_function,
batched=True,
remove_columns=["text"]
)
train_dataset = tokenized_dataset["train"]
valid_dataset = tokenized_dataset["validation"]
data_collator = DataCollatorForLanguageModeling(
tokenizer=tokenizer,
mlm=False # Causal LM (not masked LM)
)
script_directory = os.path.dirname(os.path.abspath(__file__))
ds_config_path = os.path.join(script_directory, "ds_config.json")
training_args = TrainingArguments(
output_dir="./results",
num_train_epochs=3,
per_device_train_batch_size=2, # Adjust based on GPU memory
gradient_accumulation_steps=4, # Effective batch size = batch_size * gradient_accumulation_steps
save_strategy="steps",
save_steps=200,
logging_steps=2,
eval_strategy="steps",
eval_steps=100,
bf16=True, # Enable BF16 mixed precision (use fp16 if unsupported)
deepspeed=ds_config_path, # Path to DeepSpeed config file
report_to="none",
)
model = AutoModelForCausalLM.from_pretrained( model_path, local_files_only=True, low_cpu_mem_usage=True, device_map=None)
# Initialize Trainer
trainer = Trainer(
model=model,
args=training_args,
train_dataset=train_dataset,
eval_dataset=valid_dataset, # Optional: validation set for evaluation
processing_class=tokenizer,
data_collator=data_collator,
)
# ADD configuration for Concurrent CHECKPOINT ENGINE
config = {
"host_cache_size": 50,
"parser_threads": 1,
"pin_host_cache": True,
"trainer": trainer,
}
ckpt_engine = DecoratedCheckpointing(runtime_config=config, rank=args.local_rank)
resume_from_checkpoint=False
if os.getenv("CKPT_LAST_STEP") != None :
resume_from_checkpoint=True
trainer.train(resume_from_checkpoint=resume_from_checkpoint)다음 절차의 예시를 참고하여 스크립트를 작성하세요.
- Import Concurrent CHECKPOINT
from datastates.llm import DecoratedCheckpointing
...
- ADD configuration for Concurrent CHECKPOINT ENGINE
config = {
       "host_cache_size": 50,
       "parser_threads": 1,
       "pin_host_cache": True,
       "trainer": trainer,
}
It is recommended to enter the input exactly as shown, and if a memory issue occurs, request the available host_cache_size value from the responsible person.
host_cache_size: The size of the host’s pinned memory to be used, in GB.trainer: Insert the huggingface trainer initialized above.
- Initialize Concurrent CHECKPOINT ENGINE
ckpt_engine = DecoratedCheckpointing(runtime_config=config, rank=args.local_rank)
- Set Concurrent CHECKPOINT ENGINE parameter
resume_from_checkpoint=False

if os.getenv("CKPT_LAST_STEP") != None :
       resume_from_checkpoint=True

trainer.train(resume_from_checkpoint=resume_from_checkpoint)
Concurrent Checkpoint save path
The save path is based by default on the TrainingArgument’s output_dir.
It is stored under the concurrent_checkpoint directory in the subpath of output_dir.
output_dir path.Using On-Demand Training
The method for using On-Demand Training is similar to that of Spot Training.
Initial training
Write the script by referring to the example of the following procedure.
- Import Concurrent CHECKPOINT
from datastates.llm import DecoratedCheckpointing
...
- ADD configuration for Concurrent CHECKPOINT ENGINE
config = {
       "host_cache_size": 50,
       "parser_threads": 1,
       "pin_host_cache": True,
       "trainer": trainer,
}
It is recommended to enter the input exactly as shown, and if a memory issue occurs, request the available host_cache_size value from the responsible person.
host_cache_size: The size of the host’s pinned memory to be used, in GB.trainer: Insert the huggingface trainer that was initialized above.
- Initialize Concurrent CHECKPOINT ENGINE
ckpt_engine = DecoratedCheckpointing(runtime_config=config, rank=args.local_rank)
- Set Concurrent CHECKPOINT ENGINE parameter
trainer.train(resume_from_checkpoint=False)
When manually activated
If a valid checkpoint is found in the output_dir path specified during the initial training, the checkpoint path is directly specified during model initialization when re-running the training.
Or, when re-running training, specify the same output_dir as before and configure as follows to automatically load the latest checkpoint.
Write the script by referring to the example of the following procedure.
- Import Concurrent CHECKPOINT
from datastates.llm import DecoratedCheckpointing
...
- ADD configuration for Concurrent CHECKPOINT ENGINE
config = {
       "host_cache_size": 50,
       "parser_threads": 1,
       "pin_host_cache": True,
       "trainer": trainer,
}
It is recommended to enter the input exactly as shown, and if a memory issue occurs, request the available host_cache_size value from the responsible person.
host_cache_size: The size of the host’s pinned memory to be used, in GB.trainer: Insert the huggingface trainer that was initialized above.
- Initialize Concurrent CHECKPOINT ENGINE
ckpt_engine = DecoratedCheckpointing(runtime_config=config, rank=args.local_rank)
- Set Concurrent CHECKPOINT ENGINE parameter
trainer.train(resume_from_checkpoint=True)
Run Job
Execute by adding functional environment variables together with the command you want to use in the Command field of the Training Job creation screen.
| language = go
PYTHONPATH=$CHECKPOINT_VENDOR HF_DATASETS_OFFLINE="1" ${USER_SCRIPT}
PYTHONPATH=$CHECKPOINT_VENDOR: Sets the library path to be loaded for enabling the feature.HF_DATASETS_OFFLINE=“1”: The Samsung Cloud Platform network does not support huggingface login or model/dataset download. * Therefore, set it to prevent huggingface network calls from user scripts.
Example
Basic code
| language = actionscript
- python file
python /mnt/experiment/training/compatiblitiy-test/version_check.py
- deepspeed
deepspeed --num_gpus=2 /mnt/experiment/training/compatiblitiy-test/train_llama_8b-demo.py
- accelerate
accelerate launch --config_file /mnt/experiment/training/compatiblitiy-test/sat-test/fsdp_config.yaml --num_processes 4 /mnt/experiment/training/compatiblitiy-test/sat-test/train_llama_1b-demo.py
When using the function
| language = actionscript
- python file
PYTHONPATH=$CHECKPOINT_VENDOR python /mnt/experiment/training/compatiblitiy-test/version_check.py
- deepspeed
PYTHONPATH=$CHECKPOINT_VENDOR deepspeed --num_gpus=4 /mnt/experiment/training/compatiblitiy-test/train_llama_8b-demo.py
- accelerate
PYTHONPATH=$CHECKPOINT_VENDOR accelerate launch --config_file /mnt/experiment/training/compatiblitiy-test/sat-test/fsdp_config.yaml --num_processes 4 /mnt/experiment/training/compatiblitiy-test/sat-test/train_llama_1b-demo.py
transformers==5.10.2
numpy==2.4.6
pybind11==3.0.4
safetensors==0.8.0
torch==2.12.1
torchvision==0.27.1
datasets==4.8.4
pytest
cuda-bindings~=13.2.0
packaging<=26.0

#--- test deepspeed version library
deepspeed==0.18.9
accelerate==1.13.0
Check progress
The progress can be viewed on the Training Job Details page’s Log tab. To check the progress, follow the steps below.
- All Services > AI/ML > Simple AI Training Click the menu. 1. Go to the Service Home page of Simple AI Training.
- On the Service Home page, click the Training Job menu. 2. Training Job List Navigate to the page.
- Training Job List page, click the resource to view detailed information. 3. Go to the Training Job Details page.
- After clicking the Log tab, check the logs. 4. You can view the logs while the environment is being prepared.
| language = actionscript | title =
[INFO] Concurrent Checkpoint library is installed
waiting for validator through /channel/stage.socket...
validator is running....
sidecar container is running and ready for training process to run!
- The environment is available for both On-Demand Training type and Spot Training type regardless of whether the Concurrent Checkpoint feature is used.
- In the case of On-Demand Training type, the automatic Parameter feature is not supported, so using the feature may generate Parameter-related error logs as follows. * However, the latest checkpoint loading feature works correctly.
| language = actionscript | title =
[2026-07-10 01:50:09,939] [ERROR] [decorator.py:442:get_last_checkpoint_preprocess] [Concurrent Checkpoint] No Checkpoint found with step: -1
ERROR:datastates.llm.decorator:[Concurrent Checkpoint] No Checkpoint found with step: -1
3 - Release Note
Simple AI Training
- We have officially launched the Simple AI Training service.
- You can immediately allocate and use the resources needed for training without having to build or manage separate AI infrastructure or platforms for the model training environment.