1 - Chat Playground
Goal
This tutorial introduces how to create and use a web-based Playground that allows you to easily test the APIs of various AI models provided by AIOS using Streamlit in the SCP for Enterprise environment.
environment
To run this tutorial, the following environment must be prepared.
System Environment
Installation required packages
Code block. Install streamlit package Reference
Streamlit
Python-based open-source web application framework that is highly suitable for visually presenting and sharing data science, machine learning, and data analysis results. Even without extensive web development knowledge, you can quickly create a web interface by writing just a few lines of code.
Implementation
Pre-check
Check that the model call via curl works correctly in the environment where the application runs. For this, refer to the AIOS_LLM_Private_Endpoint in the LLM Usage Guide.
- Example: {AIOS LLM private endpoint}/{API}
curl -H "Content-Type: application/json" \
-d '{"model": "meta-llama/Llama-3.3-70B-Instruct"
, "prompt" : "Hello, I am jihye, who are you"
, "temperature": 0
, "max_tokens": 100
, "stream": false}' -L AIOS_LLM_Private_Endpoint
curl -H "Content-Type: application/json" \
-d '{"model": "meta-llama/Llama-3.3-70B-Instruct"
, "prompt" : "Hello, I am jihye, who are you"
, "temperature": 0
, "max_tokens": 100
, "stream": false}' -L AIOS_LLM_Private_Endpoint
You can see that the model’s answer is included in the text field of choices.
{"id":"cmpl-4ac698a99c014d758300a3ec5583d73b","object":"text_completion","created":1750140201,"model":"meta-llama/Llama-3.3-70B-Instruct","choices":[{"index":0,"text":"?\nI am a Korean student who is studying English.\nI am interested in learning about different cultures and making friends from around the world.\nI like to watch movies, listen to music, and read books in my free time.\nI am looking forward to chatting with you and learning more about your culture and way of life.\nNice to meet you, jihye! I'm happy to chat with you and learn more about Korean culture. What kind of movies, music, and books do you enjoy? Do","logprobs":null,"finish_reason":"length","stop_reason":null,"prompt_logprobs":null}],"usage":{"prompt_tokens":11,"total_tokens":111,"completion_tokens":100}}
Project Structure
chat-playground
├── app.py          # streamlit main web app file
├── endpoints.json  # AIOS model call type definitions
├── img
│   └── aios.png
└── models.json     # AIOS model list
Chat Playground code
Reference
- models.json, endpoints.json files must exist and be configured in the proper format. Please refer to the code below.
- In the code, modify BASE_URL to the AIOS LLM Private Endpoint address, referring to the LLM usage guide.
- This Playground is designed as a single-request, request-based structure, where the user provides input values, clicks a button to send one request, and then checks the result. This enables rapid testing and response verification without complex session management.
- The parameters Model, Type, Temperature, and Max Tokens configured in the sidebar are part of an interface built with st.sidebar, and you can freely extend or modify the functionality as needed.
- The image (file) uploaded with st.file_uploader() exists as a temporary BytesIO object in server memory and is not automatically saved to disk.
app.py
This is the main Streamlit web app file. Here, the BASE_URL AIOS_LLM_Private_Endpoint refers to the LLM usage guide.
import streamlit as st
import base64
import json
import requests
from urllib.parse import urljoin

BASE_URL = "AIOS_LLM_Private_Endpoint"

# ===== Settings =====
st.set_page_config(page_title="AIOS Chat Playground", layout="wide")
st.title("🤖 AIOS Chat Playground")

# ===== Common Functions =====
def load_models():
    with open("models.json", "r") as f:
        return json.load(f)

def load_endpoints():
    with open("endpoints.json", "r") as f:
        return json.load(f)

models = load_models()
endpoints_config = load_endpoints()

# ===== Sidebar Settings =====
st.sidebar.title('Hello!')
st.sidebar.image("img/aios.png")
st.sidebar.header("⚙️ Setting")
model = st.sidebar.selectbox("Model", models)
endpoint_labels = [ep["label"] for ep in endpoints_config]
endpoint_label = st.sidebar.selectbox("Type", endpoint_labels)
selected_endpoint = next(ep for ep in endpoints_config if ep["label"] == endpoint_label)

temperature = st.sidebar.slider("🔥 Temperature", 0.0, 1.0, 0.7)
max_tokens = st.sidebar.number_input("🧮 Max Tokens", min_value=1, max_value=5000, value=100)

base_url = BASE_URL
path = selected_endpoint["path"]
endpoint_type = selected_endpoint["type"]
api_style = selected_endpoint.get("style", "openai")  # openai or cohere

# ===== Input UI =====
prompt = ""
docs = []
image_base64 = None

if endpoint_type == "image":
    prompt = st.text_area("✍️ Enter your question:", "Explain this image.")
    uploaded_image = st.file_uploader("🖼️ Upload an image", type=["png", "jpg", "jpeg"])
    if uploaded_image:
        st.image(uploaded_image, caption="Uploaded image", use_container_width=300)
        image_bytes = uploaded_image.read()
        image_base64 = base64.b64encode(image_bytes).decode("utf-8")

elif endpoint_type == "rerank":
    prompt = st.text_area("✍️ Enter your query:", "What is the capital of France?")
    raw_docs = st.text_area("📄 Documents (one per line)", "The capital of France is Paris.\nFrance capital city is known for the Eiffel Tower.\nParis is located in the north-central part of France.")
    docs = raw_docs.strip().splitlines()

elif endpoint_type == "reasoning":
    prompt = st.text_area("✍️ Enter prompt:", "9.11 and 9.8, which is greater?")

elif endpoint_type == "embedding":
    prompt = st.text_area("✍️ Enter prompt:", "What is the capital of France?")

else:
    prompt = st.text_area("✍️ Enter prompt:", "Hello, who are you?")
    uploaded_image = st.file_uploader("🖼️ Upload an image (Optional)", type=["png", "jpg", "jpeg"])
    if uploaded_image:
        image_bytes = uploaded_image.read()
        image_base64 = base64.b64encode(image_bytes).decode("utf-8")

# ===== Call Button =====
if st.button("🚀 Invoke model"):
    headers = {
        "Content-Type": "application/json"
        "Authorization": "Bearer EMPTY_KEY"
    }

    try:
        if endpoint_type == "chat":
            url = urljoin(base_url, "v1/chat/completions")
            payload = {
                "model": model,
                "messages": [
                    {"role": "system", "content": "You are a helpful assistant."}
                    {"role": "user", "content": prompt}
                ],
                "temperature": temperature,
                "max_tokens": max_tokens
            }

        elif endpoint_type == "completion":
            url = urljoin(base_url, "v1/completions")
            payload = {
                "model": model,
                "prompt": prompt,
                "temperature": temperature,
                "max_tokens": max_tokens
            }

        elif endpoint_type == "embedding":
            url = urljoin(base_url, "v1/embeddings")
            payload = {
                "model": model,
                "input": prompt
            }

        elif endpoint_type == "reasoning":
            url = urljoin(BASE_URL, "v1/chat/completions")
            payload = {
                "model": model,
                "messages": [
                    {"role": "user", "content": prompt}
                ],
                "temperature": temperature,
                "max_tokens": max_tokens
            }

        elif endpoint_type == "image":
            url = urljoin(base_url, "v1/chat/completions")
            if not image_base64:
                st.warning("🖼️ Upload an image")
                st.stop()

            payload = {
                "model": model,
                "messages": [
                    {
                        "role": "user"
                        "content": [
                            {"type": "text", "text": prompt}
                            {"type": "image_url", "image_url": {"url": f"data:image/jpeg;base64,{image_base64}"}}
                        ]
                    }
                ]
            }

        elif endpoint_type == "rerank":
            url = urljoin(base_url, "v2/rerank")
            payload = {
                "model": model,
                "query": prompt,
                "documents": docs,
                "top_n": len(docs)
            }

        else:
            st.error("❌ Unknown endpoint type")
            st.stop()

        st.expander("📤 Request payload").code(json.dumps(payload, indent=2), language="json")
        response = requests.post(url, headers=headers, json=payload)
        response.raise_for_status()
        res = response.json()

        # ===== Response Parsing =====
        if endpoint_type == "chat" or endpoint_type == "image":
            output = res["choices"][0]["message"]["content"]

        elif endpoint_type == "completion":
            output = res["choices"][0]["text"]

        elif endpoint_type == "embedding":
            vec = res["data"][0]["embedding"]
            output = f"🔢 Vector dimensions: {len(vec)}"
            st.expander("📐 Vector preview").code(vec[:20])

        elif endpoint_type == "rerank":
            results = res["results"]
            output = "\n\n".join(
                [f"{i+1}. {r['document']['text']} (score: {r['relevance_score']:.3f})" for i, r in enumerate(results)]
            )

        elif endpoint_type == "reasoning":
            message = res.get("choices", [{}])[0].get("message", {})
            reasoning = message.get("reasoning_content", "❌ No reasoning_content")
            content = message.get("content", "❌ No content")
            output = f"""📘 <b>response:</b><br>{content}<br><br>🧠 <b>Reasoning:</b><br>{reasoning}"""

        st.success("✅ Model response:")
        st.markdown(f"<div style='padding:1rem;background:#f0f0f0;border-radius:8px'>{output}</div>", unsafe_allow_html=True)

        st.expander("📦 View full response").json(res)

    except requests.RequestException as e:
        st.error("❌ Request failed")
        st.code(str(e))
import streamlit as st
import base64
import json
import requests
from urllib.parse import urljoin

BASE_URL = "AIOS_LLM_Private_Endpoint"

# ===== Settings =====
st.set_page_config(page_title="AIOS Chat Playground", layout="wide")
st.title("🤖 AIOS Chat Playground")

# ===== Common Functions =====
def load_models():
    with open("models.json", "r") as f:
        return json.load(f)

def load_endpoints():
    with open("endpoints.json", "r") as f:
        return json.load(f)

models = load_models()
endpoints_config = load_endpoints()

# ===== Sidebar Settings =====
st.sidebar.title('Hello!')
st.sidebar.image("img/aios.png")
st.sidebar.header("⚙️ Setting")
model = st.sidebar.selectbox("Model", models)
endpoint_labels = [ep["label"] for ep in endpoints_config]
endpoint_label = st.sidebar.selectbox("Type", endpoint_labels)
selected_endpoint = next(ep for ep in endpoints_config if ep["label"] == endpoint_label)

temperature = st.sidebar.slider("🔥 Temperature", 0.0, 1.0, 0.7)
max_tokens = st.sidebar.number_input("🧮 Max Tokens", min_value=1, max_value=5000, value=100)

base_url = BASE_URL
path = selected_endpoint["path"]
endpoint_type = selected_endpoint["type"]
api_style = selected_endpoint.get("style", "openai")  # openai or cohere

# ===== Input UI =====
prompt = ""
docs = []
image_base64 = None

if endpoint_type == "image":
    prompt = st.text_area("✍️ Enter your question:", "Explain this image.")
    uploaded_image = st.file_uploader("🖼️ Upload an image", type=["png", "jpg", "jpeg"])
    if uploaded_image:
        st.image(uploaded_image, caption="Uploaded image", use_container_width=300)
        image_bytes = uploaded_image.read()
        image_base64 = base64.b64encode(image_bytes).decode("utf-8")

elif endpoint_type == "rerank":
    prompt = st.text_area("✍️ Enter your query:", "What is the capital of France?")
    raw_docs = st.text_area("📄 Documents (one per line)", "The capital of France is Paris.\nFrance capital city is known for the Eiffel Tower.\nParis is located in the north-central part of France.")
    docs = raw_docs.strip().splitlines()

elif endpoint_type == "reasoning":
    prompt = st.text_area("✍️ Enter prompt:", "9.11 and 9.8, which is greater?")

elif endpoint_type == "embedding":
    prompt = st.text_area("✍️ Enter prompt:", "What is the capital of France?")

else:
    prompt = st.text_area("✍️ Enter prompt:", "Hello, who are you?")
    uploaded_image = st.file_uploader("🖼️ Upload an image (Optional)", type=["png", "jpg", "jpeg"])
    if uploaded_image:
        image_bytes = uploaded_image.read()
        image_base64 = base64.b64encode(image_bytes).decode("utf-8")

# ===== Call Button =====
if st.button("🚀 Invoke model"):
    headers = {
        "Content-Type": "application/json"
        "Authorization": "Bearer EMPTY_KEY"
    }

    try:
        if endpoint_type == "chat":
            url = urljoin(base_url, "v1/chat/completions")
            payload = {
                "model": model,
                "messages": [
                    {"role": "system", "content": "You are a helpful assistant."}
                    {"role": "user", "content": prompt}
                ],
                "temperature": temperature,
                "max_tokens": max_tokens
            }

        elif endpoint_type == "completion":
            url = urljoin(base_url, "v1/completions")
            payload = {
                "model": model,
                "prompt": prompt,
                "temperature": temperature,
                "max_tokens": max_tokens
            }

        elif endpoint_type == "embedding":
            url = urljoin(base_url, "v1/embeddings")
            payload = {
                "model": model,
                "input": prompt
            }

        elif endpoint_type == "reasoning":
            url = urljoin(BASE_URL, "v1/chat/completions")
            payload = {
                "model": model,
                "messages": [
                    {"role": "user", "content": prompt}
                ],
                "temperature": temperature,
                "max_tokens": max_tokens
            }

        elif endpoint_type == "image":
            url = urljoin(base_url, "v1/chat/completions")
            if not image_base64:
                st.warning("🖼️ Upload an image")
                st.stop()

            payload = {
                "model": model,
                "messages": [
                    {
                        "role": "user"
                        "content": [
                            {"type": "text", "text": prompt}
                            {"type": "image_url", "image_url": {"url": f"data:image/jpeg;base64,{image_base64}"}}
                        ]
                    }
                ]
            }

        elif endpoint_type == "rerank":
            url = urljoin(base_url, "v2/rerank")
            payload = {
                "model": model,
                "query": prompt,
                "documents": docs,
                "top_n": len(docs)
            }

        else:
            st.error("❌ Unknown endpoint type")
            st.stop()

        st.expander("📤 Request payload").code(json.dumps(payload, indent=2), language="json")
        response = requests.post(url, headers=headers, json=payload)
        response.raise_for_status()
        res = response.json()

        # ===== Response Parsing =====
        if endpoint_type == "chat" or endpoint_type == "image":
            output = res["choices"][0]["message"]["content"]

        elif endpoint_type == "completion":
            output = res["choices"][0]["text"]

        elif endpoint_type == "embedding":
            vec = res["data"][0]["embedding"]
            output = f"🔢 Vector dimensions: {len(vec)}"
            st.expander("📐 Vector preview").code(vec[:20])

        elif endpoint_type == "rerank":
            results = res["results"]
            output = "\n\n".join(
                [f"{i+1}. {r['document']['text']} (score: {r['relevance_score']:.3f})" for i, r in enumerate(results)]
            )

        elif endpoint_type == "reasoning":
            message = res.get("choices", [{}])[0].get("message", {})
            reasoning = message.get("reasoning_content", "❌ No reasoning_content")
            content = message.get("content", "❌ No content")
            output = f"""📘 <b>response:</b><br>{content}<br><br>🧠 <b>Reasoning:</b><br>{reasoning}"""

        st.success("✅ Model response:")
        st.markdown(f"<div style='padding:1rem;background:#f0f0f0;border-radius:8px'>{output}</div>", unsafe_allow_html=True)

        st.expander("📦 View full response").json(res)

    except requests.RequestException as e:
        st.error("❌ Request failed")
        st.code(str(e))
models.json
This is the list of AIOS models. Refer to the LLM Usage Guide to configure the model you will use.
[
  meta-llama/Llama-3.3-70B-Instruct
  "qwen/Qwen3-30B-A3B"
  "qwen/QwQ-32B"
  google/gemma-3-27b-it
  meta-llama/Llama-4-Scout
  "meta-llama/Llama-Guard-4-12B"
  "sds/bge-m3"
  "sds/bge-reranker-v2-m3"
]
[
  meta-llama/Llama-3.3-70B-Instruct
  "qwen/Qwen3-30B-A3B"
  "qwen/QwQ-32B"
  google/gemma-3-27b-it
  meta-llama/Llama-4-Scout
  "meta-llama/Llama-Guard-4-12B"
  "sds/bge-m3"
  "sds/bge-reranker-v2-m3"
]
endpoints.json
The AIOS model’s call types are defined. Depending on the type, the input screen and results are displayed differently.
[
  {
    "label": "Chat Model"
    "path": "/v1/chat/completions"
    "type": "chat"

  },
  {
    "label": "Completion Model"
    "path": "/v1/completions"
    "type": "completion"

  },
  {
    "label": "Embedding Model"
    "path": "/v1/embeddings"
    "type": "embedding"

  },
  {
    "label": "Image Chat Model"
    "path": "/v1/chat/completions"
    "type": "image
  },
  {
    "label": "Rerank Model"
    "path": "/v2/rerank"
    "type": "rerank"
  },
  {
    "label": "Reasoning Model"
    "path": "/v1/chat/completions"
    "type": "reasoning"

  }
]
[
  {
    "label": "Chat Model"
    "path": "/v1/chat/completions"
    "type": "chat"

  },
  {
    "label": "Completion Model"
    "path": "/v1/completions"
    "type": "completion"

  },
  {
    "label": "Embedding Model"
    "path": "/v1/embeddings"
    "type": "embedding"

  },
  {
    "label": "Image Chat Model"
    "path": "/v1/chat/completions"
    "type": "image
  },
  {
    "label": "Rerank Model"
    "path": "/v2/rerank"
    "type": "rerank"
  },
  {
    "label": "Reasoning Model"
    "path": "/v1/chat/completions"
    "type": "reasoning"

  }
]
How to use Playground
This document covers the two ways to run Playground.
Run on Virtual Server
1. Run Streamlit on Virtual Server
streamlit run app.py --server.port 8501 --server.address 0.0.0.0
streamlit run app.py --server.port 8501 --server.address 0.0.0.0
You can now view your Streamlit app in your browser.

URL: http://0.0.0.0:8501
In the browser, access http://{your_server_ip}:8501 or, after configuring server SSH tunneling, http://localhost:8501. Refer to the following for SSH tunneling.
2. Access Virtual Server via tunneling from local PC (when accessing via http://localhost:8501)
ssh -i {your_pemkey.pem} -L 8501:localhost:8501 ubuntu@{your_server_ip}
ssh -i {your_pemkey.pem} -L 8501:localhost:8501 ubuntu@{your_server_ip}
Run on SCP Kubernetes Engine
1. Deployment and Service startup
Execute the following YAML to start the Deployment and Service. A container image that packages the code and Python library files is provided to run the Chat Playground tutorial.
Reference
Image URL : aios-zcavifox.scr.private.kr-west1.e.samsungsdscloud.com/tutorial/chat-playground:v1.0
apiVersion: apps/v1
kind: Deployment
metadata:
  name: streamlit-deployment
spec:
  replicas: 1
  selector:
    matchLabels:
      app: streamlit
  template:
    metadata:
      labels:
        app: streamlit
    spec:
      containers:
        - name: streamlit-app
          image: aios-zcavifox.scr.private.kr-west1.e.samsungsdscloud.com/tutorial/chat-playground:v1.0
          ports:
            - containerPort: 8501
---
apiVersion: v1
kind: Service
metadata:
  name: streamlit-service
spec:
  type: NodePort
  selector:
    app: streamlit
  ports:
    - protocol: TCP
      port: 80
      targetPort: 8501
      nodePort: 30081
apiVersion: apps/v1
kind: Deployment
metadata:
  name: streamlit-deployment
spec:
  replicas: 1
  selector:
    matchLabels:
      app: streamlit
  template:
    metadata:
      labels:
        app: streamlit
    spec:
      containers:
        - name: streamlit-app
          image: aios-zcavifox.scr.private.kr-west1.e.samsungsdscloud.com/tutorial/chat-playground:v1.0
          ports:
            - containerPort: 8501
---
apiVersion: v1
kind: Service
metadata:
  name: streamlit-service
spec:
  type: NodePort
  selector:
    app: streamlit
  ports:
    - protocol: TCP
      port: 80
      targetPort: 8501
      nodePort: 30081
kubectl apply -f run.yaml
kubectl apply -f run.yaml
$ kubectl get pod
NAME                                   READY   STATUS    RESTARTS   AGE
streamlit-deployment-8bfcd5959-6xpx9   1/1     Running   0          17s

$ kubectl logs streamlit-deployment-8bfcd5959-6xpx9

Collecting usage statistics. To deactivate, set browser.gatherUsageStats to false.


  You can now view your Streamlit app in your browser.

  URL: http://0.0.0.0:8501

$ kubectl get svc
NAME                TYPE        CLUSTER-IP      EXTERNAL-IP   PORT(S)        AGE
kubernetes          ClusterIP   172.20.0.1      <none>        443/TCP        46h
streamlit-service   NodePort    172.20.95.192   <none>        80:30081/TCP   130m
In the browser, access http://{worker_node_ip}:30081 or after configuring server SSH tunneling, access http://localhost:8501. See below for SSH tunneling.
2. Access the worker node via tunneling from the local PC (http://localhost:8501 when accessing)
ssh -i {your_pemkey.pem} -L 8501:{worker_node_ip}:30081 ubuntu@{worker_node_ip}
ssh -i {your_pemkey.pem} -L 8501:{worker_node_ip}:30081 ubuntu@{worker_node_ip}
3. Access the worker node via a relay server through tunneling from the local PC (http://localhost:8501 when accessing)
ssh -i {your_pemkey.pem} -L 8501:{worker_node_ip}:30081 ubuntu@{your_server_ip}
ssh -i {your_pemkey.pem} -L 8501:{worker_node_ip}:30081 ubuntu@{your_server_ip}
Usage
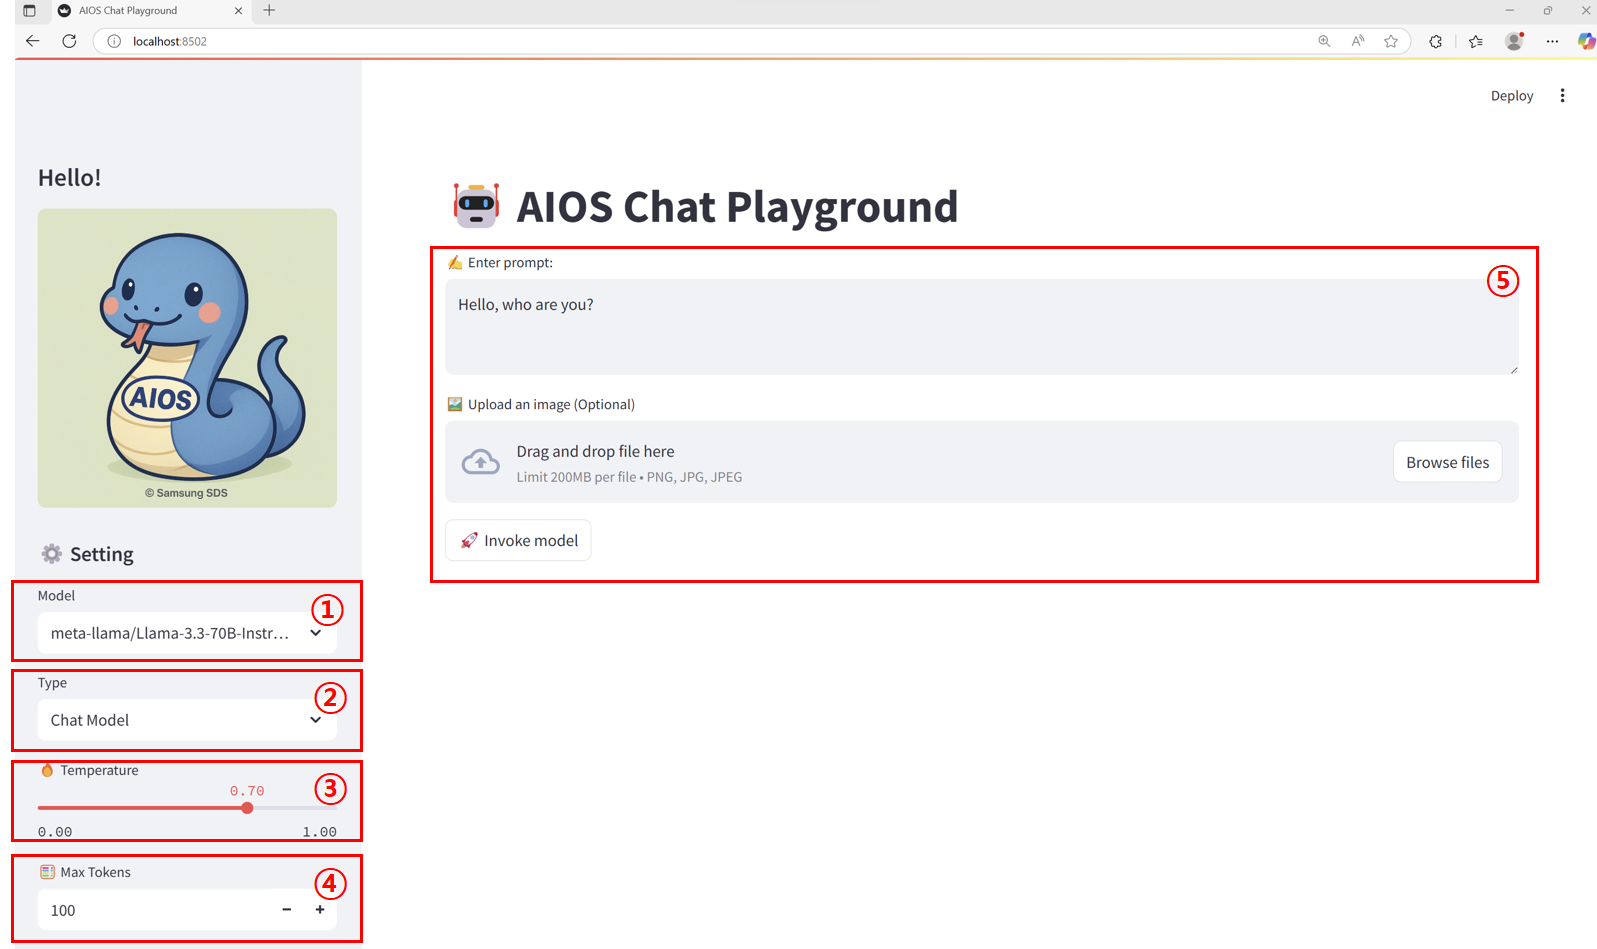
Main screen layout
| Item | description |
|---|
| 1 | Model | The list of callable models configured in the models.json file. |
| 2 | Endpoint type | Select the appropriate model according to the call format defined in the endpoints.json file. |
| 3 | Temperature | This is a parameter that controls the degree of “randomness” or “creativity” in model output. In this tutorial, it is set in the range 0.00 ~ 1.00.- 0.0 : selects only the highest-probability token → accurate and consistent responses, lacking diversity
- 0.7 : moderate randomness → a balance of creativity and consistency
- 1.0 : high randomness → diverse and creative responses, quality may vary
|
| 4 | Max Tokens | Set the maximum number of tokens that can be generated in the response text using the output length limit parameter. In this tutorial, it is set to a range of 1 ~ 5000. |
| 5 | input area | The way prompts, images, etc. are received varies by endpoint type.- Chat, Completion, Embedding. Reasoning : plain text input
- Image : text + image upload
- Rerank : query + document list (In this tutorial, each line of text is treated as a document)
|
Table. Main screen layout
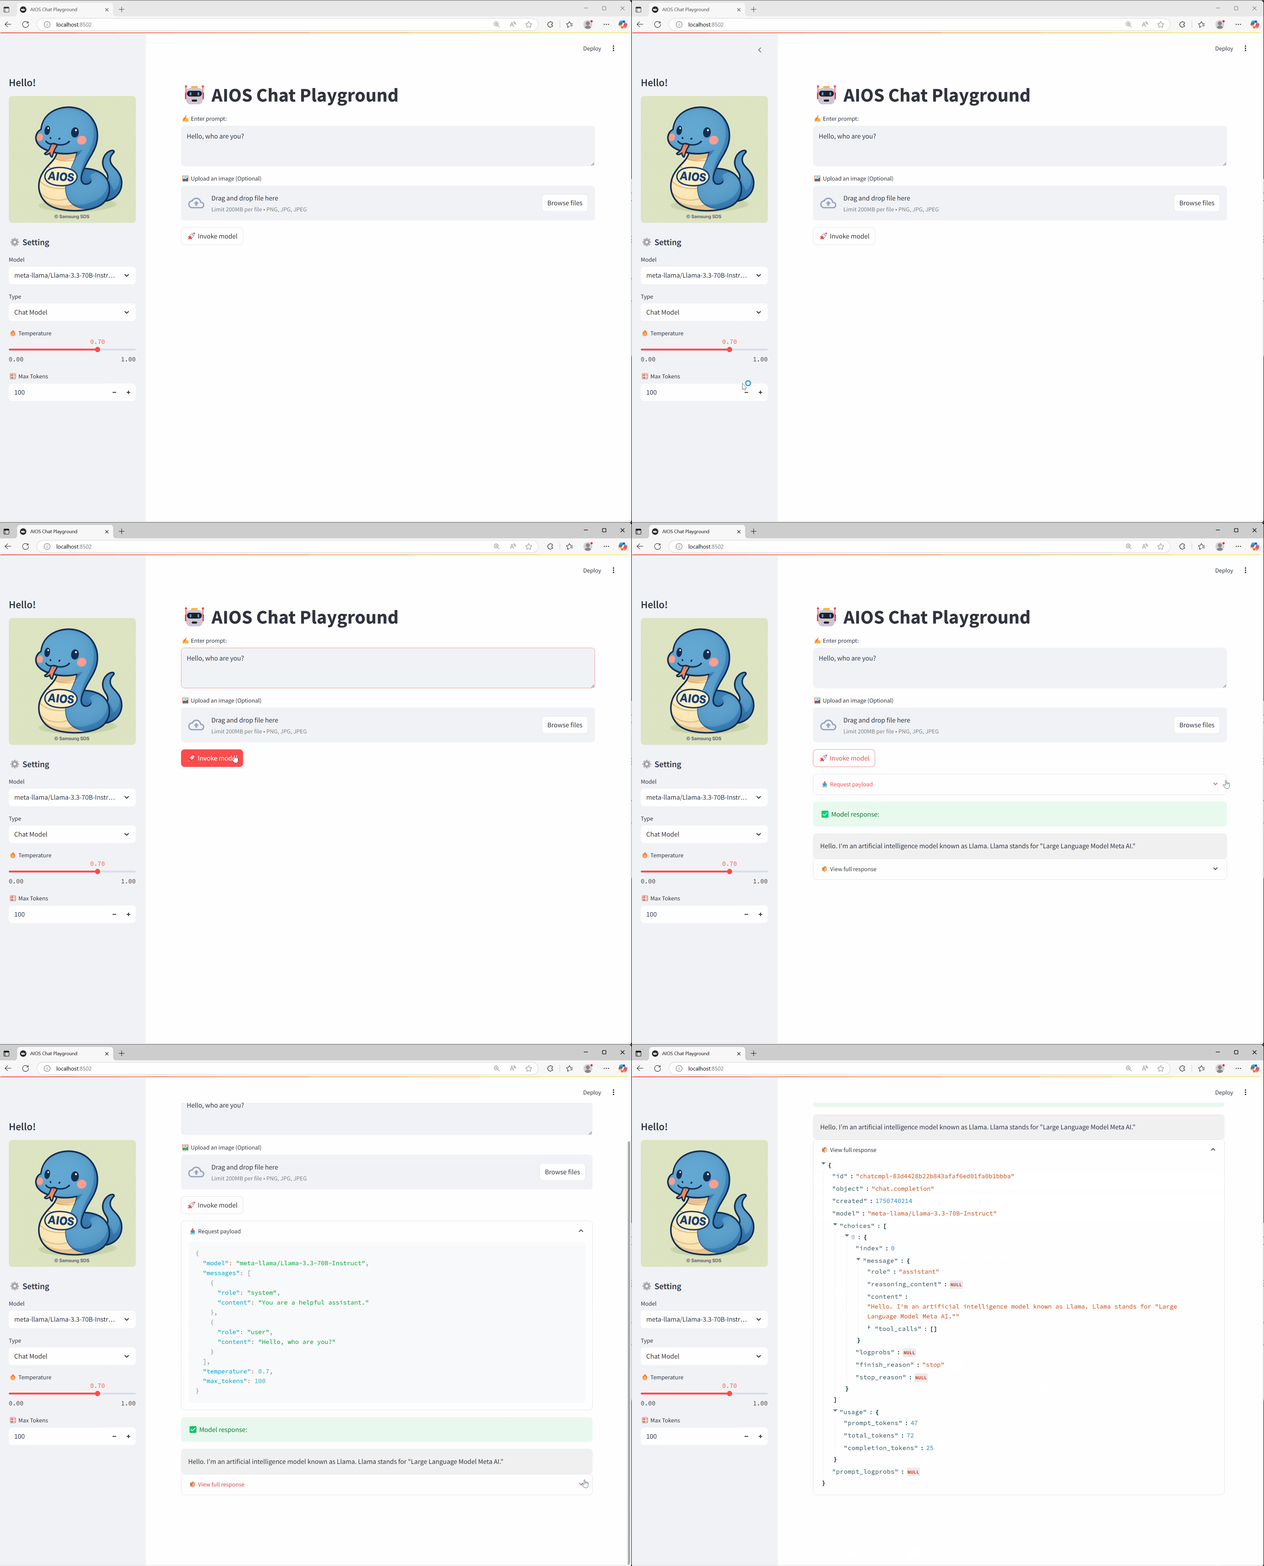
Calling a Chat model
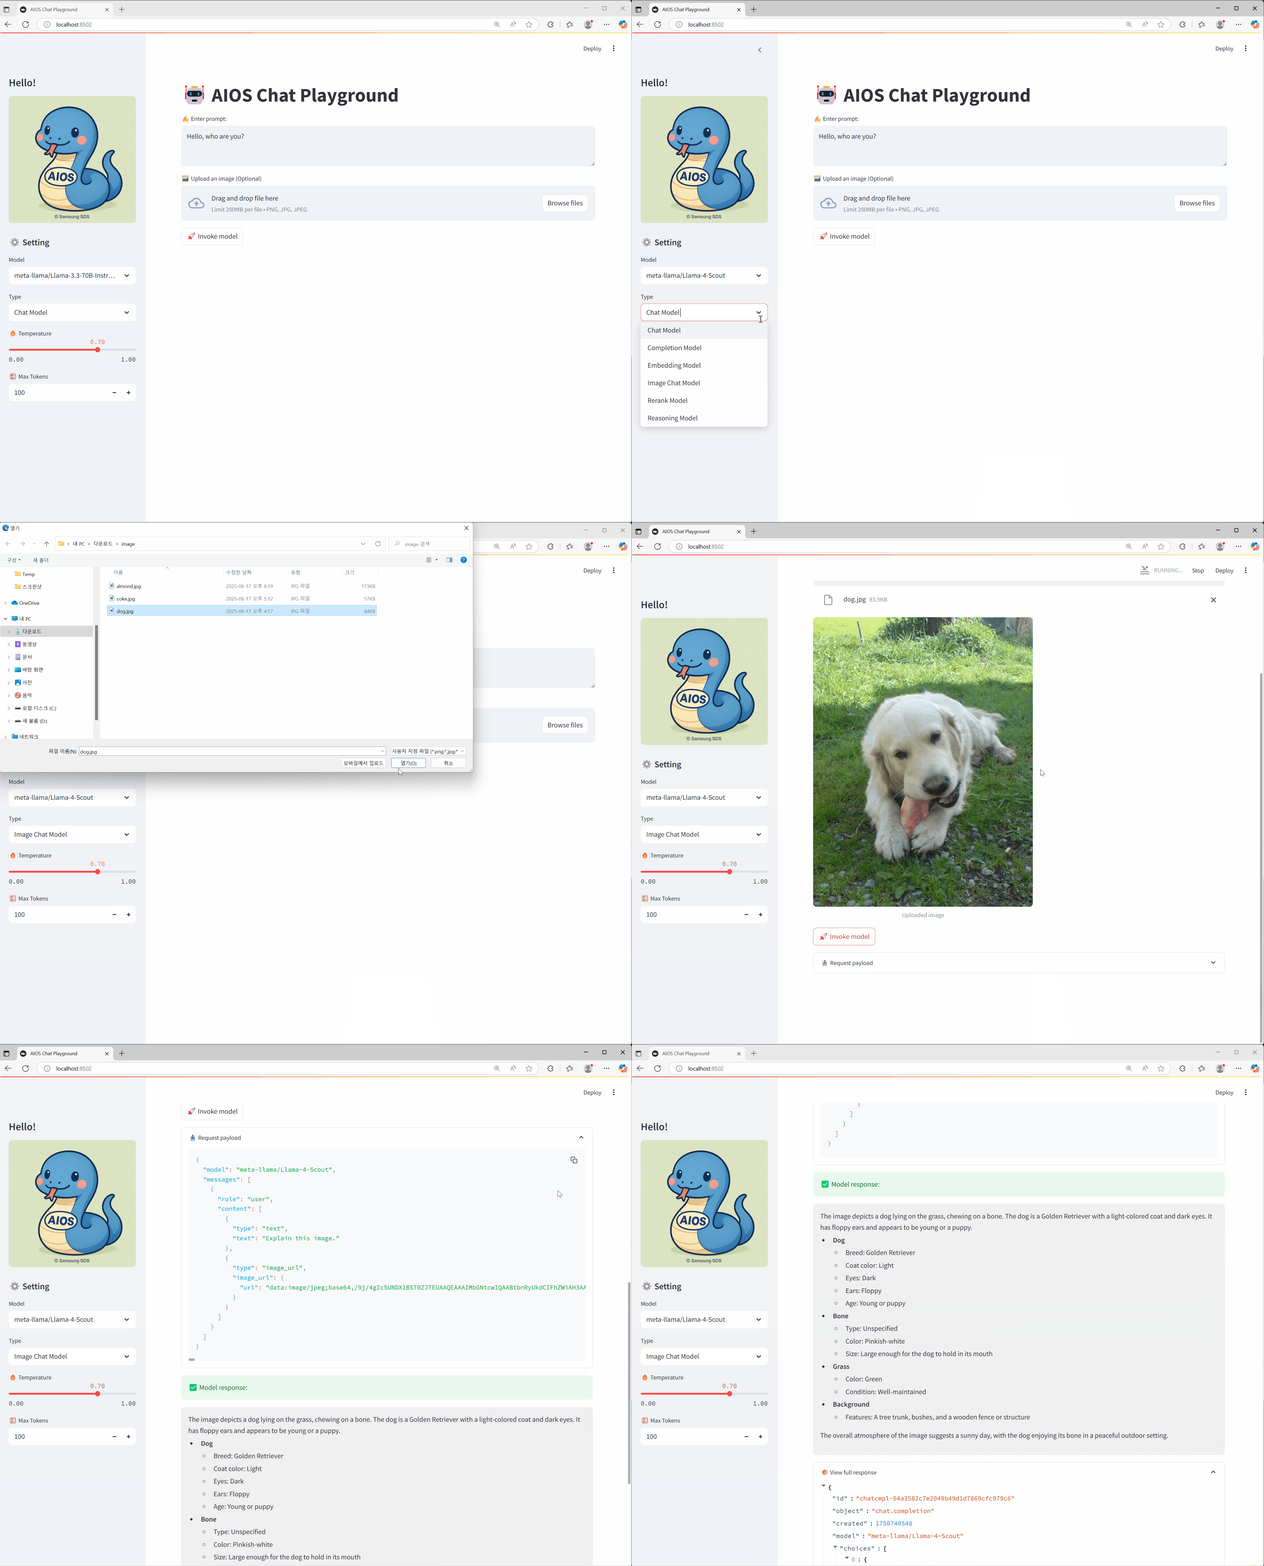
Calling an Image model
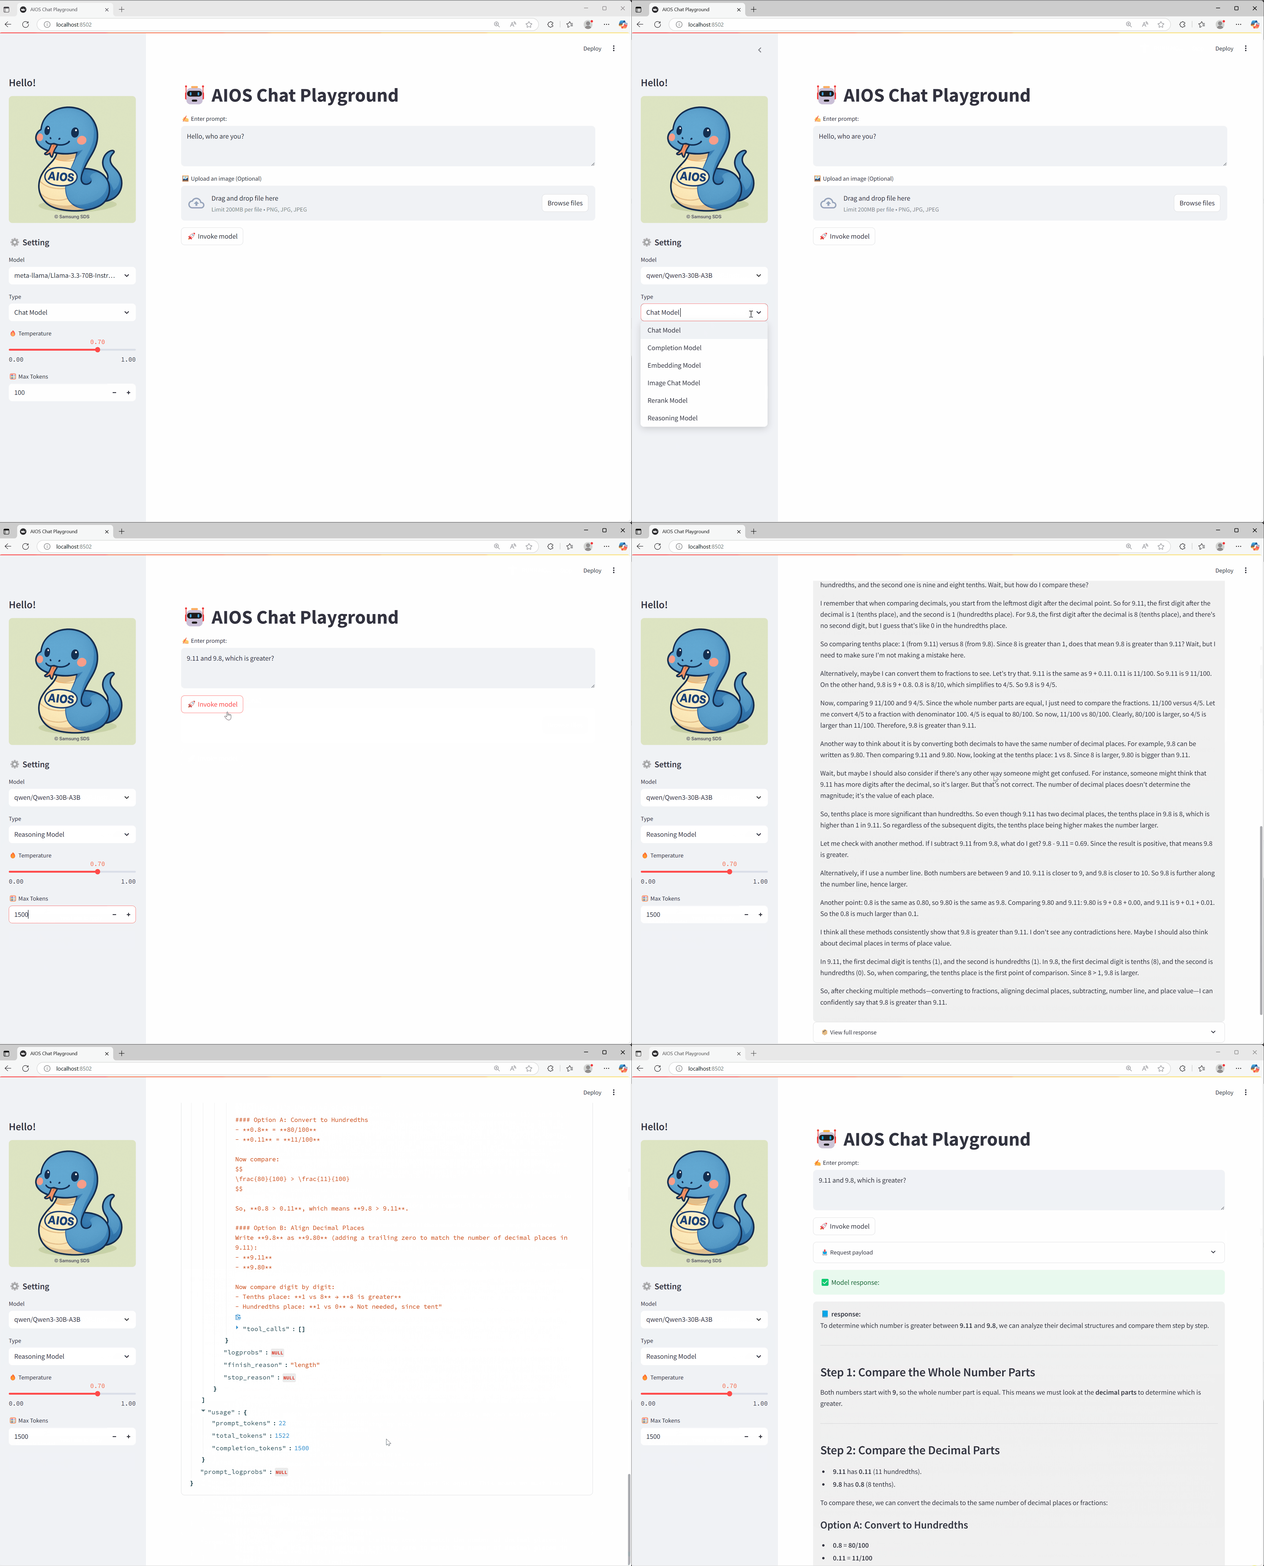
Calling a Reasoning model
Conclusion
We hope that through this tutorial you have learned how to build and use a Playground UI that lets you easily test the various AI model APIs provided by AIOS. Depending on your actual service needs, you can flexibly customize it to match the desired model and endpoint architecture.
Reference links
https://docs.streamlit.io/
2 - Chat Playground
Goal
This tutorial introduces how to create and use a web-based Playground using Streamlit in the SCP for Samsung environment, allowing you to easily test the APIs of various AI models provided by AIOS.
environment
To run this tutorial, the following environment must be prepared.
System Environment
Installation required packages
Code block. Install streamlit package Note
Streamlit
Python-based open-source web application framework that is highly suitable for visually presenting and sharing data science, machine learning, and data analysis results. Even without extensive web development knowledge, you can quickly create a web interface by writing just a few lines of code.
Implementation
Pre-check
Check that the model call via curl works correctly in the environment where the application runs. For this, see the AIOS_LLM_Private_Endpoint in the LLM Usage Guide.
- Example: {AIOS LLM private endpoint}/{API}
curl -H "Content-Type: application/json" \
-d '{"model": "meta-llama/Llama-3.3-70B-Instruct"
, "prompt" : "Hello, I am jihye, who are you"
, "temperature": 0
, "max_tokens": 100
, "stream": false}' -L AIOS_LLM_Private_Endpoint
curl -H "Content-Type: application/json" \
-d '{"model": "meta-llama/Llama-3.3-70B-Instruct"
, "prompt" : "Hello, I am jihye, who are you"
, "temperature": 0
, "max_tokens": 100
, "stream": false}' -L AIOS_LLM_Private_Endpoint
You can see that the model’s answer is included in the text field of choices.
{"id":"cmpl-4ac698a99c014d758300a3ec5583d73b","object":"text_completion","created":1750140201,"model":"meta-llama/Llama-3.3-70B-Instruct","choices":[{"index":0,"text":"?\nI am a Korean student who is studying English.\nI am interested in learning about different cultures and making friends from around the world.\nI like to watch movies, listen to music, and read books in my free time.\nI am looking forward to chatting with you and learning more about your culture and way of life.\nNice to meet you, jihye! I'm happy to chat with you and learn more about Korean culture. What kind of movies, music, and books do you enjoy? Do","logprobs":null,"finish_reason":"length","stop_reason":null,"prompt_logprobs":null}],"usage":{"prompt_tokens":11,"total_tokens":111,"completion_tokens":100}}
Project Structure
chat-playground
├── app.py          # streamlit main web app file
├── endpoints.json  # AIOS model call type definitions
├── img
│   └── aios.png
└── models.json     # AIOS model list
Chat Playground code
Reference
- models.json, endpoints.json files must exist and be configured in the proper format. Please refer to the code below.
- In the code, modify BASE_URL to the AIOS LLM Private Endpoint address, referring to the LLM Usage Guide.
- This Playground is designed with a single-request architecture, where the user provides input values, presses a button to send a single request, and checks the result. This allows quick testing and response verification without complex session management.
- The parameters Model, Type, Temperature, and Max Tokens configured in the sidebar are part of an interface built with st.sidebar, and you can freely extend or modify the functionality as needed.
- The image (file) uploaded with st.file_uploader() exists as a temporary BytesIO object in server memory and is not automatically saved to disk.
app.py
This is the main Streamlit web app file. Here, please refer to the LLM Usage Guide for the BASE_URL AIOS_LLM_Private_Endpoint.
import streamlit as st
import base64
import json
import requests
from urllib.parse import urljoin

BASE_URL = "AIOS_LLM_Private_Endpoint"

# ===== Settings =====
st.set_page_config(page_title="AIOS Chat Playground", layout="wide")
st.title("🤖 AIOS Chat Playground")

# ===== Common Functions =====
def load_models():
    with open("models.json", "r") as f:
        return json.load(f)

def load_endpoints():
    with open("endpoints.json", "r") as f:
        return json.load(f)

models = load_models()
endpoints_config = load_endpoints()

# ===== Sidebar Settings =====
st.sidebar.title('Hello!')
st.sidebar.image("img/aios.png")
st.sidebar.header("⚙️ Setting")
model = st.sidebar.selectbox("Model", models)
endpoint_labels = [ep["label"] for ep in endpoints_config]
endpoint_label = st.sidebar.selectbox("Type", endpoint_labels)
selected_endpoint = next(ep for ep in endpoints_config if ep["label"] == endpoint_label)

temperature = st.sidebar.slider("🔥 Temperature", 0.0, 1.0, 0.7)
max_tokens = st.sidebar.number_input("🧮 Max Tokens", min_value=1, max_value=5000, value=100)

base_url = BASE_URL
path = selected_endpoint["path"]
endpoint_type = selected_endpoint["type"]
api_style = selected_endpoint.get("style", "openai")  # openai or cohere

# ===== Input UI =====
prompt = ""
docs = []
image_base64 = None

if endpoint_type == "image":
    prompt = st.text_area("✍️ Enter your question:", "Explain this image.")
    uploaded_image = st.file_uploader("🖼️ Upload an image", type=["png", "jpg", "jpeg"])
    if uploaded_image:
        st.image(uploaded_image, caption="Uploaded image", use_container_width=300)
        image_bytes = uploaded_image.read()

        image_base64 = base64.b64encode(image_bytes).decode("utf-8")

elif endpoint_type == "rerank":
    prompt = st.text_area("✍️ Enter your query:", "What is the capital of France?")
    raw_docs = st.text_area("📄 Documents (one per line)", "The capital of France is Paris.\nFrance capital city is known for the Eiffel Tower.\nParis is located in the north-central part of France.")
    docs = raw_docs.strip().splitlines()

elif endpoint_type == "reasoning":
    prompt = st.text_area("✍️ Enter prompt:", "9.11 and 9.8, which is greater?")

elif endpoint_type == "embedding":
    prompt = st.text_area("✍️ Enter prompt:", "What is the capital of France?")

else:
    prompt = st.text_area("✍️ Enter prompt:", "Hello, who are you?")
    uploaded_image = st.file_uploader("🖼️ Upload an image (Optional)", type=["png", "jpg", "jpeg"])
    if uploaded_image:
        image_bytes = uploaded_image.read()
        image_base64 = base64.b64encode(image_bytes).decode("utf-8")

# ===== Call button =====
if st.button("🚀 Invoke model"):
    headers = {
        "Content-Type": "application/json"
        "Authorization": "Bearer EMPTY_KEY"
    }

    try:
        if endpoint_type == "chat":
            url = urljoin(base_url, "v1/chat/completions")
            payload = {
                "model": model,
                "messages": [
                    {"role": "system", "content": "You are a helpful assistant."}
                    {"role": "user", "content": prompt}
                ],
                "temperature": temperature,
                "max_tokens": max_tokens
            }

        elif endpoint_type == "completion":
            url = urljoin(base_url, "v1/completions")
            payload = {
                "model": model,
                "prompt": prompt,
                "temperature": temperature,
                "max_tokens": max_tokens
            }

        elif endpoint_type == "embedding":
            url = urljoin(base_url, "v1/embeddings")
            payload = {
                "model": model,
                "input": prompt
            }

        elif endpoint_type == "reasoning":
            url = urljoin(BASE_URL, "v1/chat/completions")
            payload = {
                "model": model,
                "messages": [
                    {"role": "user", "content": prompt}
                ],
                "temperature": temperature,
                "max_tokens": max_tokens
            }

        elif endpoint_type == "image":
            url = urljoin(base_url, "v1/chat/completions")
            if not image_base64:
                st.warning("🖼️ Upload an image")
                st.stop()

            payload = {
                "model": model,
                "messages": [
                    {
                        "role": "user"
                        "content": [
                            {"type": "text", "text": prompt}
                            {"type": "image_url", "image_url": {"url": f"data:image/jpeg;base64,{image_base64}"}}
                        ]
                    }
                ]
            }

        elif endpoint_type == "rerank":
            url = urljoin(base_url, "v2/rerank")
            payload = {
                "model": model,
                "query": prompt,
                "documents": docs,
                "top_n": len(docs)
            }

        else:
            st.error("❌ Unknown endpoint type")
            st.stop()

        st.expander("📤 Request payload").code(json.dumps(payload, indent=2), language="json")
        response = requests.post(url, headers=headers, json=payload)
        response.raise_for_status()
        res = response.json()

        # ===== Response Parsing =====
        if endpoint_type == "chat" or endpoint_type == "image":
            output = res["choices"][0]["message"]["content"]

        elif endpoint_type == "completion":
            output = res["choices"][0]["text"]

        elif endpoint_type == "embedding":
            vec = res["data"][0]["embedding"]
            output = f"🔢 Vector dimensions: {len(vec)}"
            st.expander("📐 Vector preview").code(vec[:20])

        elif endpoint_type == "rerank":
            results = res["results"]
            output = "\n\n".join(
                [f"{i+1}. {r['document']['text']} (score: {r['relevance_score']:.3f})" for i, r in enumerate(results)]
            )

        elif endpoint_type == "reasoning":
            message = res.get("choices", [{}])[0].get("message", {})
            reasoning = message.get("reasoning_content", "❌ No reasoning_content")
            content = message.get("content", "❌ No content")
            output = f"""📘 <b>response:</b><br>{content}<br><br>🧠 <b>Reasoning:</b><br>{reasoning}"""

        st.success("✅ Model response:")
        st.markdown(f"<div style='padding:1rem;background:#f0f0f0;border-radius:8px'>{output}</div>", unsafe_allow_html=True)

        st.expander("📦 View full response").json(res)

    except requests.RequestException as e:
        st.error("❌ Request failed")
        st.code(str(e))
import streamlit as st
import base64
import json
import requests
from urllib.parse import urljoin

BASE_URL = "AIOS_LLM_Private_Endpoint"

# ===== Settings =====
st.set_page_config(page_title="AIOS Chat Playground", layout="wide")
st.title("🤖 AIOS Chat Playground")

# ===== Common Functions =====
def load_models():
    with open("models.json", "r") as f:
        return json.load(f)

def load_endpoints():
    with open("endpoints.json", "r") as f:
        return json.load(f)

models = load_models()
endpoints_config = load_endpoints()

# ===== Sidebar Settings =====
st.sidebar.title('Hello!')
st.sidebar.image("img/aios.png")
st.sidebar.header("⚙️ Setting")
model = st.sidebar.selectbox("Model", models)
endpoint_labels = [ep["label"] for ep in endpoints_config]
endpoint_label = st.sidebar.selectbox("Type", endpoint_labels)
selected_endpoint = next(ep for ep in endpoints_config if ep["label"] == endpoint_label)

temperature = st.sidebar.slider("🔥 Temperature", 0.0, 1.0, 0.7)
max_tokens = st.sidebar.number_input("🧮 Max Tokens", min_value=1, max_value=5000, value=100)

base_url = BASE_URL
path = selected_endpoint["path"]
endpoint_type = selected_endpoint["type"]
api_style = selected_endpoint.get("style", "openai")  # openai or cohere

# ===== Input UI =====
prompt = ""
docs = []
image_base64 = None

if endpoint_type == "image":
    prompt = st.text_area("✍️ Enter your question:", "Explain this image.")
    uploaded_image = st.file_uploader("🖼️ Upload an image", type=["png", "jpg", "jpeg"])
    if uploaded_image:
        st.image(uploaded_image, caption="Uploaded image", use_container_width=300)
        image_bytes = uploaded_image.read()

        image_base64 = base64.b64encode(image_bytes).decode("utf-8")

elif endpoint_type == "rerank":
    prompt = st.text_area("✍️ Enter your query:", "What is the capital of France?")
    raw_docs = st.text_area("📄 Documents (one per line)", "The capital of France is Paris.\nFrance capital city is known for the Eiffel Tower.\nParis is located in the north-central part of France.")
    docs = raw_docs.strip().splitlines()

elif endpoint_type == "reasoning":
    prompt = st.text_area("✍️ Enter prompt:", "9.11 and 9.8, which is greater?")

elif endpoint_type == "embedding":
    prompt = st.text_area("✍️ Enter prompt:", "What is the capital of France?")

else:
    prompt = st.text_area("✍️ Enter prompt:", "Hello, who are you?")
    uploaded_image = st.file_uploader("🖼️ Upload an image (Optional)", type=["png", "jpg", "jpeg"])
    if uploaded_image:
        image_bytes = uploaded_image.read()
        image_base64 = base64.b64encode(image_bytes).decode("utf-8")

# ===== Call button =====
if st.button("🚀 Invoke model"):
    headers = {
        "Content-Type": "application/json"
        "Authorization": "Bearer EMPTY_KEY"
    }

    try:
        if endpoint_type == "chat":
            url = urljoin(base_url, "v1/chat/completions")
            payload = {
                "model": model,
                "messages": [
                    {"role": "system", "content": "You are a helpful assistant."}
                    {"role": "user", "content": prompt}
                ],
                "temperature": temperature,
                "max_tokens": max_tokens
            }

        elif endpoint_type == "completion":
            url = urljoin(base_url, "v1/completions")
            payload = {
                "model": model,
                "prompt": prompt,
                "temperature": temperature,
                "max_tokens": max_tokens
            }

        elif endpoint_type == "embedding":
            url = urljoin(base_url, "v1/embeddings")
            payload = {
                "model": model,
                "input": prompt
            }

        elif endpoint_type == "reasoning":
            url = urljoin(BASE_URL, "v1/chat/completions")
            payload = {
                "model": model,
                "messages": [
                    {"role": "user", "content": prompt}
                ],
                "temperature": temperature,
                "max_tokens": max_tokens
            }

        elif endpoint_type == "image":
            url = urljoin(base_url, "v1/chat/completions")
            if not image_base64:
                st.warning("🖼️ Upload an image")
                st.stop()

            payload = {
                "model": model,
                "messages": [
                    {
                        "role": "user"
                        "content": [
                            {"type": "text", "text": prompt}
                            {"type": "image_url", "image_url": {"url": f"data:image/jpeg;base64,{image_base64}"}}
                        ]
                    }
                ]
            }

        elif endpoint_type == "rerank":
            url = urljoin(base_url, "v2/rerank")
            payload = {
                "model": model,
                "query": prompt,
                "documents": docs,
                "top_n": len(docs)
            }

        else:
            st.error("❌ Unknown endpoint type")
            st.stop()

        st.expander("📤 Request payload").code(json.dumps(payload, indent=2), language="json")
        response = requests.post(url, headers=headers, json=payload)
        response.raise_for_status()
        res = response.json()

        # ===== Response Parsing =====
        if endpoint_type == "chat" or endpoint_type == "image":
            output = res["choices"][0]["message"]["content"]

        elif endpoint_type == "completion":
            output = res["choices"][0]["text"]

        elif endpoint_type == "embedding":
            vec = res["data"][0]["embedding"]
            output = f"🔢 Vector dimensions: {len(vec)}"
            st.expander("📐 Vector preview").code(vec[:20])

        elif endpoint_type == "rerank":
            results = res["results"]
            output = "\n\n".join(
                [f"{i+1}. {r['document']['text']} (score: {r['relevance_score']:.3f})" for i, r in enumerate(results)]
            )

        elif endpoint_type == "reasoning":
            message = res.get("choices", [{}])[0].get("message", {})
            reasoning = message.get("reasoning_content", "❌ No reasoning_content")
            content = message.get("content", "❌ No content")
            output = f"""📘 <b>response:</b><br>{content}<br><br>🧠 <b>Reasoning:</b><br>{reasoning}"""

        st.success("✅ Model response:")
        st.markdown(f"<div style='padding:1rem;background:#f0f0f0;border-radius:8px'>{output}</div>", unsafe_allow_html=True)

        st.expander("📦 View full response").json(res)

    except requests.RequestException as e:
        st.error("❌ Request failed")
        st.code(str(e))
models.json
This is the AIOS model list. Refer to the LLM Usage Guide to configure the model you will use.
[
  meta-llama/Llama-3.3-70B-Instruct
  "qwen/Qwen3-30B-A3B"
  "qwen/QwQ-32B"
  google/gemma-3-27b-it
  meta-llama/Llama-4-Scout
  "meta-llama/Llama-Guard-4-12B"
  "sds/bge-m3"
  sds/bge-reranker-v2-m3
]
[
  meta-llama/Llama-3.3-70B-Instruct
  "qwen/Qwen3-30B-A3B"
  "qwen/QwQ-32B"
  google/gemma-3-27b-it
  meta-llama/Llama-4-Scout
  "meta-llama/Llama-Guard-4-12B"
  "sds/bge-m3"
  sds/bge-reranker-v2-m3
]
endpoints.json
The AIOS model’s call types are defined. Depending on the type, the input screen and results are displayed differently.
[
  {
    "label": "Chat Model"
    "path": "/v1/chat/completions"
    "type": "chat"

  },
  {
    "label": "Completion Model"
    "path": "/v1/completions"
    "type": "completion"

  },
  {
    "label": "Embedding Model"
    "path": "/v1/embeddings"
    "type": "embedding"

  },
  {
    "label": "Image Chat Model"
    "path": "/v1/chat/completions"
    "type": "image"

  },
  {
    "label": "Rerank Model"
    "path": "/v2/rerank"
    "type": "rerank"
  },
  {
    "label": "Reasoning Model"
    "path": "/v1/chat/completions"
    "type": "reasoning"
  }
]
[
  {
    "label": "Chat Model"
    "path": "/v1/chat/completions"
    "type": "chat"

  },
  {
    "label": "Completion Model"
    "path": "/v1/completions"
    "type": "completion"

  },
  {
    "label": "Embedding Model"
    "path": "/v1/embeddings"
    "type": "embedding"

  },
  {
    "label": "Image Chat Model"
    "path": "/v1/chat/completions"
    "type": "image"

  },
  {
    "label": "Rerank Model"
    "path": "/v2/rerank"
    "type": "rerank"
  },
  {
    "label": "Reasoning Model"
    "path": "/v1/chat/completions"
    "type": "reasoning"
  }
]
How to use Playground
This document covers the two ways to run Playground.
Run on Virtual Server
1. Run Streamlit on Virtual Server
streamlit run app.py --server.port 8501 --server.address 0.0.0.0
streamlit run app.py --server.port 8501 --server.address 0.0.0.0
You can now view your Streamlit app in your browser.

URL: http://0.0.0.0:8501
In the browser, access http://{your_server_ip}:8501 or, after configuring server SSH tunneling, http://localhost:8501. See below for SSH tunneling.
2. Access Virtual Server via tunneling from local PC (when accessing via http://localhost:8501)
ssh -i {your_pemkey.pem} -L 8501:localhost:8501 ubuntu@{your_server_ip}
ssh -i {your_pemkey.pem} -L 8501:localhost:8501 ubuntu@{your_server_ip}
Running on SCP Kubernetes Engine
1. Deployment and Service startup
Run the following YAML to start the Deployment and Service. A container image that packages the code and Python library files is provided to run the Chat Playground tutorial.
Reference
Image URL : aios-evdwovtn.scr.private.kr-west1.s.samsungsdscloud.com/tutorial/chat-playground:v1.0
apiVersion: apps/v1
kind: Deployment
metadata:
  name: streamlit-deployment
spec:
  replicas: 1
  selector:
    matchLabels:
      app: streamlit
  template:
    metadata:
      labels:
        app: streamlit
    spec:
      containers:
        - name: streamlit-app
          image: aios-evdwovtn.scr.private.kr-west1.s.samsungsdscloud.com/tutorial/chat-playground:v1.0
          ports:
            - containerPort: 8501
---
apiVersion: v1
kind: Service
metadata:

  name: streamlit-service
spec:
  type: NodePort
  selector:
    app: streamlit
  ports:
    - protocol: TCP
      port: 80
      targetPort: 8501
      nodePort: 30081
apiVersion: apps/v1
kind: Deployment
metadata:
  name: streamlit-deployment
spec:
  replicas: 1
  selector:
    matchLabels:
      app: streamlit
  template:
    metadata:
      labels:
        app: streamlit
    spec:
      containers:
        - name: streamlit-app
          image: aios-evdwovtn.scr.private.kr-west1.s.samsungsdscloud.com/tutorial/chat-playground:v1.0
          ports:
            - containerPort: 8501
---
apiVersion: v1
kind: Service
metadata:

  name: streamlit-service
spec:
  type: NodePort
  selector:
    app: streamlit
  ports:
    - protocol: TCP
      port: 80
      targetPort: 8501
      nodePort: 30081
kubectl apply -f run.yaml
kubectl apply -f run.yaml
$ kubectl get pod
NAME                                   READY   STATUS    RESTARTS   AGE
streamlit-deployment-8bfcd5959-6xpx9   1/1     Running   0          17s

$ kubectl logs streamlit-deployment-8bfcd5959-6xpx9

Collecting usage statistics. To deactivate, set browser.gatherUsageStats to false.


  You can now view your Streamlit app in your browser.

  URL: http://0.0.0.0:8501

$ kubectl get svc
NAME                TYPE        CLUSTER-IP      EXTERNAL-IP   PORT(S)        AGE
kubernetes          ClusterIP   172.20.0.1      <none>        443/TCP        46h
streamlit-service   NodePort    172.20.95.192   <none>        80:30081/TCP   130m
In the browser, access http://{worker_node_ip}:30081 or after configuring server SSH tunneling, access http://localhost:8501. See below for SSH tunneling.
2. Access the worker node via tunneling from the local PC (http://localhost:8501 when accessed)
ssh -i {your_pemkey.pem} -L 8501:{worker_node_ip}:30081 ubuntu@{worker_node_ip}
ssh -i {your_pemkey.pem} -L 8501:{worker_node_ip}:30081 ubuntu@{worker_node_ip}
3. Access the worker node via a relay server through tunneling from the local PC (http://localhost:8501 when accessing)
ssh -i {your_pemkey.pem} -L 8501:{worker_node_ip}:30081 ubuntu@{your_server_ip}
ssh -i {your_pemkey.pem} -L 8501:{worker_node_ip}:30081 ubuntu@{your_server_ip}
Usage example
Main screen layout
| Item | description |
|---|
| 1 | Model | List of callable models configured in the models.json file. |
| 2 | Endpoint type | Select the appropriate model according to the call format defined in the endpoints.json file. |
| 3 | Temperature | This is a parameter that controls the degree of “randomness” or “creativity” in model output. In this tutorial, it is set in the range 0.00 ~ 1.00.- 0.0 : selects only the highest-probability token → accurate and consistent responses, lacking diversity
- 0.7 : moderate randomness → a balance of creativity and consistency
- 1.0 : high randomness → diverse and creative responses, quality may vary
|
| 4 | Max Tokens | Set the maximum number of tokens that can be generated in the response text using the output length limit parameter. In this tutorial, it is set to a range of 1 ~ 5000. |
| 5 | input area | The way prompts, images, etc. are received varies by endpoint type.- Chat, Completion, Embedding. Reasoning: plain text input
- Image: text + image upload
- Rerank: query + document list (in this tutorial, each line of text is treated as a document)
|
Table. Main screen layout
Calling a Chat model
Calling an Image model
Calling a Reasoning model
Conclusion
We hope that through this tutorial you have learned how to build and use a Playground UI that lets you easily test the various AI model APIs provided by AIOS. Depending on your actual service needs, you can flexibly customize it to match the desired model and endpoint architecture.
Reference links
https://docs.streamlit.io/
3 - RAG
Goal
We vectorize GIT logs, PR descriptions, review comments, and similar data using the AI model provided by AIOS, and based on this, we implement a RAG-based PR review assistant chatbot.
Note
RAG
RAG (Retrieval-Augmented Generation) is a natural language processing technique in which a large language model (LLM) first retrieves relevant information from an external, trustworthy knowledge base or database before generating a response, and then generates an answer based on the retrieved information. Traditional LLMs rely solely on their training data, which limits their ability to reflect up-to-date information or domain-specific knowledge. RAG addresses this limitation by first locating relevant documents or data—such as through vector search—and then using that information to produce more accurate and contextually appropriate answers to user queries.
environment
To run this tutorial, the following environment must be prepared.
System Environment
Required packages for installation
pip install streamlit
pip install opensearch-py
pip install streamlit
pip install opensearch-py
Prerequisites
- user knowledge base or database
Reference
- In this tutorial, we set up OpenSearch inside the VM and used it as a vector database.
- You can use the user’s existing repository, or utilize SCP’s Search Engine product.
System Architecture
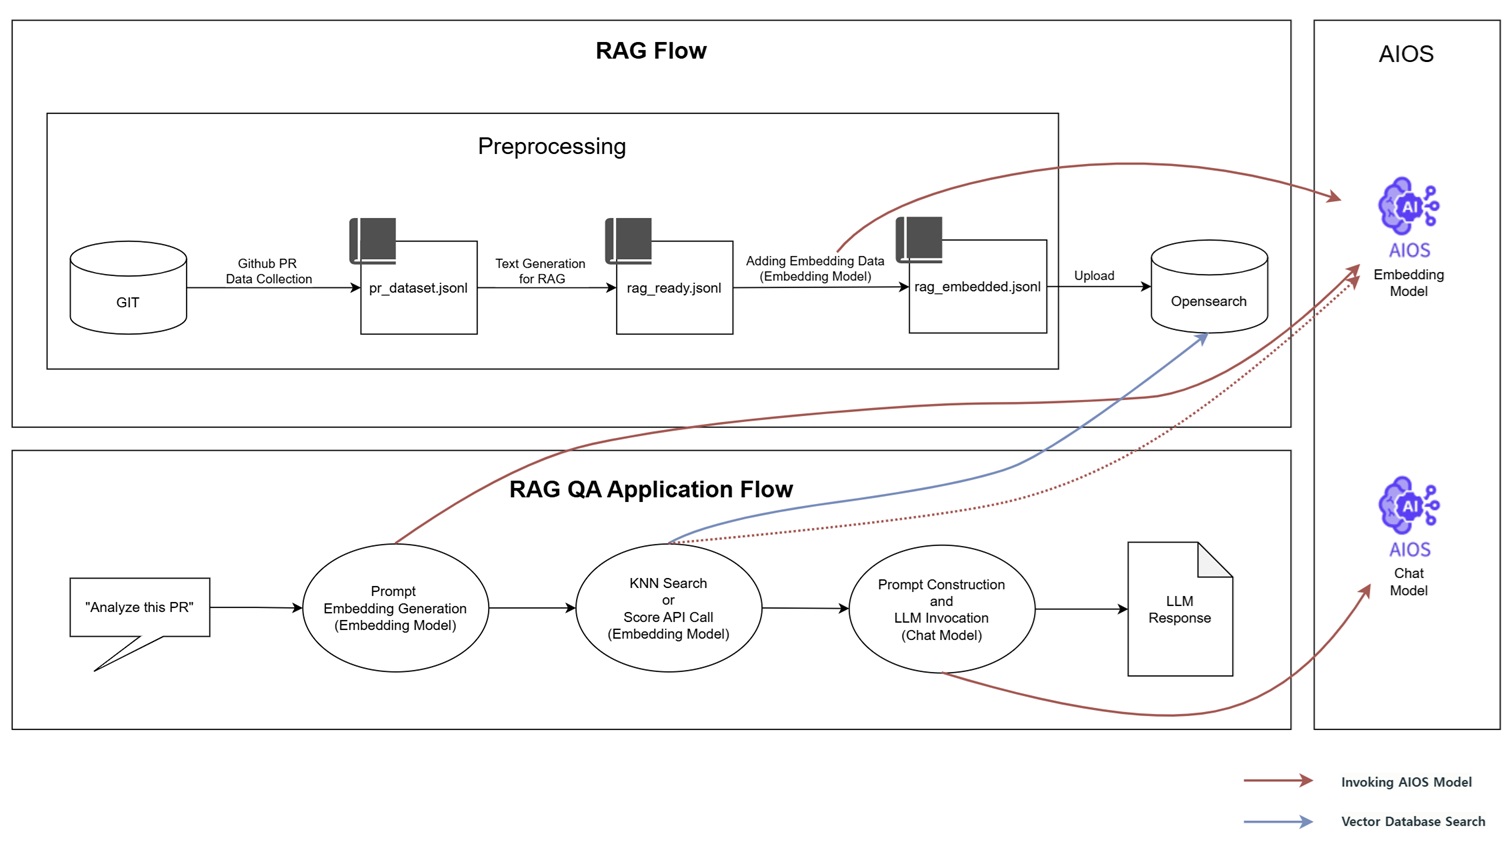
It shows the entire workflow of collecting GitHub PR data, building a RAG-based QA system, and using the AIOS model to perform embedding and response generation.
RAG Flow
- Collect PR data from a Git repository and generate pr_dataset.jsonl
- Text cleaning for RAG input → rag_ready.jsonl
- Generate vectors using the AIOS Embedding model and save them to the rag_embedded.jsonl file
- Upload the vector file to OpenSearch and configure it as a searchable format
RAG QA Application Flow
- Embedding the user’s query (e.g., “Analyze this PR.”) into a search query.
- Extract related documents via KNN search or AIOS Embedding model (score API) calls in OpenSearch.
- Compose a prompt based on the extracted document and send it to the AIOS Chat model.
- Generate a response and output the final result
Implementation
Reference
- In this tutorial, we used the Kubeflow project’s GitHub.
- The vector database data is configured as a one-time setup, and you can customize it for real-time integration and other uses in actual services.
Project Structure
rag-tutorial
├── app.py                                  # streamlit 메인 웹 앱 파일
├── generate_pr_dateset_from_branch.py      # 1. Github PR 데이터 수집
├── generate_rag_data_from_pr_dataset.py    # 2. RAG 입력용 텍스트 구성 (RAG 입력에 적합하도록 요약하여 텍스트 정제)
├── embed_prs.py                            # 3. RAG 입력용 텍스트 구성 (AIOS Embedding 모델을 통해 벡터 생성)
└── upload_rag_documnets.py                 # 4. OpenSearch에 업로드
Github PR Data Collection
Collect PR data from a Git repository and generate pr_dataset.jsonl.
Reference
- The code below is executed within the git directory.
- If there is no additional PR merge record, or if the PR merge is performed via rebase or squash-merge so that a regular merge commit is not created, data collection will not occur.
- When collecting data, each commit’s diff entry was limited to a maximum of 3000 characters. When building the actual system, additional chunking may be required depending on the length or structure of the content to enable efficient search and response generation.
$ git branch
* (HEAD detached at v1.9.1)
  master

$ python3 generate_pr_dateset_from_branch.py
🔍 Searching for merged PRs...
✅ Generated pr_dataset.jsonl with 43 merged PRs.

$ head -n 1 pr_dataset.jsonl | jq
{
  "merge_sha": "167e162ef7dffc033ddc82e55b0a108db27fc340"
  "author": "Ricardo Martinelli de Oliveira"
  "date": "Tue Mar 5 11:46:36 2024 -0300"
  "title": "Merge pull request #7461 from rimolive/kf-1.9"
  "pr_id": null,
  "commits": [
    {
      "sha": "68e4d10bbf976bb89810b4e16e8b765a2a0e68b7"
      "author": "Ricardo Martinelli de Oliveira"
      "message": "Update ROADMAP.md"
      "date": "Mon Feb 19 18:51:40 2024 -0300"
      "files": [
        ROADMAP.md
      ],
      "diff": "commit 68e4d10bbf976bb89810b4e16e8b765a2a0e68b7\nAuthor: Ricardo Martinelli de Oliveira <rmartine@redhat.com>\nDate:   Mon Feb 19 18:51:40 2024 -0300\n\n    Update ROADMAP.md\n    \n    Co-authored-by: Tommy Li <Tommy.chaoping.li@ibm.com>\n\ndiff --git a/ROADMAP.md b/ROADMAP.md\nindex 35021954..cfd39558 100644\n--- a/ROADMAP.md\n+++ b/ROADMAP.md\n@@ -8,7 +8,7 @@ The Kubeflow Community plans to deliver its v1.9 release in Jul 2024 per this [t\n * CNCF Transition\n * LLM APIs\n * New component: Model Registry\n-* Kubeflow Pipelines and kfp-tekton merged in a single GitHub repository\n+* Kubeflow Pipelines and kfp-tekton V2 merged in a single GitHub repository\n \n ### Detailed features, bug fixes and enhancements are identified in the Working Group Roadmaps and Tracking Issues:\n * [Training Operators](https://github.com/kubeflow/training-operator/issues/1994)"
    },
    {
      "sha": "5c3404782fa2700f8547b37132ff7ab2d1ed99fe"
      "author": "Ricardo M. Oliveira"
      "message": "Add Kubeflow 1.9 release roadmap"
      "date": "Mon Feb 5 14:43:45 2024 -0300"
      "files": [
        ROADMAP.md
      ],
      "diff": "commit 5c3404782fa2700f8547b37132ff7ab2d1ed99fe\nAuthor: Ricardo M. Oliveira <rmartine@redhat.com>\nDate:   Mon Feb 5 14:43:45 2024 -0300\n\n    Add Kubeflow 1.9 release roadmap\n    \n    Signed-off-by: Ricardo M. Oliveira <rmartine@redhat.com>\n\ndiff --git a/ROADMAP.md b/ROADMAP.md\nindex de3c8951..35021954 100644\n--- a/ROADMAP.md\n+++ b/ROADMAP.md\n@@ -1,6 +1,26 @@\n # Kubeflow Roadmap\n \n-## Kubeflow 1.8 Release, Planned for release: Oct 2023\n+## Kubeflow 1.9 Release, Planned for release: Jul 2024\n+The Kubeflow Community plans to deliver its v1.9 release in Jul 2024 per this [timeline](https://github.com/kubeflow/community/blob/master/releases/release-1.9/README.md#timeline). The high level deliverables are tracked in the [v1.9 Release](https://github.com/orgs/kubeflow/projects/61) Github project board. The v1.9 release process will be managed by the v1.9 [release team](https://github.com/kubeflow/community/blob/master/releases/release-1.9/release-team.md) using the best practices in the [Release Handbook](https://github.com/kubeflow/community/blob/master/releases/handbook.md).\n+\n+### Themes\n+* Kubernetes 1.29 support\n+* CNCF Transition\n+* LLM APIs\n+* New component: Model Registry\n+* Kubeflow Pipelines and kfp-tekton merged in a single GitHub repository\n+\n+### Detailed features, bug fixes and enhancements are identified in the Working Group Roadmaps and Tracking Issues:\n+* [Training Operators](https://github.com/kubeflow/training-operator/issues/1994)\n+* [KServe](https://github.com/orgs/kserve/projects/12)\n+* [Katib](https://github.com/kubeflow/katib/issues/2255)\n+* [Kubeflow Pipelines](https://github.com/kubeflow/pipelines/issues/10402)\n+* [Notebooks](https://github.com/kubeflow/kubeflow/issues/7459)\n+* [Manifests](https://github.com/kubeflow/manifests/issues/2592)\n+* [Security](https://github.com/kubeflow/manifests/issues/2598)\n+* [Model Registry](https://github.com/kubeflow/model-registry/issues/3)\n+\n+## Kubeflow 1.8 Release, Delivered: Nov 2023\n The Kubeflow Community plans to deliver its v1.8 release in Oct 2023 per this [timeline](https://github.com/kubeflow/community/tree/master/releases/release-1.8#timeline). The high level deliverables are tracked in the [v1.8 Release](https://github.com/orgs/kubeflow/projects/58/) Github project board. The v1.8 release process will be managed by the v1.8 [release team](https://github.com/kubeflow/community/blob/a956b3f6f15c49f928e37eaafec40d7f73ee1d5b/releases/release-team.md) using the best practices in the [Release Handbook](https://github.com/kubeflow/community/blob/master/releases/handbook.md).\n \n ### Themes"
    }
  ]
}
generate_pr_dateset_from_branch.py
import subprocess
import json

def run(cmd):
    return subprocess.check_output(cmd, shell=True, text=True).strip()

def extract_pr_commits(merge_sha):
    try:
        parent1 = run(f"git rev-parse {merge_sha}^1")
        parent2 = run(f"git rev-parse {merge_sha}^2")
    except subprocess.CalledProcessError:
        return []

    try:
        lines = run(f"git log {parent1}..{parent2} --pretty=format:'%H|%an|%s|%ad'").splitlines()
    except subprocess.CalledProcessError:
        return []

    commits = []
    for line in lines:
        try:
            sha, author, msg, date = line.split("|", 3)
            files = run(f"git show --pretty=format:'' --name-only {sha}").splitlines()
            diff = run(f"git show {sha}")
            commits.append({
                "sha": sha,
                "author": author,
                "message": msg,
                "date": date,
                "files": files,
                "diff": diff[:3000]  # diff가 너무 길면 자름
            })
        except:
            continue
    return commits

def extract_pr_id(title):
    if "# " in title:
        try:
            return title.split("#")[1].split()[0]
        except:
            return None
    return None

output = []

print("🔍 Searching for merged PRs...")
log_lines = run("git log --merges --pretty=format:'%H|%an|%ad|%s'").splitlines()

for line in log_lines:
    try:
        merge_sha, author, date, title = line.split("|", 3)
    except ValueError:
        continue

    commits = extract_pr_commits(merge_sha)
    if not commits:
        continue

    pr_doc = {
        "merge_sha": merge_sha,
        "author": author,
        "date": date,
        "title": title,
        "pr_id": extract_pr_id(title),
        "commits": commits
    }

    output.append(pr_doc)

with open("pr_dataset.jsonl", "w") as f:
    for item in output:
        f.write(json.dumps(item, ensure_ascii=False) + "\n")

print(f"✅ Generated pr_dataset.jsonl with {len(output)} merged PRs.")
import subprocess
import json

def run(cmd):
    return subprocess.check_output(cmd, shell=True, text=True).strip()

def extract_pr_commits(merge_sha):
    try:
        parent1 = run(f"git rev-parse {merge_sha}^1")
        parent2 = run(f"git rev-parse {merge_sha}^2")
    except subprocess.CalledProcessError:
        return []

    try:
        lines = run(f"git log {parent1}..{parent2} --pretty=format:'%H|%an|%s|%ad'").splitlines()
    except subprocess.CalledProcessError:
        return []

    commits = []
    for line in lines:
        try:
            sha, author, msg, date = line.split("|", 3)
            files = run(f"git show --pretty=format:'' --name-only {sha}").splitlines()
            diff = run(f"git show {sha}")
            commits.append({
                "sha": sha,
                "author": author,
                "message": msg,
                "date": date,
                "files": files,
                "diff": diff[:3000]  # diff가 너무 길면 자름
            })
        except:
            continue
    return commits

def extract_pr_id(title):
    if "# " in title:
        try:
            return title.split("#")[1].split()[0]
        except:
            return None
    return None

output = []

print("🔍 Searching for merged PRs...")
log_lines = run("git log --merges --pretty=format:'%H|%an|%ad|%s'").splitlines()

for line in log_lines:
    try:
        merge_sha, author, date, title = line.split("|", 3)
    except ValueError:
        continue

    commits = extract_pr_commits(merge_sha)
    if not commits:
        continue

    pr_doc = {
        "merge_sha": merge_sha,
        "author": author,
        "date": date,
        "title": title,
        "pr_id": extract_pr_id(title),
        "commits": commits
    }

    output.append(pr_doc)

with open("pr_dataset.jsonl", "w") as f:
    for item in output:
        f.write(json.dumps(item, ensure_ascii=False) + "\n")

print(f"✅ Generated pr_dataset.jsonl with {len(output)} merged PRs.")
RAG 입력용 텍스트 구성
RAG 입력에 적합하도록 요약하여 텍스트 정제후, AIOS Embedding 모델을 통해 벡터를 생성합니다.
$ python3 generate_rag_data_from_pr_dataset.py
✅ RAG용 텍스트 생성 완료 → rag_ready.jsonl
$ head -n 1 rag_ready.jsonl | jq
{
  "pr_id": null,
  "title": "Merge pull request #7461 from rimolive/kf-1.9",
  "text": "PR 제목: Merge pull request #7461 from rimolive/kf-1.9\n병합자: Ricardo Martinelli de Oliveira / 날짜: Tue Mar 5 11:46:36 2024 -0300\n커밋 요약:\n- Ricardo Martinelli de Oliveira (Mon Feb 19 18:51:40 2024 -0300): Update ROADMAP.md\n  변경 파일: ROADMAP.md\n  변경사항:\ncommit 68e4d10bbf976bb89810b4e16e8b765a2a0e68b7\nAuthor: Ricardo Martinelli de Oliveira <rmartine@redhat.com>\nDate:   Mon Feb 19 18:51:40 2024 -0300\n\n    Update ROADMAP.md\n    \n    Co-authored-by: Tommy Li <Tommy.chaoping.li@ibm.com>\n\ndiff --git a/ROADMAP.md b/ROADMAP.md\nindex 35021954..cfd39558 100644\n--- a/ROADMAP.md\n+++ b/ROADMAP.md\n@@ -8,7 +8,7 @@ The Kubeflow Community plans to deliver its v1.9 release in Jul 2024 per this [t\n * CNCF Transition\n * LLM APIs\n * New component: Model Registry\n-* Kubeflow Pipelines and kfp-tekton merged in a single GitHub repository\n+* Kubeflow Pipelines and kfp-tekton V2 merged in a single GitHub repository\n \n ### Detailed features, bug fixes and enhancements are identified in the Working Group Roadmaps and Tracking Issues:\n * [Training Operators](https://github.com/kubeflow/training-operator/issues/1994)\n- Ricardo M. Oliveira (Mon Feb 5 14:43:45 2024 -0300): Add Kubeflow 1.9 release roadmap\n  변경 파일: ROADMAP.md\n  변경사항:\ncommit 5c3404782fa2700f8547b37132ff7ab2d1ed99fe\nAuthor: Ricardo M. Oliveira <rmartine@redhat.com>\nDate:   Mon Feb 5 14:43:45 2024 -0300\n\n    Add Kubeflow 1.9 release roadmap\n    \n    Signed-off-by: Ricardo M. Oliveira <rmartine@redhat.com>\n\ndiff --git a/ROADMAP.md b/ROADMAP.md\nindex de3c8951..35021954 100644\n--- a/ROADMAP.md\n+++ b/ROADMAP.md\n@@ -1,6 +1,26 @@\n # Kubeflow Roadmap\n \n-## Kubeflow 1.8 Release, Planned for release: Oct 2023\n+## Kubeflow 1.9 Release, Planned for release: Jul 2024\n+The Kubeflow Community plans to deliver its v1.9 release in Jul 2024 per this [timeline](https://github.com/kubeflow/community/blob/master/releases/release-1.9/README.md#timeline). The high level deliverables are tracked in the [v1.9 Release](https://github.com/orgs/kubeflow/projects/61) Github project board. The v1.9 release process will be managed by the v1.9 [release team](https://github.com/kubeflow/community/blob/master/releases/release-1.9/release-team.md) using the best practices in the [Rele"
}

$ python3 embed_prs.py
✅ Line 1: embedded
✅ Line 2: embedded
✅ Line 3: embedded
✅ Line 4: embedded
✅ Line 5: embedded
✅ Line 6: embedded
✅ Line 7: embedded
✅ Line 8: embedded
✅ Line 9: embedded
✅ Line 10: embedded
... (중략) ...
generate_rag_data_from_pr_dataset.py
import json

def build_text(pr):
    lines = []
    lines.append(f"PR title: {pr['title']}")
    lines.append(f"Merger: {pr['author']} / Date: {pr['date']}")
    lines.append("Commit summary:")
    for c in pr["commits"]:
        lines.append(f"- {c['author']} ({c['date']}): {c['message']}")
        if c["files"]:
            lines.append(f"  Changed files: {', '.join(c['files'])}")
        lines.append("  Changes:")
        lines.append(c["diff"][:1000])  # truncate if too long
    return "\n".join(lines)

with open("pr_dataset.jsonl") as fin, open("rag_ready.jsonl", "w") as fout:
    for line in fin:
        pr = json.loads(line)
        text = build_text(pr)
        out = {
            "pr_id": pr.get("pr_id"),
            "title": pr.get("title"),
            "text": text
        }
        fout.write(json.dumps(out, ensure_ascii=False) + "\n")

print("✅ Text generation for RAG completed → rag_ready.jsonl")
import json

def build_text(pr):
    lines = []
    lines.append(f"PR title: {pr['title']}")
    lines.append(f"Merger: {pr['author']} / Date: {pr['date']}")
    lines.append("Commit summary:")
    for c in pr["commits"]:
        lines.append(f"- {c['author']} ({c['date']}): {c['message']}")
        if c["files"]:
            lines.append(f"  Changed files: {', '.join(c['files'])}")
        lines.append("  Changes:")
        lines.append(c["diff"][:1000])  # truncate if too long
    return "\n".join(lines)

with open("pr_dataset.jsonl") as fin, open("rag_ready.jsonl", "w") as fout:
    for line in fin:
        pr = json.loads(line)
        text = build_text(pr)
        out = {
            "pr_id": pr.get("pr_id"),
            "title": pr.get("title"),
            "text": text
        }
        fout.write(json.dumps(out, ensure_ascii=False) + "\n")

print("✅ Text generation for RAG completed → rag_ready.jsonl")
embed_prs.py
Reference
- In the code, the AIOS_LLM_Private_Endpoint for EMBEDDING_API_URL and the model’s MODEL_ID refer to the LLM Usage Guide. Please refer to it. You can input them as shown in the example below.
- EMBEDDING_API_URL = “{AIOS LLM private endpoint}/{API}”
- “model”: “{modelID}”
import json
import requests
import time

EMBEDDING_API_URL = "AIOS_LLM_Private_Endpoint"
HEADERS = {"Content-Type": "application/json"}

def get_embedding(text):
    payload = {
        "model": "MODEL_ID",
        "input": text,
        "stream": False
    }

    try:
        response = requests.post(EMBEDDING_API_URL, headers=HEADERS, json=payload)
        if response.status_code == 200:
            result = response.json()
            return result["data"][0]["embedding"]
        else:
            print(f"❌ Failed with status {response.status_code}: {response.text}")
            return None
    except Exception as e:
        print(f"⚠️ Error calling embedding API: {e}")
        return None

def main():
    with open("rag_ready.jsonl", "r", encoding="utf-8") as fin, \
         open("rag_embedded.jsonl", "w", encoding="utf-8") as fout:

        for i, line in enumerate(fin, start=1):
            try:
                item = json.loads(line)
                text = item.get("text", "").strip()
                if not text:
                    print(f"⚠️ Line {i}: empty text, skipping")
                    continue

                embedding = get_embedding(text)
                if embedding is None:
                    print(f"⚠️ Line {i}: embedding failed, skipping")
                    continue

                item["embedding"] = embedding
                fout.write(json.dumps(item, ensure_ascii=False) + "\n")
                print(f"✅ Line {i}: embedded")

                time.sleep(0.2)  # optional: rate limiting
            except Exception as e:
                print(f"❌ Line {i}: error - {e}")
                continue

if __name__ == "__main__":
    main()
import json
import requests
import time

EMBEDDING_API_URL = "AIOS_LLM_Private_Endpoint"
HEADERS = {"Content-Type": "application/json"}

def get_embedding(text):
    payload = {
        "model": "MODEL_ID",
        "input": text,
        "stream": False
    }

    try:
        response = requests.post(EMBEDDING_API_URL, headers=HEADERS, json=payload)
        if response.status_code == 200:
            result = response.json()
            return result["data"][0]["embedding"]
        else:
            print(f"❌ Failed with status {response.status_code}: {response.text}")
            return None
    except Exception as e:
        print(f"⚠️ Error calling embedding API: {e}")
        return None

def main():
    with open("rag_ready.jsonl", "r", encoding="utf-8") as fin, \
         open("rag_embedded.jsonl", "w", encoding="utf-8") as fout:

        for i, line in enumerate(fin, start=1):
            try:
                item = json.loads(line)
                text = item.get("text", "").strip()
                if not text:
                    print(f"⚠️ Line {i}: empty text, skipping")
                    continue

                embedding = get_embedding(text)
                if embedding is None:
                    print(f"⚠️ Line {i}: embedding failed, skipping")
                    continue

                item["embedding"] = embedding
                fout.write(json.dumps(item, ensure_ascii=False) + "\n")
                print(f"✅ Line {i}: embedded")

                time.sleep(0.2)  # optional: rate limiting
            except Exception as e:
                print(f"❌ Line {i}: error - {e}")
                continue

if __name__ == "__main__":
    main()
Upload to OpenSearch
Upload the vector file to OpenSearch and configure it as a searchable format.
Reference
- In this tutorial, we set up OpenSearch inside the VM and access it at http://localhost:9200. If you are using a custom vector database, please adjust the URL accordingly.
# Create an index named "kubeflow-pr-rag-index" in OpenSearch.
$ curl -X PUT "http://localhost:9200/kubeflow-pr-rag-index" \
  -H "Content-Type: application/json" \
  -d '{
    "settings": {
      "index": {
        "knn": true
      }
    },
    "mappings": {
      "properties": {
        "title": { "type": "text" },
        "text":  { "type": "text" },
        "embedding": {
          "type": "knn_vector"
          "dimension": 1024,
          "method": {
            "name": "hnsw"
            "space_type": "cosinesimil"
            "engine": "nmslib"
          }
        }
      }
    }
  }'
{"acknowledged":true,"shards_acknowledged":true,"index":"kubeflow-pr-rag-index"}

$ python3 upload_rag_documnets.py
✅ Uploaded document pr-1
✅ Uploaded document pr-2
✅ Uploaded document pr-3
✅ Uploaded document pr-4
✅ Uploaded document pr-5
✅ Uploaded document pr-6
✅ Uploaded document pr-7
✅ Uploaded document pr-8
✅ Uploaded document pr-9
✅ Uploaded document pr-10
... (omitted) ...
upload_rag_documnets.py
import json
from opensearchpy import OpenSearch

# OpenSearch 연결 설정
client = OpenSearch(
    hosts=[{"host": "localhost", "port": 9200}],
    use_ssl=False,
    verify_certs=False
)

index_name = "kubeflow-pr-rag-index"

with open("rag_embedded.jsonl", "r", encoding="utf-8") as f:
    for i, line in enumerate(f, 1):
        try:
            doc = json.loads(line)
            title = doc.get("title", "")
            text = doc.get("text", "")
            embedding = doc.get("embedding", [])

            if not embedding or len(embedding) != 1024:
                print(f"⚠️  Line {i}: Invalid embedding length, skipping.")
                continue

            body = {
                "title": title,
                "text": text,
                "embedding": embedding
            }

            doc_id = f"pr-{i}"
            client.index(index=index_name, id=doc_id, body=body)
            print(f"✅ Uploaded document {doc_id}")
        except Exception as e:
            print(f"❌ Line {i}: Failed to upload due to {e}")
import json
from opensearchpy import OpenSearch

# OpenSearch 연결 설정
client = OpenSearch(
    hosts=[{"host": "localhost", "port": 9200}],
    use_ssl=False,
    verify_certs=False
)

index_name = "kubeflow-pr-rag-index"

with open("rag_embedded.jsonl", "r", encoding="utf-8") as f:
    for i, line in enumerate(f, 1):
        try:
            doc = json.loads(line)
            title = doc.get("title", "")
            text = doc.get("text", "")
            embedding = doc.get("embedding", [])

            if not embedding or len(embedding) != 1024:
                print(f"⚠️  Line {i}: Invalid embedding length, skipping.")
                continue

            body = {
                "title": title,
                "text": text,
                "embedding": embedding
            }

            doc_id = f"pr-{i}"
            client.index(index=index_name, id=doc_id, body=body)
            print(f"✅ Uploaded document {doc_id}")
        except Exception as e:
            print(f"❌ Line {i}: Failed to upload due to {e}")
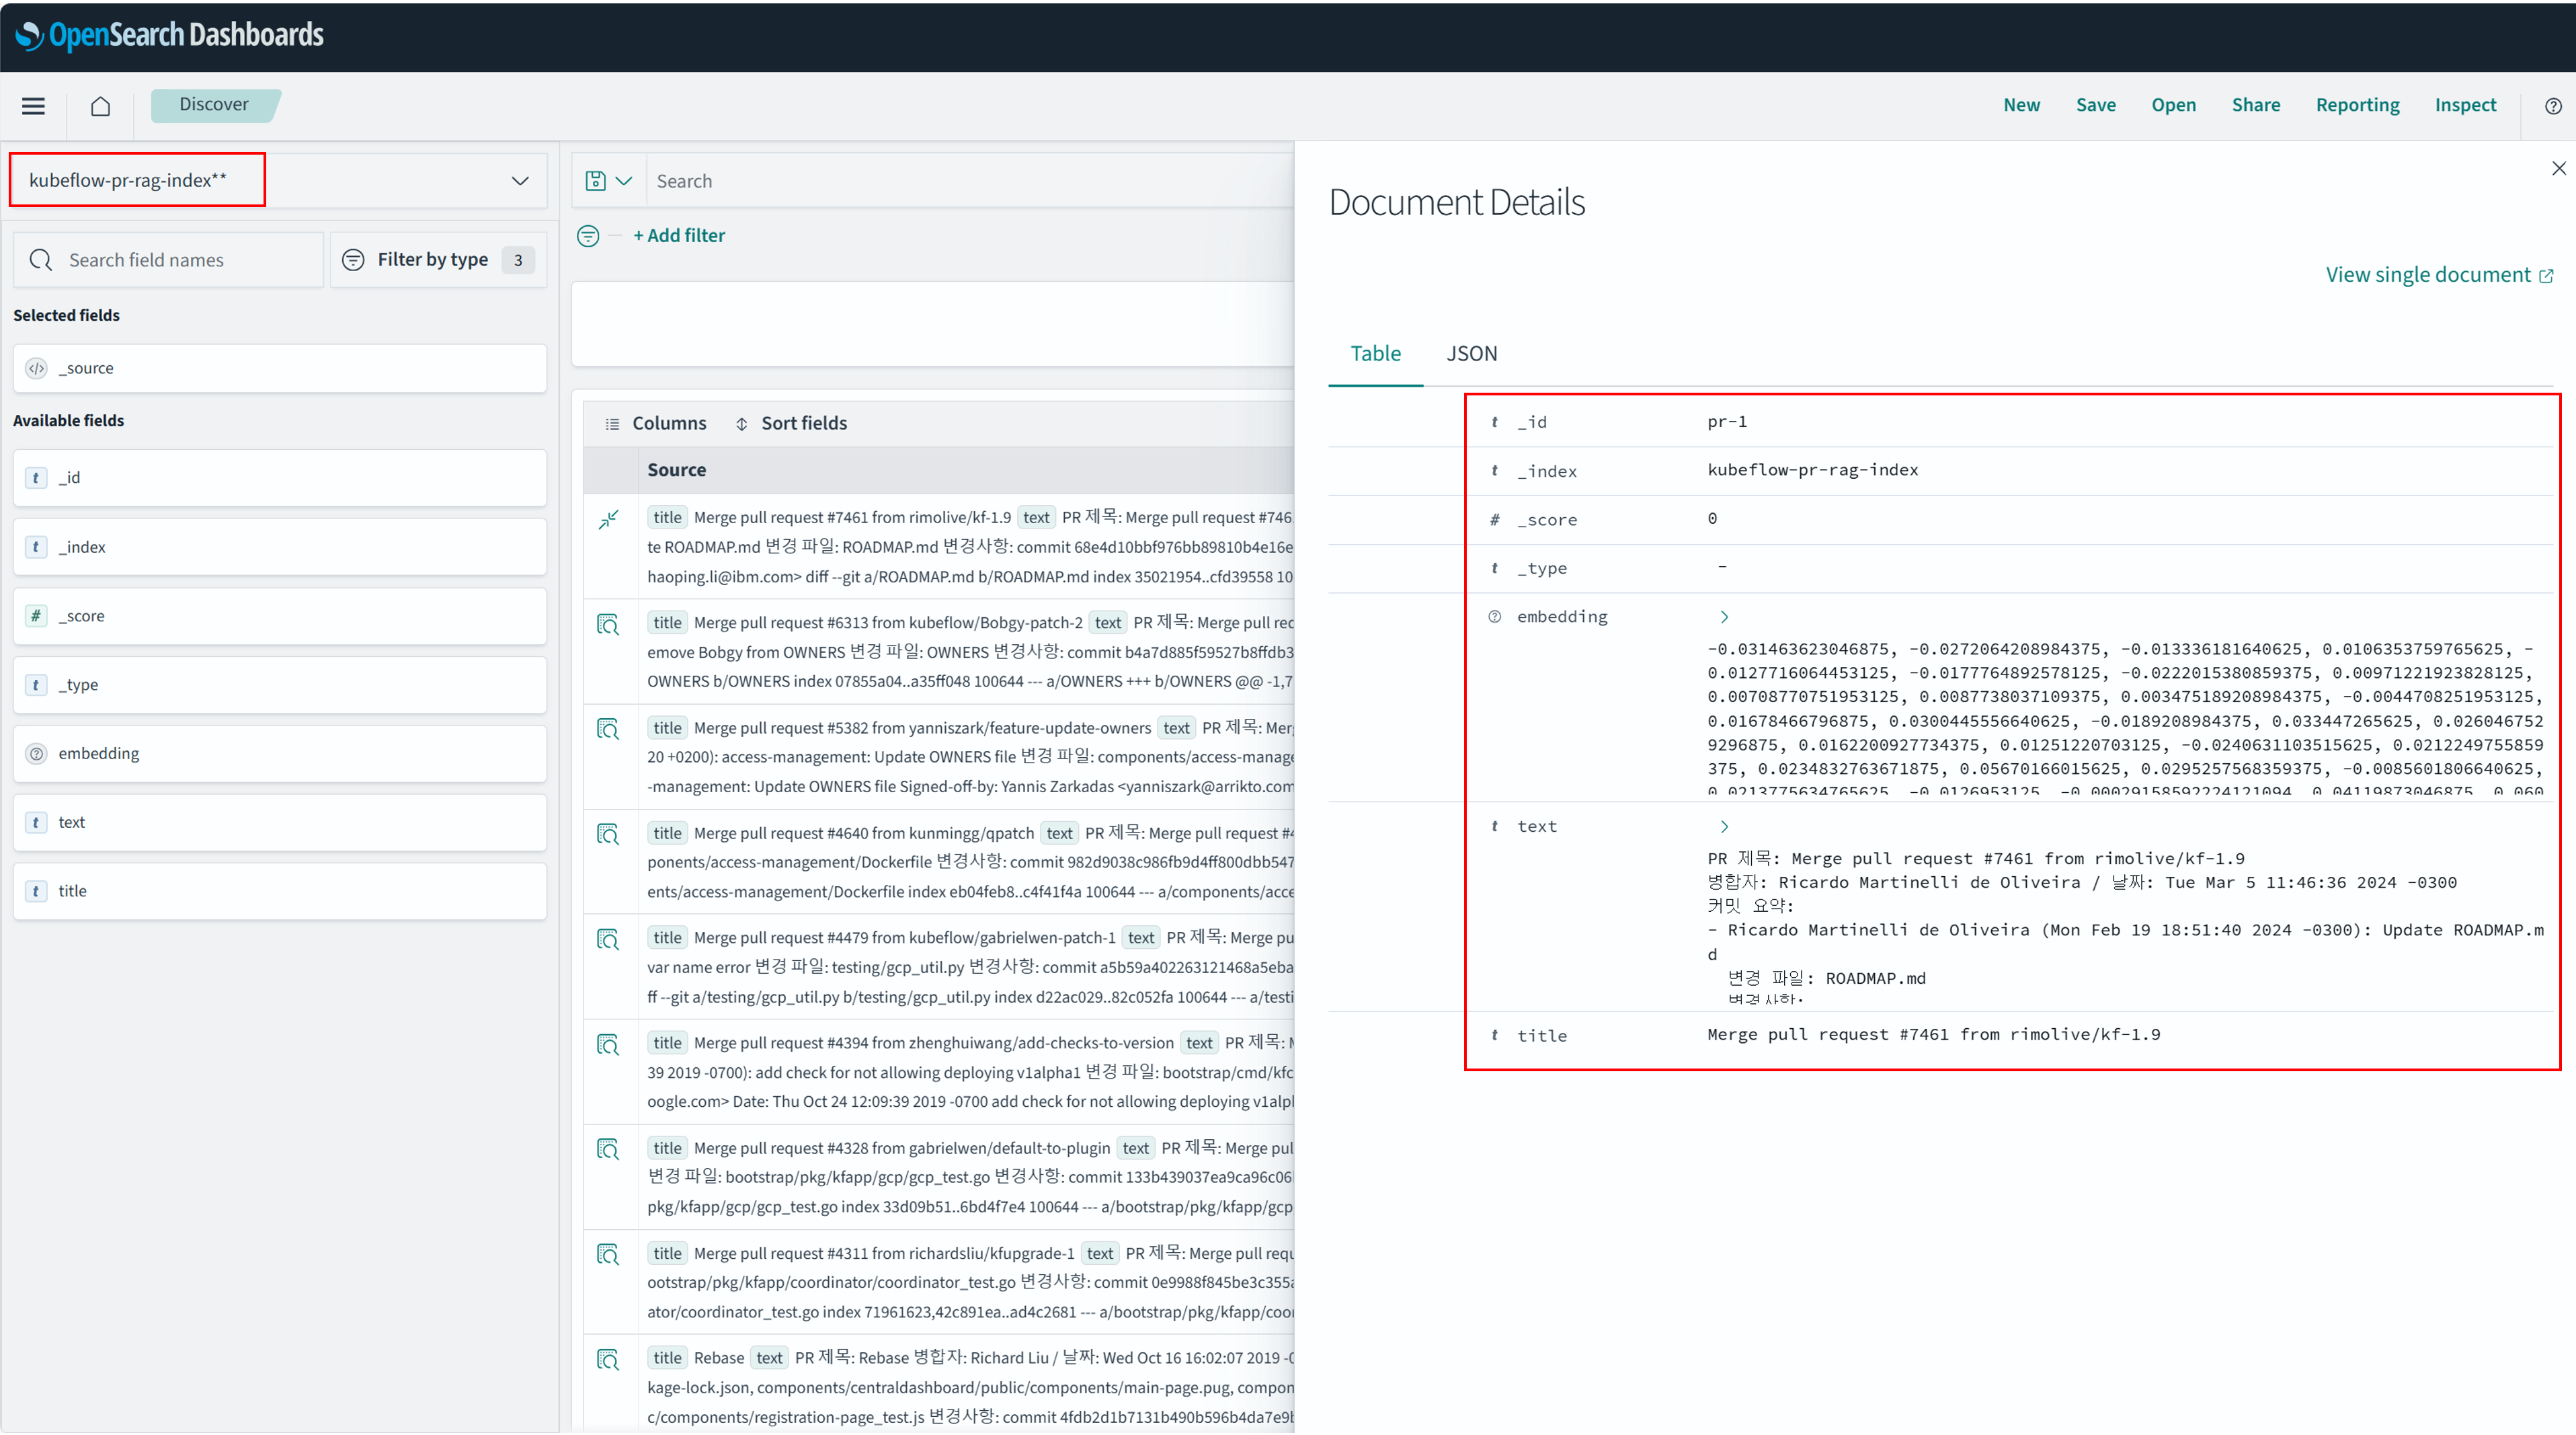
OpenSearch Dashboards에서 확인
아래 그림과 같이 OpenSearch Dashboard에서 kubeflow-pr-rag-index 에 해당하는 데이터를 확인할 수 있습니다. 데이터는 title, text, embedding으로 구성되어 있습니다.
Reference
OpenSearch Dashboard에서 Index Patterns 등록
왼쪽 메뉴 → Dashboards Management → Index patterns → Create index pattern 클릭
RAG QA Application 구성
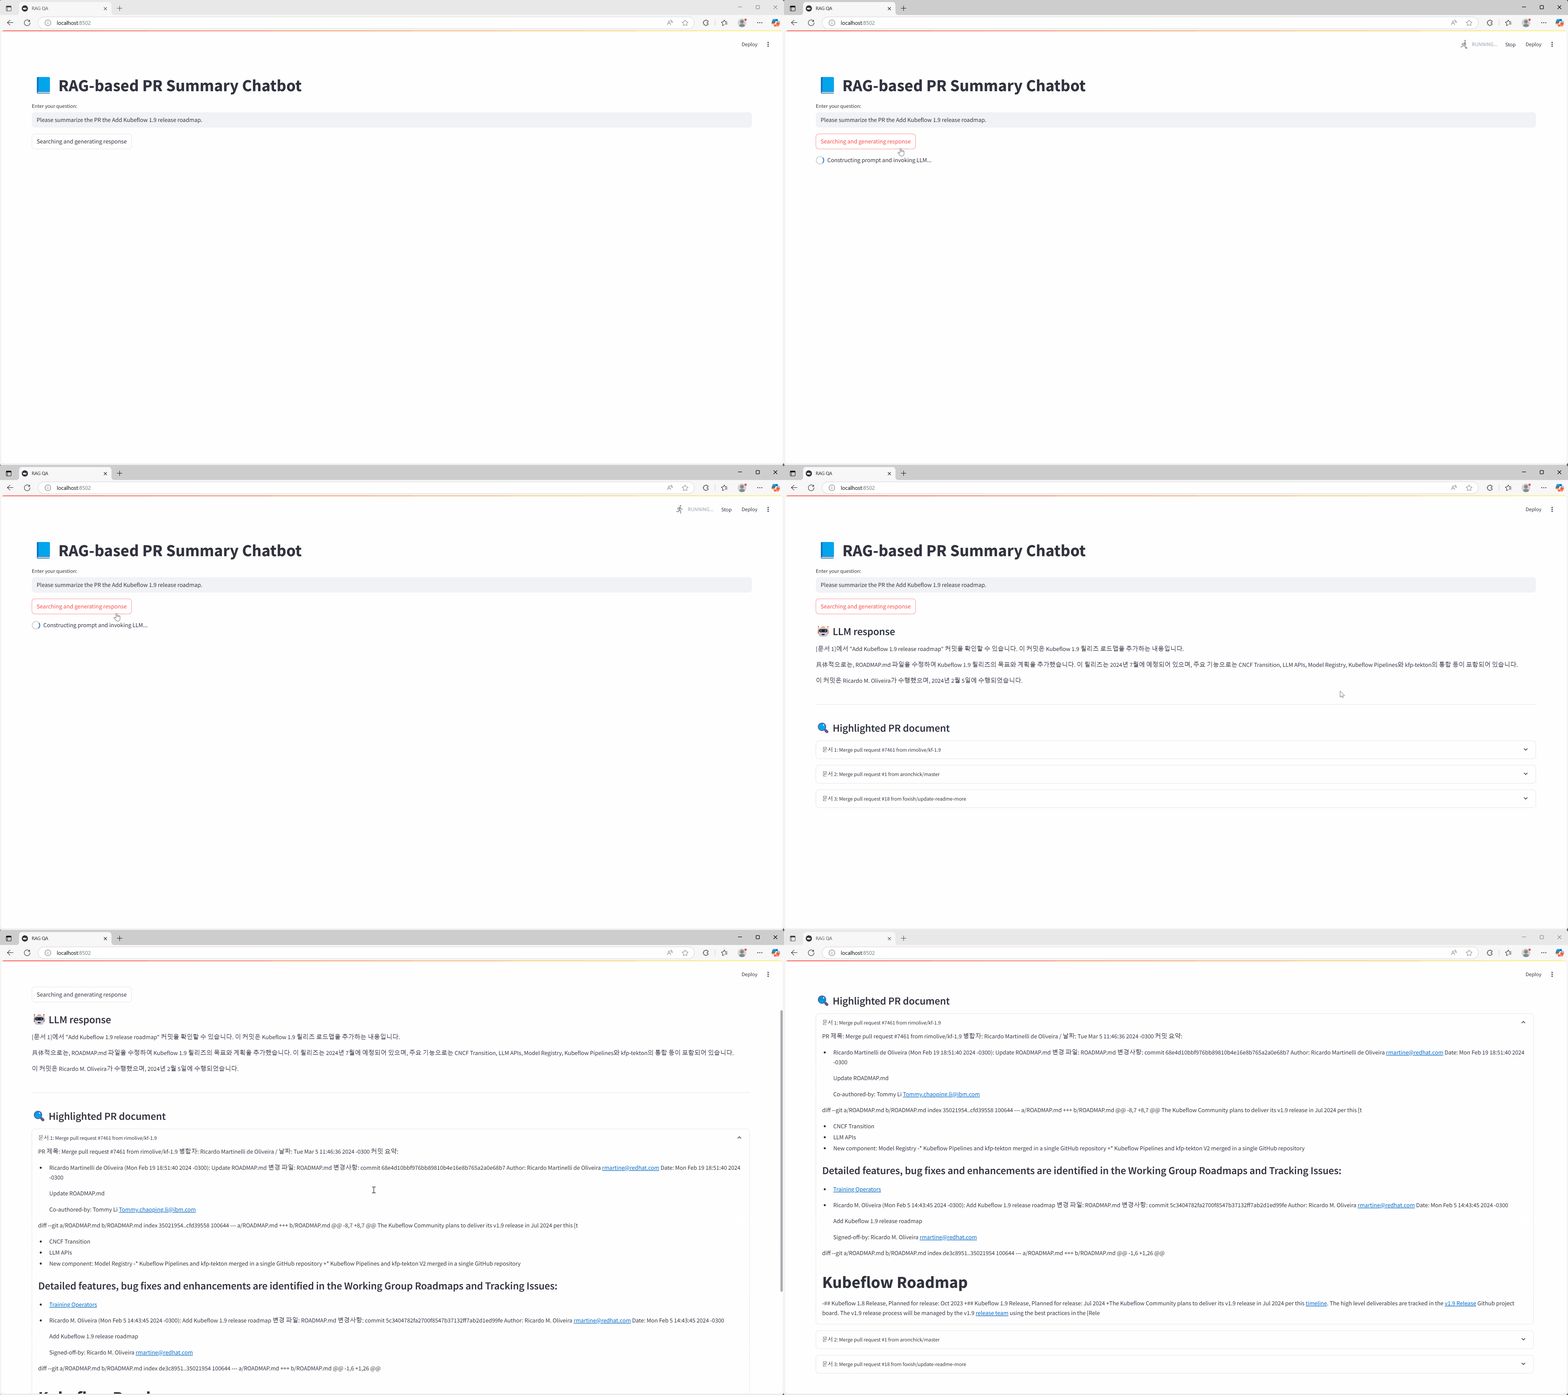
사용자의 질의를 임베딩하여 검색 질의로 변환한 뒤, RAG를 활용해 연관 문서를 추출하고, AIOS Chat 모델을 통해 최종 결과를 제공합니다.
Reference
- 이 코드에서는 유사도 검색 방식으로 OpenSearch의 KNN(K-Nearest Neightbors) 검색과 AIOS에서 제공하는 Embedding 모델의 Score API를 호출하여 입력 벡터와 가장 유사한 문서를 계산하는 방식을 지원합니다. 사용자는 두 방식 중 하나를 선택하여 사용할 수 있으며, 이 튜토리얼에서는 AIOS Score API 기반의 유사도 검색 방식을 사용합니다.
- OpenSearch의 KNN 호출 :
docs = search_similar_docs(query_vec, K) - AIOS Embedding 모델 호출 :
docs = search_similar_docs_with_score(question, K)
- 코드 내 EMBEDDING_API_URL, LLM_API_URL, SCORE_API_URL, MODEL_EMBEDDING, MODEL_CHAT은 LLM 이용 가이드를 참고하여 사용할 API와 Model로 입력해주세요. 아래의 예시처럼 입력할 수 있습니다.
- EMBEDDING_API_URL = “{AIOS LLM 프라이빗 엔드포인트}/{API}”
- MODEL_EMBEDDING = “{모델ID}”
app.py
import streamlit as st
import requests
from opensearchpy import OpenSearch

# 설정
def get_opensearch_client():
    return OpenSearch(
        hosts=[{"host": "localhost", "port": 9200}],
        use_ssl=False,
        verify_certs=False
    )

EMBEDDING_API_URL = "YOUR_EMBEDDING_API_URL"
LLM_API_URL = "YOUR_LLM_API_URL"
SCORE_API_URL = "YOUR_SCORE_API_URL"
MODEL_EMBEDDING = "YOUR_MODEL_EMBEDDING"
MODEL_CHAT = "YOUR_MODEL_CHAT"
INDEX_NAME = "kubeflow-pr-rag-index"
VECTOR_DIM = 1024
K = 3

# 임베딩 생성 함수
def embed_text(text):
    res = requests.post(
        EMBEDDING_API_URL,
        headers={"Content-Type": "application/json"},
        json={"model": MODEL_EMBEDDING, "input": text, "stream": False}
    )
    return res.json()["data"][0]["embedding"]

# 모든 문서 불러오기 (OpenSearch)
def fetch_all_docs():
    client = get_opensearch_client()
    res = client.search(
        index=INDEX_NAME,
        body={
            "size": 1000,  # 필요한 만큼 설정 (작을 경우 스크롤 API 활용 가능)
            "query": {"match_all": {}}
        }
    )
    return [doc["_source"] for doc in res["hits"]["hits"]]

# 두 문장 리스트를 받아 유사도 점수 계산
def score_text_pairs(text_1, text_2):
    payload = {
        "model": MODEL_EMBEDDING,
        "encoding_format": "float",
        "text_1": text_1,
        "text_2": text_2
    }
    headers = {
        "accept": "application/json",
        "Content-Type": "application/json"
    }

    response = requests.post(SCORE_API_URL, headers=headers, json=payload)
    response.raise_for_status()

    # 유사도 score만 추출
    scores = [item["score"] for item in response.json()["data"]]
    return scores

# 유사 문서 선택 (점수 기반 Top-K)
def search_similar_docs_with_score(query, k):
    all_docs = fetch_all_docs()
    doc_texts = [doc["text"] for doc in all_docs]
    queries = [query] * len(doc_texts)
    scores = score_text_pairs(queries, doc_texts)

    # 점수 높은 순으로 정렬
    scored_docs = sorted(zip(all_docs, scores), key=lambda x: x[1], reverse=True)
    top_docs = [doc for doc, score in scored_docs[:k]]
    return top_docs

# KNN 검색 함수
def search_similar_docs(query_vector, k):
    client = get_opensearch_client()
    res = client.search(
        index=INDEX_NAME,
        body={
            "size": k,
            "query": {
                "knn": {
                    "embedding": {
                        "vector": query_vector,
                        "k": k
                    }
                }
            }
        }
    )
    return [doc["_source"] for doc in res["hits"]["hits"]]

# 프롬프트 구성
def build_prompt(docs, question):
    context_blocks = []
    for i, doc in enumerate(docs):
        context_blocks.append(f"[문서 {i+1}]\n{doc['text']}")
    context = "\n\n".join(context_blocks)
    return f"""다음은 Kubeflow 프로젝트에서 유사한 PR 문서들입니다:

{context}

사용자 질문: {question}

위 내용을 참고하여 질문에 대해 자연어로 답변해 주세요. 가능한 문서 번호를 인용해서 설명해주세요."""

# LLM 호출 함수
def call_llm(prompt):
    res = requests.post(
        LLM_API_URL,
        headers={"Content-Type": "application/json"},
        json={
            "model": MODEL_CHAT,
            "messages": [{"role": "user", "content": prompt}],
            "stream": False
        }
    )
    return res.json()["choices"][0]["message"]["content"]

# Streamlit UI 시작
st.set_page_config(page_title="RAG QA", layout="wide")
st.title("📘 RAG-based PR Summary Chatbot")

question = st.text_input("Enter your question:", "Please summarize the PR the Add Kubeflow 1.9 release roadmap.")

if st.button("Searching and generating response"):
    with st.spinner("Generating embeddings..."):
        query_vec = embed_text(question)

    with st.spinner("Searching for similar documents in OpenSearch..."):
        #docs = search_similar_docs(query_vec, K)
        docs = search_similar_docs_with_score(question, K)

    with st.spinner("Constructing prompt and invoking LLM..."):
        prompt = build_prompt(docs, question)
        answer = call_llm(prompt)

    st.markdown("### 🤖 LLM response")
    st.write(answer)

    st.markdown("---")
    st.markdown("### 🔍 Highlighted PR document")
    for i, doc in enumerate(docs):
        with st.expander(f"문서 {i+1}: {doc['title']}"):
            # 간단한 질문 키워드 하이라이트
            highlighted = doc['text'].replace(question.split()[0], f"**{question.split()[0]}**")
            st.markdown(highlighted)
import streamlit as st
import requests
from opensearchpy import OpenSearch

# 설정
def get_opensearch_client():
    return OpenSearch(
        hosts=[{"host": "localhost", "port": 9200}],
        use_ssl=False,
        verify_certs=False
    )

EMBEDDING_API_URL = "YOUR_EMBEDDING_API_URL"
LLM_API_URL = "YOUR_LLM_API_URL"
SCORE_API_URL = "YOUR_SCORE_API_URL"
MODEL_EMBEDDING = "YOUR_MODEL_EMBEDDING"
MODEL_CHAT = "YOUR_MODEL_CHAT"
INDEX_NAME = "kubeflow-pr-rag-index"
VECTOR_DIM = 1024
K = 3

# 임베딩 생성 함수
def embed_text(text):
    res = requests.post(
        EMBEDDING_API_URL,
        headers={"Content-Type": "application/json"},
        json={"model": MODEL_EMBEDDING, "input": text, "stream": False}
    )
    return res.json()["data"][0]["embedding"]

# 모든 문서 불러오기 (OpenSearch)
def fetch_all_docs():
    client = get_opensearch_client()
    res = client.search(
        index=INDEX_NAME,
        body={
            "size": 1000,  # 필요한 만큼 설정 (작을 경우 스크롤 API 활용 가능)
            "query": {"match_all": {}}
        }
    )
    return [doc["_source"] for doc in res["hits"]["hits"]]

# 두 문장 리스트를 받아 유사도 점수 계산
def score_text_pairs(text_1, text_2):
    payload = {
        "model": MODEL_EMBEDDING,
        "encoding_format": "float",
        "text_1": text_1,
        "text_2": text_2
    }
    headers = {
        "accept": "application/json",
        "Content-Type": "application/json"
    }

    response = requests.post(SCORE_API_URL, headers=headers, json=payload)
    response.raise_for_status()

    # 유사도 score만 추출
    scores = [item["score"] for item in response.json()["data"]]
    return scores

# 유사 문서 선택 (점수 기반 Top-K)
def search_similar_docs_with_score(query, k):
    all_docs = fetch_all_docs()
    doc_texts = [doc["text"] for doc in all_docs]
    queries = [query] * len(doc_texts)
    scores = score_text_pairs(queries, doc_texts)

    # 점수 높은 순으로 정렬
    scored_docs = sorted(zip(all_docs, scores), key=lambda x: x[1], reverse=True)
    top_docs = [doc for doc, score in scored_docs[:k]]
    return top_docs

# KNN 검색 함수
def search_similar_docs(query_vector, k):
    client = get_opensearch_client()
    res = client.search(
        index=INDEX_NAME,
        body={
            "size": k,
            "query": {
                "knn": {
                    "embedding": {
                        "vector": query_vector,
                        "k": k
                    }
                }
            }
        }
    )
    return [doc["_source"] for doc in res["hits"]["hits"]]

# 프롬프트 구성
def build_prompt(docs, question):
    context_blocks = []
    for i, doc in enumerate(docs):
        context_blocks.append(f"[문서 {i+1}]\n{doc['text']}")
    context = "\n\n".join(context_blocks)
    return f"""다음은 Kubeflow 프로젝트에서 유사한 PR 문서들입니다:

{context}

사용자 질문: {question}

위 내용을 참고하여 질문에 대해 자연어로 답변해 주세요. 가능한 문서 번호를 인용해서 설명해주세요."""

# LLM 호출 함수
def call_llm(prompt):
    res = requests.post(
        LLM_API_URL,
        headers={"Content-Type": "application/json"},
        json={
            "model": MODEL_CHAT,
            "messages": [{"role": "user", "content": prompt}],
            "stream": False
        }
    )
    return res.json()["choices"][0]["message"]["content"]

# Streamlit UI 시작
st.set_page_config(page_title="RAG QA", layout="wide")
st.title("📘 RAG-based PR Summary Chatbot")

question = st.text_input("Enter your question:", "Please summarize the PR the Add Kubeflow 1.9 release roadmap.")

if st.button("Searching and generating response"):
    with st.spinner("Generating embeddings..."):
        query_vec = embed_text(question)

    with st.spinner("Searching for similar documents in OpenSearch..."):
        #docs = search_similar_docs(query_vec, K)
        docs = search_similar_docs_with_score(question, K)

    with st.spinner("Constructing prompt and invoking LLM..."):
        prompt = build_prompt(docs, question)
        answer = call_llm(prompt)

    st.markdown("### 🤖 LLM response")
    st.write(answer)

    st.markdown("---")
    st.markdown("### 🔍 Highlighted PR document")
    for i, doc in enumerate(docs):
        with st.expander(f"문서 {i+1}: {doc['title']}"):
            # 간단한 질문 키워드 하이라이트
            highlighted = doc['text'].replace(question.split()[0], f"**{question.split()[0]}**")
            st.markdown(highlighted)
RAG QA Chatbot UI 사용 방법
호출 코드 실행
- VM에서 Streamlit 실행
streamlit run app.py --server.port 8501 --server.address 0.0.0.0
streamlit run app.py --server.port 8501 --server.address 0.0.0.0
You can now view your Streamlit app in your browser.

URL: http://0.0.0.0:8501
브라우저에서 http://{your_server_ip}:8501 또는 서버 SSH 터널링 설정 후 http://0.0.0.0:8501 로 접속합니다. SSH 터널링은 아래를 참고하세요.
2. 로컬PC에서 터널링으로 VM접속 (http://0.0.0.0:8501 로 접속하는 경우)
ssh -i {your_pemkey.pem} -L 8501:localhost:8501 ubuntu@{your_server_ip}
ssh -i {your_pemkey.pem} -L 8501:localhost:8501 ubuntu@{your_server_ip}
사용 예시
Kubeflow 프로젝트 Git에서 Add Kubeflow 1.9 release roadmap PR 에 대한 요약을 질문합니다.
Kubeflow 프로젝트의 해당 PR에 대한 정보입니다.
마무리
이번 튜토리얼에서는 AIOS에서 제공하는 AI 모델을 활용하여 GIT PR 관련 데이터를 벡터화하고, OpenSearch 기반의 벡터 검색 및 LLM 응답을 조합하여 PR 리뷰 보조 챗봇을 구현해 보았습니다.이를 통해 과거 PR 히스토리에 기반한 질의응답이 가능해져, 개발자의 코드 리뷰 효율성과 품질을 향상시킬 수 있습니다. 본 시스템은 다음과 같은 방식으로 사용자 환경에 맞게 확장 및 커스터마이징할 수 있습니다.
- 벡터 데이터베이스 교체 : OpenSearch 외에 SCP Search Engine 상품 활용, 사용자 벡터 데이터베이스를 연동할 수 있습니다.
- 실시간 데이터 수집 연동 : Github Webhook 또는 Gitlab API 연동을 통해 실시간 PR 생성/업데이트 정보를 수집하고 자동 인덱싱 가능합니다.
- 대화형 UI 고도화: Streamlit 외에도 Slack Bot, 사내 메신저 등 다양한 인터페이스로 확장 가능합니다.
이번 튜토리얼을 기반으로 실제 서비스 목적에 따라 적합한 AIOS 기반 협업 도우미를 직접 구축해 보시길 바랍니다.
참고 링크
https://opensearch.org/
https://github.com/kubeflow/kubeflow
4 - Autogen
Goal
Create an Autogen AI Agent application using the AI model provided by AIOS.
Reference
Autogen
Autogen is an open-source framework that enables easy building and management of LLM-based multi-agent collaboration and event-driven automation workflows.
environment
To complete this tutorial, the following environment must be prepared.
System Environment
Packages required for installation
pip install autogen-agentchat==0.6.1 autogen-ext[openai,mcp]==0.6.1 mcp-server-time==0.6.2
pip install autogen-agentchat==0.6.1 autogen-ext[openai,mcp]==0.6.1 mcp-server-time==0.6.2
System Architecture
Displays the complete flow of the multi‑AI agent architecture and the agent architecture that leverages MCP.
Travel Planning Agent Flow
- The user requests a 3‑day Nepal travel itinerary.
- Groupchat manager adjusts the execution order of registered agents (travel planning, local information, travel conversation, comprehensive summary).
- Each agent collaborates to carry out the assigned tasks according to its role.
- When the final travel plan deliverable is generated, it is delivered to the user
MCP Flow
Note
MCP
MCP (Model Context Protocol) is an open standard protocol that coordinates interactions between the model and external data or tools.
The MCP server implements this functionality, mediating and executing function calls by leveraging tool metadata.
- The user queries the current time in Korea.
- mcp_server_time model request including metadata for a tool that can retrieve the current time through the server.
- Generate a tool calls message that calls the
get_current_time function - If you execute the
get_current_time function via the MCP server and pass the result to a model request, it generates the final response and delivers it to the user.
Implementation
Travel Planning Agent
Note
- For the AIOS_BASE_URL AIOS_LLM_Private_Endpoint and the MODEL’s MODEL_ID in the code, please refer to the LLM Usage Guide.
autogen_travel_planning.py
from urllib.parse import urljoin

from autogen_agentchat.agents import AssistantAgent
from autogen_agentchat.conditions import TextMentionTermination
from autogen_agentchat.teams import RoundRobinGroupChat
from autogen_agentchat.ui import Console
from autogen_ext.models.openai import OpenAIChatCompletionClient
from autogen_core.models import ModelFamily


# Set the API URL and model name for accessing the model.
AIOS_BASE_URL = "AIOS_LLM_Private_Endpoint"
MODEL = "MODEL_ID"

# Create a model client using OpenAIChatCompletionClient.
model_client = OpenAIChatCompletionClient(
    model=MODEL,
    base_url=urljoin(AIOS_BASE_URL, "v1"),
    api_key="EMPTY_KEY",
    model_info={
        # Set to True when images are supported.
        "vision": False
        # Set to True when function calls are supported.
        "function_calling": True,
        # Set to True when JSON output is supported.
        "json_output": True,
        # If the model you want to use is not provided by ModelFamily, use UNKNOWN.
        # "family": ModelFamily.UNKNOWN,
        "family": ModelFamily.LLAMA_3_3_70B,
        # Set to True when structured output is supported.
        "structured_output": True,
    },
)

# Create multiple agents.
# Each agent performs roles such as travel planning, recommending local activities, providing language tips, and summarizing travel itineraries.
planner_agent = AssistantAgent(
    planner_agent
    model_client=model_client,
    description="A helpful assistant that can plan trips."
    system_message=("You are a helpful assistant that can suggest a travel plan "
                    "for a user based on their request."
)

local_agent = AssistantAgent(
    "local_agent"
    model_client=model_client,
    description="A local assistant that can suggest local activities or places to visit."
    system_message=("You are a helpful assistant that can suggest authentic and ")
                    interesting local activities or places to visit for a user
                    "and can utilize any context information provided."
)

language_agent = AssistantAgent(
    language_agent
    model_client=model_client,
    description="A helpful assistant that can provide language tips for a given destination."
    system_message=("You are a helpful assistant that can review travel plans, ")
                    providing feedback on important/critical tips about how best to address
                    language or communication challenges for the given destination.
                    If the plan already includes language tips,
                    you can mention that the plan is satisfactory, with rationale.
)

travel_summary_agent = AssistantAgent(
    travel_summary_agent
    model_client=model_client,
    description="A helpful assistant that can summarize the travel plan."
    system_message=("You are a helpful assistant that can take in all of the suggestions "
                    and advice from the other agents and provide a detailed final travel plan.
                    You must ensure that the final plan is integrated and complete.
                    "YOUR FINAL RESPONSE MUST BE THE COMPLETE PLAN. "
                    "When the plan is complete and all perspectives are integrated, "
                    "you can respond with TERMINATE."
)

# Group the agents into a group and create a RoundRobinGroupChat.
# RoundRobinGroupChat adjusts agents to perform tasks in the order they were registered, rotating through them.
# This group enables agents to interact and create travel plans.
# The termination condition uses TextMentionTermination to end the group chat when the text "TERMINATE" is mentioned.
termination = TextMentionTermination("TERMINATE")
group_chat = RoundRobinGroupChat(
    [planner_agent, local_agent, language_agent, travel_summary_agent],
    termination_condition=termination,
)

async def main():
    In the main function, it runs group chat and creates a travel plan.
    # Start a group chat to plan the trip.
    # The user requests the task "Plan a 3 day trip to Nepal."
    # Print the results using the console.
    await Console(group_chat.run_stream(task="Plan a 3 day trip to Nepal."))
    await model_client.close()


if __name__ == "__main__":
    import asyncio

    asyncio.run(main())
from urllib.parse import urljoin

from autogen_agentchat.agents import AssistantAgent
from autogen_agentchat.conditions import TextMentionTermination
from autogen_agentchat.teams import RoundRobinGroupChat
from autogen_agentchat.ui import Console
from autogen_ext.models.openai import OpenAIChatCompletionClient
from autogen_core.models import ModelFamily


# Set the API URL and model name for accessing the model.
AIOS_BASE_URL = "AIOS_LLM_Private_Endpoint"
MODEL = "MODEL_ID"

# Create a model client using OpenAIChatCompletionClient.
model_client = OpenAIChatCompletionClient(
    model=MODEL,
    base_url=urljoin(AIOS_BASE_URL, "v1"),
    api_key="EMPTY_KEY",
    model_info={
        # Set to True when images are supported.
        "vision": False
        # Set to True when function calls are supported.
        "function_calling": True,
        # Set to True when JSON output is supported.
        "json_output": True,
        # If the model you want to use is not provided by ModelFamily, use UNKNOWN.
        # "family": ModelFamily.UNKNOWN,
        "family": ModelFamily.LLAMA_3_3_70B,
        # Set to True when structured output is supported.
        "structured_output": True,
    },
)

# Create multiple agents.
# Each agent performs roles such as travel planning, recommending local activities, providing language tips, and summarizing travel itineraries.
planner_agent = AssistantAgent(
    planner_agent
    model_client=model_client,
    description="A helpful assistant that can plan trips."
    system_message=("You are a helpful assistant that can suggest a travel plan "
                    "for a user based on their request."
)

local_agent = AssistantAgent(
    "local_agent"
    model_client=model_client,
    description="A local assistant that can suggest local activities or places to visit."
    system_message=("You are a helpful assistant that can suggest authentic and ")
                    interesting local activities or places to visit for a user
                    "and can utilize any context information provided."
)

language_agent = AssistantAgent(
    language_agent
    model_client=model_client,
    description="A helpful assistant that can provide language tips for a given destination."
    system_message=("You are a helpful assistant that can review travel plans, ")
                    providing feedback on important/critical tips about how best to address
                    language or communication challenges for the given destination.
                    If the plan already includes language tips,
                    you can mention that the plan is satisfactory, with rationale.
)

travel_summary_agent = AssistantAgent(
    travel_summary_agent
    model_client=model_client,
    description="A helpful assistant that can summarize the travel plan."
    system_message=("You are a helpful assistant that can take in all of the suggestions "
                    and advice from the other agents and provide a detailed final travel plan.
                    You must ensure that the final plan is integrated and complete.
                    "YOUR FINAL RESPONSE MUST BE THE COMPLETE PLAN. "
                    "When the plan is complete and all perspectives are integrated, "
                    "you can respond with TERMINATE."
)

# Group the agents into a group and create a RoundRobinGroupChat.
# RoundRobinGroupChat adjusts agents to perform tasks in the order they were registered, rotating through them.
# This group enables agents to interact and create travel plans.
# The termination condition uses TextMentionTermination to end the group chat when the text "TERMINATE" is mentioned.
termination = TextMentionTermination("TERMINATE")
group_chat = RoundRobinGroupChat(
    [planner_agent, local_agent, language_agent, travel_summary_agent],
    termination_condition=termination,
)

async def main():
    In the main function, it runs group chat and creates a travel plan.
    # Start a group chat to plan the trip.
    # The user requests the task "Plan a 3 day trip to Nepal."
    # Print the results using the console.
    await Console(group_chat.run_stream(task="Plan a 3 day trip to Nepal."))
    await model_client.close()


if __name__ == "__main__":
    import asyncio

    asyncio.run(main())
When you run the file using python, you can see multiple agents working together, each performing its role for a single task.
python autogen_travel_planning.py
python autogen_travel_planning.py
Execution result
---------- TextMessage (user) ----------
Plan a 3 day trip to Nepal.
---------- TextMessage (planner_agent) ----------
Nepal! A country with a rich cultural heritage, breathtaking natural beauty, and warm hospitality. Here's a suggested 3-day itinerary for your trip to Nepal:

**Day 1: Arrival in Kathmandu and Exploration of the City**

* Arrive at Tribhuvan International Airport in Kathmandu, the capital city of Nepal.
* Check-in to your hotel and freshen up.
* Visit the famous **Boudhanath Stupa**, one of the largest Buddhist stupas in the world.
* Explore the **Thamel** area, a popular tourist hub known for its narrow streets, shops, and restaurants.
* In the evening, enjoy a traditional Nepali dinner and watch a cultural performance at a local restaurant.

**Day 2: Kathmandu Valley Tour**

* Start the day with a visit to the **Pashupatinath Temple**, a sacred Hindu temple dedicated to Lord Shiva.
* Next, head to the **Kathmandu Durbar Square**, a UNESCO World Heritage Site and the former royal palace of the Malla kings.
* Visit the **Swayambhunath Stupa**, also known as the Monkey Temple, which offers stunning views of the city.
* In the afternoon, take a short drive to the **Patan City**, known for its rich cultural heritage and traditional crafts.
* Explore the **Patan Durbar Square** and visit the **Krishna Temple**, a beautiful example of Nepali architecture.

**Day 3: Bhaktapur and Nagarkot**

* Drive to **Bhaktapur**, a medieval town and a UNESCO World Heritage Site (approximately 1 hour).
* Explore the **Bhaktapur Durbar Square**, which features stunning architecture, temples, and palaces.
* Visit the **Pottery Square**, where you can see traditional pottery-making techniques.
* In the afternoon, drive to **Nagarkot**, a scenic hill station with breathtaking views of the Himalayas (approximately 1.5 hours).
* Watch the sunset over the Himalayas and enjoy the peaceful atmosphere.

**Additional Tips:**

* Make sure to try some local Nepali cuisine, such as momos, dal bhat, and gorkhali lamb.
* Bargain while shopping in the markets, as it's a common practice in Nepal.
* Respect local customs and traditions, especially when visiting temples and cultural sites.
* Stay hydrated and bring sunscreen, as the sun can be strong in Nepal.

**Accommodation:**

Kathmandu has a wide range of accommodation options, from budget-friendly guesthouses to luxury hotels. Some popular areas to stay include Thamel, Lazimpat, and Boudha.

**Transportation:**

You can hire a taxi or a private vehicle for the day to travel between destinations. Alternatively, you can use public transportation, such as buses or microbuses, which are affordable and convenient.

**Budget:**

The budget for a 3-day trip to Nepal can vary depending on your accommodation choices, transportation, and activities. However, here's a rough estimate:

* Accommodation: $20-50 per night
* Transportation: $10-20 per day
* Food: $10-20 per meal
* Activities: $10-20 per person

Total estimated budget for 3 days: $200-500 per person

I hope this helps, and you have a wonderful trip to Nepal!
---------- TextMessage (local_agent) ----------
Your 3-day itinerary for Nepal is well-planned and covers many of the country's cultural and natural highlights. Here are a few additional suggestions and tips to enhance your trip:

**Day 1:**

* After visiting the Boudhanath Stupa, consider exploring the surrounding streets, which are filled with Tibetan shops, restaurants, and monasteries.
* In the Thamel area, be sure to try some of the local street food, such as momos or sel roti.
* For dinner, consider trying a traditional Nepali restaurant, such as the Kathmandu Guest House or the Northfield Cafe.

**Day 2:**

* At the Pashupatinath Temple, be respectful of the Hindu rituals and customs. You can also take a stroll along the Bagmati River, which runs through the temple complex.
* At the Kathmandu Durbar Square, consider hiring a guide to provide more insight into the history and significance of the temples and palaces.
* In the afternoon, visit the Patan Museum, which showcases the art and culture of the Kathmandu Valley.

**Day 3:**

* In Bhaktapur, be sure to try some of the local pottery and handicrafts. You can also visit the Bhaktapur National Art Gallery, which features traditional Nepali art.
* At Nagarkot, consider taking a short hike to the nearby villages, which offer stunning views of the Himalayas.
* For sunset, find a spot with a clear view of the mountains, and enjoy the peaceful atmosphere.

**Additional Tips:**

* Nepal is a relatively conservative country, so dress modestly and respect local customs.
* Try to learn some basic Nepali phrases, such as "namaste" (hello) and "dhanyabaad" (thank you).
* Be prepared for crowds and chaos in the cities, especially in Thamel and Kathmandu Durbar Square.
* Consider purchasing a local SIM card or portable Wi-Fi hotspot to stay connected during your trip.

**Accommodation:**

* Consider staying in a hotel or guesthouse that is centrally located and has good reviews.
* Look for accommodations that offer amenities such as free Wi-Fi, hot water, and a restaurant or cafe.

**Transportation:**

* Consider hiring a private vehicle or taxi for the day, as this will give you more flexibility and convenience.
* Be sure to negotiate the price and agree on the itinerary before setting off.

**Budget:**

* Be prepared for variable prices and exchange rates, and have some local currency (Nepali rupees) on hand.
* Consider budgeting extra for unexpected expenses, such as transportation or food.

Overall, your itinerary provides a good balance of culture, history, and natural beauty, and with these additional tips and suggestions, you'll be well-prepared for an unforgettable trip to Nepal!
---------- TextMessage (language_agent) ----------
Your 3-day itinerary for Nepal is well-planned and covers many of the country's cultural and natural highlights. The additional suggestions and tips you provided are excellent and will help enhance the trip experience.

One aspect that is well-covered in your plan is the cultural and historical significance of the destinations. You have included a mix of temples, stupas, and cultural sites, which will give visitors a good understanding of Nepal's rich heritage.

Regarding language and communication challenges, your tip to "try to learn some basic Nepali phrases, such as 'namaste' (hello) and 'dhanyabaad' (thank you)" is excellent. This will help visitors show respect for the local culture and people, and can also facilitate interactions with locals.

Additionally, your suggestion to "consider purchasing a local SIM card or portable Wi-Fi hotspot to stay connected during your trip" is practical and will help visitors stay in touch with family and friends back home, as well as navigate the local area.

Your plan is satisfactory, and with the additional tips and suggestions, visitors will be well-prepared for an unforgettable trip to Nepal. The itinerary provides a good balance of culture, history, and natural beauty, and the tips on language, communication, and logistics will help ensure a smooth and enjoyable journey.

Overall, your plan is well-thought-out, and the additional suggestions and tips will help visitors make the most of their trip to Nepal. Well done!

However, one minor suggestion I might make is to consider including a few phrases in the local language for emergency situations, such as "where is the hospital?" or "how do I get to the airport?" This can help visitors in case of an unexpected situation, and can also give them more confidence when navigating unfamiliar areas.

But overall, your plan is excellent, and with these minor suggestions, it can be even more comprehensive and helpful for visitors to Nepal.
---------- TextMessage (travel_summary_agent) ----------
TERMINATE

Here is the complete and integrated 3-day travel plan to Nepal:

**Day 1: Arrival in Kathmandu and Exploration of the City**

* Arrive at Tribhuvan International Airport in Kathmandu, the capital city of Nepal.
* Check-in to your hotel and freshen up.
* Visit the famous **Boudhanath Stupa**, one of the largest Buddhist stupas in the world.
* Explore the surrounding streets, which are filled with Tibetan shops, restaurants, and monasteries.
* Explore the **Thamel** area, a popular tourist hub known for its narrow streets, shops, and restaurants. Be sure to try some of the local street food, such as momos or sel roti.
* In the evening, enjoy a traditional Nepali dinner and watch a cultural performance at a local restaurant, such as the Kathmandu Guest House or the Northfield Cafe.

**Day 2: Kathmandu Valley Tour**

* Start the day with a visit to the **Pashupatinath Temple**, a sacred Hindu temple dedicated to Lord Shiva. Be respectful of the Hindu rituals and customs, and take a stroll along the Bagmati River, which runs through the temple complex.
* Next, head to the **Kathmandu Durbar Square**, a UNESCO World Heritage Site and the former royal palace of the Malla kings. Consider hiring a guide to provide more insight into the history and significance of the temples and palaces.
* Visit the **Swayambhunath Stupa**, also known as the Monkey Temple, which offers stunning views of the city.
* In the afternoon, visit the **Patan City**, known for its rich cultural heritage and traditional crafts. Explore the **Patan Durbar Square** and visit the **Krishna Temple**, a beautiful example of Nepali architecture. Also, visit the Patan Museum, which showcases the art and culture of the Kathmandu Valley.

**Day 3: Bhaktapur and Nagarkot**

* Drive to **Bhaktapur**, a medieval town and a UNESCO World Heritage Site (approximately 1 hour). Explore the **Bhaktapur Durbar Square**, which features stunning architecture, temples, and palaces. Be sure to try some of the local pottery and handicrafts, and visit the Bhaktapur National Art Gallery, which features traditional Nepali art.
* In the afternoon, drive to **Nagarkot**, a scenic hill station with breathtaking views of the Himalayas (approximately 1.5 hours). Consider taking a short hike to the nearby villages, which offer stunning views of the Himalayas. Find a spot with a clear view of the mountains, and enjoy the peaceful atmosphere during sunset.

**Additional Tips:**

* Make sure to try some local Nepali cuisine, such as momos, dal bhat, and gorkhali lamb.
* Bargain while shopping in the markets, as it's a common practice in Nepal.
* Respect local customs and traditions, especially when visiting temples and cultural sites.
* Stay hydrated and bring sunscreen, as the sun can be strong in Nepal.
* Dress modestly and respect local customs, as Nepal is a relatively conservative country.
* Try to learn some basic Nepali phrases, such as "namaste" (hello), "dhanyabaad" (thank you), "where is the hospital?" and "how do I get to the airport?".
* Consider purchasing a local SIM card or portable Wi-Fi hotspot to stay connected during your trip.
* Be prepared for crowds and chaos in the cities, especially in Thamel and Kathmandu Durbar Square.

**Accommodation:**

* Consider staying in a hotel or guesthouse that is centrally located and has good reviews.
* Look for accommodations that offer amenities such as free Wi-Fi, hot water, and a restaurant or cafe.

**Transportation:**

* Consider hiring a private vehicle or taxi for the day, as this will give you more flexibility and convenience.
* Be sure to negotiate the price and agree on the itinerary before setting off.

**Budget:**

* The budget for a 3-day trip to Nepal can vary depending on your accommodation choices, transportation, and activities. However, here's a rough estimate:
        + Accommodation: $20-50 per night
        + Transportation: $10-20 per day
        + Food: $10-20 per meal
        + Activities: $10-20 per person
* Total estimated budget for 3 days: $200-500 per person
* Be prepared for variable prices and exchange rates, and have some local currency (Nepali rupees) on hand.
* Consider budgeting extra for unexpected expenses, such as transportation or food.
Summary of conversation content by agent
| agent | Conversation summary |
|---|
| planner_agent | We propose a 3‑day itinerary for Nepal.
Day 1: Arrive in Kathmandu and explore the city
Day 2: Kathmandu valley tour
Day 3: Visit Pokhara and Nagarkot
Additional tips: Respect local customs, try local food, choose transportation options, etc. |
| local_agent | Based on the planner_agent’s 3‑day itinerary, we provide additional suggestions and tips.
Day 1: Explore the area around Budhanath Stupa,
Day 2: Respect Hindu rituals at Pashupatinath Temple
Day 3: Try pottery and handicrafts in Bhaktapur
Additional tips: Respect local customs, learn basic Nepali, use local facilities, etc. |
| language_agent | Evaluate the travel itinerary and provide additional suggestions.
Basic Nepali learning, using local facilities, language preparation for emergencies, etc. |
| travel_summary_agent | Summarize the overall 3‑day itinerary.
Day 1: Arrive in Kathmandu and explore the city
Day 2: Kathmandu valley tour
Day 3: Visit Pokhara and Nagarkot
Additional tips: Respect local customs, try local food, choose transportation options, etc. |
MCP Utilization Agent
Note
- For the AIOS_LLM_Private_Endpoint used as AIOS_BASE_URL in the code and the MODEL_ID of the MODEL, please refer to the LLM Usage Guide.
autogen_mcp.py
from urllib.parse import urljoin

from autogen_core.models import ModelFamily
from autogen_ext.models.openai import OpenAIChatCompletionClient
from autogen_ext.tools.mcp import McpWorkbench, StdioServerParams
from autogen_agentchat.agents import AssistantAgent
from autogen_agentchat.ui import Console

# Set the API URL and model name for accessing the model.
AIOS_BASE_URL = "AIOS_LLM_Private_Endpoint"
MODEL = "MODEL_ID"

# Create a model client using OpenAIChatCompletionClient.
model_client = OpenAIChatCompletionClient(
    model=MODEL,
    base_url=urljoin(AIOS_BASE_URL, "v1"),
    api_key="EMPTY_KEY",
    model_info={
        # Set to True when images are supported.
        "vision": False
        # Set to True when function calls are supported.
        "function_calling": True,
        # Set to True when JSON output is supported.
        "json_output": True,
        # If the model you want to use is not provided by ModelFamily, use UNKNOWN.
        # "family": ModelFamily.UNKNOWN,
        "family": ModelFamily.LLAMA_3_3_70B,
        # Set to True when structured output is supported.
        "structured_output": True,
    }
)

# Configure the MCP server parameters.
# mcp_server_time is an MCP server implemented in python,
# It includes the get_current_time function that provides the current time and the convert_time function that converts time zones.
# This parameter sets the MCP server to the local timezone so that the time can be checked.
# For example, setting it to "Asia/Seoul" allows you to view the time according to the Korean time zone.
mcp_server_params = StdioServerParams(
    command="python","
    args=["-m", "mcp_server_time", "--local-timezone", "Asia/Seoul"],
)

async def main():
    In the main function, it runs an agent that checks the time using the MCP workbench.
    # Create and run an agent that checks the time using the MCP Workbench.
    # The agent performs the task "What time is it now in South Korea?".
    # Print the results using the console.
    # While the MCP Workbench is running, the agent checks the time
    # Outputs the result in a streaming fashion.
    # When the MCP Workbench is closed, the agent also shuts down.
    async with McpWorkbench(mcp_server_params) as workbench
        time_agent = AssistantAgent(
            "time_assistant"
            model_client=model_client,
            workbench=workbench,
            reflect_on_tool_use=True,
        )
        await Console(time_agent.run_stream(task="What time is it now in South Korea?"))
    await model_client.close()

if __name__ == "__main__":
    import asyncio
    asyncio.run(main())
from urllib.parse import urljoin

from autogen_core.models import ModelFamily
from autogen_ext.models.openai import OpenAIChatCompletionClient
from autogen_ext.tools.mcp import McpWorkbench, StdioServerParams
from autogen_agentchat.agents import AssistantAgent
from autogen_agentchat.ui import Console

# Set the API URL and model name for accessing the model.
AIOS_BASE_URL = "AIOS_LLM_Private_Endpoint"
MODEL = "MODEL_ID"

# Create a model client using OpenAIChatCompletionClient.
model_client = OpenAIChatCompletionClient(
    model=MODEL,
    base_url=urljoin(AIOS_BASE_URL, "v1"),
    api_key="EMPTY_KEY",
    model_info={
        # Set to True when images are supported.
        "vision": False
        # Set to True when function calls are supported.
        "function_calling": True,
        # Set to True when JSON output is supported.
        "json_output": True,
        # If the model you want to use is not provided by ModelFamily, use UNKNOWN.
        # "family": ModelFamily.UNKNOWN,
        "family": ModelFamily.LLAMA_3_3_70B,
        # Set to True when structured output is supported.
        "structured_output": True,
    }
)

# Configure the MCP server parameters.
# mcp_server_time is an MCP server implemented in python,
# It includes the get_current_time function that provides the current time and the convert_time function that converts time zones.
# This parameter sets the MCP server to the local timezone so that the time can be checked.
# For example, setting it to "Asia/Seoul" allows you to view the time according to the Korean time zone.
mcp_server_params = StdioServerParams(
    command="python","
    args=["-m", "mcp_server_time", "--local-timezone", "Asia/Seoul"],
)

async def main():
    In the main function, it runs an agent that checks the time using the MCP workbench.
    # Create and run an agent that checks the time using the MCP Workbench.
    # The agent performs the task "What time is it now in South Korea?".
    # Print the results using the console.
    # While the MCP Workbench is running, the agent checks the time
    # Outputs the result in a streaming fashion.
    # When the MCP Workbench is closed, the agent also shuts down.
    async with McpWorkbench(mcp_server_params) as workbench
        time_agent = AssistantAgent(
            "time_assistant"
            model_client=model_client,
            workbench=workbench,
            reflect_on_tool_use=True,
        )
        await Console(time_agent.run_stream(task="What time is it now in South Korea?"))
    await model_client.close()

if __name__ == "__main__":
    import asyncio
    asyncio.run(main())
When you run the file using python, it retrieves the tool’s metadata from the MCP server, calls the model, and when the model generates a tool calls message,
You can see that the get_current_time function is executed to retrieve the current time.
Code block. Run agent using autogen MCP. Execution result
# TextMessage (user): 사용자가 준 입력 메시지
---------- TextMessage (user) ----------
What time is it now in South Korea?
# MCP 서버에서 사용할 수 있는 도구들의 메타데이터 조회
INFO:mcp.server.lowlevel.server:Processing request of type ListToolsRequest
...생략...
INFO:autogen_core.events:{
  # MCP 서버에서 사용 가능한 도구들의 메타데이터
  "tools": [
    {
      "type": "function",
      "function": {
        "name": "get_current_time",
        "description": "Get current time in a specific timezones",
        "parameters": {
          "type": "object",
          "properties": {
            "timezone": {
              "type": "string",
              "description": "IANA timezone name (e.g., 'America/New_York', 'Europe/London'). Use 'Asia/Seoul' as local timezone if no timezone provided by the user."
            }
          },
          "required": [
            "timezone"
          ],
          "additionalProperties": false
        },
        "strict": false
      }
    },
    {
      "type": "function",
      "function": {
        "name": "convert_time",
        "description": "Convert time between timezones",
        "parameters": {
          "type": "object",
          "properties": {
            "source_timezone": {
              "type": "string",
              "description": "Source IANA timezone name (e.g., 'America/New_York', 'Europe/London'). Use 'Asia/Seoul' as local timezone if no source timezone provided by the user."
            },
            "time": {
              "type": "string",
              "description": "Time to convert in 24-hour format (HH:MM)"
            },
            "target_timezone": {
              "type": "string",
              "description": "Target IANA timezone name (e.g., 'Asia/Tokyo', 'America/San_Francisco'). Use 'Asia/Seoul' as local timezone if no target timezone provided by the user."
            }
          },
          "required": [
            "source_timezone",
            "time",
            "target_timezone"
          ],
          "additionalProperties": false
        },
        "strict": false
      }
    }
  ],
  "type": "LLMCall",
  # 입력 메시지
  "messages": [
    {
      "content": "You are a helpful AI assistant. Solve tasks using your tools. Reply with TERMINATE when the task has been completed.",
      "role": "system"
    },
    {
      "role": "user",
      "name": "user",
      "content": "What time is it now in South Korea?"
    }
  ],
  # 모델 응답
  "response": {
    "id": "chatcmpl-xxxxxxxxxxxxxxxxxxxxxxxxxxxxxxxx",
    "choices": [
      {
        "finish_reason": "tool_calls",
        "index": 0,
        "logprobs": null,
        "message": {
          "content": null,
          "refusal": null,
          "role": "assistant",
          "annotations": null,
          "audio": null,
          "function_call": null,
          "tool_calls": [
            {
              "id": "chatcmpl-tool-xxxxxxxxxxxxxxxxxxxxxxxxxxxxxxxx",
              "function": {
                "arguments": "{\"timezone\": \"Asia/Seoul\"}",
                "name": "get_current_time"
              },
              "type": "function"
            }
          ],
          "reasoning_content": null
        },
        "stop_reason": 128008
      }
    ],
    "created": 1751278737,
    "model": "MODEL_ID",
    "object": "chat.completion",
    "service_tier": null,
    "system_fingerprint": null,
    "usage": {
      "completion_tokens": 21,
      "prompt_tokens": 508,
      "total_tokens": 529,
      "completion_tokens_details": null,
      "prompt_tokens_details": null
    },
    "prompt_logprobs": null
  },
  "prompt_tokens": 508,
  "completion_tokens": 21,
  "agent_id": null
}
# ToolCallRequestEvent: 모델로부터 tool call 메시지를 받음
---------- ToolCallRequestEvent (time_assistant) ----------
[FunctionCall(id='chatcmpl-tool-xxxxxxxxxxxxxxxxxxxxxxxxxxxxxxxx', arguments='{"timezone": "Asia/Seoul"}', name='get_current_time')]
INFO:mcp.server.lowlevel.server:Processing request of type ListToolsRequest
# MCP 서버를 통해 tool call 메시지의 함수 실행
INFO:mcp.server.lowlevel.server:Processing request of type CallToolRequest
# ToolCallExecutionEvent: 함수의 실행 결과를 모델에게 전달
---------- ToolCallExecutionEvent (time_assistant) ----------
[FunctionExecutionResult(content='{\n  "timezone": "Asia/Seoul",\n  "datetime": "2025-06-30T19:18:58+09:00",\n  "is_dst": false\n}', name='get_current_time', call_id='chatcmpl-tool-xxxxxxxxxxxxxxxxxxxxxxxxxxxxxxxx', is_error=False)]
...생략...
# TextMessage (time_assistant): 모델이 생성한 최종 답변
---------- TextMessage (time_assistant) ----------
The current time in South Korea is 19:18:58 KST.
TERMINATE
MCP Server Time Query System Log Analysis Results
Log analysis results that show the execution process of the time query system through the MCP (Model Control Protocol) server.
Request Information
| Item | content |
|---|
| User request | What time is it now in South Korea? |
| Request time | 2025-06-30 19:18:58 KST |
| Processing method | Invoke MCP server tool |
Available Tools
| Tool name | Explanation | Parameter | default |
|---|
get_current_time | Retrieve the current time of a specific time zone | timezone (IANA time zone name) | Asia/Seoul |
convert_time | Time conversion between time zones | source_timezone, time, target_timezone | Asia/Seoul |
Processing Steps
| Step | action | Detailed description |
|---|
| 1 | Tool Metadata Lookup | Check the list of tools available on the MCP server |
| 2 | AI model response | Call the get_current_time function with the Asia/Seoul timezone |
| 3 | Function execution | MCP server runs the time query tool |
| 4 | Return result | Provide time information in a structured JSON format |
| 5 | Final answer | Present time to the user in a readable format |
Function Call Details
| Item | value |
|---|
| function name | get_current_time |
| parameter | {"timezone": "Asia/Seoul"} |
| Call ID | chatcmpl-tool-xxxxxxxxxxxxxxxxxxxxxxxxxxxxxxxx |
| type | function |
Execution Result
| field | value | description |
|---|
timezone | Asia/Seoul | time zone |
datetime | 2025-06-30T19:18:58+09:00 | ISO 8601 formatted time |
is_dst | false | Whether daylight saving time is applied |
Final response
| Item | content |
|---|
| Response message | The current time in South Korea is 19:18:58 KST. |
| Mark as complete | TERMINATE |
| Response time | 19:18:58 KST |
Usage Metrics Table
| Indicator | value |
|---|
| prompt token | 508 |
| completion token | 21 |
| Total token usage | 529 |
| Processing time | Immediately (real-time) |
Key Features
| feature | description |
|---|
| Utilizing the MCP protocol | Seamless integration with external tools |
| Korean time zone default setting | Use Asia/Seoul as the default |
| Structured response | Return clear data in JSON format |
| Auto-complete indicator | Notification of task completion using TERMINATE |
| Providing real-time information | Retrieve the exact current time |
Technical Significance
This is an example of a modern architecture where an AI assistant integrates with external systems to provide real-time information. Through MCP, the AI model can access various external tools and services, enabling more practical and dynamic responses.
Conclusion
In this tutorial, we implemented an application that creates travel itineraries using multiple agents by leveraging the AI model provided by AIOS and autogen, and an agent application that can use external tools by utilizing the MCP server. Through this, we learned that multiple agents with different perspectives can solve problems from various angles and utilize external tools. This system can be expanded and customized to fit user environments in the following ways.
- Agent flow control: Various techniques can be used when selecting the agent to perform a task. For reliable results, you can fix the order of agents and implement it that way, or you can let the AI model choose the agents for flexible handling. Additionally, you can use event-driven methods to implement parallel processing by multiple agents handling the work.
- Introduction of various MCP servers: In addition to mcp_server_time, various MCP servers have already been implemented. By leveraging these, the AI model can flexibly utilize diverse external tools to create useful applications.
Based on this tutorial, we encourage you to build a suitable AIOS-based collaboration assistant tailored to your actual service needs.
reference link
https://microsoft.github.io/autogen
https://modelcontextprotocol.io/
https://github.com/modelcontextprotocol/servers