We provide AI/ML services that enable easy and convenient development of ML/DL (Machine Learning/Deep Learning) models and the construction of training environments.
This is the multi-page printable view of this section. Click here to print.
AI-ML
- 1: Simple AI Inference
- 1.1: Overview
- 1.1.1: ServiceWatch metric
- 1.2: How-to Guides
- 1.3: References
- 1.3.1: API Reference
- 1.4: Data Privacy
- 1.5: Release Note
- 2: Simple AI Training
- 2.1: Overview
- 2.1.1: Server type
- 2.1.2: ServiceWatch metric
- 2.2: How-to guides
- 2.2.1: Using Job Failover
- 2.2.2: Concurrent Checkpointing
- 2.3: Release Note
- 3: CloudML
- 3.1: Overview
- 3.2: How-to guides
- 3.3: API Reference
- 3.4: CLI Reference
- 3.5: Release Note
- 4: AI&MLOps Platform
- 4.1: Overview
- 4.2: How-to guides
- 4.2.1: Cluster deployment
- 4.2.2: Kubeflow Usage Guide
- 4.3: API Reference
- 4.4: CLI Reference
- 4.5: Release Note
1 - Simple AI Inference
1.1 - Overview
Service Overview
Simple AI Inference is a serverless service that provides various global foundation models as APIs, offering public or private environments so that LLMs can be used on internal Samsung Cloud Platform resources or externally. By using Simple AI Inference, you can use multiple LLM models through the same API and improve productivity in AI application service development. It also supports compatibility with OpenAI and the LangChain SDK, enabling easy integration with existing development environments and frameworks.
Features
- Convenient LLM Model Usage: As a fully managed serverless service, you can use multiple LLM models through the same API.
- Efficient Cost Management: Costs are charged based on the actual usage of input (Input) and output (Output) tokens.
- Stable Service Provision: We provide stable services through traffic control (TPM/RTM).
- Enterprise security provided: Data is securely protected in a rigorous security environment and is not used for external model training.
Service architecture diagram
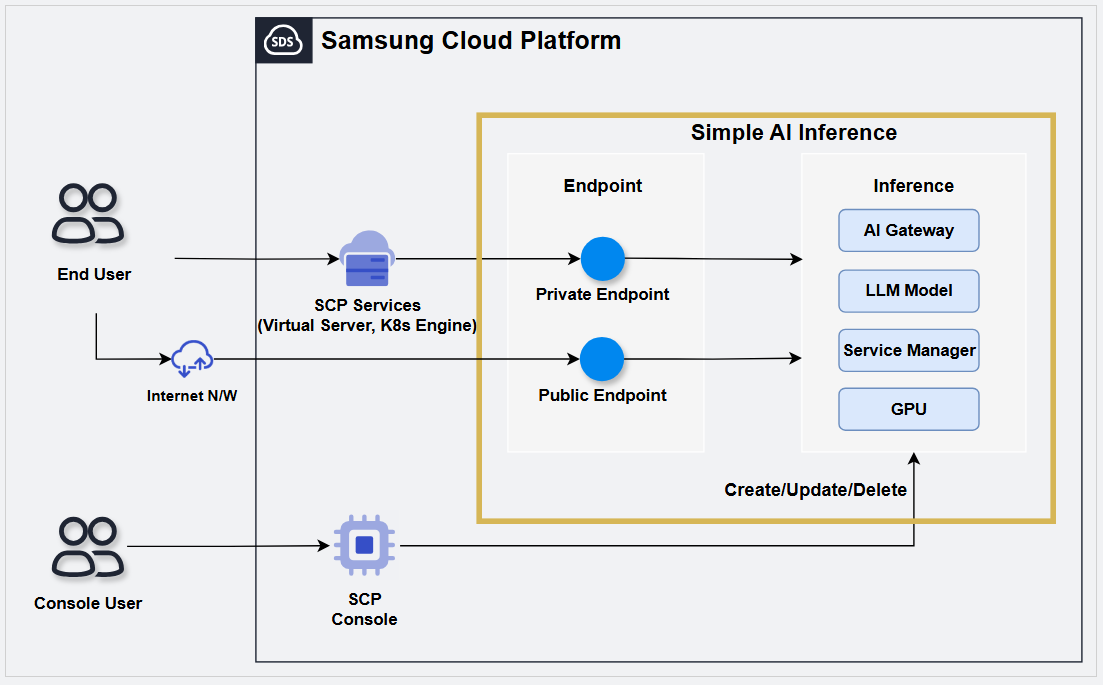
Provided Features
Simple AI Inference provides the following features.
Check convenient LLM model
- You can easily view the features and primary use cases of LLM models provided through the LLM model catalog.
- You can view and test the provided LLM model directly on the console screen using PlayGround.ReferencePlayGround is scheduled to be offered after September 2026.
Shared Use of LLM Model Account: If you request a model to use in Simple AI Inference, all users within the same Account can use it.
Serverless Service Provision : Users can request the desired model via an API and use it immediately without managing resources, and they pay only for what they use.
Public/Private endpoint provision: Depending on the user’s inference usage pattern, you can choose to use either a Public or Private endpoint.
Stable Service Provision: We provide a stable service environment through traffic control (TPM/RPM).
Provided model
The LLM models provided by Simple AI Inference are as follows.
| Model name | Application | Input type | TPM | RPM | Context Size | Image input limit count |
|---|---|---|---|---|---|---|
| Qwen3.6-27B | Text, Agent | Text, Image | 1,000,000 | 100 | 262,144 | 8 |
| gemma-4-31B-it | Text, Agent | Text, Image | 1,000,000 | 100 | 262,144 | 8 |
| gpt-oss-120b | Text | Text | 1,000,000 | 100 | 131,072 | - |
| Llama-Guard-4-12B | Security | Text, Image | 1,000,000 | 250 | 307,200 | 8 |
| Qwen3-VL-Embedding-8B | embedding | Text, Image | 1,000,000 | 250 | 262,144 | 8 |
| Qwen3-VL-Reranker-8B | reranker | Text, Image | 1,000,000 | 250 | 262,144 | 8 |
Table. Simple AI Inference provided LLM model
Caution
The models provided by the Simple AI Inference service are results generated in-house based on the data used to train the AI model. Therefore, the content, opinions, values, and judgments generated by the model are entirely unrelated to the official position or intent of Samsung Cloud Platform. Additionally, due to the nature of AI models, responses may contain distorted information or errors (hallucinations); therefore, when making important decisions, you should always verify the facts separately.
Provision status by region
The regions that provide Simple AI Inference service are as follows.
| Region | Provision status |
|---|---|
| Korea West (kr-west1) | Provide |
| Korea East (kr-east1) | Not provided |
| South Korea 1 (kr-south1) | Not provided |
| South Korea South 2 (kr-south2) | Not provided |
| South Korea South 3 (kr-south3) | Not provided |
Table. Simple AI Inference Availability by Region
Preceding Service
There are no services that need to be pre-configured before creating this service.
1.1.1 - ServiceWatch metric
Simple AI Inference sends metrics to ServiceWatch. The metrics provided by default monitoring are data collected at 5‑minute intervals.
Reference
For checking metrics in ServiceWatch, see the ServiceWatch guide.
Basic Metrics
The following are the basic metrics for the Simple AI Inference namespace. The indicators whose names are displayed in bold below are the key indicators selected among the default indicators provided by Simple AI Inference. The key metrics are used to build service dashboards that are automatically created for each service in ServiceWatch. Each metric provides guidance in the user guide on which statistical values are meaningful when querying that metric, and among the meaningful statistics, the values shown in bold are the primary statistics.
In the service dashboard or monitoring tab, you can view key metrics through primary statistical values. Or you can also view the key metrics on the monitoring tab of the Simple AI Inference detail page. You can also view the usage rate per GPU device in the ServiceWatch metrics menu.
| Performance item (metric name) | Detailed description | unit | meaningful statistics |
|---|---|---|---|
| Model Total Tokens | Model token usage (total) | Count |
|
| Model Request Server Error | Number of model request failures (server error) | Count |
|
| Model Input Tokens | Model token usage (input) | Count |
|
| Model Request Throttled | Model request limit count (request quota exceeded) | Count |
|
| Model Request Client Error | Model request failure count (client error) | Count |
|
| Model Output Tokens | Model token usage (output) | Count |
|
| Model Cached Tokens | Model token usage (cache) | Count |
|
| Model Request Prompt Rejected | Number of model request rejections (prompt review) | Count |
|
| Model Request Success | Number of successful model requests | Count |
|
Table. Simple AI Inference Basic Metrics
1.2 - How-to Guides
Create Simple AI Inference
To use Simple AI Inference, you must first create an Inference. To create an inference, follow these steps.
Click the All Services > AI-ML > Simple AI Inference menu. 1. Go to the Service Home page of Simple AI Inference.
Service Home on the page, click the Create Simple AI Inference button. 2. Navigate to the Create Serverless Inference page.
Serverless Inference creation page, enter the information required to create the service and select detailed options.
- In the Service Information Input area, select the options required to create the service.
Category RequiredDetailed description Inference service name Required Enter Serverless Inference service name - Enter using lowercase English letters and numbers, 3 ~ 25 characters
Endpoint Required Select external access for Simple AI Inference - Private: Use only private endpoint access control
- Private&Public: Use both private and public endpoint access control
Private endpoint access control Selection Add resources within Samsung Cloud Platform and allow access only to those resources - Private Access Allowed Resource: Select the resource to grant access to
- Click the Add button to select the resource to grant access to
- Select the resource to delete from the resource list, then click the Delete button to remove it
- If no resources are added, access is granted to all resources on subnets within the same region
- Can be modified after applying for a Serverless endpoint
Public endpoint access control Selection Set whether to use public endpoint access control - Enabled if set, you can add IPs or resources that are allowed access
- Public Access Allowed IP: After entering the IP range to allow access in CIDR format or as an IP address, you can add it by clicking the Add button
- Up to 100 entries can be added
- If not used, access is allowed for all IPs
- Can be modified after applying for a Serverless endpoint
Table. Serverless Inference Service Information Input ItemsCautionIf you do not use public endpoint access control or set it to the entire IP range (Any, 0.0.0.0/0), the registry can be exposed to security attacks such as external scanning and hacking. - In the Additional Information Input area, enter or select the required information.
Category Required statusDetailed description tag Selection Add Tag - Up to 50 per resource can be added
- After clicking the Add Tag button, enter or select Key, Value values
Table. Serverless Inference additional information input fields
- In the Service Information Input area, select the options required to create the service.
Summary Verify the detailed information and estimated charges generated in the panel, then click the Create button.
When the popup notifying creation opens, click the Confirm button. 5. The creation request has been completed.
- When creation is complete, check the created items on the Serverless Inference List page.
Check usage by LLM model
On the Service Home page of Simple AI Inference, you can view the list of LLMs and token usage per model.
- All Services > AI-ML > Simple AI Inference Click the menu. 1. Go to the Service Home page of Simple AI Inference.
- Check the per-model usage of LLMs in the LLM Model Usage list on the dashboard of Service Home.
Category Detailed description Model name LLM name - clicking the name moves to the Report tab on the model’s detail page
Model type LLM type - information for each model, see Provided model
Token usage (1 Week) Token usage for the past week as of today Table. Simple AI Inference LLM model usage items
View Serverless Inference details
Follow these steps to view detailed information about Serverless Inference.
All Services > AI-ML > Simple AI Inference Click the menu. 1. Go to the Service Home page of Simple AI Inference.
On the Service Home page, click the Serverless Inference menu. 2. Serverless Inference List Go to the page.
Item Explanation Create Service Serverless Inference can be created - When the button is clicked, navigate to the Serverless Inference creation page
- For creation method, see Create Simple AI Inference
Inference service name Serverless Inference name Model ID Model ID value - When the Model ID is clicked, navigate to the detailed page of that model
- For detailed information about the model, see View model detailed information
Model name Model Name - When clicking the Model ID, navigate to the model’s detail page
- For detailed information about the model, see View model detailed information
Planned model termination date Model’s scheduled end-of-service date Latency Average response time Throughput The average number of tokens the model generates per second Uptime System uptime ratio that allows the system to operate normally without service interruption and handle user requests - Green: 95% or higher
- Yellow: 80% or higher ~ less than 95%
- Red: less than 80%
Service cancellation Serverless Inference can be terminated - When the button is clicked, navigate to the Serverless Inference termination page
- For termination instructions, see Terminate Inference
Table. Serverless Inference list informationReferenceClicking Model ID or Model name takes you to the Model Catalog’s model detail page, where you can view the model’s detailed information.Serverless Inference List page, click the Inference service name to view detailed information. 3. Serverless Inference Details Go to the page.
- Serverless Inference Detailed page consists of Details, Report, Tags, Job History tabs.
Detailed Information
Serverless Inference List page lets you view detailed information of the selected resource and modify the information if necessary.
| Category | Detailed description |
|---|---|
| service | Service Name |
| Resource Type | Resource Type |
| SRN | Unique resource ID in Samsung Cloud Platform |
| Resource name | Resource Name |
| Resource ID | Unique resource ID in the service |
| Constructor | User who created the service |
| Creation Date/Time | Service creation date and time |
| Modifier | User who edited the service information |
| Modification date and time | Date and time the service information was modified |
| Endpoint | External access methods for Simple AI Inference
|
| Private endpoint | Private endpoint value
|
| Public endpoint | Public endpoint value
|
| Private endpoint access control | Information about resources with private access allowed
|
| Public endpoint access control | Publicly accessible IP and resource information
|
Table. Detailed Information Tab Items
Report
On the Serverless Inference List page, you can view the daily LLM call count and token usage for the selected resource.
| Category | Detailed description |
|---|---|
| Search filter | Select items to view in the report
|
| Number of calls | Display the number of calls as a graph for the selected period |
| Total call count | Provide the number of calls per model during the query period. |
| Token usage | Display Input and Output token usage as a graph over the selected period |
| Total token count | Display the total token usage during the query period, separated into Input and Output. |
| Average number of tokens per request | Display the average number of tokens used for LLM calls during the query period, separated into Input and Output. |
Table. Report tab item
Tag
On the Serverless Inference List page, you can view the tag information of the selected resource, and you can add, modify, or delete it.
| Category | Detailed description |
|---|---|
| Tag List | Tag list
|
Table. Tag tab item
Job History
You can view the operation history of the selected resource on the Serverless Inference List page.
| Category | Detailed description |
|---|---|
| Task History List | Resource change history
|
Table. Work History Tab Items
View model detailed information
You can view the models provided by Simple AI Inference and their detailed information. To view the model details, follow these steps.
- All Services > AI-ML > Simple AI Inference Click the menu. 1. Go to the Service Home page of Simple AI Inference.
- On the Service Home page, click the Model Catalog menu. 2. Navigate to the Model Catalog page.
- On the Model Catalog page, click the model whose detailed information you want to view. 3. Model Catalog Navigate to the detailed page.
Item Explanation License Click the button to view the model’s license information. Overview Basic description of the model Sales criteria Model developer Category Scope of model usage latest version Provided version Release date Model release year and date Model ID Model ID information Maximum token Maximum token size Output modelities Model output method Input modelities Model input method language Model language types Deployment type Model deployment method Token Limits Token limit value Reqeust Limits request limit Table. Simple AI Inference Provided Model Details
Managing API Keys
You must create and register an API key to use Simple AI Inference in Severless Inference.
Create API Key
To generate an API key, follow these steps.
Click the All Services > AI-ML > Simple AI Inference menu. 1. Go to the Service Home page of Simple AI Inference.
On the Service Home page, click the API Key menu. 2. Navigate to the API key page.
On the API key page, click the Create key button. 3. Create API Key Go to the detail page.
On the API Key Creation page, after entering the information required to generate an API key, click the Create button.
Category Required statusDetailed description Inference type Required Select inference type Expiration period Required Enter the expiration period of the API key - permanent checking the item allows use without any time restriction
Usage Selection Enter the purpose of using the API key within 128 characters Table. Serverless Inference Service Information Input ItemsCautionIf you do not use public endpoint access control or set it to the entire IP range (Any, 0.0.0.0/0), the registry can be exposed to security attacks such as external scanning and hacking.When the popup informing you to create an API key opens, click the Confirm button.
- When an API key is created, it is downloaded once at the time of creation.
Check API Key
To check the API key, follow these steps.
- All Services > AI-ML > Simple AI Inference Click the menu. 1. Go to the Service Home page of Simple AI Inference.
- On the Service Home page, click the API Key menu. 2. Go to the API key page.
Item Explanation Authentication key Authentication key information Inference type Inference type with a registered authentication key Creation timestamp Authentication key generation time Expiration date and time Authentication key expiration time Delete Delete the selected authentication key - It becomes active when you select the authentication key to delete from the key list
More Change the usage status of the selected authentication key - Disable When selected, the authentication key is not deleted, only its functionality is blocked
Key generation Create API key - When the button is clicked, go to the Create API Key page
- Refer to Create API Key for how to create an API key
Table. Simple AI Inference provided model detailed information
Terminate Inference
Terminate Serverless Inference
To cancel Serverless Inference, follow the steps below.
- Click the All Services > AI-ML > Simple AI Inference menu. 1. Go to the Service Home page of Simple AI Inference.
- On the Service Home page, click the Serverless Inference menu. 2. Serverless Inference List Go to the page.
- On the Serverless Inference List page, click the Cancel Service button of the Serverless Inference you want to delete.
- When the pop-up notifying service termination opens, enter the service name and click the Confirm button.
1.3 - References
References
You can view the API Reference supported by Simple AI Inference.
| Category | Explanation |
|---|---|
| API Reference | List of APIs supported by Simple AI Inference
|
Table. Simple AI Inference Reference List
1.3.1 - API Reference
API Reference Overview
The API Reference supported by Simple AI Inference is as follows.
| API name | API | Detailed description |
|---|---|---|
| Chat Completions API | POST /v1/chat/completions | It is compatible with OpenAI’s Completions API and can be used with the OpenAI Python client. |
| Completions API | POST /v1/completions | It is compatible with OpenAI’s Completions API and can be used with the OpenAI Python client. |
| Embedding API | POST /v1/embeddings | You can convert text into high-dimensional vectors (embeddings) and use them for various natural language processing (NLP) tasks such as similarity calculation between texts, clustering, and search. |
| Rerank API | POST /v2/rerank | Predict the relevance between a single query and each item in a document list by applying an embedding model or a cross‑encoder model. |
| Responses API | POST /v1/responses | Compatible with OpenAI’s Responses API, it can generate text or JSON output from text, image, or file inputs, and supports function calls and built-in tools. |
| Tokenize API | POST /tokenize | Converts text to token IDs. Supports Completion mode and Chat mode. |
| Models API | GET /v1/models | Returns a list of deployed models. Compatible with OpenAI’s Models API. |
Table. Simple AI Inference supported API list
Chat Completions API
POST /v1/chat/completions
Overview
The Chat Completions API is compatible with OpenAI’s Completions API and can be used with the OpenAI Python client.
Request
Context
| Key | Type | Description | Example |
|---|---|---|---|
| Base URL | string | Simple AI Inference URL for API requests | Simple AI Inference endpoint |
| Request Method | string | HTTP methods used in API requests | POST |
| Headers | object | Header information required for the request | { “Content-Type”: “application/json”, “Authorization”: “bearer sai-xxxxxxx…” } |
| Body Parameters | object | Parameters included in the request body | {“model”: “google/gemma-4-31B-it”, “messages”: [{“role”: “user”, “content”: “hello”}], “stream”: true } |
Table. Chat Completions API - Context
Path Parameters
| Name | type | Required | Description | Default value | Boundary value | Example |
|---|---|---|---|---|---|---|
| None |
Table. Chat Completions API - Path Parameters
Query Parameters
| Name | type | Required | Description | Default value | Boundary value | Example |
|---|---|---|---|---|---|---|
| None |
Table. Chat Completions API - Query Parameters
Body Parameters
| Name | Name Sub | type | Required | Description | Default value | Boundary value | Example |
|---|---|---|---|---|---|---|---|
| model | - | string | ✅ | Specify the model to use for generating responses | “google/gemma-4-31B-it” | ||
| messages | role | string | ✅ | Message list containing conversation history | [ { “role” : “user” , “content” : “message” }] | ||
| frequency_penalty | - | number | ❌ | Adjust the penalty for repeated tokens | 0 | -2.0 ~ 2.0 | 0.5 |
| logit_bias | - | object | ❌ | Adjust the probability of a specific token (example: { “100”: 2.0 }) | null | Key: Token ID, Value: -100 ~ 100 | { “100”: 2.0 } |
| logprobs | - | boolean | ❌ | Returns token probabilities for the top logprobs count | false | true, false | true |
| max_completion_tokens | - | integer | ❌ | Limit the maximum number of generated tokens | None | 0 ~ model maximum value | 100 |
| max_tokens (Deprecated) | - | integer | ❌ | Limit the maximum number of generated tokens | None | 0 ~ model maximum value | 100 |
| n | - | integer | ❌ | Specify the number of responses to generate | 1 | 3 | |
| presence_penalty | - | number | ❌ | Adjust the penalty for tokens in the existing text. | 0 | -2.0 ~ 2.0 | 1.0 |
| seed | - | integer | ❌ | Specify the seed value for controlling randomness | None | ||
| stop | - | string / array / null | ❌ | Stop generation when a specific string appears. | null | "\n" | |
| stream | - | boolean | ❌ | Whether to return results in streaming mode | false | true/false | true |
| stream_options | include_usage, continuous_usage_stats | object | ❌ | Control streaming options (e.g., whether to include usage statistics) | null | { “include_usage”: true } | |
| temperature | - | number | ❌ | Adjust the creativity of the generated output (higher values are more random) | 1 | 0.0 ~ 1.0 | 0.7 |
| tool_choice | - | string | ❌ | Adjust which Tool is invoked by the model
|
| ||
| tools | - | array | ❌ | list of Tools that the model can invoke
| None | ||
| top_logprobs | - | integer | ❌ | Specify the number of tokens with the highest probability for an integer between 0 and 20
| None | 0 ~ 20 | 3 |
| top_p | - | number | ❌ | Limit token sampling probability (higher values consider more tokens) | 1 | 0.0 ~ 1.0 | 0.9 |
| prompt_safety_model | - | string | ❌ | Specify a guard model for prompt inspection. When set, the guard model checks the prompt first, returning the guard result if it is deemed unsafe, and processing the request with the model specified in the model parameter if it is safe. | “meta-llama/Llama-Guard-4-12B” | ||
| chat_template_kwargs | - | object | ❌ | Additional keyword arguments to pass to the template renderer. Used for per-model reasoning configuration (see Reasoning configuration for details) | null | { “enable_thinking”: true } |
Table. Chat Completions API - Body Parameters
Example
Color mode
curl -X 'POST' \
   {Simple AI Inference endpoint}/v1/chat/completions \
  -H 'Authorization: bearer sai-xxxxxxx...' \
  -H 'Content-Type: application/json' \
  -d '{
    "model": "google/gemma-4-31B-it",
      "messages": [
      {
        "role": "assistant",
        "content": "You are a helpful assistant."
      },
      {
        "role": "user",
        "content": "What is the capital of South Korea?"
      }
    ]
}'
curl -X 'POST' \
{Simple AI Inference endpoint}/v1/chat/completions \
-H 'Authorization: bearer sai-xxxxxxx...' \
-H 'Content-Type: application/json' \
-d '{
"model": "google/gemma-4-31B-it",
"messages": [
{
"role": "assistant",
"content": "You are a helpful assistant."
},
{
"role": "user",
"content": "What is the capital of South Korea?"
}
]
}'Response
200 OK
| Name | Type | Description |
|---|---|---|
| id | string | Unique identifier of the response |
| object | string | Response object’s type (example: “chat.completion”) |
| created | integer | Creation time (Unix timestamp, in seconds) |
| model | string | Name of the model used |
| choices | array | List of generated response options |
| choices[].index | integer | The index of the corresponding choice |
| choices[].message | object | Generated message object |
| choices[].message.role | string | The role of the message author (e.g., “assistant”) |
| choices[].message.content | string | The actual content of the generated message |
| choices[].message.reasoning | string | The actual content of the generated inference message |
| choices[].message.tool_calls | array (optional) | Tool invocation information (may be included depending on model/settings) |
| choices[].finish_reason | string or null | Reason why the response was terminated (e.g., “stop”, “length”, etc) |
| choices[].stop_reason | object or null | Additional stop reason details |
| choices[].logprobs | object or null | Log probability information per token (included depending on settings) |
| usage | object | Token Usage Statistics |
| usage.prompt_tokens | integer | Number of tokens used in the input prompt |
| usage.completion_tokens | integer | Number of tokens used in the generated response |
| usage.total_tokens | integer | Total token count (input + output) |
Table. Chat Completions API - 200 OK
Error Code
| HTTP status code | ErrorCode description |
|---|---|
| 400 | Bad Request |
| 422 | When a request is denied due to policies such as Prompt Guard |
| 500 | Internal Server Error |
Table. Chat Completions API - Error Code
Example
Color mode
{
  "id": "chatcmpl-xxxxxxxx-xxxx-xxxx-xxxx-xxxxxxxxxxxx",
  "object": "chat.completion",
  "created": 1749702816,
  "model": "google/gemma-4-31B-it",
  "choices": [
    {
      "index": 0,
      "message": {
        "role": "assistant",
        "reasoning": null,
        "content": "The capital of South Korea is Seoul.",
        "tool_calls": []
      },
      "logprobs": null,
      "finish_reason": "stop",
      "stop_reason": null
    }
  ],
  "usage": {
    "prompt_tokens": 54,
    "total_tokens": 62,
    "completion_tokens": 8,
    "prompt_tokens_details": null
  },
  "prompt_logprobs": null
}
{
"id": "chatcmpl-xxxxxxxx-xxxx-xxxx-xxxx-xxxxxxxxxxxx",
"object": "chat.completion",
"created": 1749702816,
"model": "google/gemma-4-31B-it",
"choices": [
{
"index": 0,
"message": {
"role": "assistant",
"reasoning": null,
"content": "The capital of South Korea is Seoul.",
"tool_calls": []
},
"logprobs": null,
"finish_reason": "stop",
"stop_reason": null
}
],
"usage": {
"prompt_tokens": 54,
"total_tokens": 62,
"completion_tokens": 8,
"prompt_tokens_details": null
},
"prompt_logprobs": null
}Prompt Guard response
If the prompt_safety_model parameter is set, the guard model checks the prompt first.
- safe:
modelThe request is processed unchanged using the model specified in the parameter. - unsafe: Returns a guard result in the following form and the request is terminated.
Color mode
{
  "guard_result": "unsafe",
  "categories": ["S1", "S2"],
  "categories_description": ["Violent Crimes", "Non-Violent Crimes"],
  "messages": [
    "Cannot fulfill the request due to violent content.",
    "Cannot respond as it may promote illegal activities."
  ]
}
{
"guard_result": "unsafe",
"categories": ["S1", "S2"],
"categories_description": ["Violent Crimes", "Non-Violent Crimes"],
"messages": [
"Cannot fulfill the request due to violent content.",
"Cannot respond as it may promote illegal activities."
]
}Reasoning configuration
Through the chat_template_kwargs parameter, you can control the reasoning (inference mode) configuration for each model. The default behavior and supported options vary by model.
| model | basic reasoning | Configure chat_template_kwargs | Explanation |
|---|---|---|---|
| zai-org/GLM-5.2 | On (Think Max) |
| Adjust inference depth with reasoning_effort, disable with enable_thinking=false |
| Qwen/Qwen3.6-27B | On |
| Reasoning is enabled by default and can be disabled when needed. |
| google/gemma-4-31B-it | Off |
| By default, reasoning is disabled, but it can be enabled when needed. |
| openai/gpt-oss-120b | medium |
| Adjust inference depth with reasoning_effort (default: medium) |
Table. Chat Completions API - Model-specific Reasoning Configuration
Color mode
curl -X 'POST' \
{Simple AI Inference endpoint}/v1/chat/completions \
-H 'Authorization: bearer sai-xxxxxxx...' \
-H 'Content-Type: application/json' \
-d '{
"model": "zai-org/GLM-5.2",
"messages": [
{
"role": "user",
"content": "Please solve a complex math problem."
}
],
"chat_template_kwargs": {
"reasoning_effort": "high"
}
}'curl -X 'POST' \
{Simple AI Inference endpoint}/v1/chat/completions \
-H 'Authorization: bearer sai-xxxxxxx...' \
-H 'Content-Type: application/json' \
-d '{
"model": "zai-org/GLM-5.2",
"messages": [
{
"role": "user",
"content": "Please solve a complex math problem."
}
],
"chat_template_kwargs": {
"reasoning_effort": "high"
}
}'Reference
Completions API
POST /v1/completions
Overview
The Completions API is compatible with OpenAI’s Completions API and can be used with the OpenAI Python client.
Request
Context
| Key | Type | Description | Example |
|---|---|---|---|
| Base URL | string | Simple AI Inference URL for API requests | Simple AI Inference endpoint |
| Request Method | string | HTTP methods used in API requests | POST |
| Headers | object | Header information required for the request | { “Content-Type”: “application/json”, “Authorization”: “bearer sai-xxxxxxx…” } |
| Body Parameters | object | Parameters included in the request body | {“model”: “google/gemma-4-31B-it”, “prompt” : “hello”, “stream”: true } |
Table. Completions API - Context
Path Parameters
| Name | type | Required | Description | Default value | Boundary value | Example |
|---|---|---|---|---|---|---|
| None |
Table. Completions API - Path Parameters
Query Parameters
| Name | type | Required | Description | Default value | Boundary value | Example |
|---|---|---|---|---|---|---|
| None |
Table. Completions API - Query Parameters
Body Parameters
| Name | Name Sub | type | Required | Description | Default value | Boundary value | Example |
|---|---|---|---|---|---|---|---|
| model | - | string | ✅ | Specify the model to use for generating responses | “google/gemma-4-31B-it” | ||
| prompt | - | array | ✅ | User input text | "" | ||
| echo | - | boolean | ❌ | Whether to include the input text in the output | false | true/false | true |
| frequency_penalty | - | number | ❌ | Adjust the penalty for repeated tokens | 0 | -2.0 ~ 2.0 | 0.5 |
| logit_bias | - | object | ❌ | Adjust the probability of a specific token (example: { “100”: 2.0 }) | null | Key: Token ID, Value: -100~100 | { “100”: 2.0 } |
| logprobs | - | integer | ❌ | Returns token probabilities for the top logprobs count | null | 1 ~ 5 | 5 |
| max_completion_tokens | - | integer | ❌ | Limit the maximum number of generated tokens | None | 0~model maximum value | 100 |
| max_tokens (Deprecated) | - | integer | ❌ | Limit the maximum number of generated tokens | None | 0~model maximum value | 100 |
| n | - | integer | ❌ | Specify the number of responses to generate | 1 | 3 | |
| presence_penalty | - | number | ❌ | Adjust the penalty for tokens in the existing text. | 0 | -2.0 ~ 2.0 | 1.0 |
| seed | - | integer | ❌ | Specify the seed value for controlling randomness | None | ||
| stop | - | string / array / null | ❌ | Stop generation when a specific string appears. | null | "\n" | |
| stream | - | boolean | ❌ | Whether to return results in streaming mode | false | true/false | true |
| stream_options | include_usage, continuous_usage_stats | object | ❌ | Control streaming options (e.g., whether to include usage statistics) | null | { “include_usage”: true } | |
| temperature | - | number | ❌ | Adjust the creativity of the generated output (higher values are more random) | 1 | 0.0 ~ 1.0 | 0.7 |
| top_p | - | number | ❌ | Limit the sampling probability of tokens (higher values consider more tokens) | 1 | 0.0 ~ 1.0 | 0.9 |
Table. Completions API - Body Parameters
Example
Color mode
curl -X 'POST' \
{Simple AI Inference endpoint}/v1/completions \
-H 'Authorization: bearer sai-xxxxxxx...' \
-H 'Content-Type: application/json' \
-d '{
"model": "google/gemma-4-31B-it",
"prompt": "What is the capital of South Korea?",
"temperature": 0.7
}'curl -X 'POST' \
{Simple AI Inference endpoint}/v1/completions \
-H 'Authorization: bearer sai-xxxxxxx...' \
-H 'Content-Type: application/json' \
-d '{
"model": "google/gemma-4-31B-it",
"prompt": "What is the capital of South Korea?",
"temperature": 0.7
}'Response
200 OK
| Name | Type | Description |
|---|---|---|
| id | string | Unique identifier of the response |
| object | string | Response object’s type (example: “text_completion”) |
| created | integer | Creation time (Unix timestamp, in seconds) |
| model | string | Name of the model used |
| choices | array | List of generated response options |
| choices[].index | number | The index of the corresponding choice |
| choices[].text | string | Generated text object |
| choices[].logprobs | object | Log probability information per token (included depending on settings) |
| choices[].finish_reason | string or null | Reason why the response was terminated (e.g., “stop”, “length”, etc) |
| choices[].stop_reason | object or null | Additional stop reason details |
| choices[].prompt_logprobs | object or null | Log probability per input prompt token (nullable) |
| usage | object | Token Usage Statistics |
| usage.prompt_tokens | number | Number of tokens used in the input prompt |
| usage.total_tokens | number | Total token count (input + output) |
| usage.completion_tokens | number | Number of tokens used in the generated response |
| usage.prompt_tokens_details | object | Prompt token usage details |
Table. Completions API - 200 OK
Error Code
| HTTP status code | ErrorCode description |
|---|---|
| 400 | Bad Request |
| 422 | When a request is denied due to policies such as Prompt Guard |
| 500 | Internal Server Error |
Table. Completions API - Error Code
Example
Color mode
{
"id": "cmpl-xxxxxxxx-xxxx-xxxx-xxxx-xxxxxxxxxxxx",
"object": "text_completion",
"created": 1749702612,
"model": "google/gemma-4-31B-it",
"choices": [
{
"index": 0,
"text": " \nOur capital city is Seoul. \n\nA. 1\nB. ",
"logprobs": null,
"finish_reason": "length",
"stop_reason": null,
"prompt_logprobs": null
}
],
"usage": {
"prompt_tokens": 9,
"total_tokens": 25,
"completion_tokens": 16,
"prompt_tokens_details": null
}
}{
"id": "cmpl-xxxxxxxx-xxxx-xxxx-xxxx-xxxxxxxxxxxx",
"object": "text_completion",
"created": 1749702612,
"model": "google/gemma-4-31B-it",
"choices": [
{
"index": 0,
"text": " \nOur capital city is Seoul. \n\nA. 1\nB. ",
"logprobs": null,
"finish_reason": "length",
"stop_reason": null,
"prompt_logprobs": null
}
],
"usage": {
"prompt_tokens": 9,
"total_tokens": 25,
"completion_tokens": 16,
"prompt_tokens_details": null
}
}Reference
Embedding API
POST /v1/embeddings
Overview
The Embedding API converts given text into high-dimensional vectors (embeddings), enabling support for various natural language processing (NLP) tasks such as similarity calculation between texts, clustering, and search.
Request
Context
| Key | Type | Description | Example |
|---|---|---|---|
| Base URL | string | Simple AI Inference URL for API requests | Simple AI Inference endpoint |
| Request Method | string | HTTP methods used in API requests | POST |
| Headers | object | Header information required for the request | { “Content-Type”: “application/json”, “Authorization”: “bearer sai-xxxxxxx…” } |
| Body Parameters | object | Parameters included in the request body | { “model”: “Qwen/Qwen3-VL-Embedding-8B”, “input”: “What is the capital of France?”} |
Table. Embedding API - Context
Path Parameters
| Name | type | Required | Description | Default value | Boundary value | Example |
|---|---|---|---|---|---|---|
| None |
Table. Embedding API - Path Parameters
Query Parameters
| Name | type | Required | Description | Default value | Boundary value | Example |
|---|---|---|---|---|---|---|
| None |
Table. Embedding API - Query Parameters
Body Parameters
| Name | Name Sub | type | Required | Description | Default value | Boundary value | Example |
|---|---|---|---|---|---|---|---|
| model | - | string | ✅ | Specify the model to use for generating responses | “Qwen/Qwen3-VL-Embedding-8B” | ||
| input | - | array | ✅ | User’s search query or question | “What is the capital of France?" | ||
| encoding_format | - | string | ❌ | Specify the format for returning the embedding | float | “float”, “base64” | [0.01319122314453125,0.057220458984375, … (omitted) |
| truncate_prompt_tokens | - | integer | ❌ | Limit the number of input tokens | > 0 | 100 |
Table. Embedding API - Body Parameters
Example
Color mode
curl -X 'POST' \
{Simple AI Inference endpoint}/v1/embeddings \
-H 'Authorization: bearer sai-xxxxxxx...' \
-H 'Content-Type: application/json' \
-d '{
"model": "Qwen/Qwen3-VL-Embedding-8B",
"input": "What is the capital of France?",
"encoding_format": "float"
}'curl -X 'POST' \
{Simple AI Inference endpoint}/v1/embeddings \
-H 'Authorization: bearer sai-xxxxxxx...' \
-H 'Content-Type: application/json' \
-d '{
"model": "Qwen/Qwen3-VL-Embedding-8B",
"input": "What is the capital of France?",
"encoding_format": "float"
}'Response
200 OK
| Name | Type | Description |
|---|---|---|
| id | string | Unique identifier of the response |
| object | string | Response object’s type (example: “list”) |
| created | number | Creation time (Unix timestamp, in seconds) |
| model | string | Name of the model used |
| data | array | Array of objects containing embedding results |
| data.index | number | Order index of the input text (example: indicates the order when there are multiple input texts) |
| data.object | string | Data item type |
| data.embedding | array | Embedding vector values of the input text (composed of a float array according to the model’s embedding dimensions) |
| usage | object | Token Usage Statistics |
| usage.prompt_tokens | number | Number of tokens used in the input prompt |
| usage.total_tokens | number | Total token count (input + output) |
| usage.completion_tokens | number | Number of tokens used in the generated response |
| usage.prompt_tokens_details | object | Prompt token details |
Table. Embedding API - 200 OK
Error Code
| HTTP status code | ErrorCode description |
|---|---|
| 400 | Bad Request |
| 422 | When the request is denied due to policies such as Prompt Guard |
| 500 | Internal Server Error |
Table. Embedding API - Error Code
Example
Color mode
{
"id":"embd-xxxxxxxx-xxxx-xxxx-xxxx-xxxxxxxxxxxx",
"object":"list",
"created":1749035024,
"model":"Qwen/Qwen3-VL-Embedding-8B",
"data":[
{
"index":0,
"object":"embedding",
"embedding":
[0.01319122314453125,0.057220458984375,-0.028533935546875,-0.0008697509765625,-0.01422119140625,0.033416748046875,-0.0062408447265625,-0.04364013671875,-0.004497528076171875,0.0008072853088378906,-0.0193328857421875,0.041168212890625,-0.019317626953125,-0.0188751220703125,-0.047088623046875,
-0 ....(omitted)
-0.05706787109375,-0.0147705078125]
}
],
"usage":
{
"prompt_tokens":9,
"total_tokens":9,
"completion_tokens":0,
"prompt_tokens_details":null
}
}{
"id":"embd-xxxxxxxx-xxxx-xxxx-xxxx-xxxxxxxxxxxx",
"object":"list",
"created":1749035024,
"model":"Qwen/Qwen3-VL-Embedding-8B",
"data":[
{
"index":0,
"object":"embedding",
"embedding":
[0.01319122314453125,0.057220458984375,-0.028533935546875,-0.0008697509765625,-0.01422119140625,0.033416748046875,-0.0062408447265625,-0.04364013671875,-0.004497528076171875,0.0008072853088378906,-0.0193328857421875,0.041168212890625,-0.019317626953125,-0.0188751220703125,-0.047088623046875,
-0 ....(omitted)
-0.05706787109375,-0.0147705078125]
}
],
"usage":
{
"prompt_tokens":9,
"total_tokens":9,
"completion_tokens":0,
"prompt_tokens_details":null
}
}Reference
Rerank API
POST /v2/rerank
Overview
The Rerank API applies an embedding model or a cross‑encoder model to calculate similarity scores between a single query and each document in a list, and reorders the document ranking based on these scores. Generally, the score of a sentence pair represents the similarity between the two sentences on a scale from 0 to 1.
- Embedding-based model: After converting the query and documents each into vectors, we measure the similarity between vectors (e.g., cosine similarity) and calculate a score.
- Reranker(Cross-Encoder) based model: The query and document are input as a pair to the model for evaluation.
Request
Context
| Key | Type | Description | Example |
|---|---|---|---|
| Base URL | string | Simple AI Inference URL for API requests | Simple AI Inference endpoint |
| Request Method | string | HTTP methods used in API requests | POST |
| Headers | object | Header information required for the request | { “Content-Type”: “application/json”, “Authorization”: “bearer sai-xxxxxxx…” } |
| Body Parameters | object | Parameters included in the request body | { “model”: “Qwen/Qwen3-VL-Reranker-8B”, “query”: …, “documents”: […] } |
Table. Rerank API - Context
Path Parameters
| Name | type | Required | Description | Default value | Boundary value | Example |
|---|---|---|---|---|---|---|
| None |
Table. Rerank API - Path Parameters
Query Parameters
| Name | type | Required | Description | Default value | Boundary value | Example |
|---|---|---|---|---|---|---|
| None |
Table. Rerank API - Query Parameters
Body Parameters
| Name | Name Sub | type | Required | Description | Default value | Boundary value | Example |
|---|---|---|---|---|---|---|---|
| model | - | string | ✅ | Specify the model to use for generating responses | “Qwen/Qwen3-VL-Reranker-8B” | ||
| query | - | string | ✅ | User’s search query or question | “What is the capital of France?" | ||
| documents | - | array | ✅ | List of documents to be reordered | Maximum model input length limit | [“The capital of France is Paris.”] | |
| top_n | - | integer | ❌ | Specify the number of top documents to return (0 returns all) | 0 | > 0 | 5 |
| truncate_prompt_tokens | - | integer | ❌ | Limit the number of input tokens | > 0 | 100 |
Table. Rerank API - Body Parameters
Example
Color mode
curl -X 'POST' \
{Simple AI Inference endpoint}/v2/rerank \
-H 'Authorization: bearer sai-xxxxxxx...' \
-H 'Content-Type: application/json' \
-d '{
"model": "Qwen/Qwen3-VL-Reranker-8B",
"query": "What is the capital of France?",
"documents": [
"The capital of France is Paris.",
"France capital city is known for the Eiffel Tower.",
"Paris is located in the north-central part of France."
],
"top_n": 2,
"truncate_prompt_tokens": 512
}'curl -X 'POST' \
{Simple AI Inference endpoint}/v2/rerank \
-H 'Authorization: bearer sai-xxxxxxx...' \
-H 'Content-Type: application/json' \
-d '{
"model": "Qwen/Qwen3-VL-Reranker-8B",
"query": "What is the capital of France?",
"documents": [
"The capital of France is Paris.",
"France capital city is known for the Eiffel Tower.",
"Paris is located in the north-central part of France."
],
"top_n": 2,
"truncate_prompt_tokens": 512
}'Response
200 OK
| Name | Type | Description |
|---|---|---|
| id | string | Unique identifier of the API response (UUID format) |
| model | string | Name of the model that generated the result |
| usage | object | Object containing resource information used in the request |
| usage.prompt_tokens | integer | Number of tokens used in the input prompt |
| usage.total_tokens | integer | Total number of tokens used for request processing |
| results | array | An array containing the results of documents related to the query. |
| results[].index | integer | Index number in the result array |
| results[].document | object | An object containing the contents of the retrieved document |
| results[].document.text | string | The actual text content of the retrieved document |
| results[].document.multi_modal | object or null | Multimodal document information |
| results[].relevance_score | float | Score indicating the relevance between the query and the document (0 ~ 1) |
Table. Rerank API - 200 OK
Error Code
| HTTP status code | ErrorCode description |
|---|---|
| 400 | Bad Request |
| 422 | When the request is denied due to policies such as Prompt Guard |
| 500 | Internal Server Error |
Table. Rerank API - Error Code
Example
Color mode
{
"id": "score-xxxxxxxx-xxxx-xxxx-xxxx-xxxxxxxxxxxx",
"model": "Qwen/Qwen3-VL-Reranker-8B",
"usage": {
"prompt_tokens": 54,
"total_tokens": 54
},
"results": [
{
"index": 0,
"document": {
"text": "The capital of France is Paris.",
"multi_modal": null
},
"relevance_score": 0.9237253665924072
},
{
"index": 2,
"document": {
"text": "Paris is located in the north-central part of France.",
"multi_modal": null
},
"relevance_score": 0.9181006550788879
}
]
}{
"id": "score-xxxxxxxx-xxxx-xxxx-xxxx-xxxxxxxxxxxx",
"model": "Qwen/Qwen3-VL-Reranker-8B",
"usage": {
"prompt_tokens": 54,
"total_tokens": 54
},
"results": [
{
"index": 0,
"document": {
"text": "The capital of France is Paris.",
"multi_modal": null
},
"relevance_score": 0.9237253665924072
},
{
"index": 2,
"document": {
"text": "Paris is located in the north-central part of France.",
"multi_modal": null
},
"relevance_score": 0.9181006550788879
}
]
}Reference
Responses API
POST /v1/responses
Overview
The Responses API is compatible with OpenAI’s Responses API and can be used in the OpenAI Python client. It can generate text or JSON output from text, image, or file inputs, and supports function calls and built-in tools (web search, file search, etc.).
Request
Context
| Key | Type | Description | Example |
|---|---|---|---|
| Base URL | string | Simple AI Inference URL for API requests | Simple AI Inference endpoint |
| Request Method | string | HTTP methods used in API requests | POST |
| Headers | object | Header information required for the request | { “Content-Type”: “application/json”, “Authorization”: “bearer sai-xxxxxxx…” } |
| Body Parameters | object | Parameters included in the request body | {“model”: “openai/gpt-oss-120b”, “input”: “What is the capital of South Korea?” } |
Table. Responses API - Context
Path Parameters
| Name | type | Required | Description | Default value | Boundary value | Example |
|---|---|---|---|---|---|---|
| None |
Table. Responses API - Path Parameters
Query Parameters
| Name | type | Required | Description | Default value | Boundary value | Example |
|---|---|---|---|---|---|---|
| None |
Table. Responses API - Query Parameters
Body Parameters
| Name | Name Sub | type | Required | Description | Default value | Boundary value | Example |
|---|---|---|---|---|---|---|---|
| model | - | string | ✅ | Model ID to use for response generation | “openai/gpt-oss-120b” | ||
| input | - | string / array | ✅ | Text/image/file input for the model. String or InputItem array | “Tell me a story” or [{ “role” : “user”, “content” : “message” }] | ||
| instructions | - | string | ❌ | System (developer) message inserted into the model context | null | “You are a helpful assistant." | |
| temperature | - | number | ❌ | Sampling temperature. The higher, the more random; the lower, the more deterministic. | 1 | 0 ~ 2 | 0.7 |
| top_p | - | number | ❌ | Limit the nucleus sampling probability. Changing it together with temperature is not recommended. | 1 | 0 ~ 1 | 0.9 |
| top_logprobs | - | integer | ❌ | Maximum log-probability token count to return at each token position | null | 0 ~ 20 | 3 |
| stream | - | boolean | ❌ | Whether to return results in streaming mode | false | true/false | true |
| stream_options | include_usage | object | ❌ | Control streaming options (e.g., whether to include usage statistics) | null | { “include_usage”: true } | |
| tools | - | array | ❌ | List of tools the model can invoke (built-in tools + function)
| [] | ||
| tool_choice | - | string / object | ❌ | How the model selects tools
|
| ||
| prompt_safety_model | - | string | ❌ | Specify a guard model for prompt inspection. When set, the prompt is first checked by the guard model, and if judged unsafe, the guard result is returned; if safe, the request is processed with the model specified in the model parameter. | “meta-llama/Llama-Guard-4-12B” | ||
| chat_template_kwargs | - | object | ❌ | Additional keyword arguments to pass to the template renderer. Used for per-model reasoning configuration (gpt-oss-120b uses the reasoning parameter, see Reasoning configuration for details). | null | { “enable_thinking”: true } | |
| reasoning | - | object | ❌ | gpt-oss-120b model’s reasoning configuration. Specify inference depth with the effort field (low/medium/high, default medium) | null | { “effort”: “high” } |
Table. Responses API - Body Parameters
Example
Color mode
curl -X 'POST' \
{Simple AI Inference endpoint}/v1/responses \
-H 'Authorization: bearer sai-xxxxxxx...' \
-H 'Content-Type: application/json' \
-d '{
"model": "openai/gpt-oss-120b",
"input": "What is the capital of South Korea?"
}'curl -X 'POST' \
{Simple AI Inference endpoint}/v1/responses \
-H 'Authorization: bearer sai-xxxxxxx...' \
-H 'Content-Type: application/json' \
-d '{
"model": "openai/gpt-oss-120b",
"input": "What is the capital of South Korea?"
}'Response
200 OK
| Name | Type | Description |
|---|---|---|
| id | string | Unique identifier of the response |
| object | string | Response object type (always “response”) |
| created_at | integer | Creation time (Unix timestamp, in seconds) |
| completed_at | integer or null | Completion time (exists only when in completed state) |
| status | string | Response status (completed/failed/in_progress/cancelled/queued/incomplete) |
| model | string | Used model name |
| output | array | Array of output items generated by the model |
| output[].type | string | Output item type (example: “message”) |
| output[].id | string | Output Item ID |
| output[].status | string | Item status (example: “completed”) |
| output[].role | string | Message author role (example: “assistant”) |
| output[].content | array | Content array |
| output[].content[].type | string | Content type (example: “output_text”) |
| output[].content[].text | string | Generated text |
| output[].content[].annotations | array | annotation array |
| error | object or null | Error information |
| incomplete_details | object or null | Reason for incompletion (reason: max_output_tokens / content_filter) |
| instructions | string or null | System/Developer Message |
| max_output_tokens | integer or null | Maximum output token count |
| parallel_tool_calls | boolean | Whether to allow parallel tool invocation |
| previous_response_id | string or null | Previous response ID |
| reasoning | object or null | reasoning composition (effort, summary) |
| store | boolean | Whether to save the response |
| temperature | number | Sampling temperature |
| text | object | Text response configuration (format, etc) |
| tool_choice | string / object | Tool selection method |
| tools | array | Tool List |
| top_p | number | Top P value |
| truncation | string | Cutting strategy |
| usage | object | Token Usage Statistics |
| usage.input_tokens | integer | Number of input tokens |
| usage.input_tokens_details.cached_tokens | integer | Number of cached tokens |
| usage.output_tokens | integer | Number of output tokens |
| usage.output_tokens_details.reasoning_tokens | integer | reasoning token count |
| usage.total_tokens | integer | Total token count |
| metadata | object | metadata |
Table. Responses API - 200 OK
Error Code
| HTTP status code | ErrorCode description |
|---|---|
| 400 | Bad Request |
| 422 | When the request is denied due to policies such as Prompt Guard |
| 500 | Internal Server Error |
Table. Responses API - Error Code
Example
Color mode
{
"id": "resp_xxxxxxxxxxxxxxxxxxxxxxxxxxxxxxxxxxxxxxxxxxxxxxxx",
"object": "response",
"created_at": 1741476542,
"status": "completed",
"completed_at": 1741476543,
"error": null,
"incomplete_details": null,
"instructions": null,
"max_output_tokens": null,
"model": "openai/gpt-oss-120b",
"output": [
{
"type": "message",
"id": "msg_xxxxxxxxxxxxxxxxxxxxxxxxxxxxxxxxxxxxxxxxxxxxxxxx",
"status": "completed",
"role": "assistant",
"content": [
{
"type": "output_text",
"text": "The capital of South Korea is Seoul.",
"annotations": []
}
]
}
],
"parallel_tool_calls": true,
"previous_response_id": null,
"reasoning": {
"effort": null,
"summary": null
},
"store": true,
"temperature": 1.0,
"text": {
"format": {
"type": "text"
}
},
"tool_choice": "auto",
"tools": [],
"top_p": 1.0,
"truncation": "disabled",
"usage": {
"input_tokens": 54,
"input_tokens_details": {
"cached_tokens": 0
},
"output_tokens": 8,
"output_tokens_details": {
"reasoning_tokens": 0
},
"total_tokens": 62
},
"metadata": {}
}{
"id": "resp_xxxxxxxxxxxxxxxxxxxxxxxxxxxxxxxxxxxxxxxxxxxxxxxx",
"object": "response",
"created_at": 1741476542,
"status": "completed",
"completed_at": 1741476543,
"error": null,
"incomplete_details": null,
"instructions": null,
"max_output_tokens": null,
"model": "openai/gpt-oss-120b",
"output": [
{
"type": "message",
"id": "msg_xxxxxxxxxxxxxxxxxxxxxxxxxxxxxxxxxxxxxxxxxxxxxxxx",
"status": "completed",
"role": "assistant",
"content": [
{
"type": "output_text",
"text": "The capital of South Korea is Seoul.",
"annotations": []
}
]
}
],
"parallel_tool_calls": true,
"previous_response_id": null,
"reasoning": {
"effort": null,
"summary": null
},
"store": true,
"temperature": 1.0,
"text": {
"format": {
"type": "text"
}
},
"tool_choice": "auto",
"tools": [],
"top_p": 1.0,
"truncation": "disabled",
"usage": {
"input_tokens": 54,
"input_tokens_details": {
"cached_tokens": 0
},
"output_tokens": 8,
"output_tokens_details": {
"reasoning_tokens": 0
},
"total_tokens": 62
},
"metadata": {}
}Prompt Guard response
If the prompt_safety_model parameter is set, the guard model checks the prompt first.
- safe:
modelThe request is processed unchanged with the model specified in themodelparameter. - unsafe: Returns a guard result in the following form and the request is terminated.
Color mode
{
  "guard_result": "unsafe",
  "categories": ["S1", "S2"],
  "categories_description": ["Violent Crimes", "Non-Violent Crimes"],
  "messages": [
    "Cannot fulfill the request due to violent content.",
    "Cannot respond as it may promote illegal activities."
  ]
}{
"guard_result": "unsafe",
"categories": ["S1", "S2"],
"categories_description": ["Violent Crimes", "Non-Violent Crimes"],
"messages": [
"Cannot fulfill the request due to violent content.",
"Cannot respond as it may promote illegal activities."
]
}Reasoning configuration
You can control the model-specific reasoning (inference mode) configuration via the chat_template_kwargs or reasoning parameters.
- gpt-oss-120b:
reasoningparameter’seffortfield specifies the inference depth. * (low/medium/high, default medium) - Other models:
chat_template_kwargsparameter is used, and please refer to Chat Completions API - Reasoning configuration for configuration.
| model | Parameter | basic reasoning | Configuration method |
|---|---|---|---|
| openai/gpt-oss-120b | reasoning | medium | { “effort”: “low” } / { “effort”: “medium” } (default) / { “effort”: “high” } |
| Other models | chat_template_kwargs | Varies by model | Chat Completions API - Reasoning Configuration see |
Table. Responses API - Model-specific Reasoning Configuration
Color mode
curl -X 'POST' \
   {Simple AI Inference endpoint}/v1/responses \
  -H 'Authorization: bearer sai-xxxxxxx...' \
  -H 'Content-Type: application/json' \
  -d '{
    "model": "openai/gpt-oss-120b",
    "input": "Please solve a complex math problem.",
    "reasoning": {
      "effort": "high"
    }
  }'
curl -X 'POST' \
{Simple AI Inference endpoint}/v1/responses \
-H 'Authorization: bearer sai-xxxxxxx...' \
-H 'Content-Type: application/json' \
-d '{
"model": "openai/gpt-oss-120b",
"input": "Please solve a complex math problem.",
"reasoning": {
"effort": "high"
}
}'Reference
Tokenize API
POST /tokenize
Overview
The Tokenize API converts text to token IDs. Supports two request types: Completion (prompt-based) and Chat (messages-based). Compatible with vLLM’s Tokenize API.
Request
Context
| Key | Type | Description | Example |
|---|---|---|---|
| Base URL | string | Simple AI Inference URL for API requests | Simple AI Inference endpoint |
| Request Method | string | HTTP methods used in API requests | POST |
| Headers | object | Header information required for the request | { “Content-Type”: “application/json”, “Authorization”: “bearer sai-xxxxxxx…” } |
| Body Parameters | object | Parameters included in the request body | { “model”: “openai/gpt-oss-120b”, “prompt”: “Hello, world!” } |
Table. Tokenize API - Context
Path Parameters
| Name | type | Required | Description | Default value | Boundary value | Example |
|---|---|---|---|---|---|---|
| None |
Table. Tokenize API - Path Parameters
Query Parameters
| Name | type | Required | Description | Default value | Boundary value | Example |
|---|---|---|---|---|---|---|
| None |
Table. Tokenize API - Query Parameters
Body Parameters - Common
| Name | Name Sub | type | Required | Description | Default value | Boundary value | Example |
|---|---|---|---|---|---|---|---|
| model | - | string | ✅ | Specify the model to use for tokenization | “openai/gpt-oss-120b” |
Table. Tokenize API - Body Parameters (Common)
Body Parameters - Completion method (prompt-based)
| Name | Name Sub | type | Required | Description | Default value | Boundary value | Example |
|---|---|---|---|---|---|---|---|
| prompt | - | string | ✅ | Text to be tokenized | “Hello, world!" | ||
| add_special_tokens | - | boolean | ❌ | If true, add special tokens (e.g., BOS) to the prompt. | true | true / false | true |
| return_token_strs | - | boolean | ❌ | If true, also return the token string corresponding to the token ID. | false | true / false | true |
Table. Tokenize API - Body Parameters (Completion mode)
Body Parameters - Chat method (based on messages)
| Name | Name Sub | type | Required | Description | Default value | Boundary value | Example |
|---|---|---|---|---|---|---|---|
| messages | role | string | ✅ | Message list containing conversation history | [{ “role”: “user”, “content”: “hi” }] | ||
| add_generation_prompt | - | boolean | ❌ | If true, add a generation prompt to the chat template. Cannot set to true simultaneously with continue_final_message. | true | true / false | true |
| continue_final_message | - | boolean | ❌ | If true, the last message is formatted in an open form without EOS. Instead of the model starting a new message, it continues that message. Cannot be set to true together with add_generation_prompt. | false | true / false | false |
| add_special_tokens | - | boolean | ❌ | If true, insert additional special tokens such as BOS in addition to the special tokens added by the chat template. Most models handle special tokens with the chat template, so the default false is recommended. | false | true / false | false |
| return_token_strs | - | boolean | ❌ | If true, also return the token string corresponding to the token ID. | false | true / false | true |
| chat_template | - | string | ❌ | Jinja template to use for conversion. Provide it if not defined in the tokenizer. | null | ||
| chat_template_kwargs | - | object | ❌ | Additional keyword arguments to pass to the template renderer | null | { “add_generation_prompt”: true } | |
| tools | - | array | ❌ | List of tools the model can invoke | null |
Table. Tokenize API - Body Parameters (Chat mode)
Example
Color mode
curl -X 'POST' \
  {Simple AI Inference endpoint}/tokenize \
  -H 'Authorization: bearer sai-xxxxxxx...' \
  -H 'Content-Type: application/json' \
  -d '{
    "model": "openai/gpt-oss-120b",
    "prompt": "Hello, world!"
  }'
curl -X 'POST' \
{Simple AI Inference endpoint}/tokenize \
-H 'Authorization: bearer sai-xxxxxxx...' \
-H 'Content-Type: application/json' \
-d '{
"model": "openai/gpt-oss-120b",
"prompt": "Hello, world!"
}'curl -X 'POST' \
{Simple AI Inference endpoint}/tokenize \
-H 'Authorization: bearer sai-xxxxxxx...' \
-H 'Content-Type: application/json' \
-d '{
"model": "openai/gpt-oss-120b",
"messages": [
{
"role": "user",
"content": "hi"
}
]
}'curl -X 'POST' \
{Simple AI Inference endpoint}/tokenize \
-H 'Authorization: bearer sai-xxxxxxx...' \
-H 'Content-Type: application/json' \
-d '{
"model": "openai/gpt-oss-120b",
"messages": [
{
"role": "user",
"content": "hi"
}
]
}'Response
200 OK
| Name | Type | Description |
|---|---|---|
| count | integer | Number of tokenized tokens |
| max_model_len | integer | Maximum token length supported by the model |
| tokens | array | List of tokenized token IDs |
| token_strs | array | List of token strings corresponding to token IDs (returned only when return_token_strs is true) |
Table. Tokenize API - 200 OK
Error Code
| HTTP status code | ErrorCode description |
|---|---|
| 400 | Bad Request (model field missing, request body missing, etc) |
| 404 | Model Not Found (unsupported model) |
| 500 | Internal Server Error |
Table. Tokenize API - Error Code
Example
Color mode
{
  "max_model_len": 1024,
  "count": 6,
  "tokens": [638357778, 638357778, 399020470, 1618501362, 2382766391, 2765235376],
  "token_strs": null
}
{
"max_model_len": 1024,
"count": 6,
"tokens": [638357778, 638357778, 399020470, 1618501362, 2382766391, 2765235376],
"token_strs": null
}{
"max_model_len": 1024,
"count": 6,
"tokens": [638357778, 638357778, 399020470, 1618501362, 2382766391, 2765235376],
"token_strs": ["<|im_start|>", "user", "<|im_sep|>", "hi", "<|im_end|>", ""]
}{
"max_model_len": 1024,
"count": 6,
"tokens": [638357778, 638357778, 399020470, 1618501362, 2382766391, 2765235376],
"token_strs": ["<|im_start|>", "user", "<|im_sep|>", "hi", "<|im_end|>", ""]
}Reference
Models API
GET /v1/models
Overview
The Models API returns a list of Simple AI Inference models. Compatible with OpenAI’s Models API.
Request
Context
| Key | Type | Description | Example |
|---|---|---|---|
| Base URL | string | Simple AI Inference URL for API requests | Simple AI Inference endpoint |
| Request Method | string | HTTP methods used in API requests | GET |
| Headers | object | Header information required for the request | { “Authorization”: “bearer sai-xxxxxxx…” } |
| Body Parameters | - | - | Since it is a GET request, there is no body. |
Table. Models API - Context
Path Parameters
| Name | type | Required | Description | Default value | Boundary value | Example |
|---|---|---|---|---|---|---|
| None |
Table. Models API - Path Parameters
Query Parameters
| Name | type | Required | Description | Default value | Boundary value | Example |
|---|---|---|---|---|---|---|
| None |
Table. Models API - Query Parameters
Body Parameters
Since it is a GET request, there is no body.
Example
Color mode
curl -X 'GET' \
  {Simple AI Inference endpoint}/v1/models \
  -H 'Authorization: bearer sai-xxxxxxx...'
curl -X 'GET' \
{Simple AI Inference endpoint}/v1/models \
-H 'Authorization: bearer sai-xxxxxxx...'Response
200 OK
| Name | Type | Description |
|---|---|---|
| object | string | Response object’s type (“list”) |
| data | array | Model object list |
| data[].id | string | Model identifier |
| data[].object | string | Object type (“model”) |
| data[].created | integer | Model creation time (Unix timestamp, in seconds) |
| data[].owned_by | string | Model owner |
Table. Models API - 200 OK
Error Code
| HTTP status code | ErrorCode description |
|---|---|
| 401 | Unauthorized (apikey missing or invalid) |
| 500 | Internal Server Error |
Table. Models API - Error Code
Example
Color mode
{
  "data": [
    {
      "id": "openai/gpt-oss-120b",
      "created": 1780979126,
      "object": "model",
      "owned_by": "SCP Simple AI Inference"
    },
    {
      "id": "Qwen/Qwen3-VL-Embedding-8B",
      "created": 1781512915,
      "object": "model",
      "owned_by": "SCP Simple AI Inference"
    },
    {
      "id": "Qwen/Qwen3-VL-Reranker-8B",
      "created": 1781512915,
      "object": "model",
      "owned_by": "SCP Simple AI Inference"
    }
  ],
  "object": "list"
}
{
"data": [
{
"id": "openai/gpt-oss-120b",
"created": 1780979126,
"object": "model",
"owned_by": "SCP Simple AI Inference"
},
{
"id": "Qwen/Qwen3-VL-Embedding-8B",
"created": 1781512915,
"object": "model",
"owned_by": "SCP Simple AI Inference"
},
{
"id": "Qwen/Qwen3-VL-Reranker-8B",
"created": 1781512915,
"object": "model",
"owned_by": "SCP Simple AI Inference"
}
],
"object": "list"
}Reference
1.4 - Data Privacy
Data Personal Information Protection and Security
Simple AI Inference operates its service with the principle that the confidentiality and security of customer data are paramount. Inference requests and response data transmitted through the service are processed only within the scope necessary to provide AI inference functionality and operate the service. This data will not be used for purposes other than providing the service.
Simple AI Inference adheres to the following principles.
- Customer request and response data are used solely for processing purposes related to service provision.
- We do not provide or share customers’ request and response content with third parties without the customer’s consent.
- Customer request and response data are not used as training data for AI model training or performance improvement.
1.5 - Release Note
Simple AI Inference
2026.07.16
NEW
official service launch- Simple AI Inference service has been officially launched.
- You can use various open-source LLM models serverlessly via an API.
- After creating Virtual Server, GPU Server, and Kubernetes Engine resources on Samsung Cloud Platform, you can use LLM on those resources.
2 - Simple AI Training
2.1 - Overview
Service Overview
Simple AI Training is a fully managed AI Training service that enables data scientists and machine learning engineers to train models at scale without the burden of infrastructure management. Through the Simple AI Training service, you can easily train models and obtain results by preparing only data and training code, without separate AI infrastructure or platforms for the environment.
Features
- Eliminate the complexity of infrastructure management: In the service background of Simple AI Training, elements required for the service are automatically provisioned, and after the service ends, resources are reclaimed, so separate infrastructure operation is not needed.
- Easy and fast model training: Instead of complex command-line interface (CLI), you can run model training tasks with just a few clicks through the web console interface. * The user only needs to specify the storage location of the training script and data, as well as the GPU instance.
- Highly Secure Data Transfer: It directly integrates with cloud data storage (Object Storage, etc.) to process large volumes of data while maintaining security without concerns of external leakage.
- Stable model training: Even if infrastructure errors occur during training, the system automatically detects and recovers from failures, providing an uninterrupted training environment.
- Efficient Cost Management: For lower‑priority training, you can use idle GPUs, or Samsung Cloud Platform automatically handles Spot interruption and resumption, enabling cost‑effective training.
Service configuration diagram
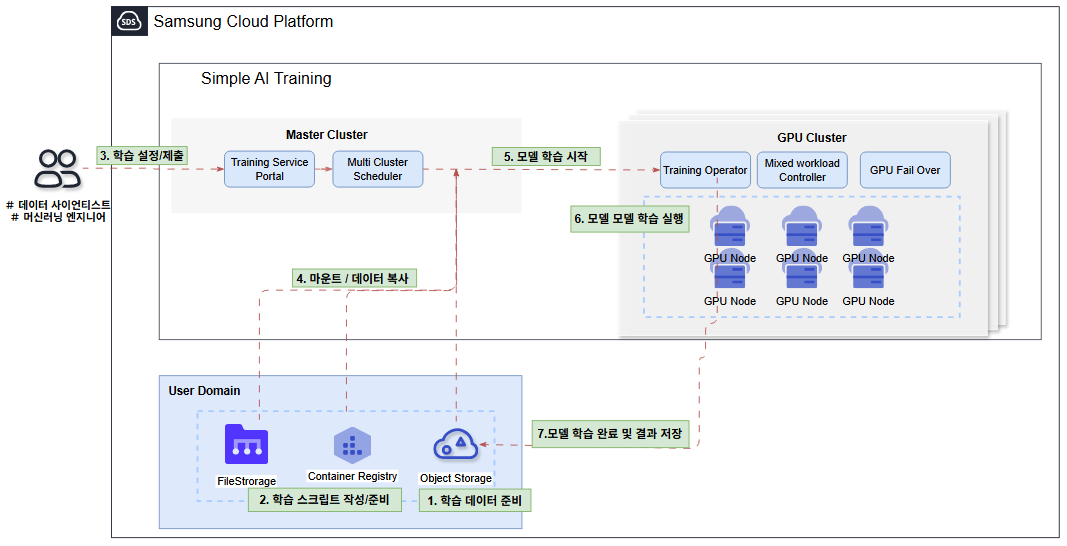
Provided features
Simple AI Training provides the following features.
- Serverless environment provision: Automate all processes from infrastructure setup, data loading, model training, to result storage, allowing you to focus solely on training.
- Distributed Training and Warm Pool Support: Automatically distribute large models or massive datasets across multiple instances, and during continuous training jobs, instantly reuse instances to reduce infrastructure provisioning time.
- Custom Container Support: You can import a user’s Docker container image for training (BYOC: Bring Your Own Container).
- Model Training Availability: Supports GPU Failover and Checkpointing, enabling smooth model training.
- GPU Failover: During training, if a GPU error occurs, the system automatically detects and recovers from the fault, preventing interruption caused by the error.
- Curcurrent Checkpointing: By storing intermediate training results in Object Storage, training can be resumed from the checkpoint if a failure occurs.
- Safe Data Access: Integrated with the cloud’s data storage (Object Storage), it can process data while maintaining security without worrying about external leaks.
- Providing Various Pricing Plans: By offering various pricing plans, you can reduce costs and conduct efficient training.
Information
Custom Container feature is scheduled to be available in September 2026.
Provided server
Simple AI Training provides the g2 server type (H100) and the g3 server type (B300). For detailed specifications of the server type, refer to 서버 타입.
| Category | Instance type |
|---|---|
| g2 | at.g2v12h1, at.g2v24h2, at.g2v48h4, at.g2v96h8, at.g2.spot |
| g3 | at.g3v16b1, at.g3v16b2, at.g3v16b4, at.g3v16b8, at.g3.spot |
Table. Simple AI Training provided server
Provision status by region
The regions that provide the Simple AI Training service are as follows.
| Region | Provision status |
|---|---|
| Korea West (kr-west1) | Provide |
| Korea East (kr-east1) | Not provided |
| South Korea South 1 (kr-south1) | Not provided |
| South Korea South 2 (kr-south2) | Not provided |
| South Korea South 3 (kr-south3) | Not provided |
Table. Simple AI Training regional availability status
Preceding Service
This is a list of services that must be pre‑configured before creating the service. For detailed information, refer to the guide provided for each service and prepare in advance.
| Service Category | service | Detailed description |
|---|---|---|
| Storage | File Storage | Storage that enables multiple client servers to share files over a network connection. |
| Storage | Object Storage | Object storage that simplifies data storage and retrieval |
| Container | Container Registry | A service that easily stores, manages, and shares container images. |
Table. Simple AI Training pre-service
2.1.1 - Server type
Simple AI Training is categorized according to the provided GPU type, and the GPU used for Simple AI Training is determined by the server type selected when creating a Training Job. Select the server type according to the specifications of the task you want to run in Simple AI Training. The server types supported by Simple AI Training are as follows.
at.g3v16b1
Category | Example | Detailed description |
|---|---|---|
| Service Category | at | Refers to the Simple AI Training service |
| Server generation | g3 | Provided server categories and generations
|
| CPU | v16 | vCore count
|
| GPU | b1 | GPU type and quantity
|
Table. Simple AI Training server type format
g2 server type
The g2 server type is a GPU Bare Metal Server that uses NVIDIA H100 SXM GPUs, making it suitable for large-scale high-performance AI computation.
- Provide 8 NVIDIA Hopper Architecture-based H100 GPUs
- Provides 1,979 TFLOPS of FP8 Tensor Core performance per GPU and 989 TFLOPS of FP16 Tensor Core performance.
- Supports up to 96 vCPUs and 2,048 GB of memory
- Supports up to 1,600 Gb/s NVIDIA InfiniBand RDMA network.
- Service network up to 100 Gbps
- 900 GB/s GPU P2P communication via NVSwitch within the node
| Instance classification | vCPU | Memory | GPU | Local Disk |
|---|---|---|---|---|
| at.g2v12h1 | 12 | 234 | 1 | 10 Gi |
| at.g2v24h2 | 24 | 468 | 2 | 20 Gi |
| at.g2v48h4 | 48 | 936 | 4 | 40 Gi |
| at.g2v96h8 | 96 | 1,872 | 8 | 80 Gi |
| at.g2.spot | 12 | 234 | 1 | 10 Gi |
Table. Multi-node GPU Cluster > H100 server type
g3 server type
The g3 server type is a GPU Bare Metal Server that uses the NVIDIA B300 SXM GPU, making it suitable not only for large-scale high-performance AI computation but also for LLM inference and AI deployment for generative AI.
- Provides 8 NVIDIA Blackwell Ultra Architecture-based B300 GPUs
- Provides 13.5 PFLOPS FP4 Tensor Core and 4.5 PFLOPS FP8 Tensor Core performance per GPU.
- Supports up to 128 vCPUs and 4,096 GB of memory
- Supports up to 6,400 Gb/s NVIDIA InfiniBand RDMA network.
- Service network up to 100 Gbps
- 1.8 TB/s GPU P2P communication via NVSwitch within a node
| Instance classification | vCPU | Memory | GPU | Local Disk |
|---|---|---|---|---|
| at.g3v16b1 | 16 | 480 | 1 | 10 Gi |
| at.g3v32b2 | 32 | 960 | 2 | 20 Gi |
| at.g3v64b4 | 64 | 1,920 | 4 | 40 Gi |
| at.g3v128b8 | 128 | 3,840 | 8 | 80 Gi |
| at.g3.spot | 16 | 480 | 1 | 10 Gi |
Table. Multi-node GPU Cluster > B300 server type
2.1.2 - ServiceWatch metric
Simple AI Training sends metrics to ServiceWatch. The metrics provided by default monitoring are data collected at 5‑minute intervals.
Reference
To view metrics in ServiceWatch, see the ServiceWatch guide.
Basic Metrics
The following are the basic metrics for the Simple AI Training namespace. The indicators whose names are displayed in bold below are the key indicators selected from the basic indicators provided by Simple AI Training. The main metrics are used to build service dashboards that are automatically created for each service in ServiceWatch. Each metric guides users via the user guide on which statistical value is meaningful when querying the metric, and among the meaningful statistics, the values displayed in bold are the primary statistics.
In the service dashboard or monitoring tab, you can view key metrics through primary statistical values. Or you can also view the key metrics on the monitoring tab of the Simple AI Training detail page. In ServiceWatch’s metrics menu, you can also view utilization by GPU device.
| Performance Item (Metric Name) | Detailed description | unit | meaningful statistics |
|---|---|---|---|
| CPU Usage | Average number of CPU cores used by the Training Job Pod in the last 5 minutes | Cores |
|
| GPU Utilization | GPU utilization in the Training Job | Percent |
|
| Memory Usage | Memory currently used in the Training Job Pod | Bytes |
|
Table. Simple AI Training basic metrics
2.2 - How-to guides
You can create a Training Job for the Simple AI Training service, choose the AI training method, and proceed with training.
Creating a Training Job
To use the Simple AI Training service, you must first create a Training Job. To create a Trainging Job, follow these steps.
All Services > AI/ML > Simple AI Training Click the menu. 1. Go to the Service Home page of Simple AI Training.
On the Service Home page, click the Create Training Job button. 2. Create Training Job Go to the page.
On the Training Job creation page, enter the information required for service creation and select detailed options.
- Select the required information related to the Training Job in the Required Information Input area.
Category required statusDetailed description Learning type Required Select training mode - On-Demand Training: Securely conduct training by preempting a server at the desired time
- Concurrent Checkpointing feature applied to support efficient checkpoint storage
- Spot Training: Conduct cost‑effective training for lower‑priority jobs using idle GPUs
- Concurrent Checkpointing and Mixed workload features applied to support training continuity (automatic pause and resume)
- For detailed information on the Concurrent Checkpointing feature, see the Concurrent Checkpointing 개요 reference
Training Job name Required Enter the Training Job name - Enter using lowercase English letters, numbers, and special characters (-.) within 3 ~ 63 characters
- The name must start and end with a lowercase English letter or number
Distributed Framework Required Select version of the distributed Framework - PyTorch, DeepSpeed selectable
Table. Required input fields for Training Job - On-Demand Training: Securely conduct training by preempting a server at the desired time
- Select the options required to create a Training Job in the Service Information Input area.
Category required statusDetailed description Job Failover Selection Select whether to use the Job Failover feature - Spot Training cannot be used with Job Failover
- For detailed information about the Job Failover feature, see Job Failover 사용하기
Resource allocation Required Select the number of GPUs and memory size to use for training Number of nodes Required Set the scale of distributed training - Distributed training is possible from 2 nodes onward
Shared Memory Required Set the memory to be shared between processes for distributed training and distributed data processing. Table. Training Job service information input items - In the AI Training Image Information Input area, select the options required to create the service.
Category required statusDetailed description AI Training Image URL Required Enter the user’s container registry (SCR, Docker Hub, etc.) address User ID Selection User ID of the image repository Password Required Password for the image repository Table. Training Job AI Training Image Information Input Items - Training Command and Volume Information Input area, please input or select the required information.
Category required statusDetailed description Storage connection Selection Select whether to use an additional volume - When used, enter the additional volume mount path and training script URL
- File Storage Volume Mount Path: Data path to use when connecting to File Storage (e.g., /root)
- Import Training Script (Object Storage): Enter the script URL when connecting to Object Storage
Command Required Enter command information within 3 to 1,024. Table. Training Job AI Training Image Information Input Items - Additional Information Input area, please enter or select the required information.
Category required statusDetailed description tag Selection Add Tag - Up to 50 can be added per resource
- After clicking the Add Tag button, enter or select Key, Value values
Table. Training Job training command and volume information input items
- Select the required information related to the Training Job in the Required Information Input area.
Summary Check the detailed information generated in the panel, and click the Create button.
When the popup notifying creation opens, click the Confirm button.
- When creation is complete, check the created resources on the Training Job List page.
Check detailed information of Training Job
You can view and edit the complete resource list and detailed information of the Training Job service. To view the details of a Training Job, follow these steps.
- Click the All Services > AI/ML > Simple AI Training menu. 1. Go to the Service Home page of Simple AI Training.
- On the Service Home page, click the Training Job menu. 2. Navigate to the Training Job List page.
- On the Training Job List page, click the resource to view detailed information. 3. Navigate to the Training Job Details page.
- Training Job Details page consists of the Details, Monitoring, Logs, Tags tabs.
Category Detailed description Service status CloudML status - Creating: Creating
- Deployed: Created / operating normally
- Updating: Updating settings
- Terminating: Deleting
- Error: Error occurred
Delete Training Job Button to cancel the service Table. Training Job detail page items
- Training Job Details page consists of the Details, Monitoring, Logs, Tags tabs.
Detailed Information
Training Job List page allows you to view detailed information of the selected resource.
| Category | Detailed description |
|---|---|
| service | Service name |
| Resource Type | Resource Type |
| SRN | Unique resource ID in Samsung Cloud Platform |
| Resource name | Resource Name |
| Resource ID | Unique resource ID in the service |
| Constructor | User who created the service |
| Creation Date/Time | Service creation date and time |
| Modifier | User who edited the service information |
| Modification date | Date and time the service information was modified |
| Learning Type | AI Training learning method |
| Training Job name | Training Job name |
| Distributed Framework | Types of distributed frameworks |
| Job Failover | Whether to use the Job Failover feature |
| Resource allocation | GPU and memory information allocated as resources |
| Number of nodes | Number of nodes |
| Shared Memory | Shared memory information between processes |
| Command | Command information entered when creating a Training Job |
| Image URL | User’s container registry address |
| File Storage Volume Mount Point | Mount path of the connected File Storage when using an additional volume |
| Traing Script URL | Object Storage script URL connected when using an additional volume |
Table. Training Job detailed information items
Monitoring
Training Job List page allows you to view the monitoring information of the selected resource.
| Category | Detailed description |
|---|---|
| Monitoring | Display ServiceWatch service’s monitoring information in conjunction
|
Table. Training Job Monitoring Tab Items
Reference
The monitoring metrics for Simple AI Training are in the ServiceWatch 지표.
log
On the Training Job List page, you can view the log information of the selected resource.
| Category | Detailed description |
|---|---|
| Job log | Display ServiceWatch service log information linked
|
Table. Training Job log tab items
Reference
The logs of the Training Job are provided in conjunction with the ServiceWatch service.
To check the Training Job logs, please refer to Training Job 로그 확인하기.
Tag
Training Job list page lets you view the tag information of the selected resource, and you can add, modify, or delete it.
| Category | Detailed description |
|---|---|
| Tag list | Tag list
|
Table. Training Job Tag Tab Items
Checking Training Job logs
You can view the logs of a Training Job in the ServiceWatch service. To view the logs of the Training Job, follow these steps.
- Click the All Services > AI/ML > Simple AI Training menu. 1. Go to the Service Home page of Simple AI Training.
- On the Service Home page, click the Training Job menu. 2. Go to the Training Job List page.
- Training Job list page: select the resource to view logs. 3. Navigate to the Training Job Details page.
- On the Training Job Details page, click the Log tab. 4. The log information for this job is displayed.
- Click the name below the Training Job name in the log information. 5. Navigate to the ServiceWatch Log Group Details page.
- Log Group Details page, click the Log Stream tab. 6. The list of log streams is displayed.
- Click the log stream name to verify (example: master). 7. The logs of the stream are displayed in chronological order.
- When a failover occurs, the logs of the training that was interrupted due to the failure and the logs of the training that was restarted after reallocation are recorded together in a single stream.
- If the initialization log displayed at the start of training (e.g., Starting dataset initialization) appears more than once, you can confirm that the training was rescheduled and restarted.
Delete Training Job
You can delete unused Training Jobs. To delete a Training Job, follow these steps.
- All Services > AI/ML > Simple AI Training Click the menu. 1. Go to the Service Home page of Simple AI Training.
- On the Service Home page, click the Training Job menu. 2. Go to the Training Job List page.
- On the Training Job List page, select the resources to delete, then click the Delete button at the top of the list.
- Click the resource to delete, go to the Training Job Details page, and you can also delete it individually.
- When a pop-up notifying deletion opens, click the Confirm button.
Using the Training Workspace
You can use the Simple AI Training service by using the Training Workspace.
Create Training Workspace
To create a Training Workspace, follow the steps below.
Click the All Services > AI/ML > Simple AI Training menu. 1. Go to the Service Home page of Simple AI Training.
Click the Training Workspace menu on the Service Home page. 2. Go to the Training Workspace List page.
On the Training Workspace List page, click the Create Service button. 3. Go to the Create Training Workspace page.
Enter the information required to create the service and select detailed options.
- In the Service Information Input area, select the options required to create a Training Workspace.
Category required statusDetailed description Training Workspace name Required Enter the Training Workspace name - Enter using lowercase English letters, numbers, and special characters (-.) within 63 characters
Resource allocation Required Select the number of GPUs and memory size to use for training Number of nodes Required Set the scale of distributed training - Distributed training is possible from 2 nodes onward
Contract period Required Select the service usage agreement period Table. Training Workspace service information input items
- In the Service Information Input area, select the options required to create a Training Workspace.
Summary Check the detailed information and estimated billing amount generated in the panel, and click the Create button.
When the popup notifying creation opens, click the Confirm button.
- When creation is complete, check the resources you created on the Training Workspace List page.
Edit Training Workspace
You can modify the number of nodes in the Training Workspace. To modify the Training Workspace, follow these steps.
- Click the All Services > AI/ML > Simple AI Training menu. 1. Go to the Service Home page of Simple AI Training.
- On the Service Home page, click the Training Workspace menu. 2. Navigate to the Training Workspace List page.
- On the Training Workspace List page, click the More > Edit button of the resource you want to modify. 3. Go to the Training Workspace Edit page.
- On the Training Workspace Edit page, check and modify the node count.
- When the edit is complete, click the Confirm button.
Delete Training Workspace
You can delete an unused Training Workspace. To delete the Training Workspace, follow these steps.
- All Services > AI/ML > Simple AI Training Click the menu. 1. Go to the Service Home page of Simple AI Training.
- On the Service Home page, click the Training Workspace menu. 2. Navigate to the Training Workspace List page.
- On the Training Workspace List page, select the resource to delete, then click the Cancel Service button at the top of the list.
- You can also delete the resource individually by clicking the More > Service Cancellation button.
- When a pop-up indicating deletion opens, click the Confirm button.
2.2.1 - Using Job Failover
Job Failover is a feature that automatically reallocates to normal resources to continue training, ensuring that training is not interrupted even if hardware failures such as GPUs occur while training with On-Demand Training. By using the Job Failover feature, you can ensure training continuity without the user having to manually detect failures or recreate the job when system errors or hardware faults are detected.
Job Failover Overview
During a Training Job, various hardware issues such as GPU errors or node failures can occur on the node where the training is deployed. When you use the Job Failover feature, the system automatically avoids the failed node when such hardware failures are detected, reassigns the Training Job to healthy resources, and resumes training. The main operation of Job Failover is as follows.
- Fault Detection: Continuously monitors the GPU and hardware status of nodes running training to detect anomalies.
- Automatic Reallocation: If a hardware failure is detected, the system excludes the failed node and reallocates the Training Job to healthy nodes, restarting the training.
- Unnecessary relocation prevention: User code errors, configuration errors, and similar issues that are not hardware failures are excluded from the Failover target.
- Retry Count Limit: Failover is performed only within the specified maximum number of attempts (3), and if this is exceeded, training ends in failure.
Job Failover Usage Conditions
- Job Failover can be used only when the training type is selected as On-Demand Training when creating a Training Job. * When Spot Training is used, Job Failover cannot be used.
- You can select whether to use the Job Failover feature in the Service Information input area’s Job Failover item when creating a Training Job. * After creation, you can check its usage on the Training Job Details page’s Details tab.
Information
- If training is reallocated to another resource due to failover, the memory state at the point where training was interrupted is not retained. * To continue training, we recommend configuring the training script to save checkpoints to shared storage (File Storage, Object Storage).
- Failover does not always guarantee immediate execution.
- Jobs that are reassigned by failover are set with a high priority, so they receive resources and run before other jobs that are waiting.
- However, depending on the priority and queue order of Jobs already in the queue at the time of reallocation, a reallocated Job may be executed later than those Jobs.
- While checking the node status to decide on Job relocation (up to 5 minutes), the Job may remain in Pending - failoverinprogress state.
Check error cause
When a training interruption occurs, the system checks the node’s GPU and hardware status to determine whether the cause is a hardware failure or a non‑hardware issue such as a user application or configuration. Whether to perform failover is determined based on this judgment result.
If it is judged to be a hardware failure
If a physical or hardware-level error that prevents normal GPU usage is detected, it is considered a hardware failure and a failover is performed. This error prevents further training on the affected node, so the failed node is excluded and the workload is reallocated to healthy resources to resume training. Examples of errors that are considered hardware failures are as follows.
| XID code | Error | Explanation |
|---|---|---|
| 48 | GPU memory (HBM) uncorrectable error (Uncorrectable Double Bit ECC) |
|
| 79 | GPU has been detached from the system (GPU fallen off the bus) |
|
| 94, 95 | GPU internal memory (SRAM) unrecoverable error |
|
| - | GPU overheating, power supply unit (PSU), PCIe, and other hardware component failures |
|
Table: Examples of errors considered hardware failures
Reference
XID code: a number assigned by the NVIDIA GPU driver to differentiate error types, which can be referenced to identify the cause of errors in GPU logs.
If it is judged to be an internal error
If the cause of the training interruption is determined to be user application code or configuration issues rather than a hardware failure, there is a high likelihood that the same problem will recur even after redeployment, so we reject the Failover and terminate in an internalerror state. Examples of errors that are considered internal errors are as follows.
| XID code | Error | Explanation |
|---|---|---|
| - | Forced termination due to insufficient memory (Out Of Memory) |
|
| 31 | GPU memory page fault |
|
| 43 | GPU processing halted |
|
| 13 | Graphics and Compute Engine Exception |
|
| - | GPU configuration warnings, software errors, etc. |
|
Table. Example of errors considered internal errors
Reference
- XID code: a number assigned by the NVIDIA GPU driver to differentiate error types, which can be referenced to identify the cause of errors in GPU logs.
- In this case, check the training script, execution Command, input data, resource settings, etc. * For detailed information on how to check logs, see Job Failover 로그 확인하기.
Check Job Failover status
- Click the All Services > AI/ML > Simple AI Training menu. 1. Go to the Service Home page of Simple AI Training.
- On the Service Home page, click the Training Job menu. 2. Navigate to the Training Job List page.
- On the Training Job List page, check the Job’s status.
- The state flow based on whether failover is used and the hardware fault assessment result is as follows.
Category Detailed description Failover success When a hardware failure is detected and the resources have been successfully reallocated to normal resources - Running → Pending - failoverinprogress → Running If the status changes in this order, the failover is performed correctly and training resumes
Failover Rejection The training was halted, but since no hardware failure signal was detected, it was determined not to be a candidate for reallocation - Running → Pending - failoverinprogress → Pending - internalerror If the status changes in this order, the failover is rejected
- Since it may be caused by non-hardware reasons such as user code errors, checking the logs is necessary
Failover not configured When Job Failover is disabled - If a training interruption occurs, do not attempt reallocation and terminate the training in the Running → Failed order
Table. State flow according to Job Failover - The main status values displayed during failover are as follows.
status Detailed description Pending - failoverinprogress Detecting hardware failures and assessing failover feasibility, or currently reallocating to normal resources. Pending - maxretriesexceeded State in which failover exceeds the maximum number of attempts and no further reallocation is performed. Pending - imagepullbackoff Unable to load the container image, preventing training from starting (image URL and authentication information need to be verified) Pending - internalerror The failover was denied because it was determined that the system is not a failover candidate, such as when no hardware fault signal is detected. Table. Main status values during Job Failover
- The state flow based on whether failover is used and the hardware fault assessment result is as follows.
Check Job Failover logs
When a failover occurs, you can view the logs of the previous training that was interrupted by the failure and the logs of the training that resumed after reallocation together in a single log stream.
Reference
The logs of the Training Job are provided in conjunction with the ServiceWatch service.
How to check the Training Job logs, please refer to Training Job 로그 확인하기.
- Click the All Services > AI/ML > Simple AI Training menu. 1. Go to the Service Home page of Simple AI Training.
- On the Service Home page, click the Training Job menu. 2. Navigate to the Training Job List page.
- On the Training Job List page, select the resource whose logs you want to view. 3. Navigate to the Training Job Details page.
- On the Training Job Details page, click the Log tab. 4. The log information for this job is displayed.
- Click the name below the Training Job name in the log information. 5. Go to the ServiceWatch Log Group Details page.
- On the Log Group Details page, click the Log Stream tab. 6. The list of log streams is displayed.
- Click the log stream name to check (e.g., master). 7. The logs for this stream are displayed in chronological order.
- When a failover occurs, the logs of the training that was interrupted due to the failure and the logs of the training that was restarted after reallocation are recorded together in a single stream.
- If the initialization log displayed at the start of training (e.g., Starting dataset initialization) appears more than once, you can confirm that the training was rescheduled and restarted.
2.2.2 - Concurrent Checkpointing
Concurrent Checkpointing is a feature that asynchronously saves checkpoints even during Forward/Backward operations, unlike the traditional method. Therefore, by using this feature you can reduce the overhead of checkpoint saving, efficiently shorten the overall training time, and automatically save the training progress that might be lost if an unexpected interruption occurs.
Concurrent Checkpointing Overview
The Training Jobs provided by Simple AI Training include On-Demand Training type and Spot Training type. Concurrent Checkpointing can be used in both types, but the scope of its functionality differs by type. The scope of use for each type is as follows.
| type | Scope of use |
|---|---|
| On-Demand Training |
|
| Spot Training |
|
Table. Scope of Concurrent Checkpointing usage by Training Job type
Using Concurrent Checkpointing
Preliminary preparation: Write script
The user can use the save method of Trainer and Concurrent Checkpoint simultaneously.
Reference
- The checkpoints saved by Concurrent Checkpoint are not in safetensor format. * Therefore, if you need the safetensor format in the future, we recommend also using the checkpointing feature of the Huggingface Trainer.
- The
output_diris shared among theTrainingArgument. - Concurrent Checkpoint maintains up to 3 checkpoints.
Spot Training Usage
The script example when using Spot Training is as follows.
|language = python | title = Training Script Example | collapse = true
Color mode
// Written based on transformers==5.10.2.

import os
import torch
from transformers import (
    AutoTokenizer,
    AutoModelForCausalLM,
    Trainer,
    TrainingArguments,
    DataCollatorForLanguageModeling
)
from datasets import load_dataset
import json
from datastates.llm import DecoratedCheckpointing
import argparse
import logging
import time

def parse_args():
    parser = argparse.ArgumentParser()
    parser.add_argument(
        --local_rank
        type=int,
        default=-1,
        help="local rank passed from distributed launcher (Deepspeed, torchrun, etc.)"
    )
    return parser.parse_args()

if __name__ == "__main__":
    args = parse_args()

    model_path="/root/.cache/huggingface/hub/models--meta-llama--Llama-3.2-1B/snapshots/4e20de362430cd3b72f300e6b0f18e50e7166e08"

    # Load tokenizer and model
    tokenizer = AutoTokenizer.from_pretrained(model_path, local_files_only=True)

    # Set pad token to EOS if not already defined
    if tokenizer.pad_token is None:
        tokenizer.pad_token = tokenizer.eos_token

    # Load WikiText-2 dataset
    dataset = load_dataset("wikitext", "wikitext-2-raw-v1",cache_dir="/root/.cache/huggingface/datasets")

    # Tokenization function
    def tokenize_function(examples):
        return tokenizer(
            examples["text"],
            truncation=True,
            max_length=128,
            padding="max_length"
        )

    # Tokenize the dataset
    tokenized_dataset = dataset.map(
        tokenize_function,
        batched=True,
        remove_columns=["text"]
    )

    train_dataset = tokenized_dataset["train"]
    valid_dataset = tokenized_dataset["validation"]

    data_collator = DataCollatorForLanguageModeling(
        tokenizer=tokenizer,
        mlm=False  # Causal LM (not masked LM)
    )

    script_directory = os.path.dirname(os.path.abspath(__file__))
    ds_config_path = os.path.join(script_directory, "ds_config.json")

    training_args = TrainingArguments(
        output_dir="./results",
        num_train_epochs=3,
        per_device_train_batch_size=2,  # Adjust based on GPU memory
        gradient_accumulation_steps=4,  # Effective batch size = batch_size * gradient_accumulation_steps
        save_strategy="steps",
        save_steps=200,
        logging_steps=2,
        eval_strategy="steps",
        eval_steps=100,
        bf16=True,  # Enable BF16 mixed precision (use fp16 if unsupported)
        deepspeed=ds_config_path,  # Path to DeepSpeed config file
        report_to="none",
    )

    model = AutoModelForCausalLM.from_pretrained( model_path,  local_files_only=True, low_cpu_mem_usage=True, device_map=None)

    # Initialize Trainer
    trainer = Trainer(
        model=model,
        args=training_args,
        train_dataset=train_dataset,
        eval_dataset=valid_dataset,  # Optional: validation set for evaluation
        processing_class=tokenizer,
        data_collator=data_collator,
    )

       # ADD configuration for Concurrent CHECKPOINT ENGINE
    config = {
        "host_cache_size": 50,
        "parser_threads": 1,
        "pin_host_cache": True,
        "trainer": trainer,
    }

    ckpt_engine = DecoratedCheckpointing(runtime_config=config, rank=args.local_rank)

resume_from_checkpoint=False

if os.getenv("CKPT_LAST_STEP") != None :
resume_from_checkpoint=True

trainer.train(resume_from_checkpoint=resume_from_checkpoint)
// Written based on transformers==5.10.2.
import os
import torch
from transformers import (
AutoTokenizer,
AutoModelForCausalLM,
Trainer,
TrainingArguments,
DataCollatorForLanguageModeling
)
from datasets import load_dataset
import json
from datastates.llm import DecoratedCheckpointing
import argparse
import logging
import time
def parse_args():
parser = argparse.ArgumentParser()
parser.add_argument(
--local_rank
type=int,
default=-1,
help="local rank passed from distributed launcher (Deepspeed, torchrun, etc.)"
)
return parser.parse_args()
if __name__ == "__main__":
args = parse_args()
model_path="/root/.cache/huggingface/hub/models--meta-llama--Llama-3.2-1B/snapshots/4e20de362430cd3b72f300e6b0f18e50e7166e08"
# Load tokenizer and model
tokenizer = AutoTokenizer.from_pretrained(model_path, local_files_only=True)
# Set pad token to EOS if not already defined
if tokenizer.pad_token is None:
tokenizer.pad_token = tokenizer.eos_token
# Load WikiText-2 dataset
dataset = load_dataset("wikitext", "wikitext-2-raw-v1",cache_dir="/root/.cache/huggingface/datasets")
# Tokenization function
def tokenize_function(examples):
return tokenizer(
examples["text"],
truncation=True,
max_length=128,
padding="max_length"
)
# Tokenize the dataset
tokenized_dataset = dataset.map(
tokenize_function,
batched=True,
remove_columns=["text"]
)
train_dataset = tokenized_dataset["train"]
valid_dataset = tokenized_dataset["validation"]
data_collator = DataCollatorForLanguageModeling(
tokenizer=tokenizer,
mlm=False # Causal LM (not masked LM)
)
script_directory = os.path.dirname(os.path.abspath(__file__))
ds_config_path = os.path.join(script_directory, "ds_config.json")
training_args = TrainingArguments(
output_dir="./results",
num_train_epochs=3,
per_device_train_batch_size=2, # Adjust based on GPU memory
gradient_accumulation_steps=4, # Effective batch size = batch_size * gradient_accumulation_steps
save_strategy="steps",
save_steps=200,
logging_steps=2,
eval_strategy="steps",
eval_steps=100,
bf16=True, # Enable BF16 mixed precision (use fp16 if unsupported)
deepspeed=ds_config_path, # Path to DeepSpeed config file
report_to="none",
)
model = AutoModelForCausalLM.from_pretrained( model_path, local_files_only=True, low_cpu_mem_usage=True, device_map=None)
# Initialize Trainer
trainer = Trainer(
model=model,
args=training_args,
train_dataset=train_dataset,
eval_dataset=valid_dataset, # Optional: validation set for evaluation
processing_class=tokenizer,
data_collator=data_collator,
)
# ADD configuration for Concurrent CHECKPOINT ENGINE
config = {
"host_cache_size": 50,
"parser_threads": 1,
"pin_host_cache": True,
"trainer": trainer,
}
ckpt_engine = DecoratedCheckpointing(runtime_config=config, rank=args.local_rank)
resume_from_checkpoint=False
if os.getenv("CKPT_LAST_STEP") != None :
resume_from_checkpoint=True
trainer.train(resume_from_checkpoint=resume_from_checkpoint)다음 절차의 예시를 참고하여 스크립트를 작성하세요.
- Import Concurrent CHECKPOINT
from datastates.llm import DecoratedCheckpointing
...
- ADD configuration for Concurrent CHECKPOINT ENGINE
config = {
       "host_cache_size": 50,
       "parser_threads": 1,
       "pin_host_cache": True,
       "trainer": trainer,
}
Reference
It is recommended to enter the input exactly as shown, and if a memory issue occurs, request the available host_cache_size value from the responsible person.
host_cache_size: The size of the host’s pinned memory to be used, in GB.trainer: Insert the huggingface trainer initialized above.
- Initialize Concurrent CHECKPOINT ENGINE
ckpt_engine = DecoratedCheckpointing(runtime_config=config, rank=args.local_rank)
- Set Concurrent CHECKPOINT ENGINE parameter
resume_from_checkpoint=False

if os.getenv("CKPT_LAST_STEP") != None :
       resume_from_checkpoint=True

trainer.train(resume_from_checkpoint=resume_from_checkpoint)
Reference
Reallocating idle GPUs enables the option to automatically load checkpoints and allow uninterrupted training when resuming.
Concurrent Checkpoint save path
The save path is based by default on the TrainingArgument’s output_dir.
It is stored under the concurrent_checkpoint directory in the subpath of output_dir.
Reference
When loading a checkpoint automatically or manually, it loads the most recent checkpoint (e.g., the one with the highest step number) saved in the
output_dir path.Using On-Demand Training
The method for using On-Demand Training is similar to that of Spot Training.
Information
The automatic Parameter feature is not currently supported and can only be enabled manually.
Initial training
Write the script by referring to the example of the following procedure.
- Import Concurrent CHECKPOINT
from datastates.llm import DecoratedCheckpointing
...
- ADD configuration for Concurrent CHECKPOINT ENGINE
config = {
       "host_cache_size": 50,
       "parser_threads": 1,
       "pin_host_cache": True,
       "trainer": trainer,
}
Reference
It is recommended to enter the input exactly as shown, and if a memory issue occurs, request the available host_cache_size value from the responsible person.
host_cache_size: The size of the host’s pinned memory to be used, in GB.trainer: Insert the huggingface trainer that was initialized above.
- Initialize Concurrent CHECKPOINT ENGINE
ckpt_engine = DecoratedCheckpointing(runtime_config=config, rank=args.local_rank)
- Set Concurrent CHECKPOINT ENGINE parameter
trainer.train(resume_from_checkpoint=False)
When manually activated
If a valid checkpoint is found in the output_dir path specified during the initial training, the checkpoint path is directly specified during model initialization when re-running the training.
Or, when re-running training, specify the same output_dir as before and configure as follows to automatically load the latest checkpoint.
Caution
If activated manually, the validity of the checkpoint cannot be guaranteed.
Write the script by referring to the example of the following procedure.
- Import Concurrent CHECKPOINT
from datastates.llm import DecoratedCheckpointing
...
- ADD configuration for Concurrent CHECKPOINT ENGINE
config = {
       "host_cache_size": 50,
       "parser_threads": 1,
       "pin_host_cache": True,
       "trainer": trainer,
}
Reference
It is recommended to enter the input exactly as shown, and if a memory issue occurs, request the available host_cache_size value from the responsible person.
host_cache_size: The size of the host’s pinned memory to be used, in GB.trainer: Insert the huggingface trainer that was initialized above.
- Initialize Concurrent CHECKPOINT ENGINE
ckpt_engine = DecoratedCheckpointing(runtime_config=config, rank=args.local_rank)
- Set Concurrent CHECKPOINT ENGINE parameter
trainer.train(resume_from_checkpoint=True)
Run Job
Execute by adding functional environment variables together with the command you want to use in the Command field of the Training Job creation screen.
notice
The method to run a Training Job is the same for both On-Demand Training type and Spot Training type.
| language = go
PYTHONPATH=$CHECKPOINT_VENDOR HF_DATASETS_OFFLINE="1" ${USER_SCRIPT}
PYTHONPATH=$CHECKPOINT_VENDOR: Sets the library path to be loaded for enabling the feature.HF_DATASETS_OFFLINE=“1”: The Samsung Cloud Platform network does not support huggingface login or model/dataset download. * Therefore, set it to prevent huggingface network calls from user scripts.
Example
Basic code
| language = actionscript
- python file
python /mnt/experiment/training/compatiblitiy-test/version_check.py
- deepspeed
deepspeed --num_gpus=2 /mnt/experiment/training/compatiblitiy-test/train_llama_8b-demo.py
- accelerate
accelerate launch --config_file /mnt/experiment/training/compatiblitiy-test/sat-test/fsdp_config.yaml --num_processes 4 /mnt/experiment/training/compatiblitiy-test/sat-test/train_llama_1b-demo.py
When using the function
| language = actionscript
- python file
PYTHONPATH=$CHECKPOINT_VENDOR python /mnt/experiment/training/compatiblitiy-test/version_check.py
- deepspeed
PYTHONPATH=$CHECKPOINT_VENDOR deepspeed --num_gpus=4 /mnt/experiment/training/compatiblitiy-test/train_llama_8b-demo.py
- accelerate
PYTHONPATH=$CHECKPOINT_VENDOR accelerate launch --config_file /mnt/experiment/training/compatiblitiy-test/sat-test/fsdp_config.yaml --num_processes 4 /mnt/experiment/training/compatiblitiy-test/sat-test/train_llama_1b-demo.py
Caution
When this feature is enabled, the Python package version installed in the library path takes precedence.
(Example: Run user image with torch version 2.11 → torch 2.12.1)
transformers==5.10.2
numpy==2.4.6
pybind11==3.0.4
safetensors==0.8.0
torch==2.12.1
torchvision==0.27.1
datasets==4.8.4
pytest
cuda-bindings~=13.2.0
packaging<=26.0

#--- test deepspeed version library
deepspeed==0.18.9
accelerate==1.13.0
Check progress
The progress can be viewed on the Training Job Details page’s Log tab. To check the progress, follow the steps below.
- All Services > AI/ML > Simple AI Training Click the menu. 1. Go to the Service Home page of Simple AI Training.
- On the Service Home page, click the Training Job menu. 2. Training Job List Navigate to the page.
- Training Job List page, click the resource to view detailed information. 3. Go to the Training Job Details page.
- After clicking the Log tab, check the logs. 4. You can view the logs while the environment is being prepared.
| language = actionscript | title =
[INFO] Concurrent Checkpoint library is installed
waiting for validator through /channel/stage.socket...
validator is running....
sidecar container is running and ready for training process to run!
information
- The environment is available for both On-Demand Training type and Spot Training type regardless of whether the Concurrent Checkpoint feature is used.
- In the case of On-Demand Training type, the automatic Parameter feature is not supported, so using the feature may generate Parameter-related error logs as follows. * However, the latest checkpoint loading feature works correctly.
| language = actionscript | title =
[2026-07-10 01:50:09,939] [ERROR] [decorator.py:442:get_last_checkpoint_preprocess] [Concurrent Checkpoint] No Checkpoint found with step: -1
ERROR:datastates.llm.decorator:[Concurrent Checkpoint] No Checkpoint found with step: -1
2.3 - Release Note
Simple AI Training
2026.07.16
NEW
official service launch- We have officially launched the Simple AI Training service.
- You can immediately allocate and use the resources needed for training without having to build or manage separate AI infrastructure or platforms for the model training environment.
3 - CloudML
3.1 - Overview
Service Overview
CloudML is an integrated platform that supports the entire machine learning process—from data analysis to model development, training, validation, and deployment—in a cloud environment.
Features
- Cloud ML is designed to enable users in various roles such as analysts, machine learning engineers, and developers to collaborate in a single environment and easily design and operate machine learning workflows.
- Cloud ML provides an analysis environment based on Python and R, and users with programming experience can leverage the platform more flexibly and effectively. In particular, using the generative AI–based Copilot feature allows code writing, refactoring, error correction, and function recommendation to be performed easily with natural language input, thereby increasing analytical productivity and accessibility.
- Cloud ML systematically supports each stage, including configuring the analysis environment, model development and serving, analysis automation, and visualization. It enables improvements in both productivity and model quality through repetitive experiments and operational automation.
Service Architecture Diagram
CloudML consists of an analysis environment, machine learning lifecycle management, automated analysis support, visualization, and a generative AI‑based Copilot feature, allowing users to perform the entire machine‑learning process in an integrated manner.
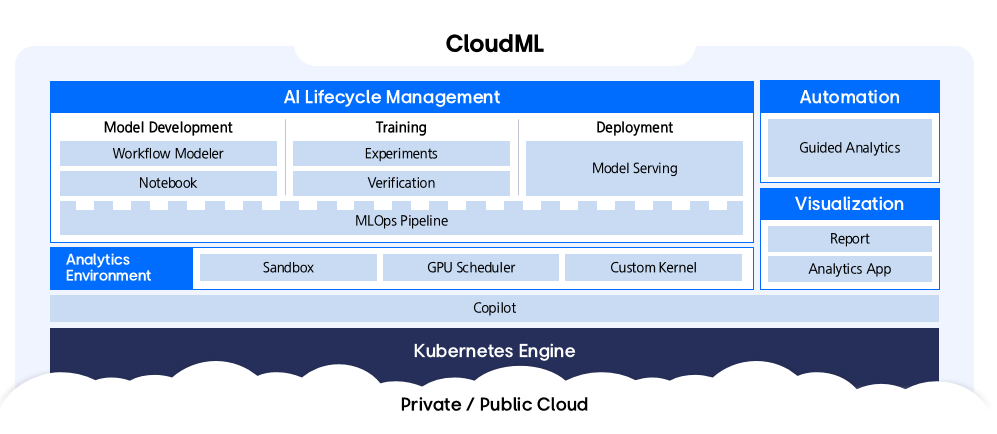
Provided features
CloudML provides the following features.
- Visual Modeling: Provides an intuitive interface that lets you build and deploy machine learning models without coding using a Drag&Drop approach. You can easily manage the entire process from data loading to model evaluation and deployment.
- Code-based Development: In the Jupyter Notebook environment, you can freely write and execute code using Python, R, and others. It provides powerful features for advanced users and researchers.
- Workflow Automation: It efficiently automates complex machine learning workflows such as data preprocessing, model training, evaluation, and deployment.
- Experiment Management: You can train machine learning models with various parameter combinations and systematically manage and compare the results.
- Using Copilot Features: It provides a natural-language-based AI assistant that guides and automates the model development process. It supports various tasks such as code generation, refactoring, error correction, and documentation, enhancing productivity.
- Integrated Platform: All features are integrated within CloudML for convenient use.
- Scalability and Flexibility: Supports scaling computing resources and connecting various data sources as needed.
Constraints
Before using CloudML, be sure to check the following constraints and incorporate them into your service usage plan. Since Cloud ML operates in a Kubernetes-based environment, appropriate cluster resource configuration is required for stable service operation.
- Application Basic Resources: To run the Application, a minimum of 24 vCPU cores and 96 GBi of memory are allocated by default.
- Analysis Task Resources: To perform analysis tasks, additional CPU or GPU resource configuration is required beyond the basic resources above. It should be configured appropriately, taking the workload of the analysis tasks into account.
- Copilot (CPU-based usage): To run Copilot on CPU resources, a minimum of 16 vCPU cores and 10 GiB of memory are required. In this case, the CPU resources available for analysis tasks are reduced accordingly.
- Copilot (GPU-based usage): Copilot can also be configured to use dedicated GPU resources.
- Supported LLM models: Currently, the LLM models that can be applied to Copilot are limited to Llama3.
Provision status by region
CloudML is available in the following environments.
| region | Availability |
|---|---|
| Korea West (kr-west1) | Provide |
| Korea East (kr-east1) | Provide |
| South Korea South 1 (kr-south1) | Not provided |
| South Korea South 2 (kr-south2) | Not provided |
| South Korea South 3 (kr-south3) | Not provided |
Table. CloudML regional availability status
Preliminary Service
This is a list of services that must be pre-configured before creating the service. Please refer to the guide provided for each service for details and prepare in advance.
| Service Category | service | Detailed description |
|---|---|---|
| Container | Container Registry | A service that stores, manages, and shares container images. |
| Container | Kubernetes Engine | Kubernetes container orchestration service |
| Networking | Load Balancer | A service that automatically distributes server traffic load. |
Table. CloudML Prerequisite Services
3.2 - How-to guides
Create CloudML
Users can create the service by entering the required CloudML information and selecting detailed options through the Samsung Cloud Platform Console.
To create a CloudML, follow these steps.
Click the All Services > AI/ML > CloudML menu. Navigate to CloudML’s Service Home page.
On the Service Home page, click the Create CloudML button. You will be taken to the CloudML page.
On the CloudML Creation page, enter the information required to create the service and select detailed options.
In the Version Selection area, select the version of the service.
Category RequiredDetailed description Select version Required Select CloudML version Table. CloudML service version selection optionsSCP Kubernetes Engine deployment Select the options needed to create a service in this area.
Category RequiredDetailed description Cluster name Required Select Kubernetes Engine cluster Table. CloudML Service Cluster Selection OptionsIn the Service Information Input area, select the options required to create the service.
Category required or notDetailed description CloudML name Required Enter service name Explanation Selection Enter service description Domain name Required Enter the domain name to be used for the service - Enter 2-63 characters using lowercase English letters, numbers, and special characters
endpoint Required Select the endpoint to use in the service - Choose between Private and Public
Copilot Selection Select whether to use Copilot in the service - Apply when selected requires agreement to terms in the popup window
- If the selected cluster is not configured with GPUs dedicated to LLMs, or the allocated LLM resources are insufficient, Copilot cannot be applied
Resource Information Required Display resource information of the selected cluster Enter SCR information Required Enter SCR information to be used in the service - Enter private endpoint, authentication key, secret key
Table. CloudML service information input itemsAdditional Information Input area, please enter or select the required information.
Category RequiredDetailed description tag Selection Add Tag - Up to 50 can be added per resource
- After clicking the Add Tag button, enter or select Key, Value values
Table. CloudML Additional Information Input Items
Summary Check the detailed information and estimated billing amount generated in the panel, and click the Complete button.
- When creation is complete, check the created resources on the CloudML List page.
Check CloudML detailed information
You can view and edit the full list of resources and detailed information for the CloudML service. CloudML Details page consists of Details, Tags, Activity Log tabs.
To view the detailed information of CloudML, follow these steps.
- Click the All Services > AI/ML > CloudML menu. Navigate to CloudML’s Service Home page.
- On the Service Home page, click the resource (CloudML) to view detailed information. You will be taken to the CloudML Details page.
- CloudML Details page displays CloudML’s status information and detailed information, and consists of Details, Tags, Activity History tabs.
Category Detailed description Service status CloudML status - Creating: Creating
- Deployed: Created / operating normally
- Updating: Updating settings
- Terminating: Terminating
- Error: Error occurred
Connection Guide Service Access Guide - Information on host to register on the user’s PC
Service termination Cancel Service button Table. CloudML status information and additional features
- CloudML Details page displays CloudML’s status information and detailed information, and consists of Details, Tags, Activity History tabs.
Detailed Information
CloudML List page lets you view detailed information of the selected resource and modify it if necessary.
| Category | Detailed description |
|---|---|
| service | Service name |
| Resource Type | Resource Type |
| SRN | Unique resource ID in Samsung Cloud Platform |
| Resource name | Resource name |
| Resource ID | Unique resource ID in the service |
| constructor | User who created the service |
| Creation date and time | Service creation date and time |
| editor | User who edited the service information |
| Modification date | Date and time the service information was modified |
| Product name | CloudML name |
| Copilot | Whether to use Copilot |
| Explanation | Description of the service |
| Cluster name | Selected Kubernetes Engine cluster name |
| domain name | Entered service domain name |
| Version | Selected service version |
| Installation node information | Node information installed on the cluster |
| SCR information | Entered SCR information |
Table. CloudML detailed information items
tag
On the CloudML List page, you can view the tag information of the selected resource, and add, modify, or delete it.
| Category | Detailed description |
|---|---|
| Tag list | Tag list
|
Table. CloudML Tag Tab Items
Job History
On the CloudML list page, you can view the operation history of the selected resource.
| Category | Detailed description |
|---|---|
| Task History List | Resource Change History
|
Table. Work History Tab Detailed Information Items
Terminate CloudML Service
Users can cancel the CloudML service through the Samsung Cloud Platform Console.
Reference
If the CloudML service status is Creating, Updating, or Terminating, the service cannot be terminated.
To cancel CloudML, follow the steps below.
- Click the All Services > AI/ML > CloudML menu. Navigate to CloudML’s Service Home page.
- Click the Cancel Service button on the Service Home page. A service cancellation alert window appears.
- Enter the CloudML name to delete in the dialog and click the Confirm button.
3.2.1 - Kubernetes Cluster Configuration
Configuring a Kubernetes cluster
To apply for the CloudML service, a dedicated cluster for CloudML must be set up. A dedicated cluster means creating a Kubernetes Engine that meets or exceeds the required minimum specifications and configuring several necessary settings. Create a dedicated cluster in advance before applying for the CloudML service.
- For instructions on creating a cluster, see the Cluster Creation guide.
- CloudML exposes an HTTPS endpoint on port 443. When creating a cluster, select Public Endpoint.
Recommended specifications for cluster nodes and storage
Cluster nodes can be added or modified after the cluster is created. The following are the recommended specifications for cluster nodes and storage that should be prepared to install CloudML for five users.
| Category | Item | role | capacity |
|---|---|---|---|
| cluster node | Kubernetes node pool (Virtual Server) | Application execution
| 24 core / 96 GBi |
| Cluster node | Kubernetes node pool (Virtual Server) | Run Analysis
| 8 core / 32 GBi x 2 EA
|
| repository | File Storage | Data storage | 1 TB |
Table. Recommended specifications for cluster nodes and storage items
Notice
If you need to change specifications such as adjusting the number of nodes, adding GPU nodes, or expanding resources, please request technical support.
- Technical Support Information Page: https://www.samsungsds.com/kr/support/support_tech.html
- Technical support request email: brightics.cs@samsung.com
Add a label to a node
Add labels to the nodes directly according to the role-specific recommendations in the cluster node and storage specifications.
- For instructions on adding labels to a node YAML, refer to the Edit Node YAML guide.
To add a label to a cluster node, follow these steps.
- Click the All Services > Container > Kubernetes Engine menu. Navigate to the Service Home page of Kubernetes Engine.
- On the Service Home page, click the Node menu. You will be taken to the Node List page.
- On the Node List page, select the cluster for which you want to view detailed information from the gear button at the top left, then click the Confirm button.
- Select the node you want to view details for and click it. You will be taken to the Node Details page.
- On the Node Details page, click the YAML tab. You will be taken to the YAML tab page.
- On the YAML tab page, click the Edit button. The node edit window opens.
- In the node edit window, add a label that matches the role and click the Save button.
- Check the following information and add a label that matches the node specifications.
Category Purpose-specific labels CPU node - App:
node.kubernetes.io/nodetype: ml-app
- Analytics:
node.kubernetes.io/nodetype: ml-analytics
GPU node - Analysis:
node.kubernetes.io/nodetype: ml-analytics-gpu
- Copilot:
node.kubernetes.io/nodetype: ml-gpu
Table. Kubernetes node label items by purpose - App:
- Check the following information and add a label that matches the node specifications.
3.3 - API Reference
API Reference
3.4 - CLI Reference
CLI Reference
3.5 - Release Note
CloudML
2025.07.01
NEW
CloudML service official version release- We have launched the CloudML service, which supports the entire machine learning process—from data analysis to model development, training, validation, and deployment—in a cloud environment through the Samsung Cloud Platform.
4 - AI&MLOps Platform
4.1 - Overview
Service Overview
AI&MLOps Platform is a machine learning platform that automates repetitive tasks across the entire pipeline of developing, training, and deploying machine learning models. Through the AI&MLOps Platform service, integrated management of training data, models, and operational data is possible on a Kubernetes-based AI/MLOps environment.
The AI&MLOps Platform provides an Enterprise service that adds add-on features such as distributed training job execution and monitoring to the open-source product Kubeflow.Mini, which enables development, training, tuning, and deployment of machine learning models.
Reference
For AI&MLOps Platform related sites, refer to Kubeflow.
Features
Providing a Cloud Native MLOps Environment: The AI&MLOps Platform provides a cloud‑optimized machine learning model development environment, and its Kubernetes‑based architecture makes integration with various open‑source tools convenient.
Machine Learning Development and Operations Convenience: Provides a standardized environment that supports various machine learning frameworks such as TensorFlow, PyTorch, scikit-learn, Keras, etc. By automating the entire pipeline for developing, training, and deploying machine learning models, it makes model composition and creation easy and promotes reusability.
Enhanced GPU Integration: By leveraging Multi‑Node GPU on a Bare Metal Server and GPUDirect RDMA (Remote Direct Memory Access), the job speed of LLM (Large Language Model) and natural language processing (NLP) can be dramatically improved.
Service Diagram
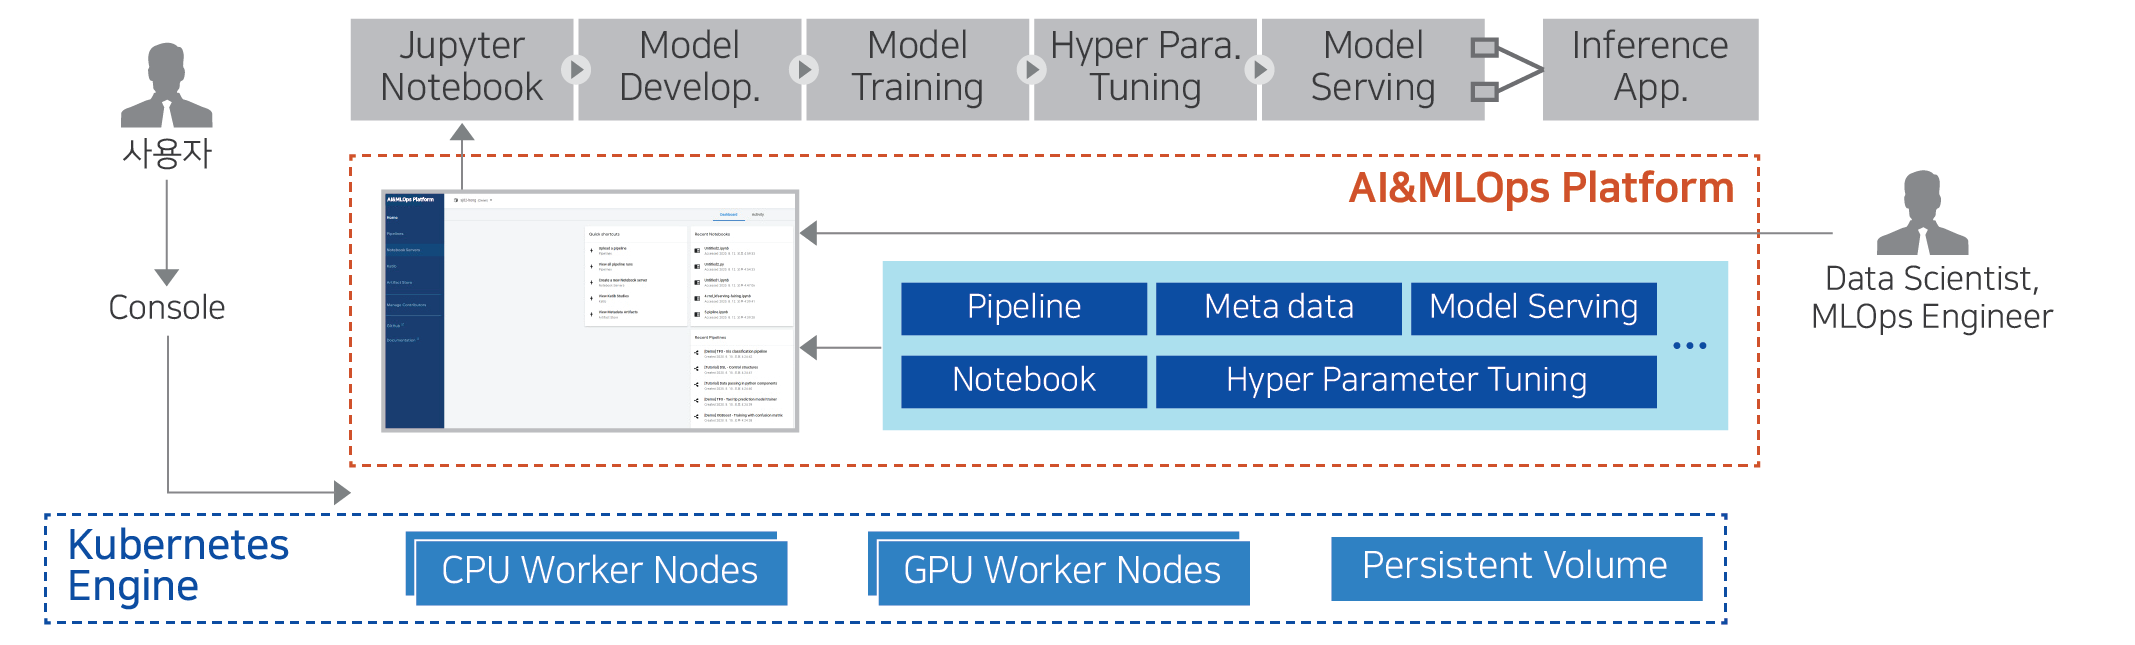
Provided features
The AI&MLOps Platform provides the following features.
ML Model Development Environment and Features
- Notebook Provision: Creates Jupyter Notebooks and VS Code that include ML frameworks such as Tensorflow, Pytorch, etc.
- TensorBoard: TensorBoard(ML model training process visualization/analysis tool) creates and manages the server.
- Volumes: When developing ML models, store datasets and models, and connect a Volume when creating a Jupyter Notebook.
ML model distributed training Job execution/management
- Supports execution and monitoring of distributed training jobs, as well as management and analysis of inference services. (Add-on)
- Provides various features for configuring MLOps environments, such as Job Queue management. (Add-on)
- Provides efficient GPU resource utilization features such as Job Scheduler (FIFO, Bin-packing, Gang-based), GPU Fraction, and GPU resource monitoring, etc. (Add-on)
- We dramatically improved the job speed of LLM (Large Language Model) and natural language processing (NLP) by using BM-based Multi-Node GPU and GPU Direct RDMA (Remote Direct Memory Access). (Add-on)
ML Model Experiment Management and Pipeline
- Provides Experiments (KFP) for managing ML pipeline experiments.
- Supports pipeline automation features for configuring and executing ML tasks in stages.
Component
Operating System version
The operating systems supported by the AI&MLOps Platform are as follows.
| Operating System (OS) | Version |
|---|---|
| RHEL | RHEL 8.3 |
| Ubuntu | Ubuntu 18.04, Ubuntu 20.04, Ubuntu 22.04 |
Table. Supported Operating System Versions
Provision status by region
The AI&MLOps Platform is available in the environments below.
| region | Provision status |
|---|---|
| Korea West (kr-west1) | Provide |
| Korea East (kr-east1) | Provide |
| South Korea South 1 (kr-south1) | Not provided |
| South Korea South 2 (kr-south2) | Not provided |
| South Korea South 3(kr-south3) | Not provided |
Table. AI&MLOps Platform regional availability status
Prior Service
This is a list of services that must be pre-configured before creating the service. For details, refer to the guide provided for each service and prepare in advance.
| Service Category | service | Detailed description |
|---|---|---|
| Container | Kubernetes Engine | Kubernetes container orchestration service |
Table. AI&MLOps Platform Preliminary Services
4.2 - How-to guides
Create AI&MLOps Platform
Users can create the service by entering the required information for the AI&MLOps Platform and selecting detailed options through the Samsung Cloud Platform Console.
To create an AI&MLOps Platform, follow these steps.
- Click the All Services > AI/ML > AI&MLOps Platform menu. You will be taken to the Service Home page of AI&MLOps Platform.
- Service Home page, click the AI&MLOps Platform Create button. You will be taken to the AI&MLOps Platform Create page.
- On the AI&MLOps Platform creation Service Type Selection page, enter the information required to create the service and select detailed options.
- Select the service type in the Service Type and Version Selection area.
Category RequiredDetailed description Service type Required Service type selected by the user - AI&MLOps Platform
- Kubeflow Mini
Service type version Required Select version of the selected service - Provide a list of versions of the offered service
Table. AI&MLOps Platform service types and version selection items - Cluster Deployment Area Classification Select the options required to create a service in this area.
Category RequiredDetailed description Cluster deployment area Required - Deploy from Kubernetes Engine: Select the previously created Kubernetes Engine
- Deploy to a new cluster: When creating the AI&MLOps Platform, also create a Kubernetes Engine
Table. AI&MLOps Platform Service Cluster Deployment Area Classification ItemsReferenceThe configuration elements on the following Service Information Input page vary depending on the cluster deployment settings.
- Select the service type in the Service Type and Version Selection area.
- On the Service Information Input page of AI&MLOps Platform Creation, enter the information required to create the service and select detailed options.
- You can select the cluster deployment region.
- For instructions on configuring Deploy to a new cluster, see the Deploy to a new cluster guide.
- Deploy on SCP Kubernetes Engine For configuration, refer to the Deploy on SCP Kubernetes Engine guide.
- Refer to the Kubernetes Cluster specifications guide for the Kubernetes cluster specifications required for installation.
- You can select the cluster deployment region.
- On the Creation Information Check page of AI&MLOps Platform creation, review the detailed information you created and the estimated billing amount, and click the Complete button.
- Once creation is complete, check the created resources on the AI&MLOps Platform Service List page.
Check detailed information of AI&MLOps Platform
The AI&MLOps Platform service allows you to view and edit the full list of resources and detailed information. AI&MLOps Platform Service Details page consists of Details, Tags, Activity History tabs.
To view detailed information about the AI&MLOps Platform service, follow the steps below.
- Click the All Services > AI/ML > AI&MLOps Platform Service menu. Navigate to the Service Home page of the AI&MLOps Platform Service.
- On the Service Home page, click the AI&MLOps Platform menu. You will be taken to the AI&MLOps Platform Service List page.
- On the AI&MLOps Platform Service List page, click the resource to view detailed information. You will be taken to the AI&MLOps Platform Service Details page.
- AI&MLOps Platform Service Details page displays status information and additional feature information, and consists of Details, Tags, Activity History tabs.
Detailed Information
AI&MLOps Platform Service List page lets you view detailed information of the selected resource and edit the information if needed.
| Category | Detailed description |
|---|---|
| service | Service name |
| Resource Type | Resource Type |
| SRN | Unique resource ID in Samsung Cloud Platform |
| Resource name | Resource name
|
| Resource ID | Unique resource ID in the service |
| constructor | User who created the service |
| Creation date and time | Service creation date and time |
| editor | User who edited the service information |
| Modification date | Date and time the service information was modified |
| Dashboard status | Dashboard status value |
| Service name | Service name |
| Admin Email Address | Administrator email address |
| image name | Service image name |
| Version | Image version |
| Service type | Deployed service type |
Table. AI&MLOps Platform Service Detailed Information Items
tag
AI&MLOps Platform Service List page lets you view the tag information of the selected resource, and you can add, modify, or delete it.
| Category | Detailed description |
|---|---|
| Tag list | Tag list
|
Table. Cluster Tag Tab Items
Job History
AI&MLOps Platform Service List page lets you view the operation history of the selected resource.
| Category | Detailed description |
|---|---|
| Task History List | Resource Change History
|
Table. AI&MLOps Platform Service Job History Tab Detailed Information Items
Access AI&MLOps Platform
To access the AI&MLOps Platform dashboard, you must complete the prerequisite steps.
Preliminary work
To access the AI&MLOps Platform, you must preconfigure the relevant ports and the IP addresses required for connection in the Security Group and Firewall (if using a firewall).
Kubeflow Mini: port 31390 (inbound rules of Security Group, VPC firewall)
To access the cluster’s worker node, you must set an inbound rule for port 22 on the Security Group and Firewall (when using a VPC firewall).
Access Dashboard
To access the AI&MLOps Platform service, follow these steps.
- Click the All Services > AI/ML > AI&MLOps Platform Service menu. You will be taken to the Service Home page of the AI&MLOps Platform service.
- Click the AI&MLOps Platform Service menu on the Service Home page. You will be taken to the AI&MLOps Platform Service List page.
- Click the resource to view detailed information on the AI&MLOps Platform Service List page. You will be taken to the AI&MLOps Platform Details page.
- AI&MLOps Platform Details on the page, click the Access Guide button. The Access Guide popup window opens.
- Access Guide In the popup window, click the dashboard’s URL link. You will be taken to the corresponding dashboard page.
Caution
When using a public subnet and assigning a public IP, you may be exposed to security attacks such as external hacking and malware infection.
Terminate AI&MLOps Platform
You can cancel the unused service to reduce operating costs. However, canceling the service may cause the running service to stop immediately, so you should thoroughly consider the impact of service interruption before proceeding with the cancellation.
Caution
Please note that data cannot be recovered after terminating the service.
To cancel the AI&MLOps Platform, follow the steps below.
- Click the All Services > AI/ML > AI&MLOps Platform Service menu. Navigate to the Service Home page of the AI&MLOps Platform Service.
- On the Service Home page, click the AI&MLOps Platform Service menu. You will be taken to the AI&MLOps Platform Service List page.
- Click the resource to view detailed information on the AI&MLOps Platform Service List page. You will be taken to the AI&MLOps Platform Details page.
- AI&MLOps Platform Details on the page, click the Cancel Service button. The Cancel Service popup will open.
- After entering the service name for verification, click Confirm.
- When termination is complete, check on the AI&MLOps Platform Service List page whether the resource has been terminated.
4.2.1 - Cluster deployment
Cluster deployment area
Samsung Cloud Platform offers two cloud deployment regions in the AI&MLOps Platform creation’s service type selection.
common
Before proceeding with the cluster deployment, be sure to verify the Kubernetes cluster specifications required for installation.
- Regardless of the choice of cluster deployment region, you must verify the Kubernetes cluster specifications in advance.
- For detailed specification information, refer to the Kubernetes cluster specifications guide.
Depending on the selection of the cluster deployment region, the installation details on the AI&MLOps Platform creation service information input page differ.
Deploy on SCP Kubernetes Engine
- All Services > AI/ML > AI&MLOps Platform Click the menu. 1. Navigate to the Service Home page of the AI&MLOps Platform.
- On the Service Home page, click the Create AI&MLOps Platform button. 2. Navigate to the Create AI&MLOps Platform page.
- On the Service Type and Version Selection page of AI&MLOps Platform creation, enter the information required to create the service and select detailed options.Cluster deploymentPlease select the Deploy on SCP Kubernetes Engine option.
- AI&MLOps Platform Creation’s Service Information Input page: enter the information required to create the service and select detailed options.
- Service Information Input area, enter or view the information required to create a service.
구분 RequiredDetailed description Service Name Required Enter AI&MLOps Platform name - AI&MLOps Platform name cannot be duplicated within the project
Storage Class Required Storage Class is automatically registered Installation node information Lookup Check the node information of the selected Kubernetes Engine Admin Email Address Required Enter the administrator (Admin) email address to use for login Password required Enter the password to use for login Confirm password Required Re-enter the password to prevent password errors Table. AI&MLOps Platform Service Information Input Items - Additional Information Input area, enter or select the information needed to create the service.
Category RequiredDetailed description tag Select Select tags to add to the AI&MLOps Platform - Click Add Tag to create a new tag or add an existing tag
- Up to 50 tags can be registered
- The newly added tags are applied after the service creation is completed
Table. AI&MLOps Platform Service Additional Information Input Items
- Service Information Input area, enter or view the information required to create a service.
Deploy to a new cluster
- All Services > AI/ML > AI&MLOps Platform Click the menu. 1. Navigate to the Service Home page of the AI&MLOps Platform.
- On the Service Home page, click the Create AI&MLOps Platform button. 2. Go to the AI&MLOps Platform Creation page.
- On the Service Type and Version Selection page of AI&MLOps Platform creation, enter the information required to create the service and select detailed options.Cluster deploymentSelect the Deploy to a new cluster option.
- On the Service Information Input page of AI&MLOps Platform creation, enter the information required to create a service and select detailed options.
Service Information Input area, enter or view the information required for service creation.
Category RequiredDetailed description Service Name Required Enter AI&MLOps Platform name - AI&MLOps Platform name cannot be duplicated within a project
Storage Class Required Storage Class is automatically registered Installation node information Lookup Check the node information of the selected Kubernetes Engine Admin Email Address Required Enter the administrator (Admin) email address to use for login Password Required Enter the password to use for login Confirm password Required Re-enter the password to prevent password errors Table. AI&MLOps Platform Service Information Input ItemsKubernetes Engine Information Input Enter or select the required information in the area.
Category Required statusDetailed description Cluster name Required Cluster name - must start with an English letter and may use English letters, numbers, and special characters (
-)
- Enter within 3 to 30 characters
Control Plane Settings > Kubernetes Version required Select Kubernetes version Control Area Settings > Control Area Logging Selection Select whether to enable control plane logging - Audit/Event logs from the cluster control plane can be viewed in Cloud Monitoring’s log analysis
- Each account receives 1 GB of free log storage for all services, and logs exceeding 1 GB are deleted sequentially
- For more details, refer to Cloud Monitoring > log analysis
Network Settings Required Network connection settings for the node pool - VPC: Select a pre‑created VPC
- Availability Zone: Choose the Availability Zone of the selected VPC
- Subnet: Select a standard Subnet to use from the subnets of the selected VPC
- Security Group: Click the Search button and then select a Security Group in the Select Security Group popup
- Load Balancer: Provides the
type:LoadBalancerfeature in a Kubernetes Service object- Select a load balancer on the same network
- Use: select whether to enable
- Cannot be changed after configuration
File Storage Settings Required Select the file storage volume to use in the cluster - Default Volume (NFS): Select File Storage via the Search button
- Default Volume file storage offers only the NFS format
Table. Kubernetes Engine service information entry items- must start with an English letter and may use English letters, numbers, and special characters (
In the Node Pool Information Input area, enter or select the required information.
Category RequiredDetailed description Node pool configuration Required Select node pool information - * Marked items are required fields, so they must be entered
- For the AI&MLOps Platform, image size can continuously increase depending on usage, so setting Block Storage to at least 200GB enables smooth system configuration
Table. AI&MLOps Platform Service Information Input ItemsReference- A Windows OS node pool can be created only when an additional storage (CIFS) volume is in use in the cluster.
- Volume encryption for node pool Block Storage can only be set at initial creation.
- Enabling encryption may cause performance degradation in some features.
- You can enter node count, minimum node count, maximum node count only when you have selected the node pool auto‑scaling or shrinking feature.
In the Additional Information Input area, enter or select the required information.
Category RequiredDetailed description tag Select Select tags to add to the AI&MLOps Platform - Click Add Tag to create a new tag or add an existing tag
- Up to 50 tags can be registered
- The newly added tags are applied after the service creation is completed
Table. AI&MLOps Platform service information input items
Cluster specifications
To use the AI&MLOps Platform, you need a Kubernetes Engine to install the AI&MLOps Platform. You can select an existing Kubernetes Engine, or create a Kubernetes Engine together when creating the AI&MLOps Platform.
The specifications of the Kubernetes cluster required for installation are as follows.
Node pool resource size (composed of two or more nodes)
- AI&MLOps Platform: vCPU 32, Memory 128G or more Kubeflow Mini: up to vCPU 24, Memory 96G
Kubernetes version
AI&MLOps Platform v1.9.1 (k8s v1.30) Kubeflow Mini v1.9.1 (k8s v1.30)
Information
Only one AI & MLOps Platform instance can be installed per Kubernetes cluster, and the platform cannot be installed on a cluster that is already being used for other purposes.
4.2.2 - Kubeflow Usage Guide
Below, we guide you on how to use Kubeflow after creating it.
Add Kubeflow User
Below is a guide on how to use Kubeflow after it has been created.
Kubeflow only creates the account of the single Admin User entered on the initial installation screen.
When using the Kubeflow Dashboard, to add users other than the initial user, you must modify the settings of Dex (the authentication integration component of Kubeflow).
- Dex is deployed in the auth namespace, and its configuration is stored in a configmap named dex.
Reference
Kubeflow separates namespaces for each user.
The following is an example of Dex configuration.
Color mode
apiVersion: v1
kind: ConfigMap
metadata:
  name: dex
  namespace: auth
data:
  config.yaml: |
    issuer: http://dex.auth.svc.cluster.local:5556/dex
    storage:
      type: kubernetes
      config:
        inCluster: true
    web:
      http: 0.0.0.0:5556
    logger:
      level: "debug"
      format: text
    oauth2:
      skipApprovalScreen: true
    enablePasswordDB: true
    staticPasswords:
    - email: admin@kubeflow.org
      hash: $2y$10$Yb9WVbn8pzVSM6fBgKdFae1Bh6Z.XTihi7bNu3sB6/h5bt1JuUOgq
      username: admin
      userID: 9cb67307-fd6d-4441-9b59-52acd78f4c9e
    staticClients:
    - id: kubeflow-oidc-authservice
      redirectURIs: ["/login/oidc"]
      name: 'Dex Login Application'
secret: pUBnBOY80SnXgjibTYM9ZWNzY2xreNGQok apiVersion: v1
kind: ConfigMap
metadata:
name: dex
namespace: auth
data:
config.yaml: |
issuer: http://dex.auth.svc.cluster.local:5556/dex
storage:
type: kubernetes
config:
inCluster: true
web:
http: 0.0.0.0:5556
logger:
level: "debug"
format: text
oauth2:
skipApprovalScreen: true
enablePasswordDB: true
staticPasswords:
- email: admin@kubeflow.org
hash: $2y$10$Yb9WVbn8pzVSM6fBgKdFae1Bh6Z.XTihi7bNu3sB6/h5bt1JuUOgq
username: admin
userID: 9cb67307-fd6d-4441-9b59-52acd78f4c9e
staticClients:
- id: kubeflow-oidc-authservice
redirectURIs: ["/login/oidc"]
name: 'Dex Login Application'
secret: pUBnBOY80SnXgjibTYM9ZWNzY2xreNGQok When the enablePasswordDB value in the configuration is true, Dex stores the list of users defined in staticPasswords from the configmap into its internal storage when the service starts. Therefore, by adding new user entries composed of email, hash, username, and userID to staticPasswords, you can freely add users beyond the initial ones and use the Kubeflow service.
The attribute values for adding a user can be defined as follows.
| parameter | Explanation |
|---|---|
| A value in a standard E‑mail format | |
| hash | Bcrypt algorithm encrypted user password value, and you can directly input the hash value generated by the Bcrypt algorithm
|
| username | User name
|
| userID | A uniquely identifiable ID value
|
Table. Attribute values for adding a user
From a node where you can use kubectl, use the following command to enter the edit screen of dex configmap.
Color mode
kubectl edit configmap dex -n authkubectl edit configmap dex -n authColor mode
staticPasswords:
    - email: admin@kubeflow.org
      hash: $2y$10$Yb9WVbn8pzVSM6fBgKdFae1Bh6Z.XTihi7bNu3sB6/h5bt1JuUOgq
      username: admin
      userID: 9cb67307-fd6d-4441-9b59-52acd78f4c9e
    - email: sds@samsung.com
      hash: $2y$12$0g5.y86jnrt0v6In5NRCZ.YVuvrAUQ6j/RJYO3rV.kNulaDALOKfq
      username: sds
userID: 8961d517-3498-4148-90c9-7e442ee91154staticPasswords:
- email: admin@kubeflow.org
hash: $2y$10$Yb9WVbn8pzVSM6fBgKdFae1Bh6Z.XTihi7bNu3sB6/h5bt1JuUOgq
username: admin
userID: 9cb67307-fd6d-4441-9b59-52acd78f4c9e
- email: sds@samsung.com
hash: $2y$12$0g5.y86jnrt0v6In5NRCZ.YVuvrAUQ6j/RJYO3rV.kNulaDALOKfq
username: sds
userID: 8961d517-3498-4148-90c9-7e442ee91154Since the staticPasswords value in the configmap is applied when the Dex service starts, restart the Dex service using the following command.
Color mode
kubectl rollout restart deployment dex -n authkubectl rollout restart deployment dex -n authAttempt to log in using new user information.
Verify that after successful login, it transitions to the screen for creating a new Namespace(profile).
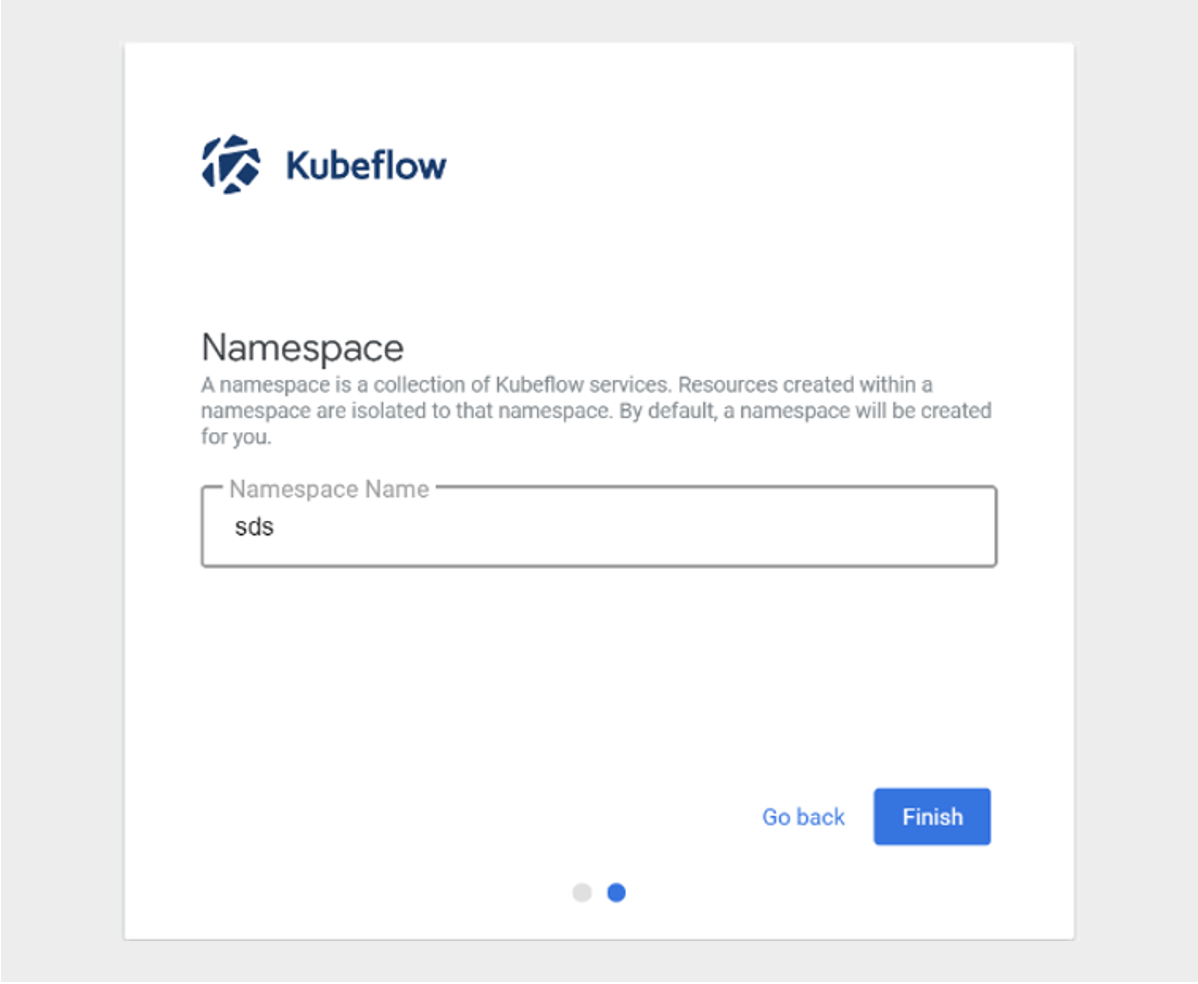
The above content was written with reference to the official Kubeflow site. For more details, see Kubeflow Profiles.
How to use Custom Image in Kubeflow Jupyter Notebook
To use a custom image in the Kubeflow Notebook Controller that manages the Notebook life cycle of Kubeflow, you must meet several requirements.
Kubeflow assumes that Jupyter will start automatically when a Notebook image is run. Therefore, you need to set the default command to start Jupyter in the container image.
The following is an example of what should be included in a Dockerfile.
Color mode
ENV NB_PREFIX

CMD ["sh","-c", "jupyter notebook --notebook-dir=/home/${NB_USER} --ip=0.0.0.0 --no-browser --allow-root --port=8888 --NotebookApp.token='' --NotebookApp.password='' --NotebookApp.allow_origin='*' --NotebookApp.base_url=${NB_PREFIX}"]
ENV NB_PREFIX
CMD ["sh","-c", "jupyter notebook --notebook-dir=/home/${NB_USER} --ip=0.0.0.0 --no-browser --allow-root --port=8888 --NotebookApp.token='' --NotebookApp.password='' --NotebookApp.allow_origin='*' --NotebookApp.base_url=${NB_PREFIX}"]The above items are explained as follows.
| parameter | Explanation |
|---|---|
--notebook-dir=/home/jovyan | Set working directory
|
--ip=0.0.0.0 | Allow Jupyter Notebook to accept connections from any IP |
--allow-root | Allow the user to run Jupyter Notebook as root |
--port=8888 | Port configuration |
--NotebookApp.token=’’ –NotebookApp.password=’’ | Disable Jupyter authentication
|
--NotebookApp.allow_origin=’*’ | Allow origin |
--NotebookApp.base_url=NB_PREFIX | Base URL setting |
Table. Settings to include in Dockerfile
You can create a Custom Image by referring to the Dockerfile that builds the tesorflow notebook image.
- https://github.com/kubeflow/kubeflow/blob/v1.2.0/components/tensorflow-notebook-image/Dockerfile Please refer to it.
Reference
Custom Image must be stored in a public registry such as Docker Hub or a private registry, and be push/pullable from Kubeflow.
On the Notebook Servers page, click the +NEW SERVER button.
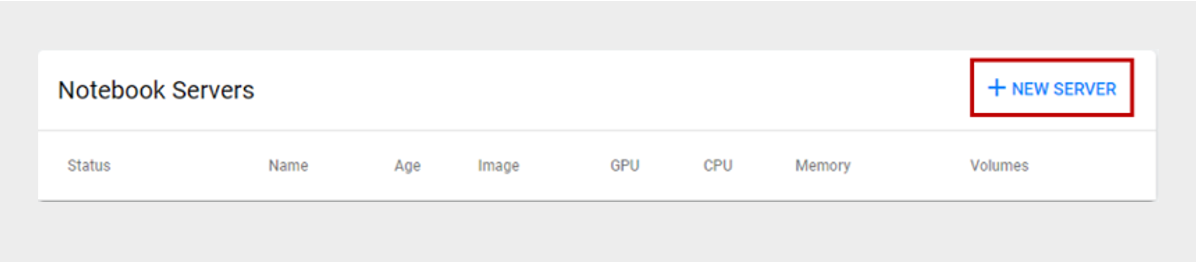
If you have created a Custom Image, check Custom Image on the Kubeflow Notebook Server screen and enter the Custom Image address to create a new Notebook Server.
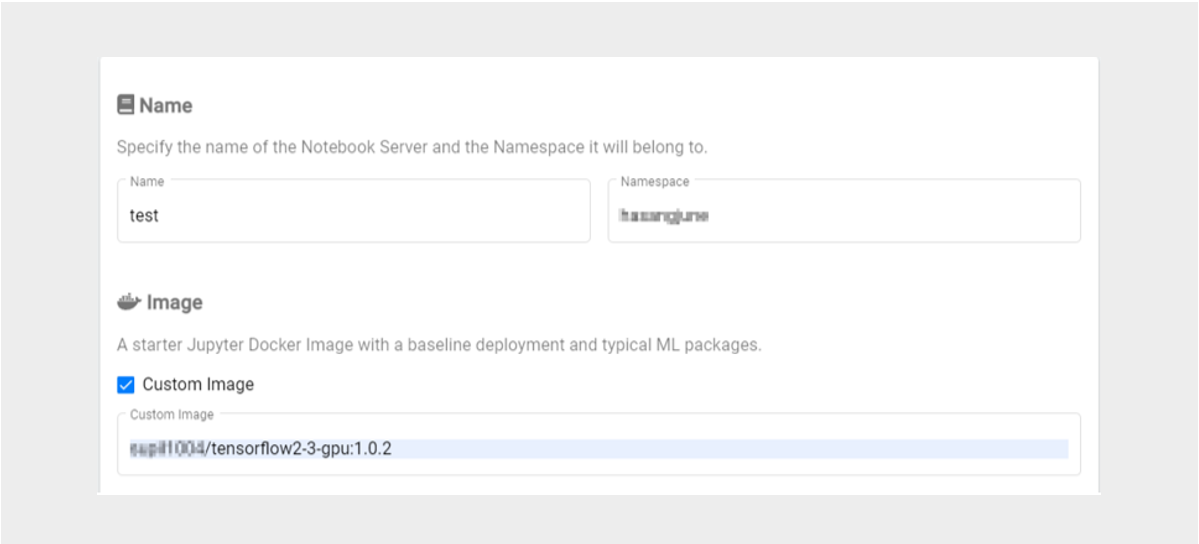
Information
The above content was written with reference to the Kubeflow official site.
- For more details, see the Kubeflow Notebooks > Container Images documentation on the official Kubeflow website.
4.3 - API Reference
API Reference
4.4 - CLI Reference
CLI Reference
4.5 - Release Note
AI&MLOps Platform
2025.07.01
FEATURE
AI&MLOps Platform open-source version upgrade- The AI&MLOps Platform open-source version has been upgraded.
- Kubeflow 1.9
2025.02.27
NEW
AI&MLOps Platform service official version release- The AI&MLOps Platform service, which automates repetitive tasks across the entire pipeline of machine learning model development, training, and deployment, has been launched.
- We provide a machine learning platform service based on Kubernetes.