
also HPC Cluster one MS HPC Pack and use
also HPC Cluster one MS HPC Pack and use
Overview
Traditionally, the HPC(High Performance Computing, high-performance computing) field has been built on Linux. However, some HPC applications only support Windows, so a Windows-based cluster is sometimes required. Microsoft HPC Pack is a Windows HPC cluster management tool provided to meet this demand.
This guide describes the procedures for building and operating a Windows HPC cluster with HPC Pack on the Samsung Cloud Platform infrastructure. Chapter 2 will cover how to install HPC Pack. Chapter 3 will explain how to submit jobs. Chapter 4 will provide a summary and introduce future plans.
HPC Pack installation
Overall Architecture and Terminology
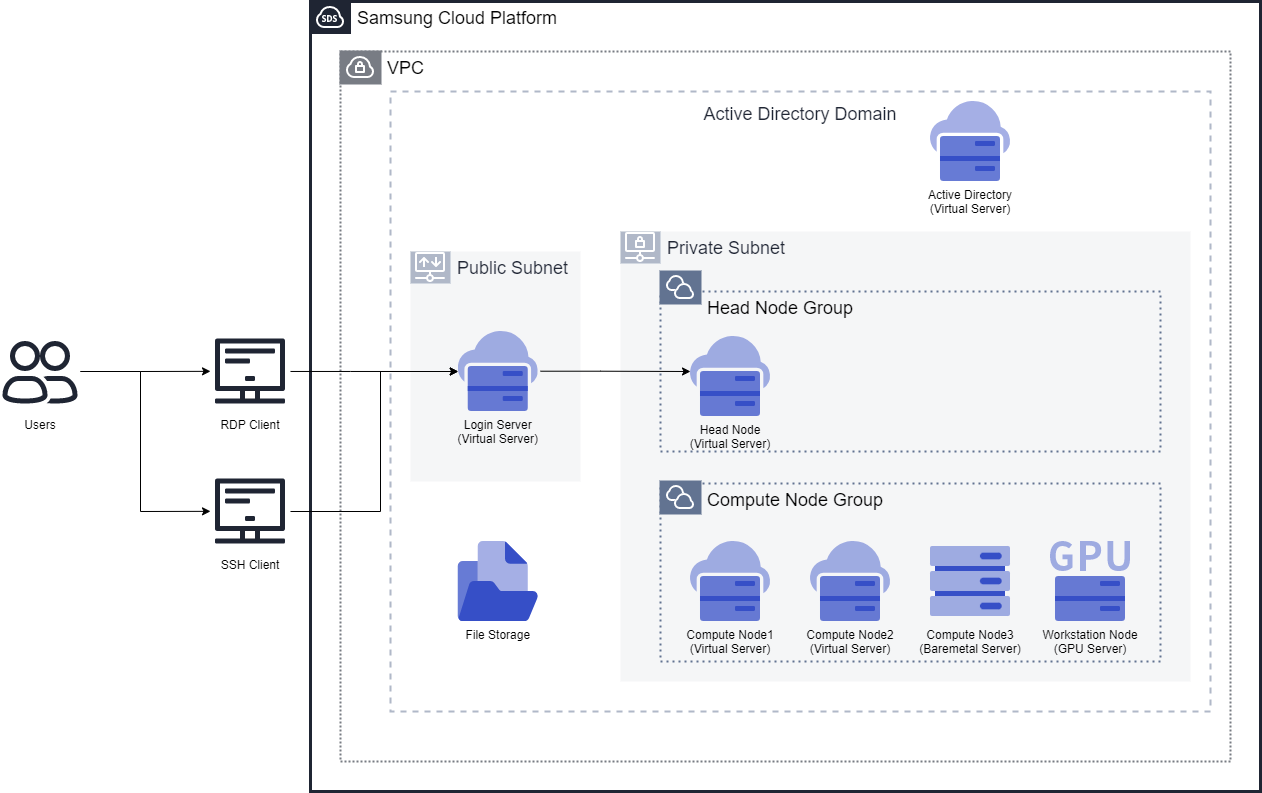
In this guide, we will create two subnets within a single VPC. One subnet will be a public subnet, and the other will be a private subnet. The public subnet will host a Virtual Server that serves as a login node accessible to users. Users can connect to this login node using an RDP client or an SSH client. The private subnet will contain the head node, compute nodes, and workstation nodes (GPU).
RDP is the Remote Desktop Protocol, a protocol for remotely accessing another computer’s graphical interface. It typically uses TCP port 3389. An SSH client is a client for connecting to a remote server via Secure Shell. It typically uses TCP port 22. In Samsung Cloud Platform, Windows servers are accessed using RDP, while Linux servers are accessed using SSH. This guide also introduces how to install SSH on Windows servers for access.
The HPC cluster consists of a head node, compute nodes, and a workstation node. The head node is configured as a Virtual Server, and the compute nodes are composed of two Virtual Servers and one Bare Metal Server. Additionally, the workstation node for graphics work is configured as a GPU Server. This configuration can vary depending on the purpose of the HPC cluster, and you can adjust the number of servers and specify server specifications to suit your environment. The reason for this setup is to emphasize that a mixed HPC cluster of Virtual Server, Bare Metal Server, and GPU Server is possible within the Samsung Cloud Platform.
The list of servers required in this guide is shown in the table below. Assuming familiarity with the basic concepts of Samsung Cloud Platform, this guide will not cover VPC, Subnet, Security Group, Virtual Server creation, or Bare Metal Server creation features.
| Node Types | Recommended server specifications | OS | Purpose |
|---|---|---|---|
| Login node | s1v1m2 | Windows 2019 | HPC Pack Client installation |
| head node | s1v4m8 or higher | Windows 2019 | Install HPC Pack Head Node |
| Compute node (Virtual Server) | h2 series | Windows 2019 Standard | Install HPC Pack Compute Node |
| Compute node (Bare Metal Server) | h2v96m768_metal | Windows 2019 Standard | Install HPC Pack Compute Node |
| Workstation node (GPU Server) | - | Windows 2019 Standard | Install HPC Pack Workstation Node |
One of the prerequisites for HPC Pack is the domain service Active Directory. All nodes must belong to the same domain. Although the architecture diagram shows Active Directory installed on a Virtual Server, this guide does not cover details of Active Directory; it only requires that all servers belong to a single domain.
Head node installation
The version of HPC Pack used in this guide is 2019 Update 2. The download link for Update 2 is as follows.
https://www.microsoft.com/en-us/download/details.aspx?id=105615
If the download address changes or a new version is released, please search for the new address and download it.
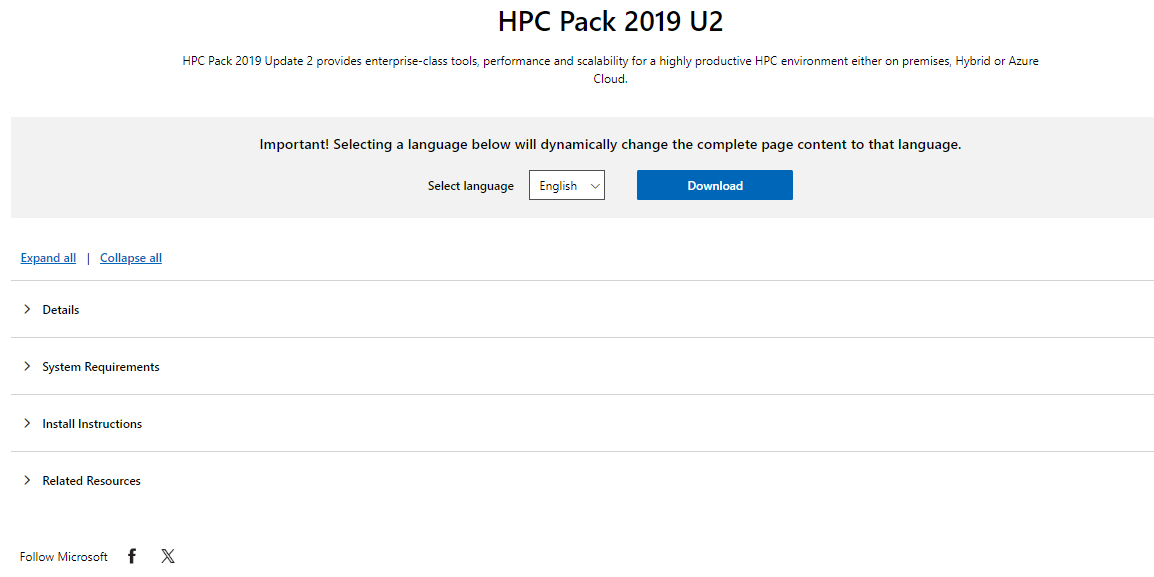
Click the download button.
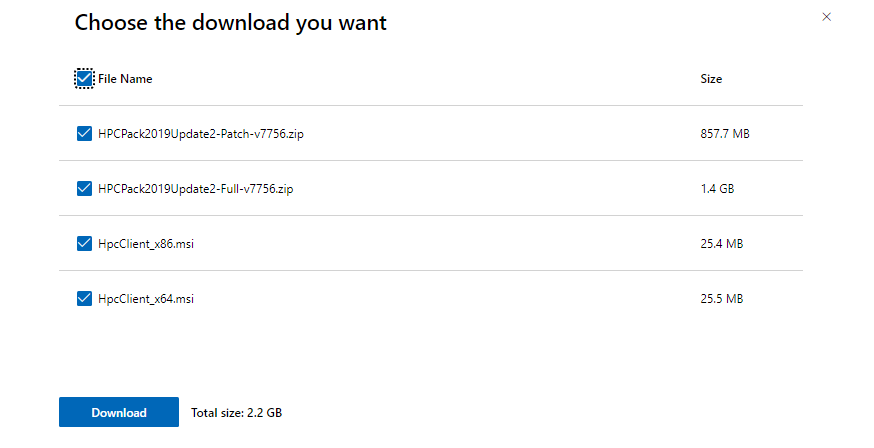
Download the Full version and the Client X64 version. Since this is a first-time installation, do not download the patch. Move these files to the head node (or download them on the head node) and extract the archive.
In HPC Pack, an X.509 certificate is required to secure communication between nodes. If you are not familiar with certificates, you can create one using the script provided by HPC Pack. The script file is named CreateHpcCertificate.ps1 and is located in the setup folder under the extracted HPC Pack directory. Open PowerShell, navigate to the setup folder under the installation directory, and create the certificate with the following command.
.\CreateHpcCertificate.ps1 -CommonName "HPC Pack Node Communication" -Path "[인증서 파일 경로]\hpccomm.pfx" -Password (ConvertTo-SecureString "[암호]" -AsPlainText -Force)
Here, [certificate file path] is the folder where the certificate file will be installed, and [password] must be entered as the actual password required for the certificate. This password is used only for HPC Pack and can differ from the OS password.
File C:Users\newone\Downloads\HPCPack2019Update2-Full-v7756\setup\CreateHpcCertificate.ps1 is published by CN=Microsoft Corporation, O=Microsoft Corporation, L=Redmond, S=Washington, C=US and is not trusted on your system. Only run scripts from trusted publishers.
  [V] Never run  [D] Do not run  [R] Run once  [A] Always run  [?] Help (default is "D"):
Press R and then Enter in the above message to install. If there is no error message, the installation succeeded, and you can see the hpccomm.pfx file in the path. Now run the setup.exe file in the extracted folder to proceed with the HPC Pack installation.
When the script runs and the message “This script is signed by Microsoft Corporation…” appears, press R (Run once) to allow execution. If it completes without error, the hpccomm.pfx file is created in the specified location.
Run setup.exe in the extracted root folder to start the installation.
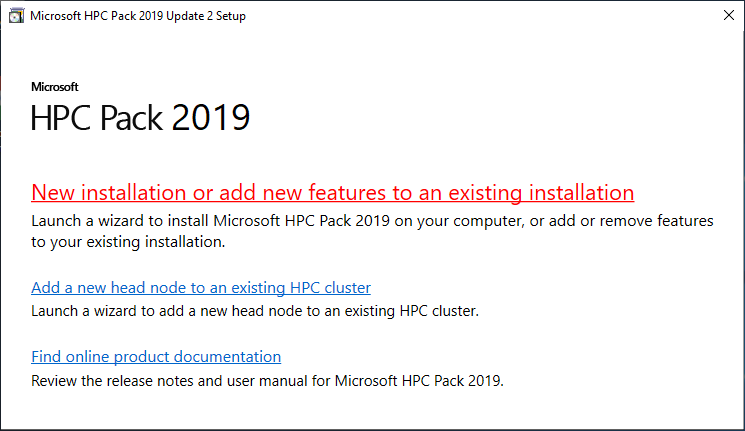
Click New installation or add new features to an existing installation.
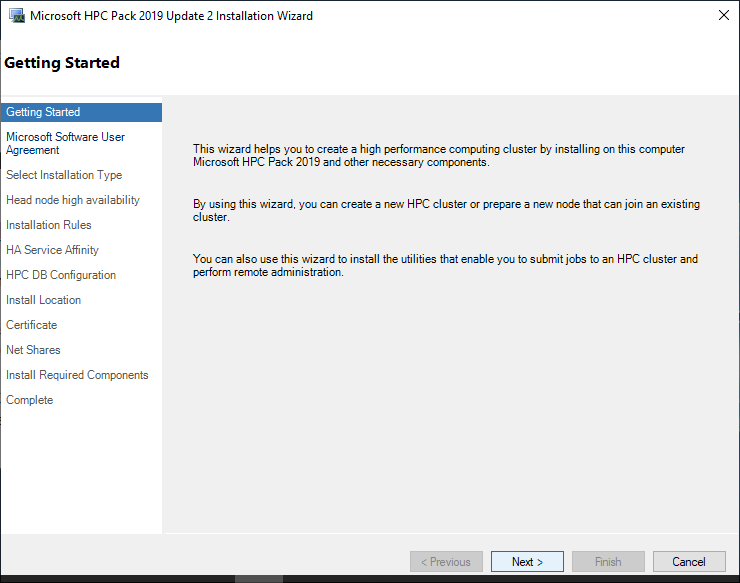
This is a simple installation guide. Click the Next button.
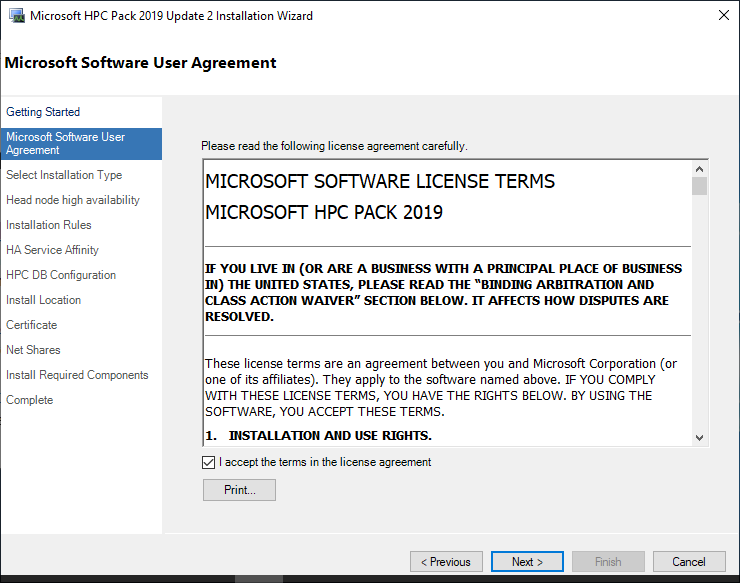
It asks whether you agree to the license agreement. Read it and click the Next button.
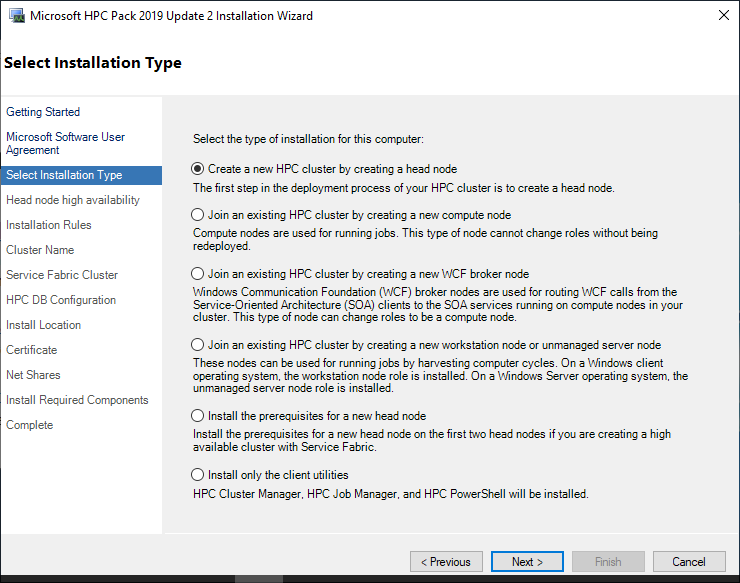
Since you are installing a head node, select the topmost Create a new HPC cluster by creating a head node and click the Next button.
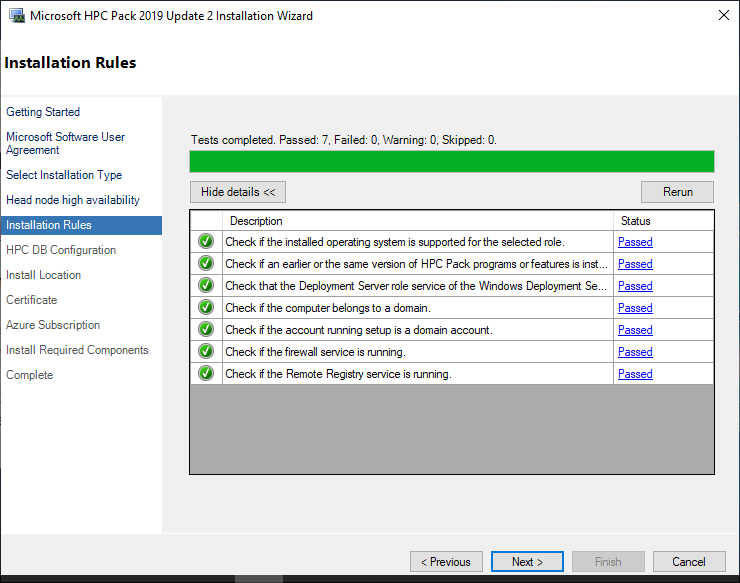
Automatically perform tests for the required pre‑installation conditions. If any test shows a Status other than Passed, we recommend stopping and resolving the cause. If all are Passed, click the Next button.
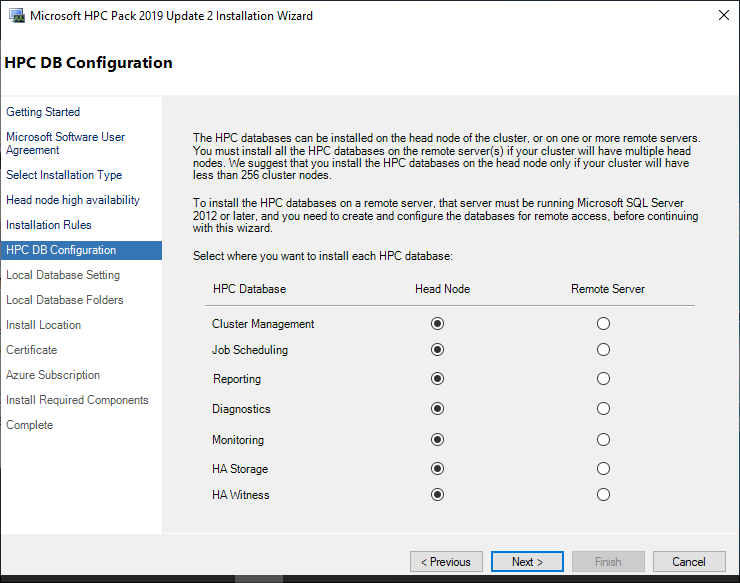
From now on, we will configure the DB. You can configure multiple DBs separately, but since we decided not to use a remote DB, select all as head nodes and click the Next button.
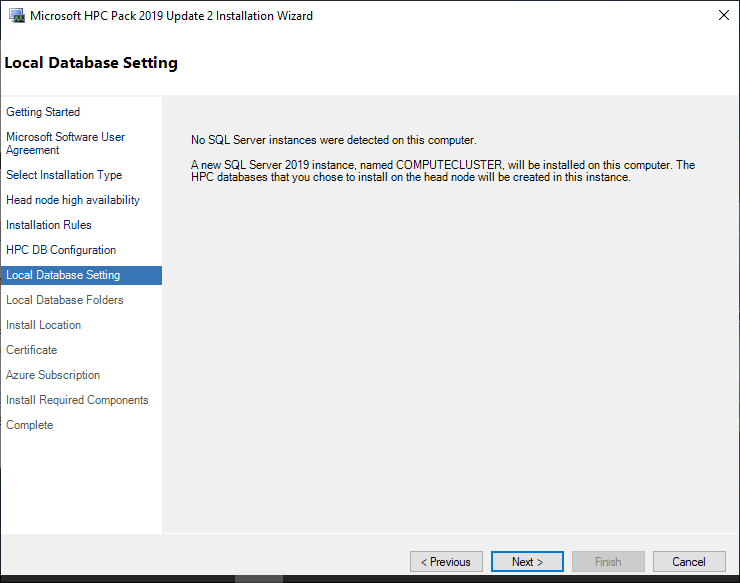
Since SQL Server is not installed, this is a message indicating that it will be installed anew. Click the Next button.
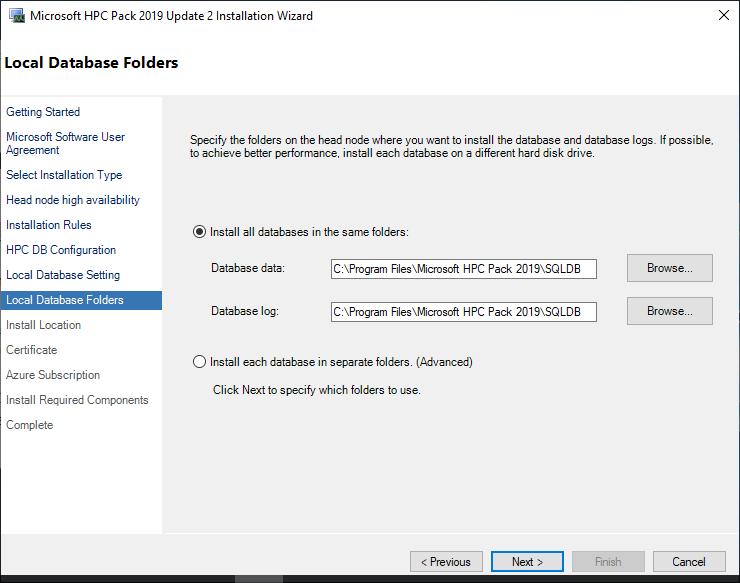
This is the location where the SQL Server is installed. Keep the default installation path and click the Next button.
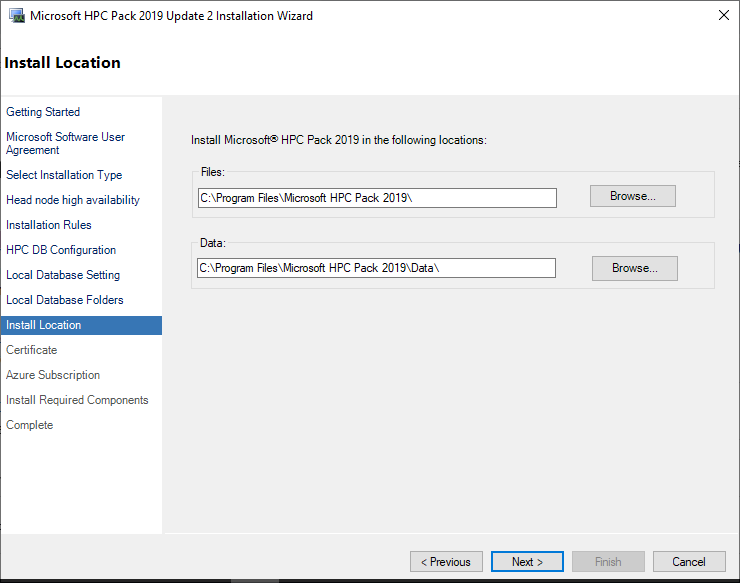
This is the location where HPC Pack is installed. Keep the default installation path and click the Next button.
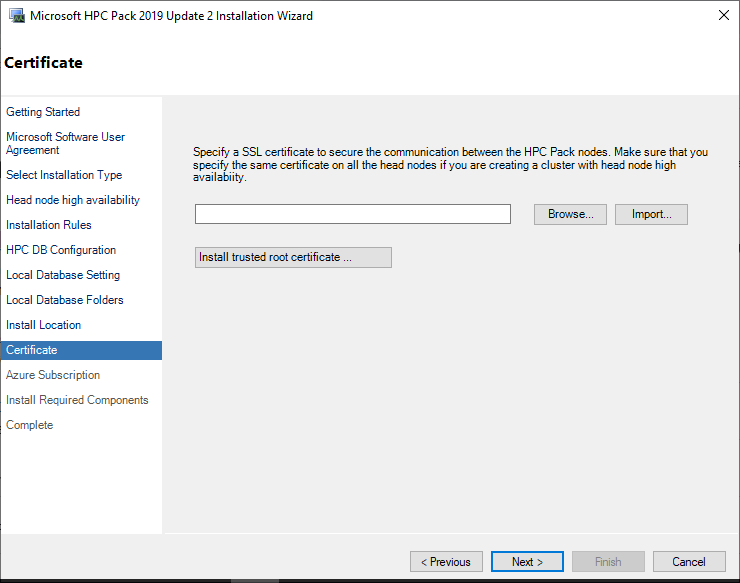
This is the step to register the certificate. Press the Import button.
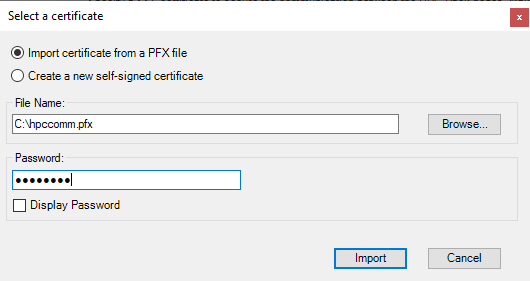
Import Certicate form a PFX file, select it, then use Browse to select the certificate you previously created. In the Password field, enter the password you used when creating the certificate. Then click the Import button to proceed to the next step.
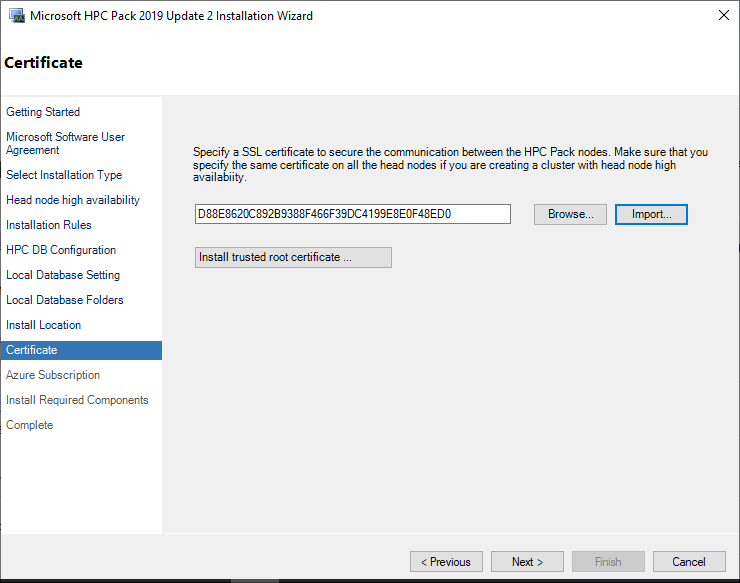
If you have successfully retrieved the certificate, click the Next button.
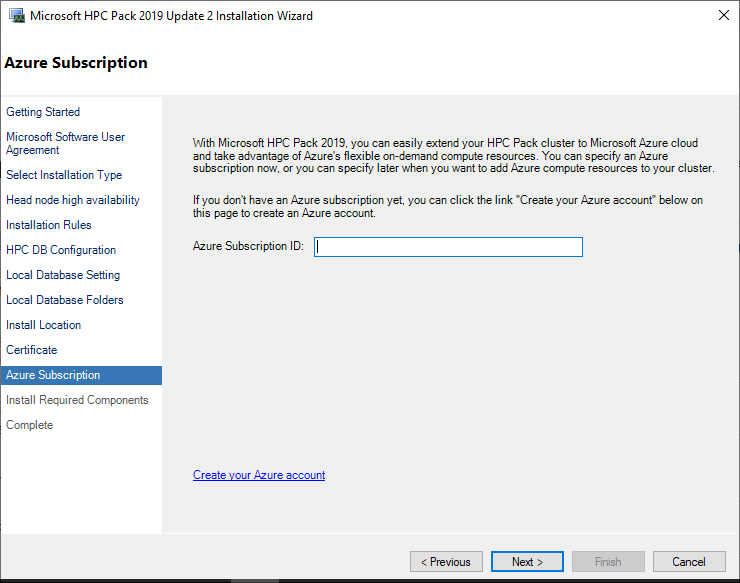
This is the step where you enter information when using the Azure integration feature. In this guide, leave it blank. Click the Next button.
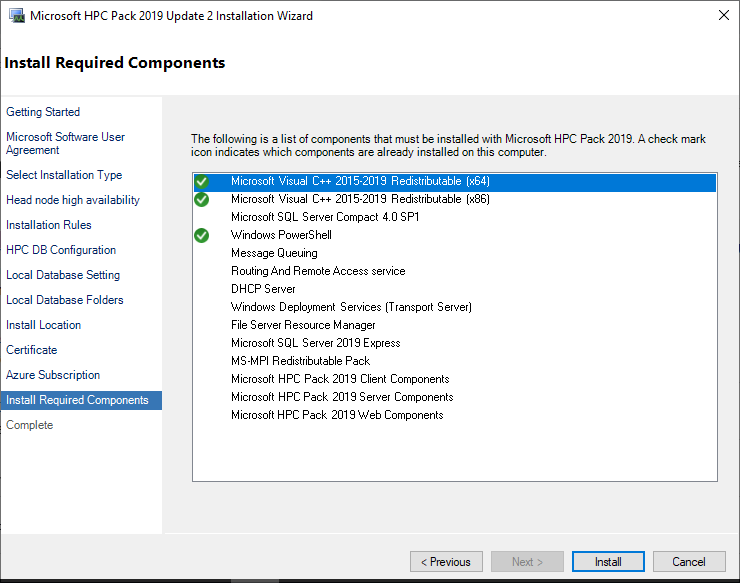
Now is the installation stage. Press the Install button to install. Installation takes about 10–20 minutes, so you can have a cup of coffee and come back.
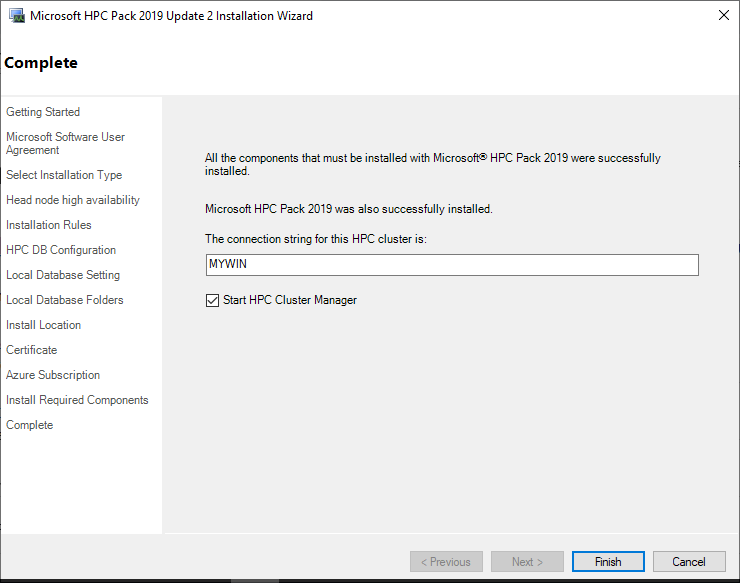
When the process is complete, click the Finish button. Press the Windows button and go to Start, and you can see that HPC Cluster Manager and HPC Job Manager are installed in the HPC Pack 2019 section. Since all functions of HPC Job Manager are available in HPC Cluster Manager, you can use HPC Cluster Manger on the head node. Conversely, you may not want to grant users full permissions in HPC Pack. In that case, you only need to install HPC Job Manager. You can do this by installing only the client file (HpcClient_x64.msi) that was provided with the download. I will explain this again during the discussion of the login node.
Cluster configuration
There are steps you need to take to complete the cluster setup on the head node. When you launch HPC Cluster Manager, you must complete the Required deployment tasks. Select the first Configure your network.
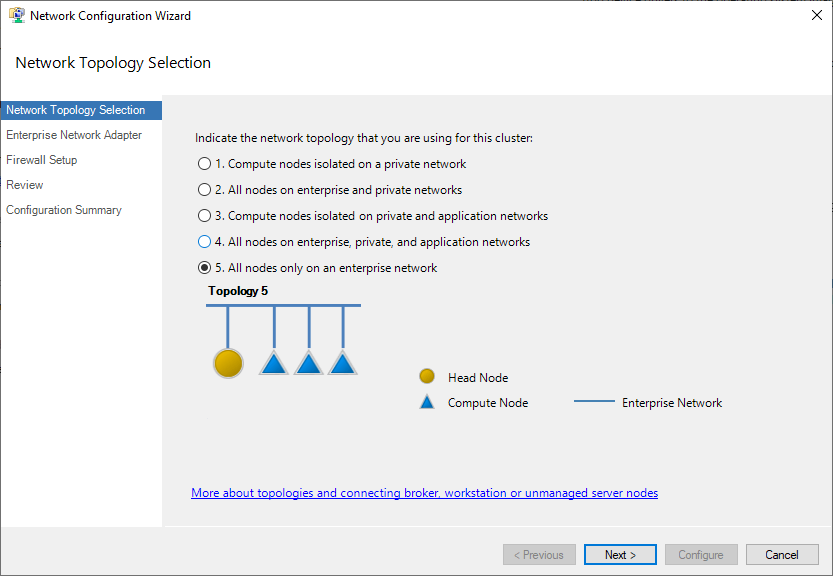
This is the step where you determine the network topology. Select All nodes only on an enterprise network.
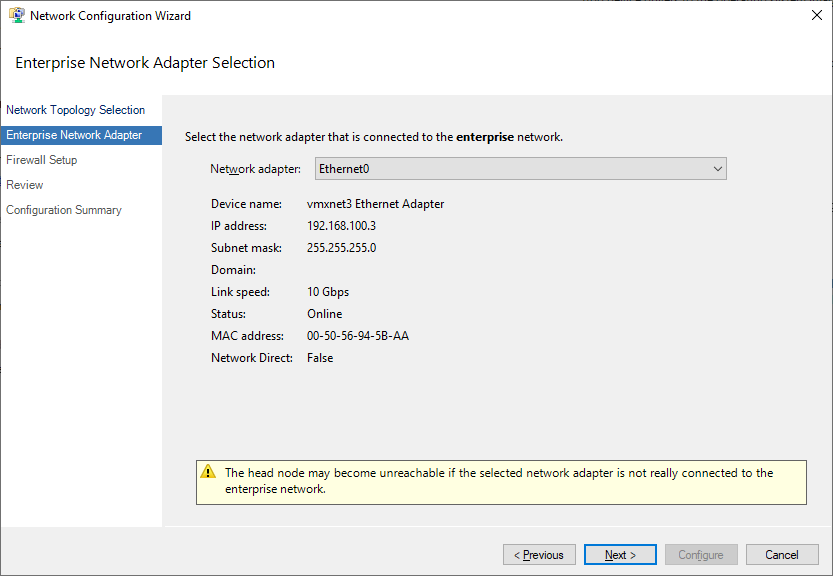
After selecting the network adapter as Ethernet0, click the Next button.
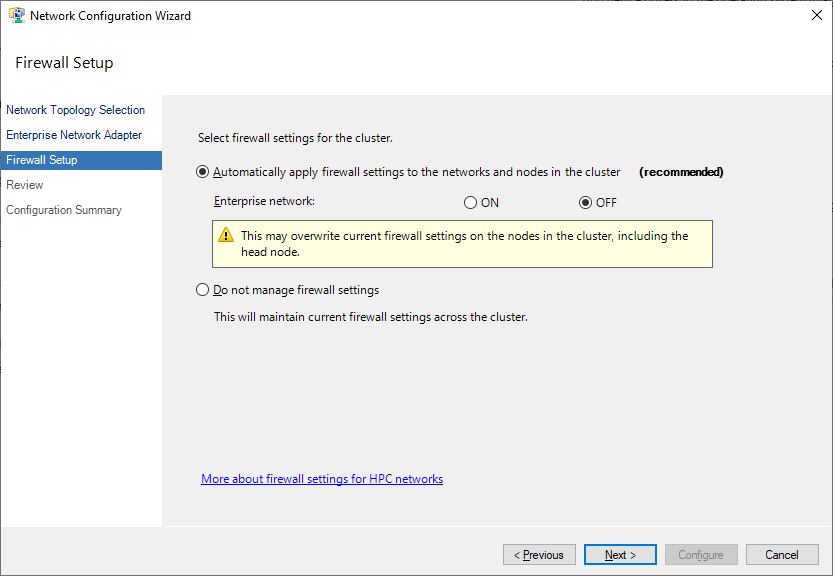
It is about configuring the firewall, but since it can be set in the Samsung Cloud Platform Console, set it to OFF.
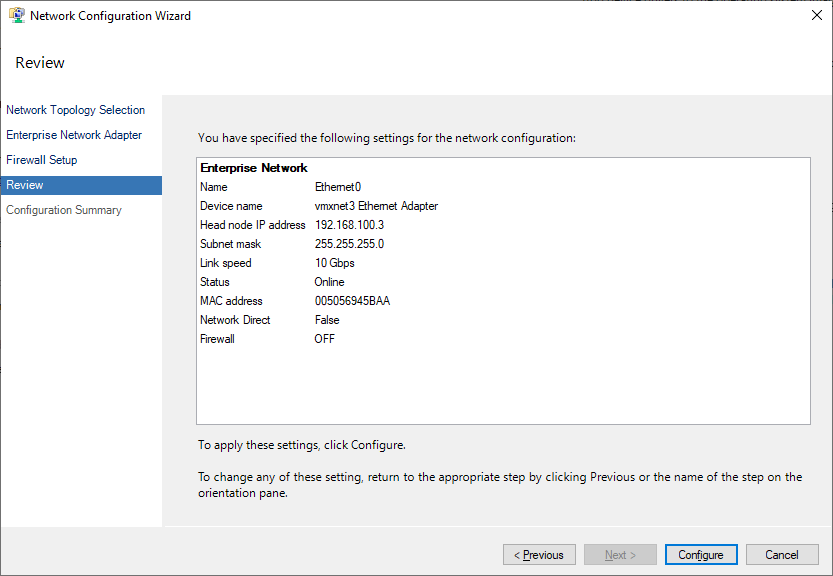
Check the network settings and click the Configure button.
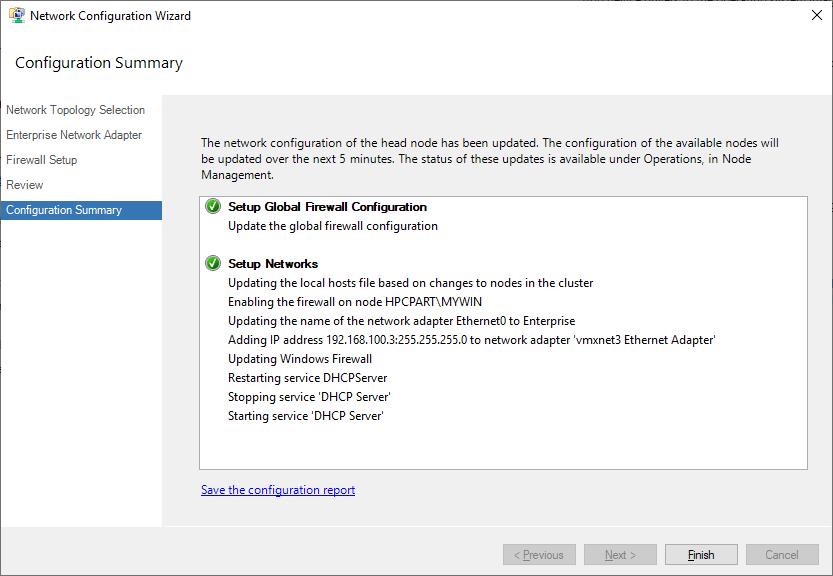
Click the Finish button to complete the network configuration.
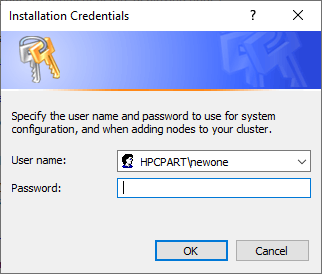
When you select Provide installation credentials as the second step, the screen shown above appears. This authentication selects users in the Active Directory domain.
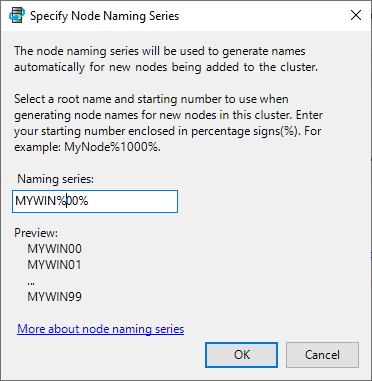
Third, select Configure the naming of new node. This defines the naming rule for compute nodes when they are added automatically. Since we will set it manually, it doesn’t matter much, so just give it an appropriate name.
Add compute node
In this guide, the compute nodes consist of two Virtual Servers and one Bare Metal Server. Repeat the following compute node tasks three times. To add compute nodes, you must also install HPC Pack on the compute nodes. Transfer the files that were installed on the head node to the compute nodes. After running the installation file with Setup.exe, the license agreement step is the same as installing the head node.
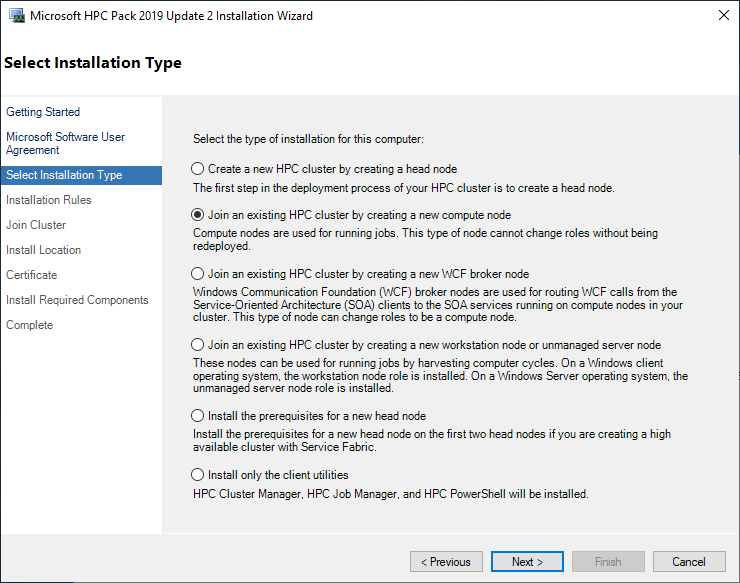
It differs starting from the Select Installation Type step. Select Join an existing HPC Cluster by creating a new compute node and click the Next button.
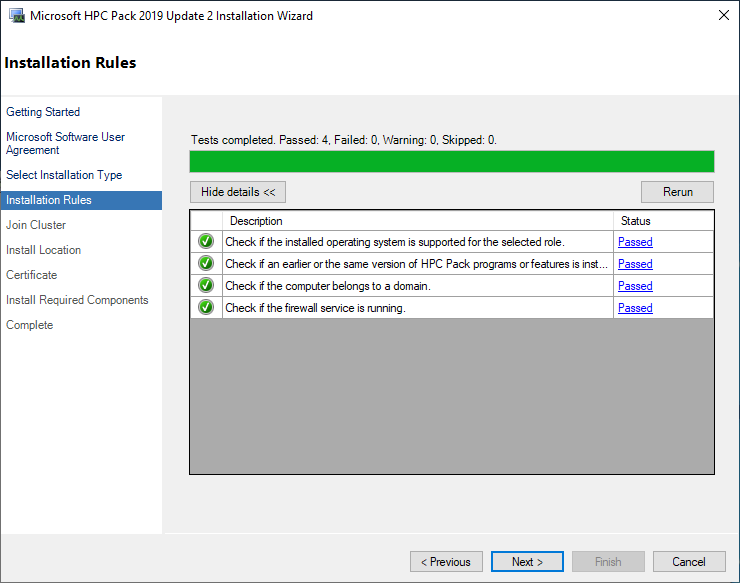
Automatically perform tests for the required pre‑installation conditions. If any test shows a Status other than Passed, we recommend stopping further progress and resolving the cause. If all are Passed, click the Next button.
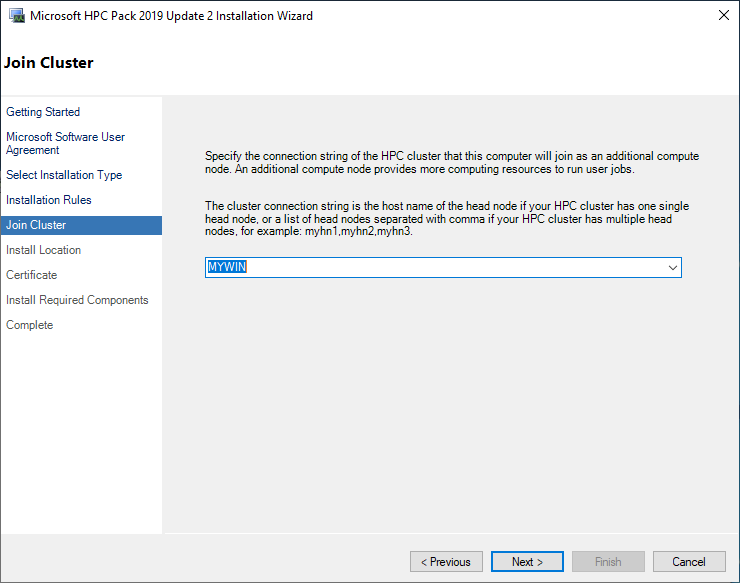
Select the head node to connect to. If it is in the same Active Directory domain, the head node’s name will be displayed. If the previously installed head node does not appear in the list, something is wrong and you cannot proceed.
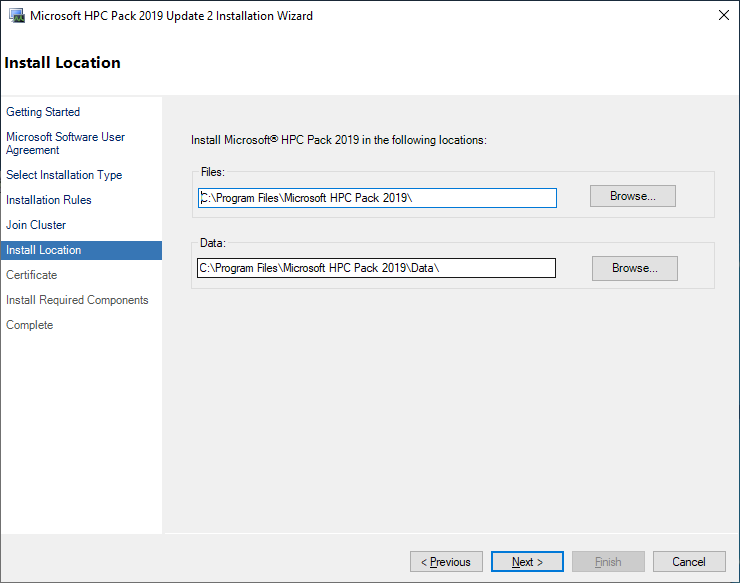
Select the installation path. Click the Next button without changing the existing path. Then, on the certificate screen, you must use the same certificate file as the head node. In other words, do not create a new certificate on the compute node; instead, copy the head node’s certificate to the compute node and then proceed.
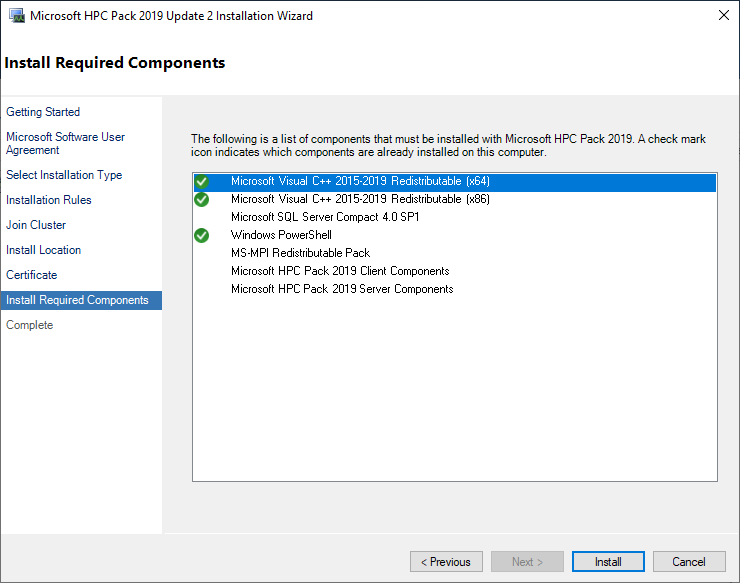
Perform the installation. It will take less time than the head node.
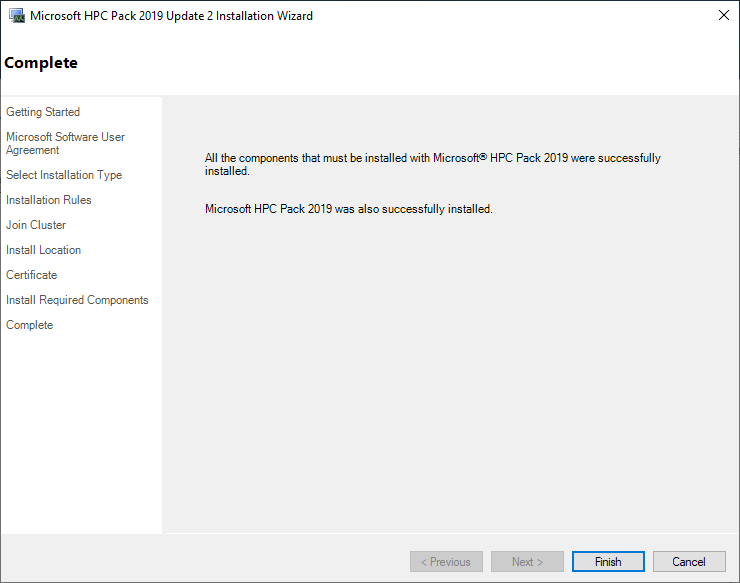
Press the Finish button to complete the installation.
On the compute node, you must install and register it with the cluster to complete the process. If you go to the Resource Management of the head node’s HPC Cluster Manger, you will see the added compute node.
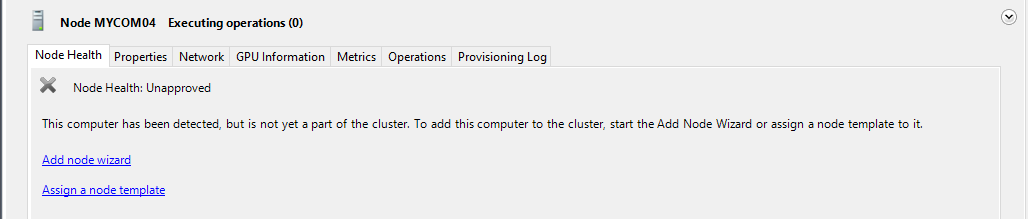
However, Node Health is Unapproved. Click Assign a node Template.
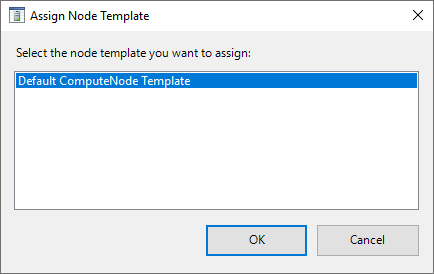
Select Default ComputeNode Template. Then it takes a moment to provision, and the status changes as follows.
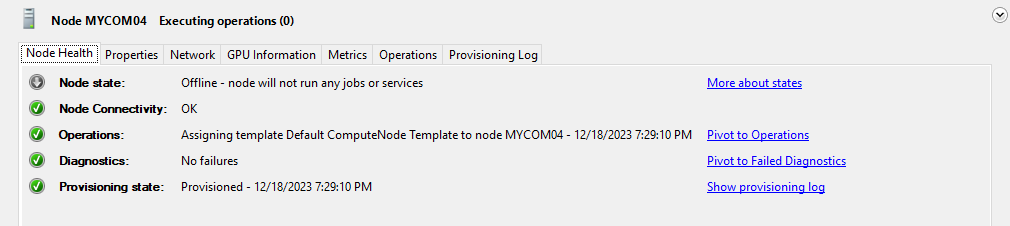
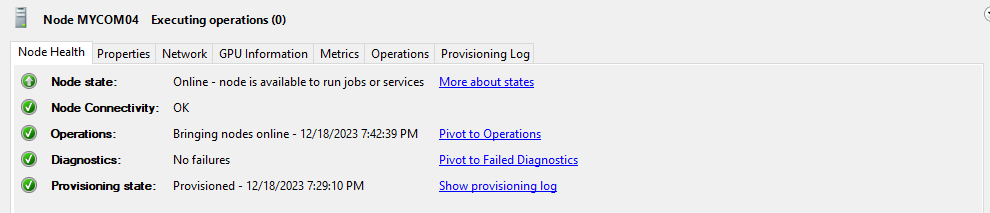
Node is normal, but the Node state is still offline. Right-click on the node and click Bring Online. The Node State will change to Online as shown.
Workstation node configuration
The workstation node in HPC Pack provides a somewhat unique feature not found in other schedulers. In HPC, a workstation generally refers to a server that performs pre‑ and post‑processing. The traditional HPC application workflow involves performing preprocessing on the workstation, solving on the HPC cluster, and then bringing the results back to the workstation for post‑processing. However, recently, because preprocessing and post‑processing also require substantial CPU, memory, or GPU resources, it has become increasingly common to perform these steps on the HPC cluster rather than on a separate workstation. Even in such cases, resources are shared and allocated by the job scheduler. However, the concept of a workstation node in HPC Pack is different. It assumes that such tasks are performed without going through the job scheduler. If you are not managed by HPC Pack, you may wonder why you would need to register at all. HPC Pack allows you to set availability policies for workstation nodes. For example, you can configure the node so that the job scheduler does not run during working hours, and only allows batch jobs after working hours. If there is no such availability policy and the server is completely unmanaged, there is no need to register it with an HPC Pack cluster.
Before installing a workstation node, there are some steps to take. The compute node had a Default Template, but the workstation node does not have a default template, so you need to create one. Click the Configuration→Node Templates→Actions→New button.
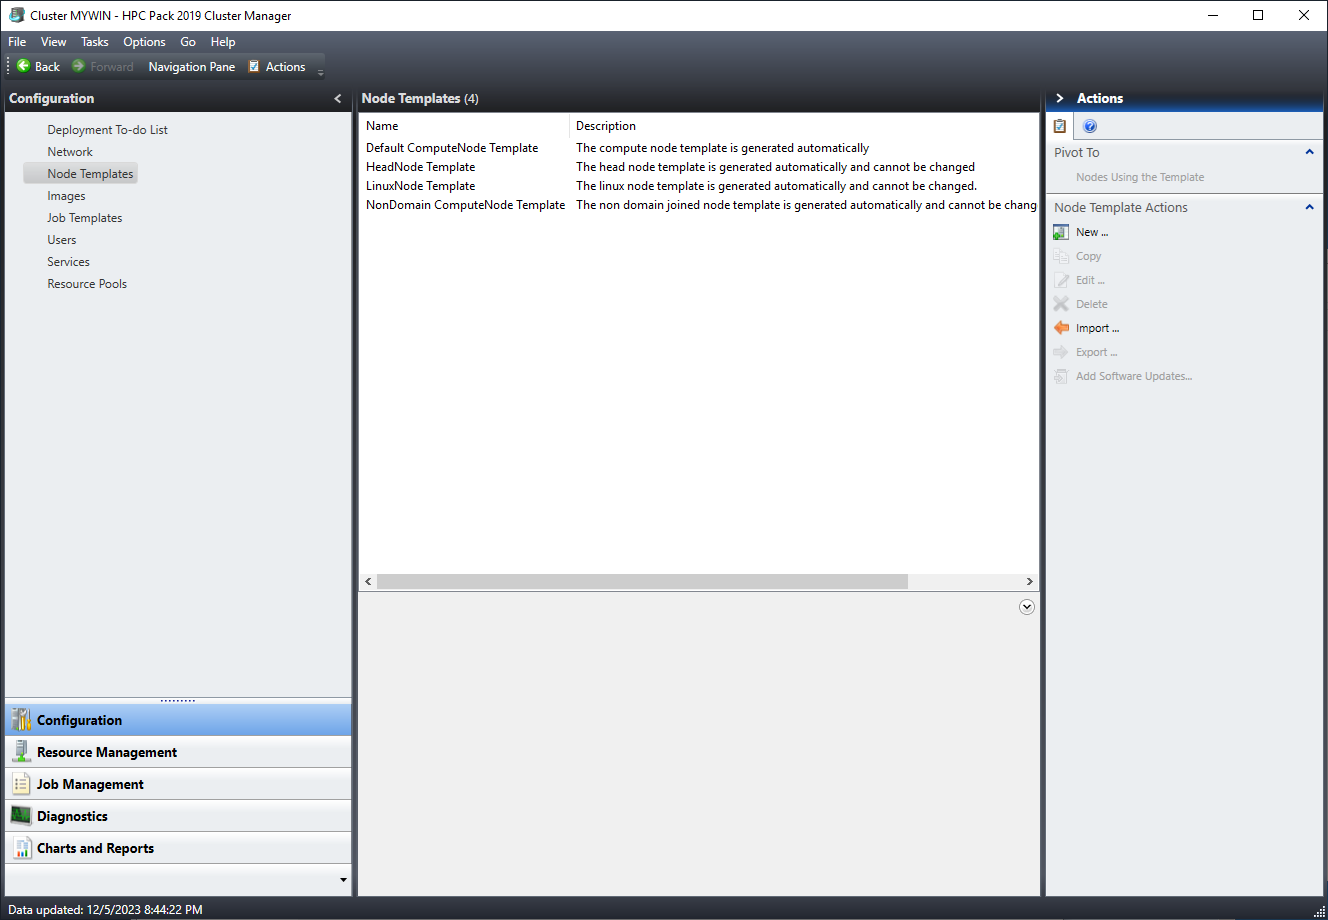
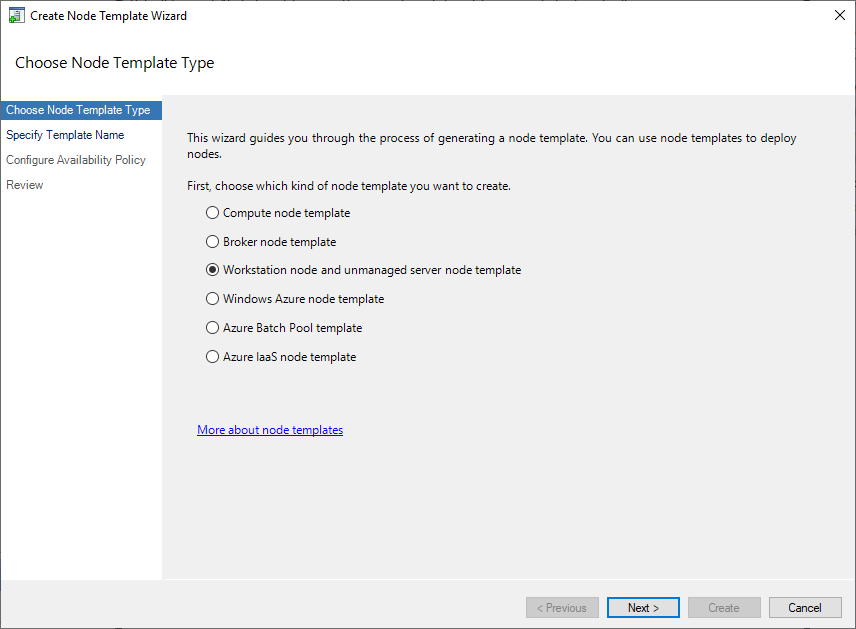
Select Workstation node and unmanaged server node template.
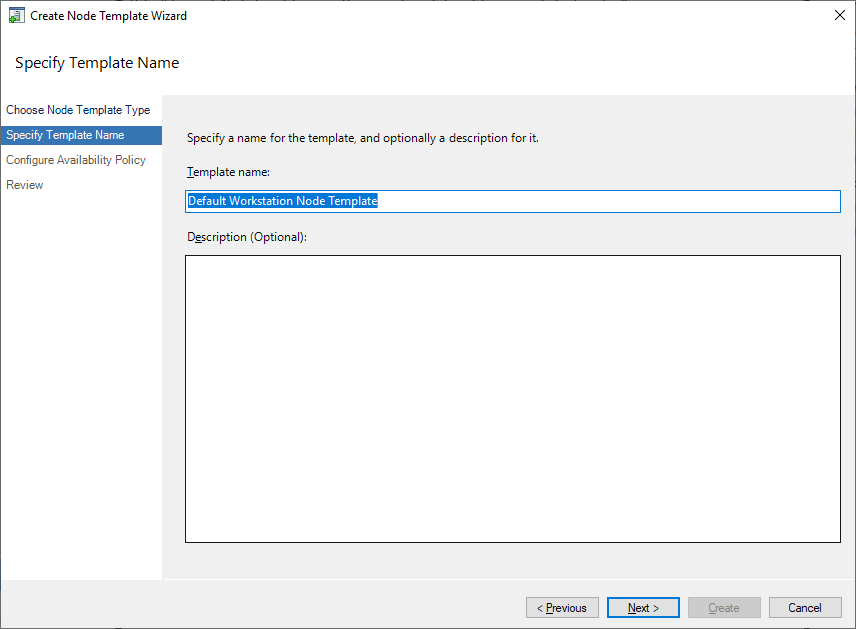
Naming the template is not very important, so just give it an appropriate name.
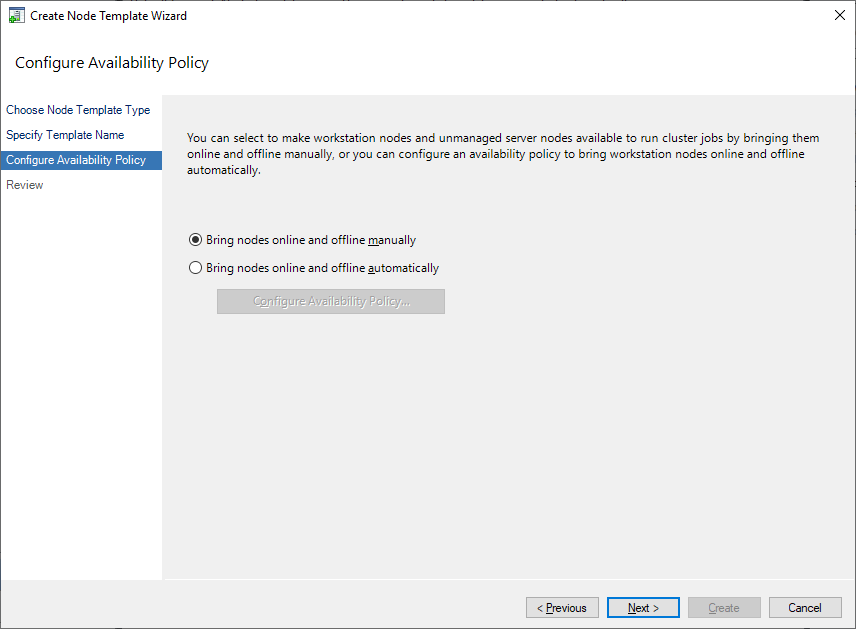
This is the step to set the availability policy (Avialblity Policy). Select Bring nodes online and offline manually. Detailed configuration will be done after completing the template.
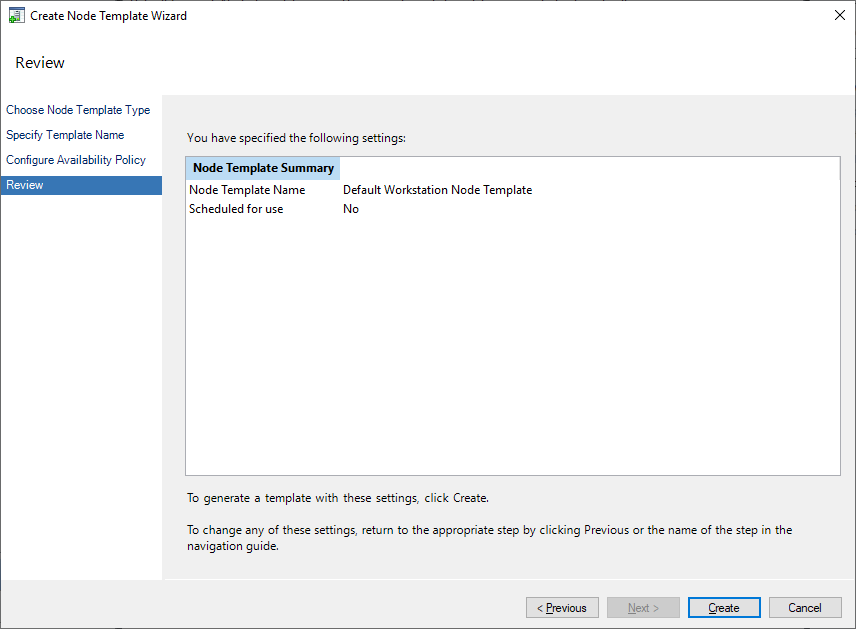
When you click the Create button, a template is generated.
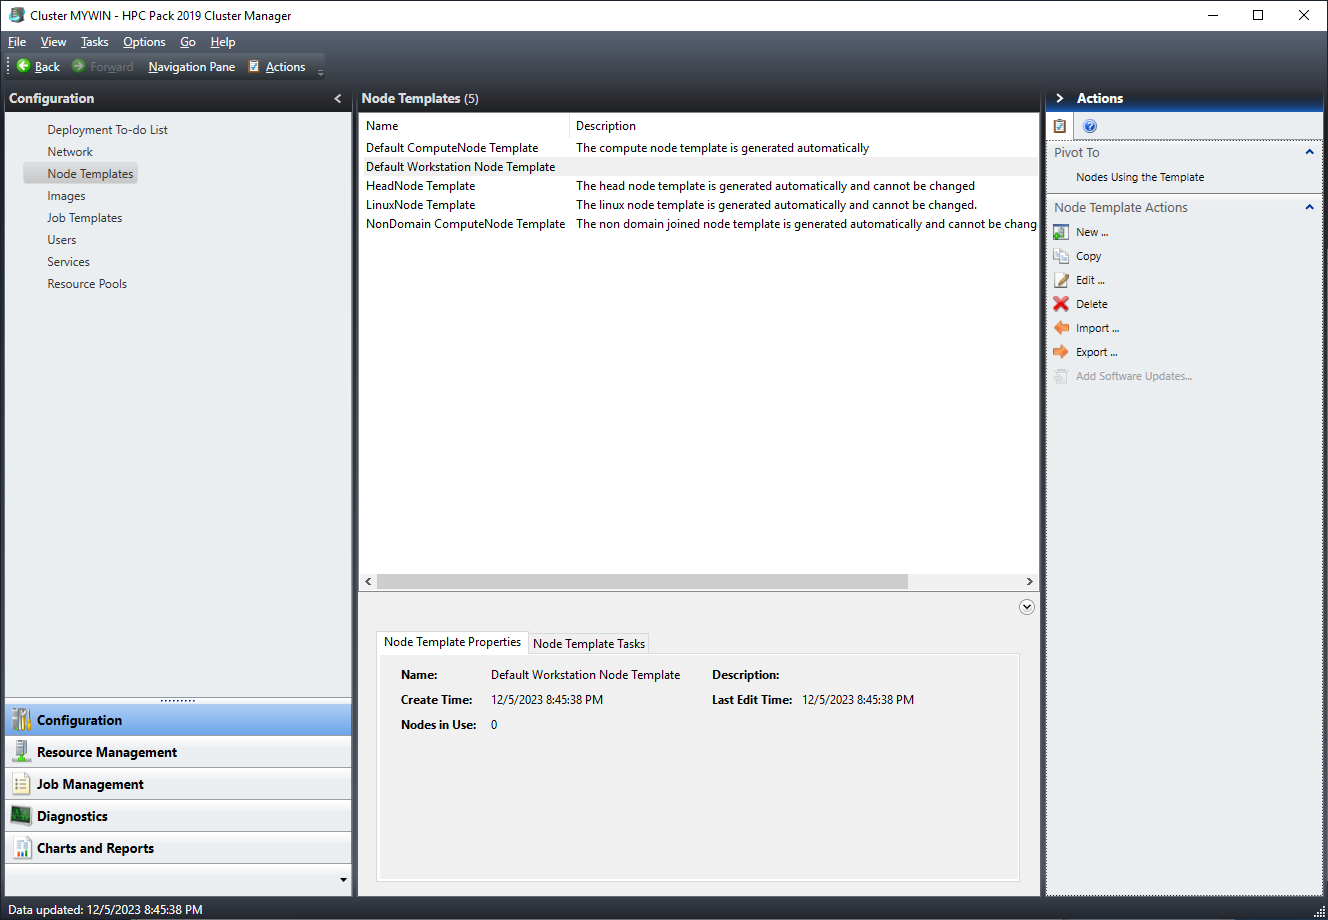
Again, in the node template window, click the Edit button of the template you just created in Node Template Actions.
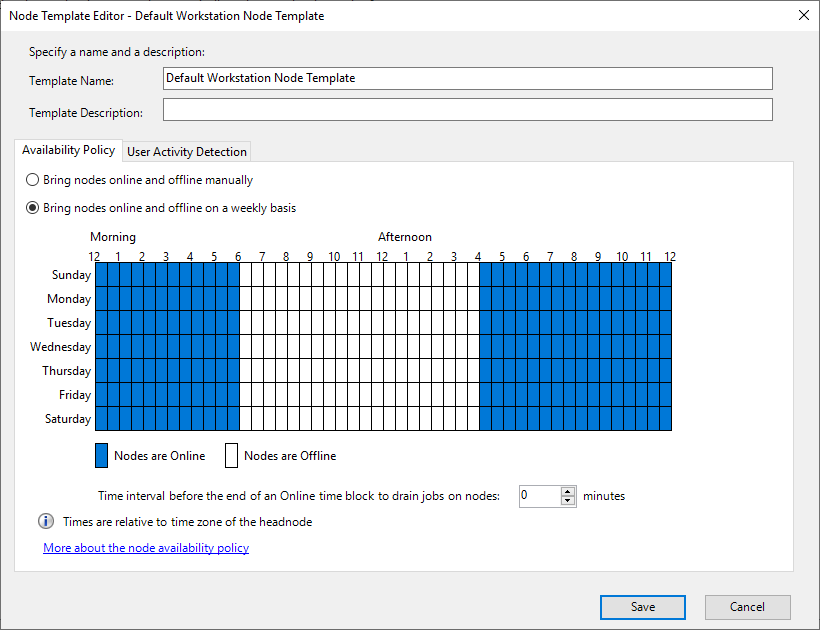
There are the Availablity Policy and User Activity Dection tabs. In the Availablity Policy, Bring nodes oneline and offline manually means manually setting nodes to Online or Offline. This can be applied to compute nodes as well as workstation nodes, so it is not a special feature. Bring nodes online and offline on a weekly basis sets online and offline periods based on a weekly schedule. For example, you can keep nodes online during working hours so that only jobs assigned by the job scheduler can run, and set them offline after working hours to allow free use.
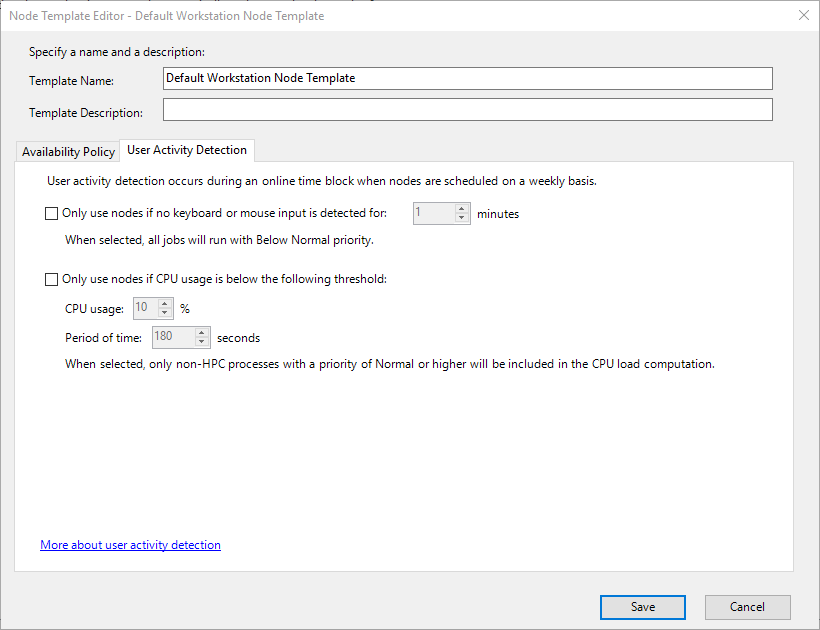
User Activity Detection adjusts the priority of Jobs by monitoring user activity on the workstation.
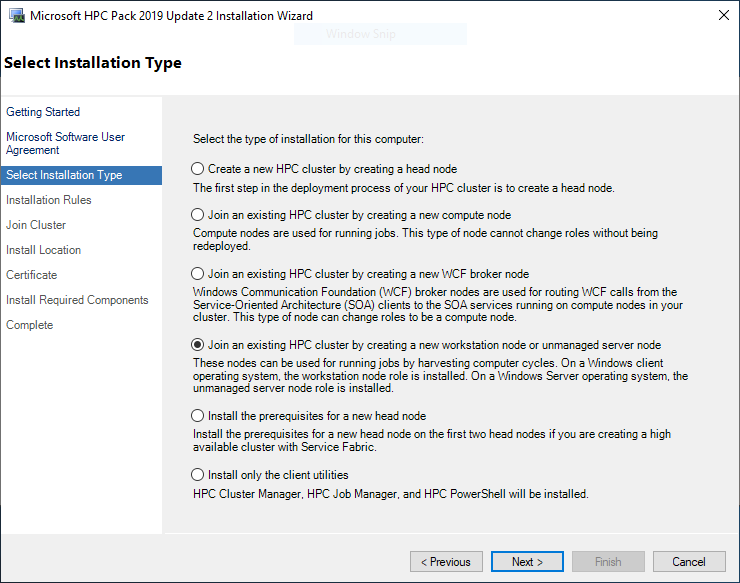
Just as when adding a compute node, run the installer and proceed through the license agreement step unchanged, and at the installation type step, select Join an existing HPC cluster by creating a new workstation node or unmanaged server node.
The subsequent configuration is the same as installing a compute node. Once installation is complete, go to Resource Management just like with a compute node. The node you just registered is in an Unapproved state. Select the second item, “Assign a node template”.
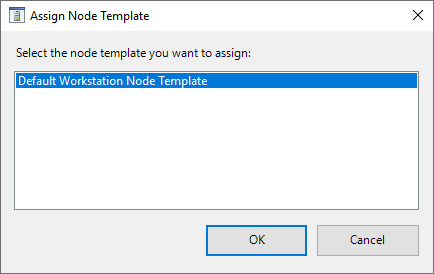
Select the template you created earlier and click the Ok button. The workstation node configuration is now complete. In other HPC services, many services integrate such workstation nodes with remote desktop clients. However, the workstation node in HPC Pack differs from those remote desktop features, so use it with caution. For reference, HPC Pack also supports node access using Windows Remote Desktop Connection (RDP).
login node
Although it was explained when installing the head node, you can install the client files of HPC Pack to install only the HPC Job Manager. Let’s install the client to create a login node.
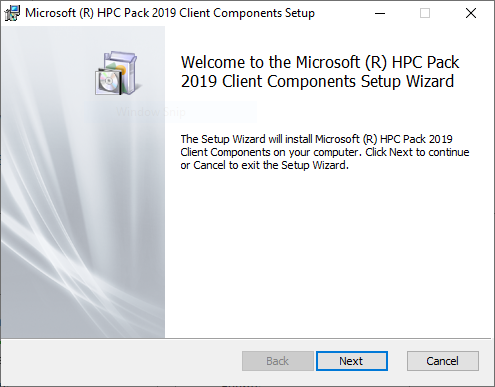
Click the Next button.

It contains information about the license; agree and click the Next button.
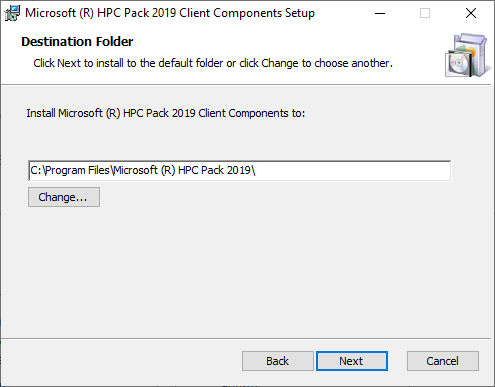
The location where the HPC Pack client is installed. Click the Next button.
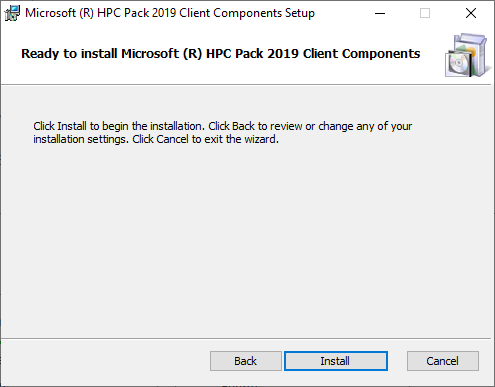
Click the Install button.
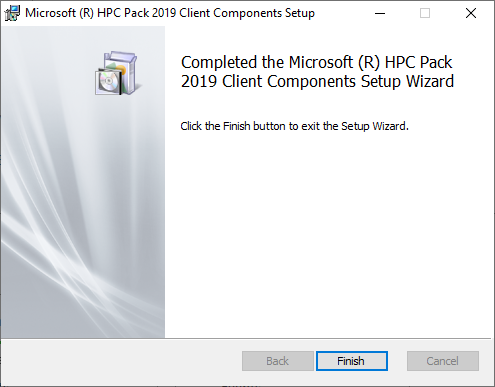
The client installs in a very short time. Once installation is complete, launch the Job Manager.
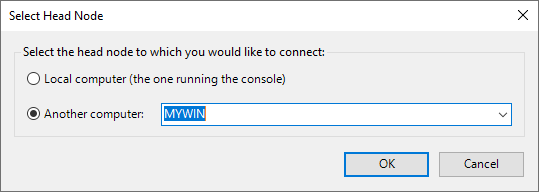
Run it and, when prompted to set the head node, select the head node just as you would when installing a compute node. HPC Job Manager works almost the same way as HPC Cluster Manager. By allowing users to connect to the login node and restricting head node configuration to administrators, you can manage permissions finely.
SSH configuration
For HPC users accustomed to Linux, the inconvenient aspect of Windows is the terminal environment. However, Windows also provides the PowerShell shell environment, and using SSH is possible. Note that SSH is not a default service on Windows, so the installation process described below is required.
Download the OpenSSH installation file for Windows 64‑bit from https://github.com/PowerShell/Win32-OpenSSH/releases and install it on the Windows server. At the time this guide was written, the latest version was the OpenSSH‑Win64‑v9.4.0.0.msi file. Because it is an MSI file, it installs without any special instructions. The installation path is C:Program FilesOpenSSH, and you can verify the installation in File Explorer.
Open Windows PowerShell and run the following commands. These commands add the OpenSSH executable path to the PATH environment variable.
$env:Path="$env:Path;C:\Program
Files\OpenSSH\"
Set-ItemProperty –Path
‘Registry::HKEY_LOCAL_MACHINE\System\CurrentControlSet\Control\Session
Manager\Environment' -Name PATH -Value $env:Path
If it were a Linux cluster, in the bashrc file
PATH=$PATH:$HOME/bin
It can be regarded as equivalent to a command of this kind. To run the SSH service, execute the following in PowerShell.
Start-Service sshd
To use it at the start, do the following.
Set-Service sshd -StartupType Automatic
The two commands above correspond to the following similar commands in Linux.
systemctl start sshd
systemctl enable sshd
Now you can make an SSH connection from the SSH client. Create a session in MobaXterm as shown below and connect.
Here, enter the Host IP in item 1 and write the user name in item 2. If you want to use the PowerShell environment by default in item 3, add powershell.exe. If you want to use the default Command environment, leave it blank.
Task Settings
Single Task Job
The Job Management screen is as follows.
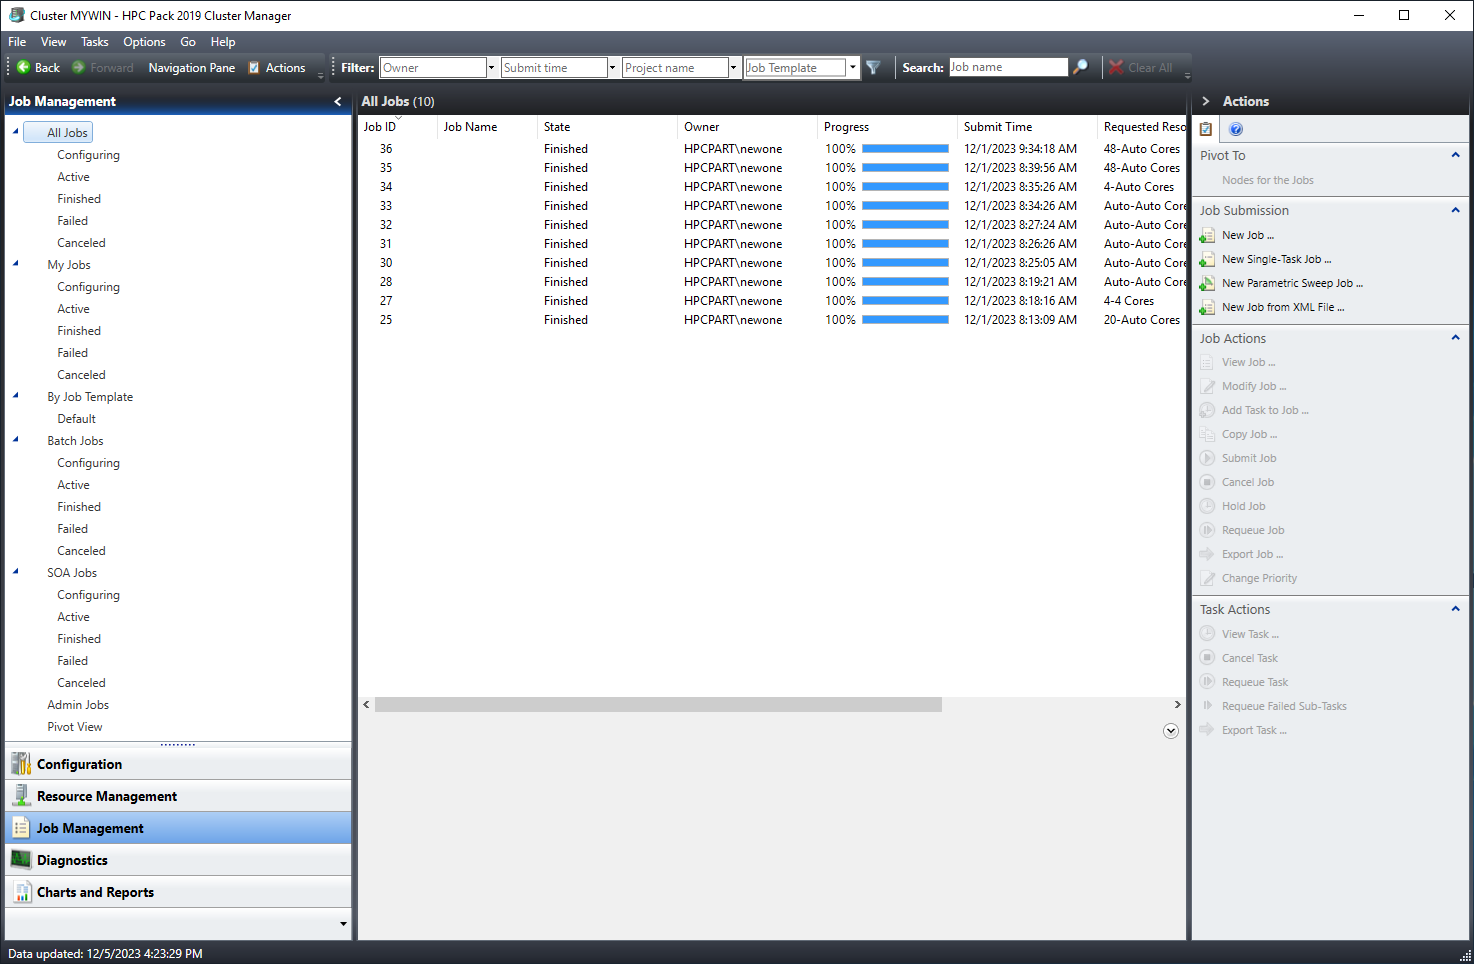
The center is the main screen where the list of Jobs is displayed. The left sidebar provides a function for filtering Jobs. You can filter by options such as Job status, type, and My Jobs. The right sidebar concerns actions, allowing you to submit a new Job or give specific commands to an existing Job.
In the right sidebar, there is Job Submission. Select the New Single Task Job on the second line.
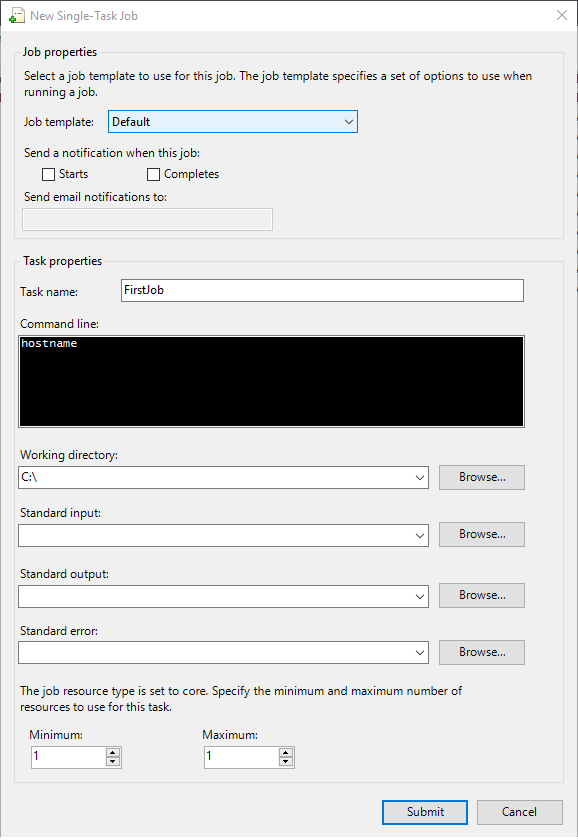
The term “Task” appears in the center. In HPC Pack, a Task is a subunit of a Job. A single Job can consist of multiple Tasks. However, since you selected Single Task Job in the previous menu, you only need to create one Task. Enter an appropriate name in Task Name. Because it is a Single Task, the Task Name becomes the Job Name. These names are solely for human identification; the actual scheduler distinguishes them by numeric IDs, so Job (Task) names can be duplicated or even left blank.
In the Command Line, write the software command to be executed in the Job. Since this is the first time, let’s test with the simple Linux command hostname. This command outputs the node’s host name. Next, specify the working directory where the command runs and the paths for standard outputs. We will leave these blank because the current Job does not write to files. Finally, specify the cores allocated to this Job. For a regular Job, set the Minimum and Maximum to the same value. The current Job is submitted with 1 core. Click the Submit button to submit the Job. When the Job is submitted, a new Job ID is assigned and appears in the list. Because this Job finishes quickly, its status becomes Finished immediately. If the State does not become Finished right away, there is an issue.
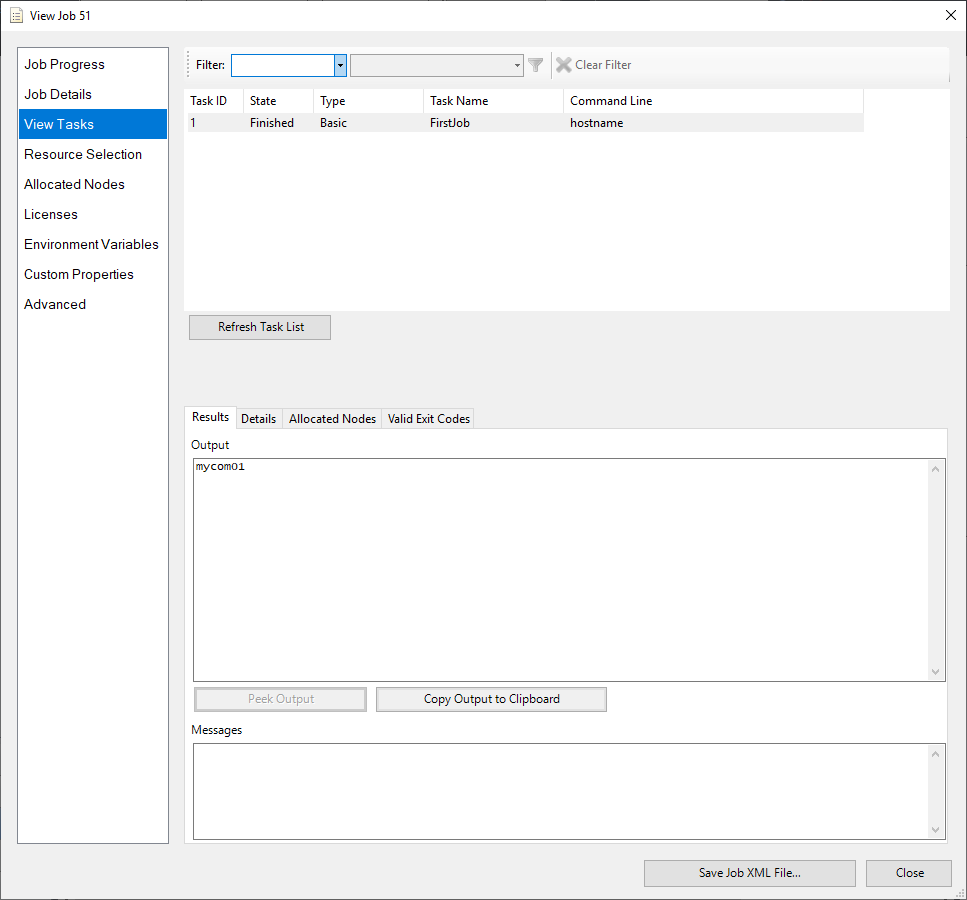
Now, when you click Job, you can obtain the detailed information of the Job. Click View Tasks in the left menu to see the Job’s results. In the Output section, the compute node’s host name was correctly displayed as mycom01.
Job Manager Details
In HPC Pack, you can define jobs in greater detail.
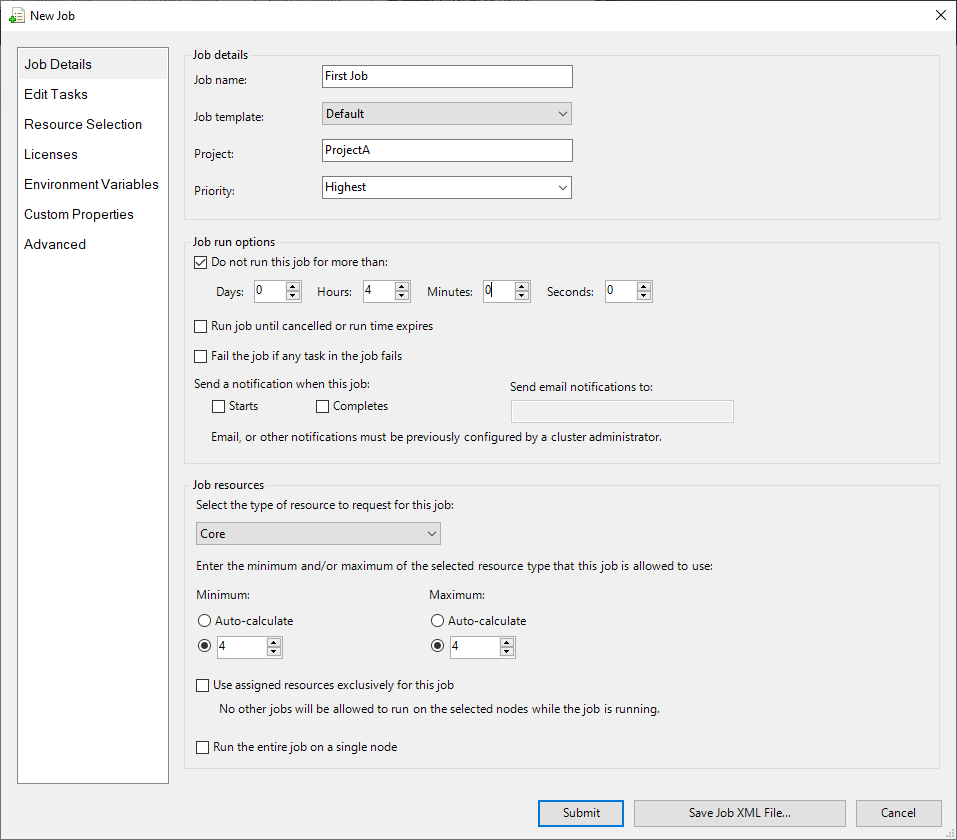
In Job Details, you can set the job’s name, project (Project), and priority (Priority). The project can be useful because you can group and analyze jobs by specific projects later. When multiple jobs are in the queue, the job with the higher priority is processed first. Priorities are set in five levels from Lowest to Highest.
Job run options allow you to set options for how a job is executed. The Do not run this job for more than: item prevents the job from running longer than a specified duration. Other schedulers such as Slurm commonly use the term Walltime. The Run job until cancelled or run time expires option keeps the job running even after it finishes, until the specified run time elapses or a cancel action is issued. The Fail the job if any task in this job option causes the entire job to be marked as failed if any one of its multiple tasks fails. The Send a notification when this job option configures an email notification upon job completion. Among these, the Run time corresponding to Walltime and the email notification option are frequently used.
Job resource sets the resources for a Job. The type can be selected from Core, CPU, Socket, or GPU. Usually Core or GPU is used. You can specify the minimum and maximum amounts of the resource. If set to Auto, it is calculated automatically based on the Job’s tasks. Use assigned resource exclusively for this job forces that no other Job can be placed on the node where this Job runs. For example, when you need a test Job such as a node stress test, this ensures that other Jobs do not affect it. Run the entire job on a single node makes this Job run on a single node. If 10 cores are required but the remaining resources are 5 cores on each of two nodes, the total is 10 cores but they are distributed across two nodes. If the Single Node option is enabled, since 10 cores cannot be secured on a single node, the Job will remain in the Queue state.
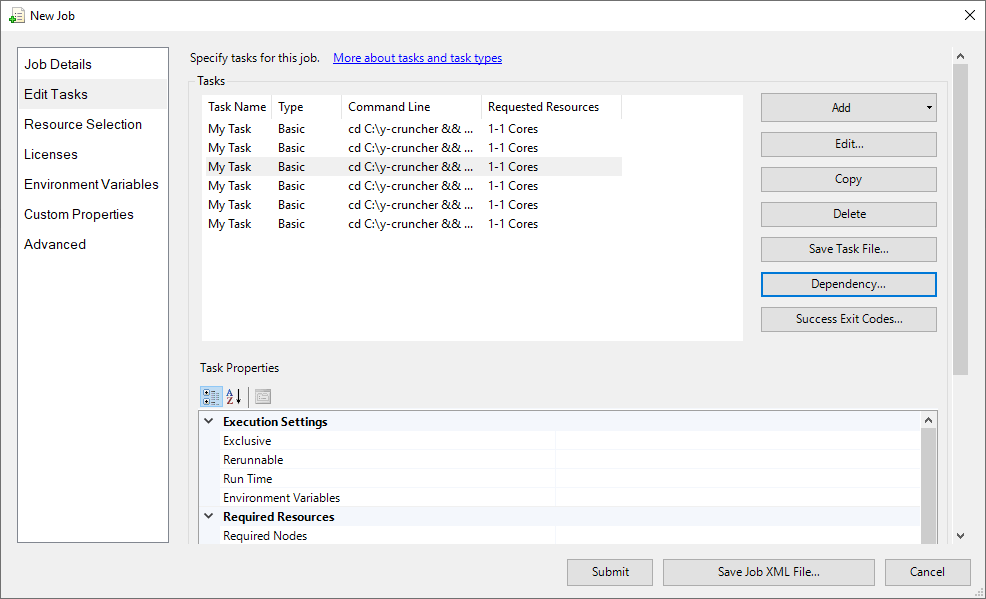
Edit Tasks is the menu for configuring a Job’s tasks. Clicking the Add button lets you create it similarly to the Single Task job screen. Tasks can be edited, copied, or deleted. You might wonder how multiple Jobs composed of single tasks differ from a single Job composed of multiple tasks. In a single Job, you can break down the steps of the tasks. Let’s keep clicking the Dependency button.
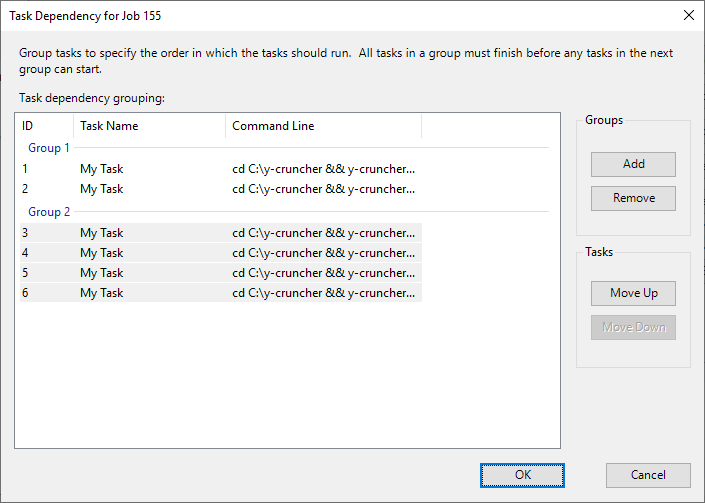
There are six tasks divided into two groups: tasks 1 and 2 are in group 1, and tasks 3–6 are in group 2. Within a group, multiple tasks can run concurrently, but all tasks in the preceding group must finish before tasks in the next group can execute. Dependencies can also be set between jobs. In a single job, resources are allocated and all tasks are performed, so after the first group completes, the next group runs using the allocated resources. For multiple jobs, later jobs start without allocated resources, so after the first job finishes, it is uncertain when the subsequent job will run.
You can further refine the nodes on which a Job runs. Let’s go into the Resource Selection menu.
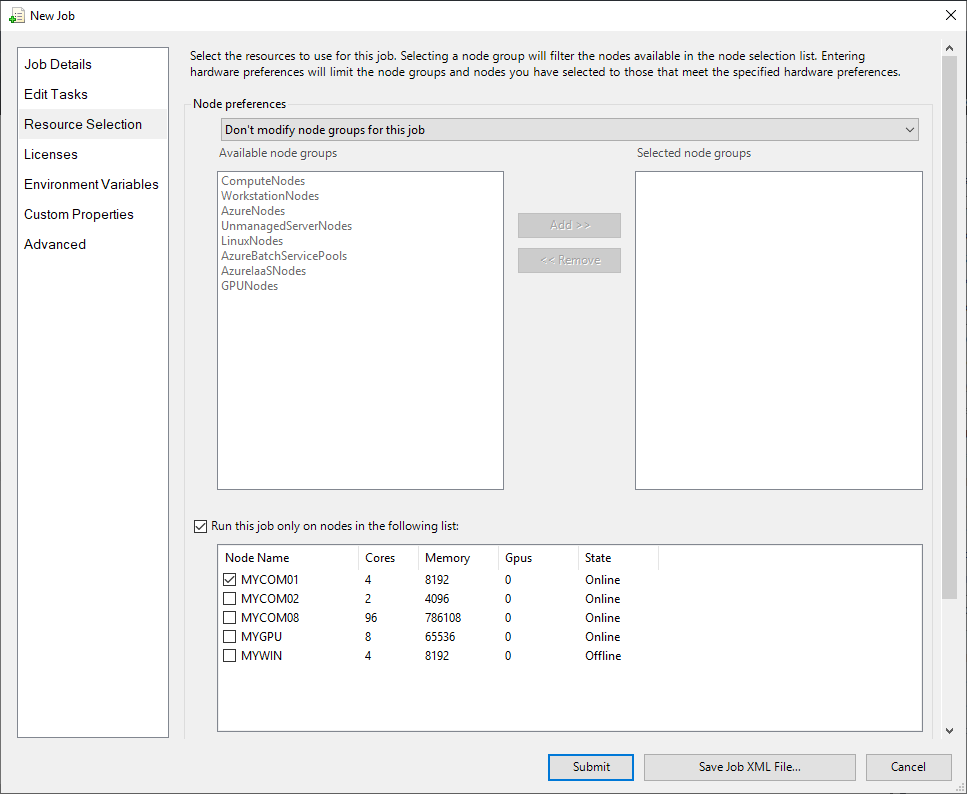
If you have grouped nodes, you can restrict them to that group only. As in this guide, grouping is appropriate when Virtual Server groups and Baremetal servers are included in the compute nodes and have different server specs. You can also make them run on a specific node only. In the figure above, we directly selected the MYCOM01 node so that jobs are submitted only there. Now click the Submit button to submit the job.
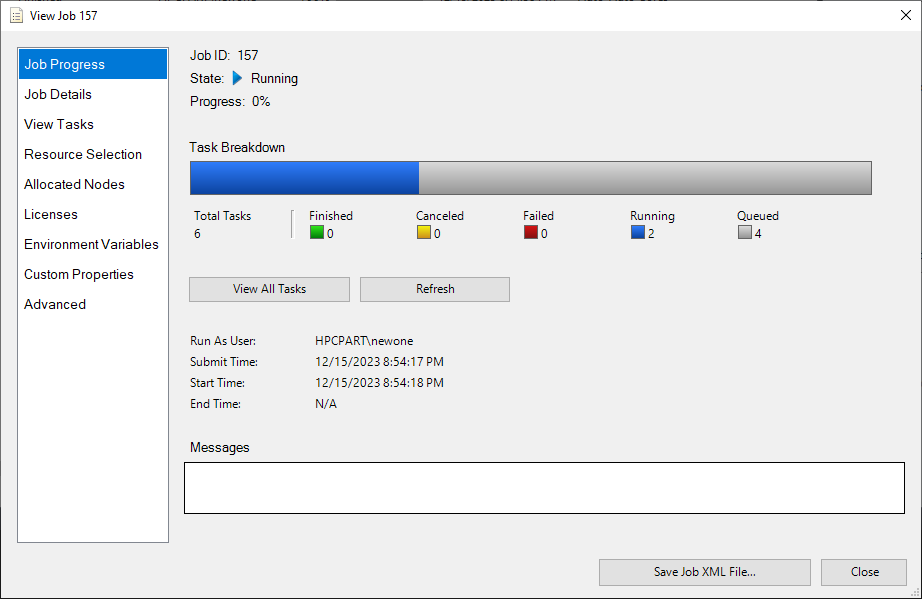
On the job’s detail screen, 2 tasks are in Running state and 4 tasks are in Queued state. Although only 2 of the allocated 4 cores are being used, the tasks in group 2 are in Queued state because dependencies were set earlier.
Another advanced feature is Parametric Sweep. When you click Parametric Sweep Job on the right screen, the following screen appears.
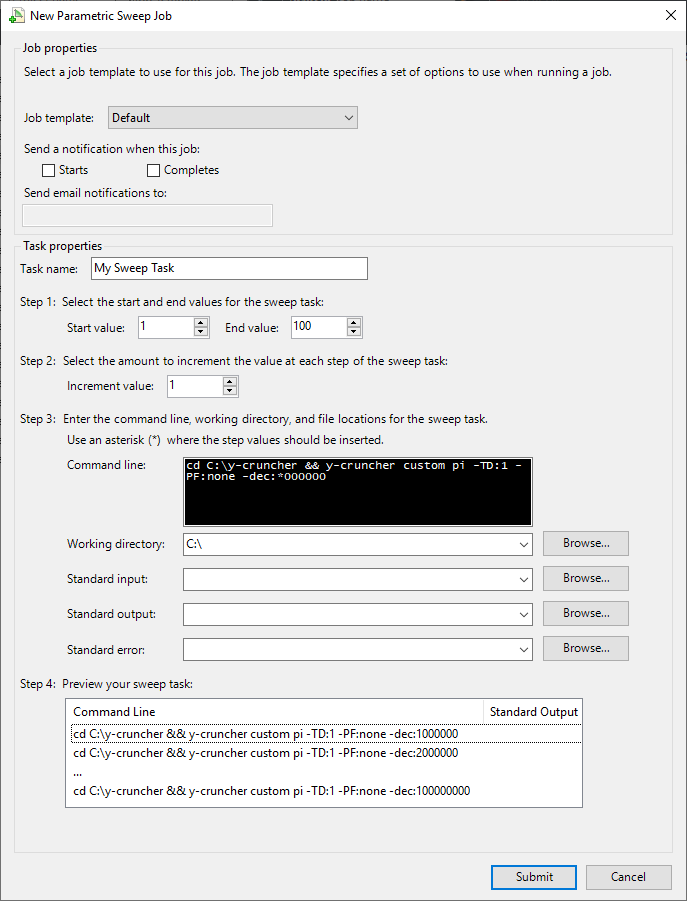
Here, Sweep is specified as a number. In the figure above, the increment ratio from 1 to 100 was set to 1. The Sweep Task is defined through a command. The command executed varies according to the Sweep number.
For example, using cd C:y-cruncher && y-cruncher custom pi -TD:1 -PF:none -dec:*000000 is a command that calculates pi with y-cruncher. The dec:*000000 option uses * to represent the Sweep number. dec specifies the number of digits of pi. For instance, if the Sweep number is 1, dec:1000000 calculates up to one million digits, and if the Sweep number is 100, dec:100000000 calculates up to one hundred million digits.
While using the GUI for these detailed tasks is convenient, it becomes tedious to perform repetitive operations. In HPC Pack, you can export a Job in XML format. Later, simply reading this XML file will recreate the Job with the same settings as before. This XML file can also be edited to your liking using a text editor.
The following are samples of Single Task Job and Parametric Sweep Task Job.
<?xml version="1.0" encoding="utf-8"?>
<Task Version="3.000" Name="My Task" CommandLine="cd C:\y-cruncher && y-cruncher bench 500m -TD:4
-PF:cppasync" WorkDirectory="C:\" MinCores="4" MaxCores="4" Type="Basic" xmlns="http://schemas.microsoft.com/
HPCS2008R2/scheduler/" />
<?xml version="1.0" encoding="utf-8"?>
<Task Version="3.000" Name="My Sweep Task" StartValue="1" EndValue="100" IncrementValue="1" CommandLine="cd
C:\y-cruncher && y-cruncher custom pi -TD:1 -PF:none -dec:*000000" WorkDirectory="C:\"
Type="ParametricSweep" MinCores="1" MaxCores="1" IsParametric="true" xmlns="http://schemas.microsoft.com/HPCS2008R2/scheduler/" />
Introduction to HPC Pack commands
Previously, we also introduced connecting to a terminal via SSH. HPC Pack provides commands that can be used in a terminal environment. These commands can alleviate the inconveniences of the GUI. While there are many types of commands, we will introduce only the representative ones.
1) clusrun
Clusrun is used to send terminal commands simultaneously to nodes within a cluster. This command is intended more for administrators than for users, primarily for checking the status of multiple nodes or for system administration tasks. It is not available in typical job schedulers, and in HPC cluster services based on Slurm, it is replaced by middleware called ClusterShell.
The /all option sends the command to all nodes in the cluster, as shown below.
PS C:\> clusrun /all hostname
-------------------------- MYCOM01 returns 0 --------------------------
mycom01
-------------------------- MYCOM02 returns 0 --------------------------
mycom02
-------------------------- MYCOM08 returns 0 --------------------------
mycom08
-------------------------- MYGPU returns 0 --------------------------
mygpu
-------------------------- MYWIN returns 0 --------------------------
mywin

-------------------------- Summary --------------------------
5 Nodes succeeded
You can send commands only to specific nodes as follows. Note that Windows generally does not distinguish between uppercase and lowercase.
PS C:\> clusrun /nodes:*com*
-------------------------- MYCOM01 returns 0 --------------------------
mycom01
-------------------------- MYCOM02 returns 0 --------------------------
mycom02
-------------------------- MYCOM08 returns 0 --------------------------
mycom08

-------------------------- Summary --------------------------
3 Nodes succeeded
2) hpcfile
This command is used to transfer small files. In Linux, there is a command called scp. It is used as follows.
hpcfile put -file:"[파일경로]" -targetnode:MYCOM01 -destFile:"[파일경로]"
3) job
The job command is literally a command that submits and manages jobs. First, to check jobs that are currently in the Queued or Running state as shown below, use the list command.
PS C:\> job list
Id          Owner               Name                 State        Priority        Resource Request

---------- -------------------- -------------------- ------------ --------------- ------------------

196        HPCPART\newone       My Sweep Task                  Running      Normal          *-* cores
198        HPCPART\newone       My Task                        Queued       Normal          *-* cores
199        HPCPART\newone       My Task                        Queued       Normal          *-* cores
201        HPCPART\newone       My Task                        Queued       Normal          *-* cores
Submitting a Job requires three steps. First is the step of creating the Job. This step prepares the Job before it is submitted. The next step is to add a Task to the created Job. Finally, submit the Job. Below is an example of submitting a Job.
PS C:\> job new
Created job, ID: 221
PS C:\> job add 221 /taskfile:SingleTask.xml
Task 221.1 added.
PS C:\> job submit 221
Job has been submitted. ID: 222.
We used the SingleTask.xml file created in the previous chapter. While it is possible to input the contents of the XML through options, there are too many options, making it inconvenient, so we recommend actively using the XML file.
4) node
Node commands are used to check the status of nodes in a cluster. In the slurm of an HPC Cluster, the command called sinfo was used. An example usage is as follows.
PS C:\> node list
Node Name           State       Max Run Idle Availability    Cost Per Hour
------------------- ----------- --- --- ---- --------------- -------------
MYCOM01  Online      4   4   0    AlwaysOn        1
MYCOM02  Online      4   0   0    AlwaysOn        1
MYCOM08  Unreachable 96  0   96  AlwaysOn        1
MYGPU    Unreachable 8   0   0   AlwaysOn        1
MYWIN    Offline     4   0   0    AlwaysOn        1
Admin Portal
In traditional Linux HPC, users submit jobs from a terminal environment, which creates a barrier for novice users. Recently, many web portals have been developed to make this easier. HPC Pack also provides a portal for administrators, but it is geared toward administrators and lacks many features for regular users. Moreover, because HPC Pack itself is a GUI desktop application, the need for a web portal is not high. However, the portal’s advantage is that it requires no separate installer as long as a web browser is available.
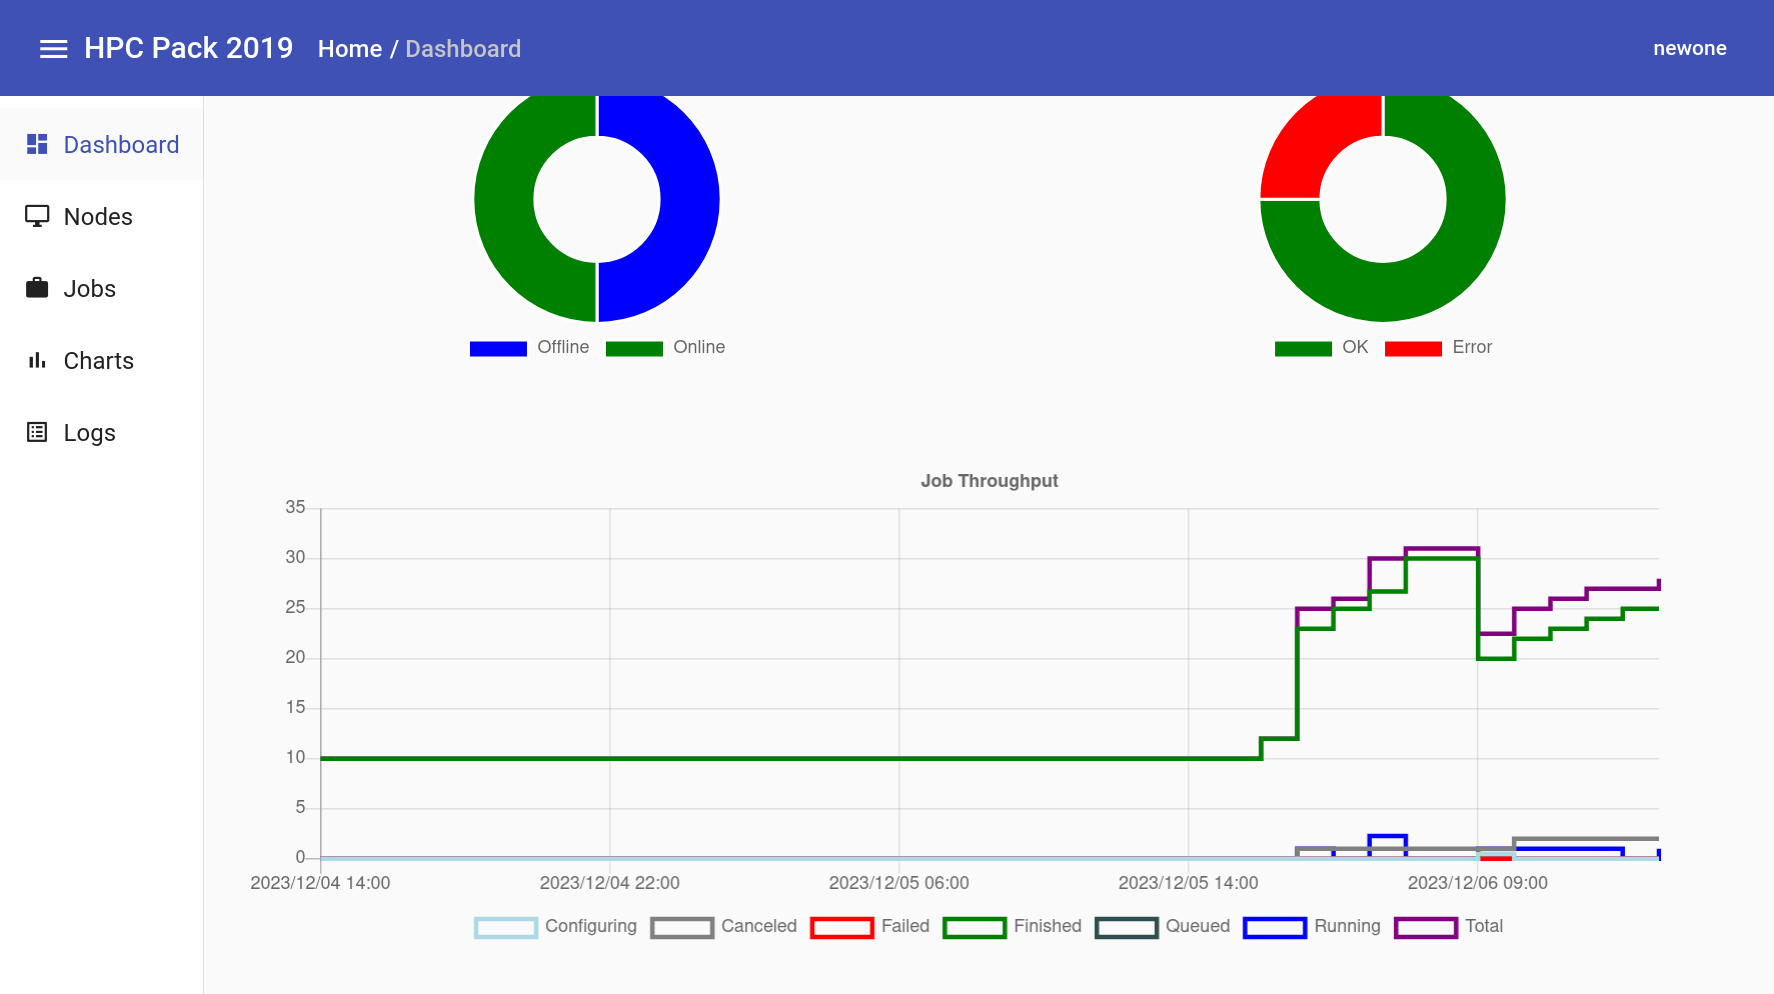
This is the dashboard screen. You can roughly view node statuses and job statuses.
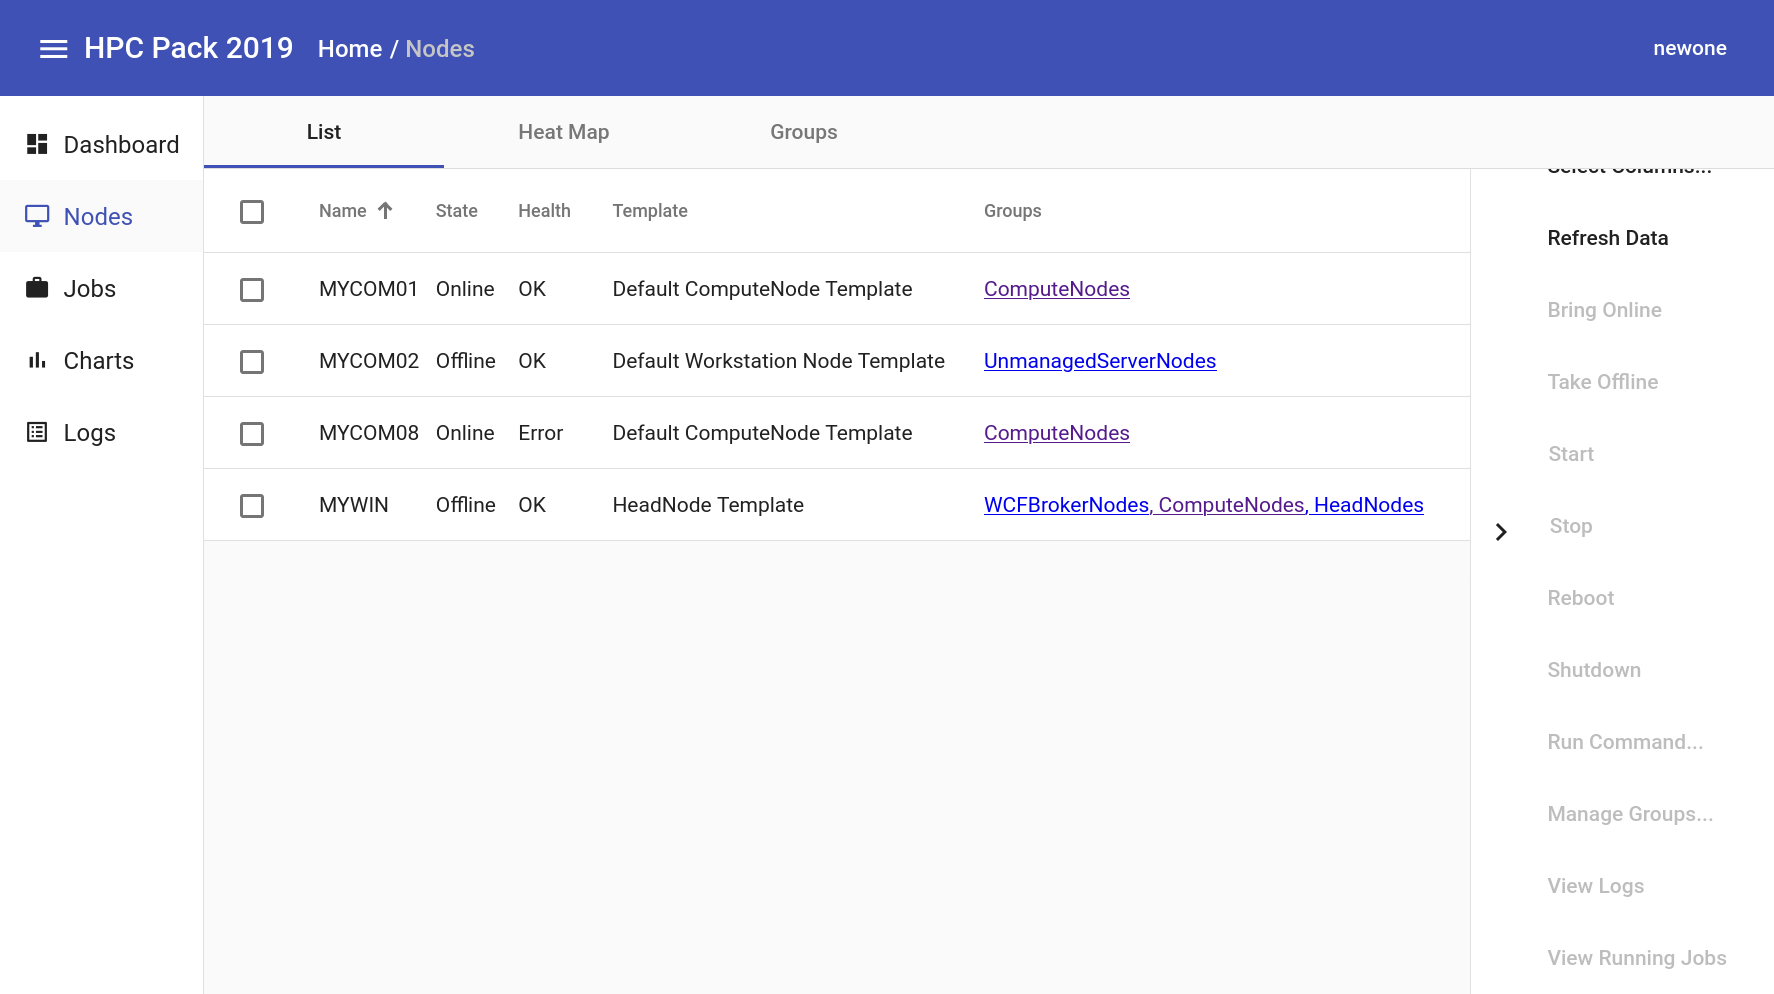
On the node screen, you can view the node’s status and perform simple actions. It is almost the same as the Resource Management menu in Cluster Manager.
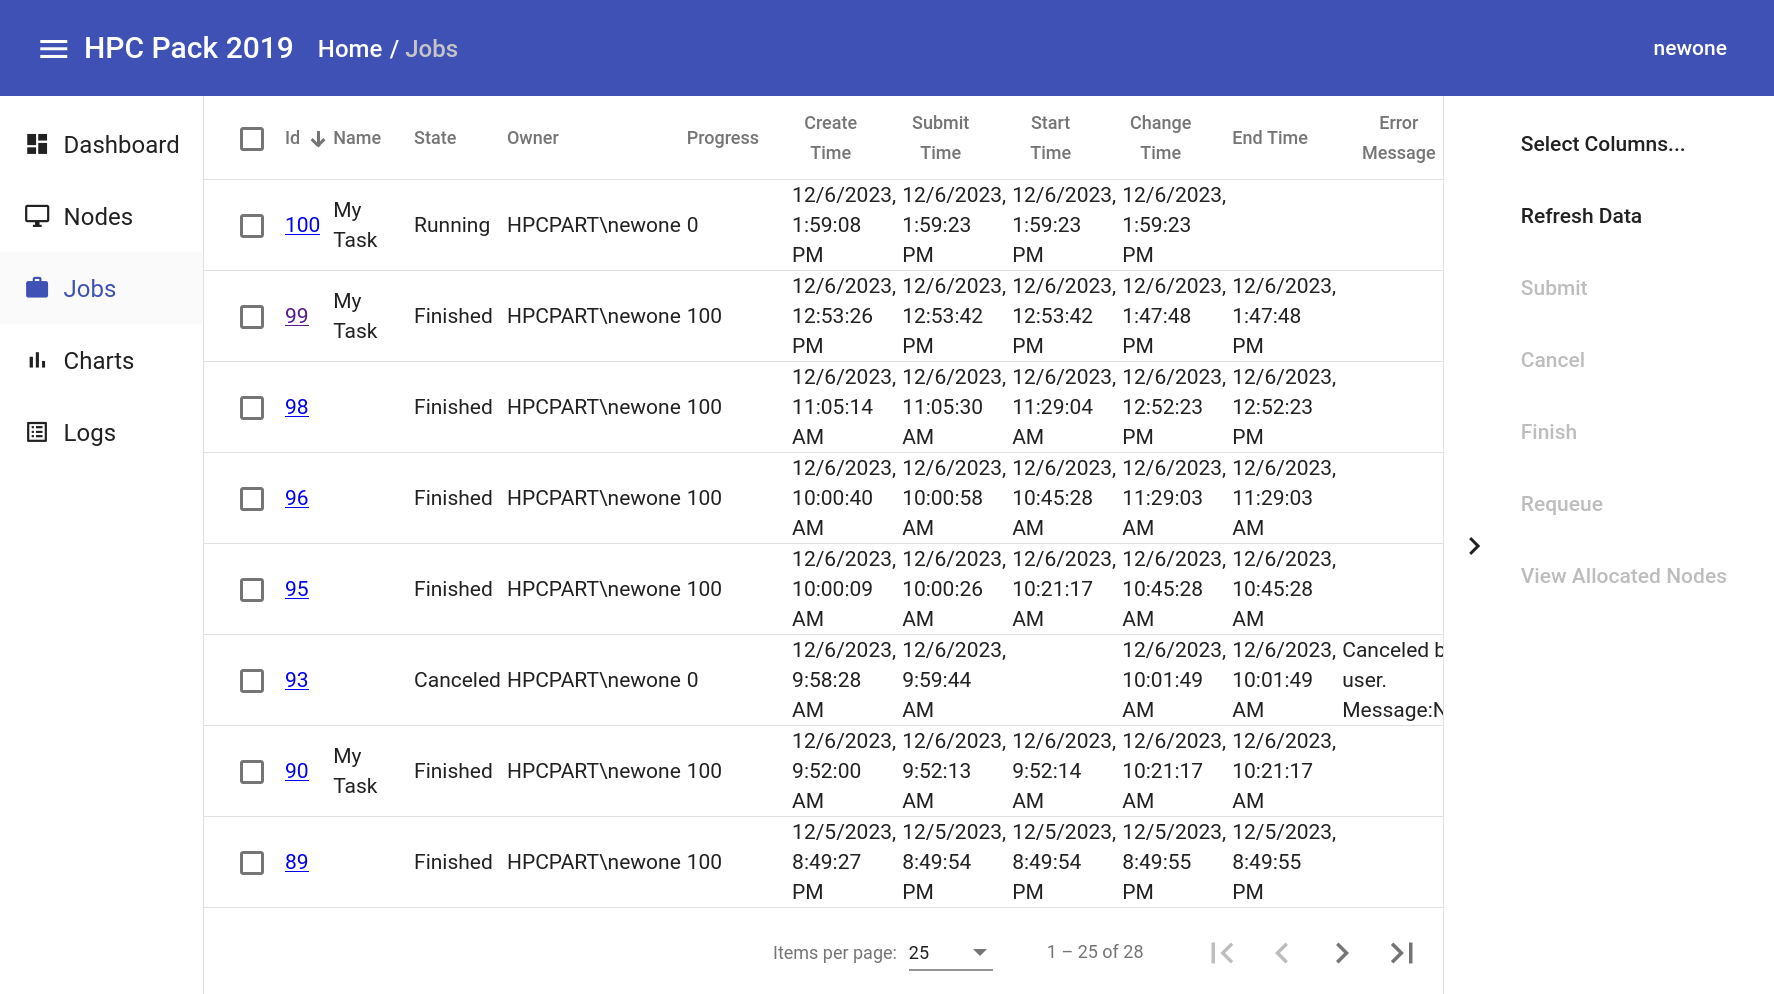
On the Job screen, you can view the Job list and perform simple actions. However, because Job submission, which is possible in Cluster Manager, is not allowed, it cannot be used from the user portal.
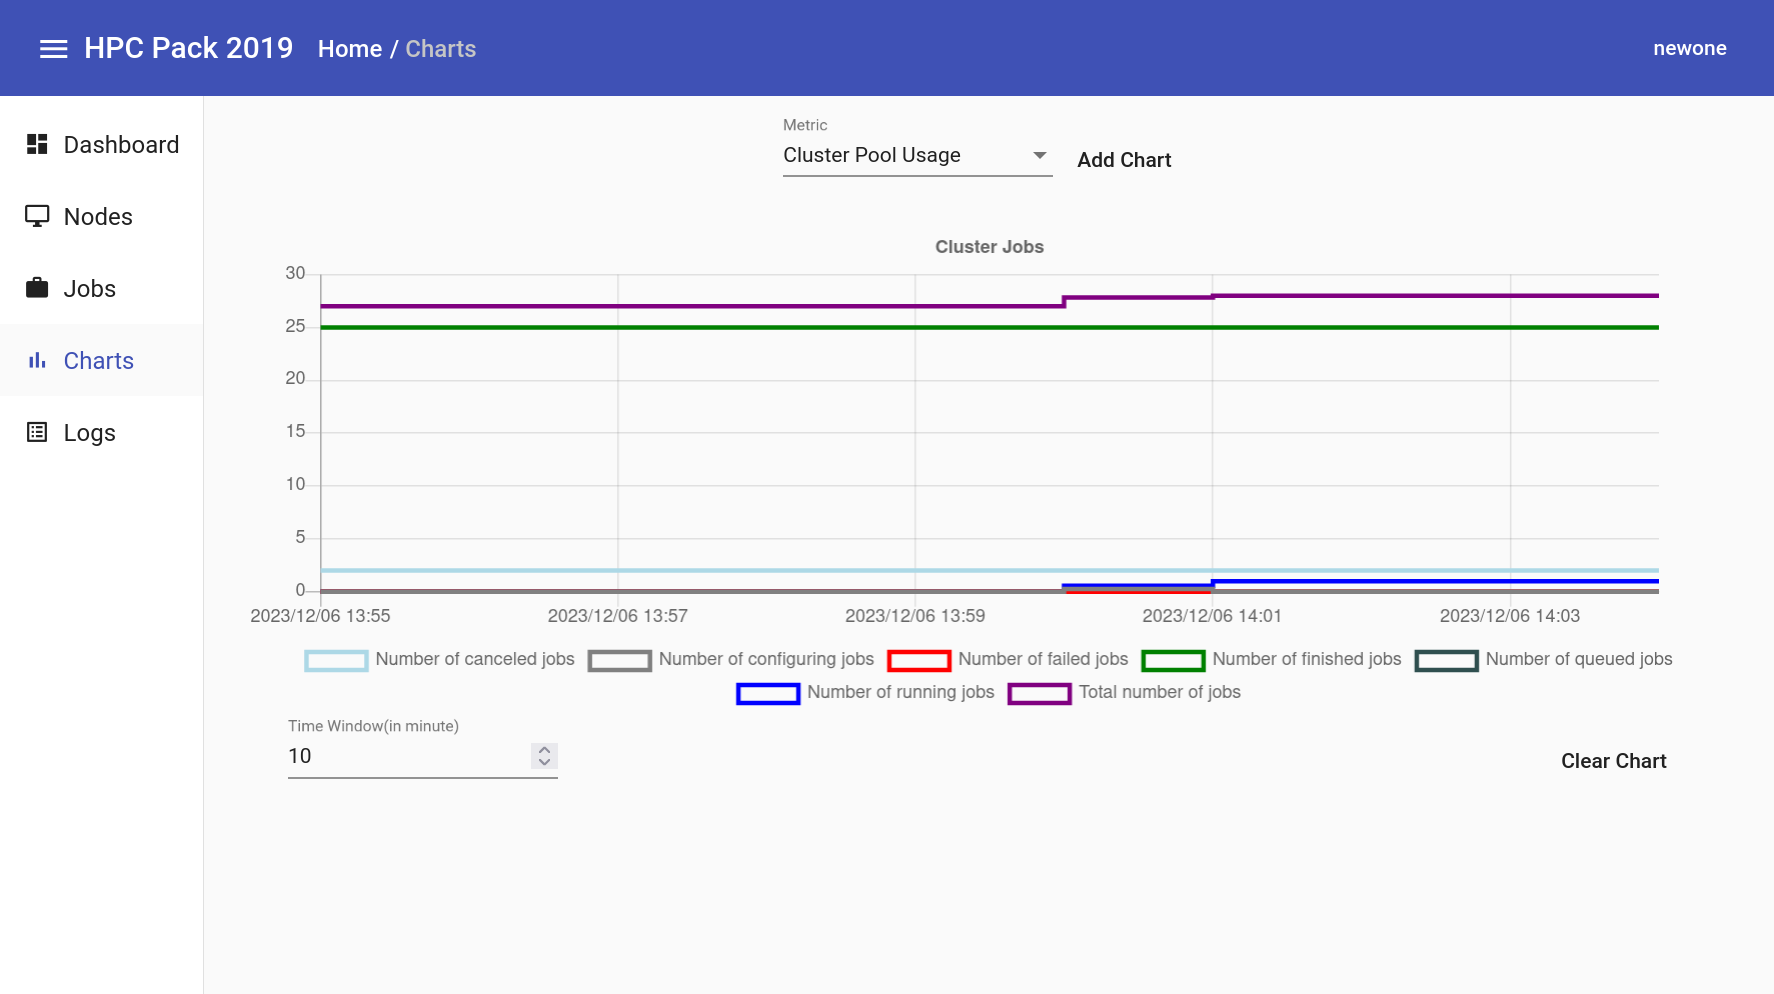
In the chart menu, you can display various metrics as charts.
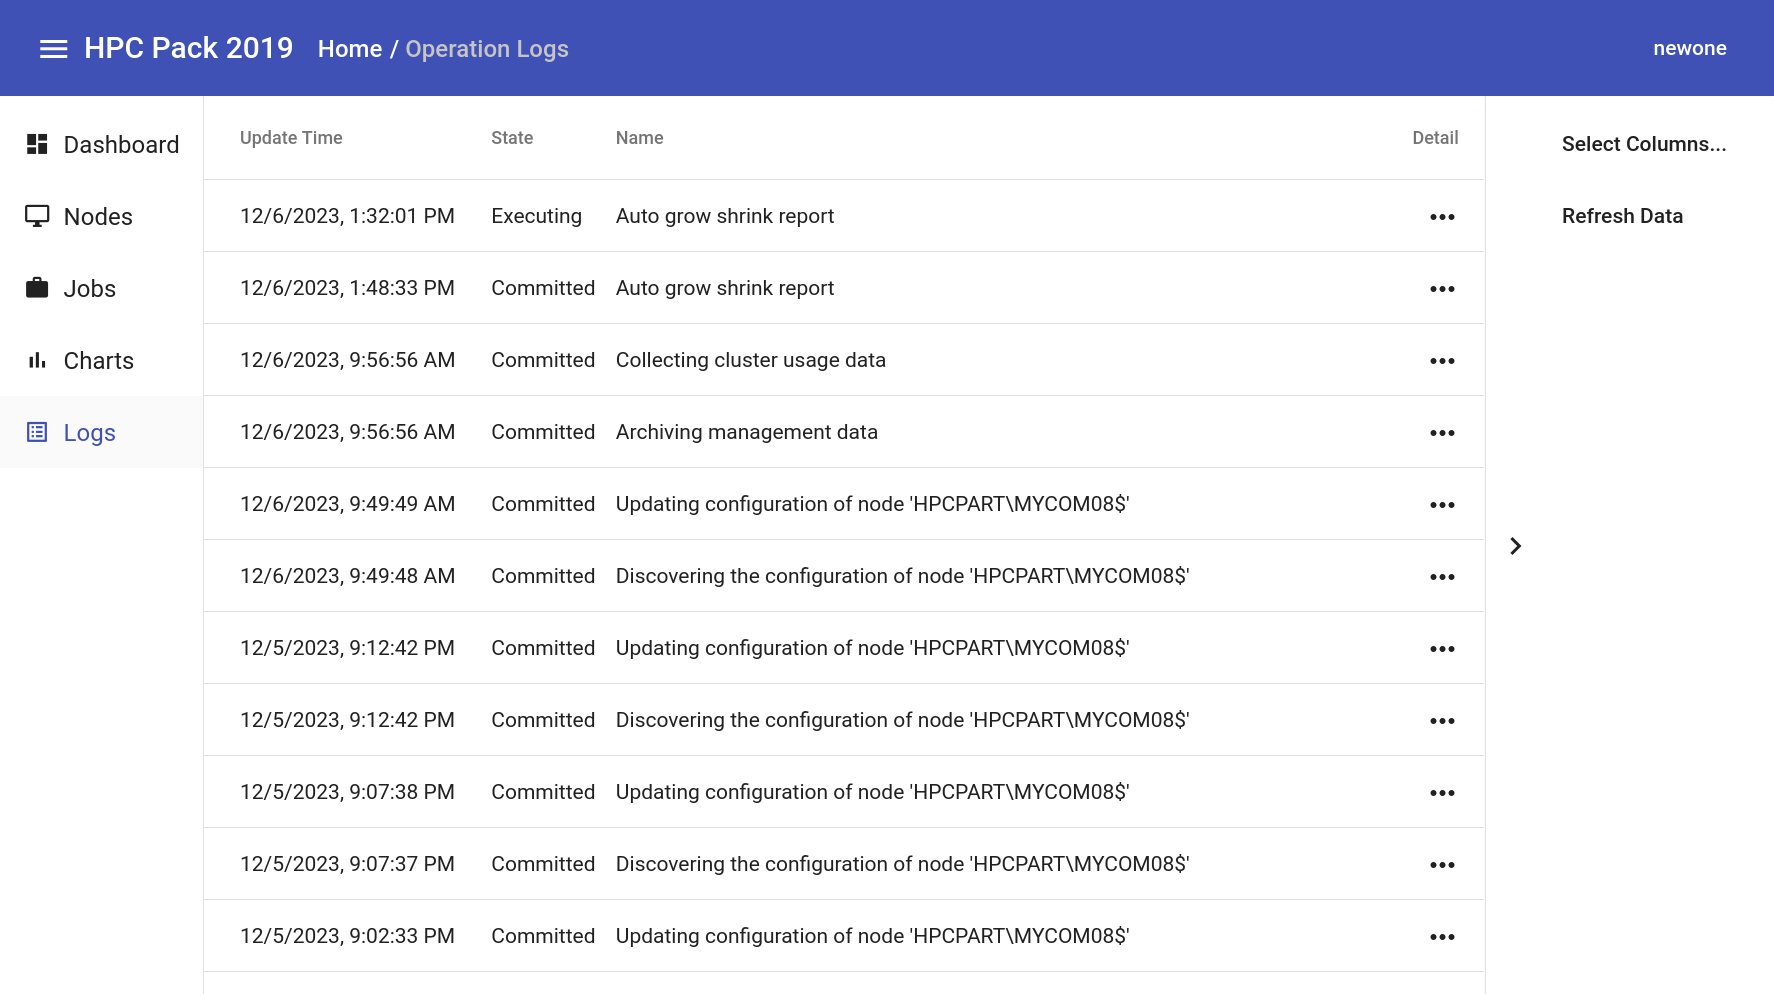
The Logs menu shows the cluster’s logs.
Summary and Future Plans
Here, we installed MS HPC Pack on Samsung Cloud Platform for a Windows HPC cluster and submitted a job. An HPC cluster should not use only a single server specification but must employ various server specs, and we discovered that Samsung Cloud Platform allows mixing Virtual Server, Baremetal Server, and GPU Server configurations.
I hope this guide is helpful to anyone who needs a Windows HPC cluster.
Although we tried to include a lot of content, there are many features we couldn’t cover. We will further supplement the guide. The tasks to be added are as follows.
- Active Directory installation and configuration
- Security Group configuration for HPC Pack
- Remote Database configuration
- Head node redundancy (HA, High Availablity)
- More Windows HPC application use cases (e.g., Excel, VBA, etc.)
- Add Linux compute node
- SOA(Service-oriented architecture) service configuration/WCF broker node configuration
- Automated compute node addition
- Node Preparation, Release Task Configuration
- GPGPU configuration
Additionally, the current guide explains how to manually configure an HPC cluster. In contrast, Samsung Cloud Platform’s “HPC Cluster” service provides automated installation, offering end‑to‑end automation from Baremetal server creation to middleware installation.
We are also considering the automation features of MS’s HPC Pack in the future. If that happens, we expect Windows HPC cluster users to be able to use the HPC cluster more comfortably.
Reference
[1] Overview of Microsoft HPC Pack 2019, https://learn.microsoft.com/ko-kr/powershell/high-performance-computing/overview?view=hpc19-ps
[2] y-cruncher A Multi-Threaded Pi-Program, http://www.numberworld.org/y-cruncher/
[3] PowerShell, https://learn.microsoft.com/ko-kr/powershell/scripting/overview?view=powershell-7.4