
File Storage-based Replication (Snapshot/D2D/DR) Usage Guide
File Storage-based Replication (Snapshot/D2D/DR) Usage Guide
Overview
File Storage provided by Samsung Cloud Platform (hereinafter SCP) is a storage service available on Virtual Server (hereinafter VM) and Bare Metal Server (hereinafter BM).
This document provides an overview of features related to File Storage and introduces a guide for using NFS.
- snapshot
- Disaster Recovery (DR)
- Disk to Disk Backup (D2D)
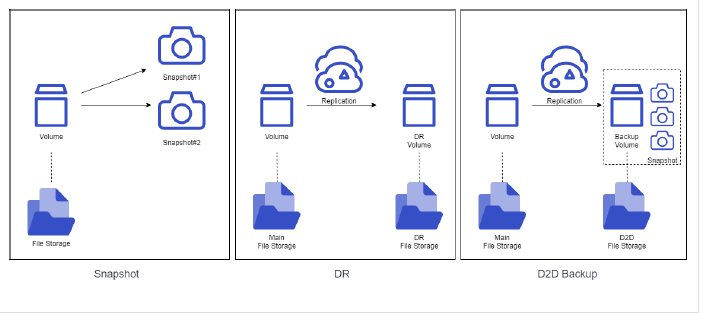
Snapshot
Snapshots are a Point‑In‑Time based data replication solution designed to guard against logical data failures. Even if unintended file modifications occur that the user does not want, you can revert to a previous point through copying or recovery. Snapshots do not affect the performance of the original data when created, and they also have no performance impact during creation or deletion. Creating a 1TB snapshot also completes within seconds.
The storage space of snapshots generally occupies more space as data changes occur more frequently.
Snapshot Creation
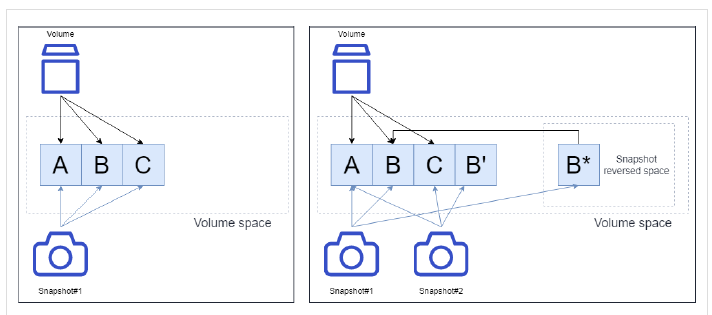
The initial snapshot stores pointer information for the blocks that the base volume has at the time it is created. After a data change occurs on the primary volume, it stores pointer information to the original data, and that region is included in the snapshot reservation area. Subsequent snapshots contain only the data blocks that have changed since the previous snapshot.
Snapshot Recovery
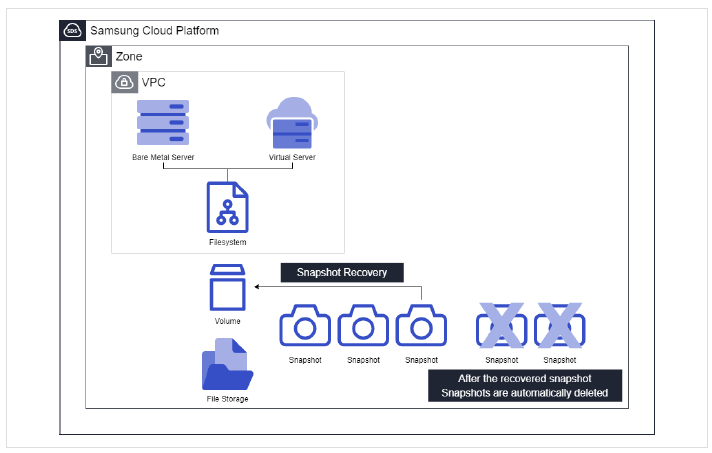
SCP File Storage provides two recovery methods—either for the entire volume or on a per-file basis—using existing snapshots.
Full Recovery
The original file system is restored using snapshot data from a specific point in time, and once the restoration is complete, snapshots created after the used snapshot are automatically deleted.
File-level recovery
- You access a snapshot at a specific point in time and proceed with recovery of the required files.
- The recovery operation does not affect snapshots that exist at the time it is performed.
- After the user clicks Enable file-level recovery in the console, they log into the OS and perform the necessary recovery steps themselves.
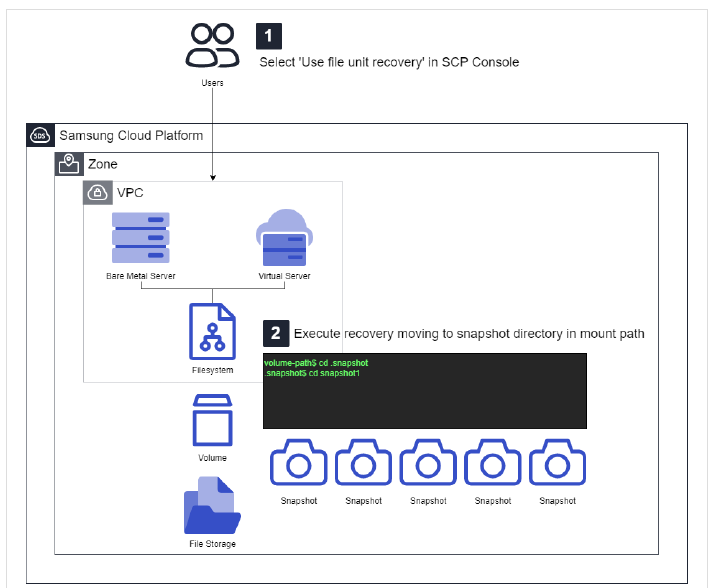
volume-path$ cd .snapshot
.snapshot$ cd snapshot1
volume-path$ cd .snapshot
.snapshot$ cd snapshot1- Resource Management > Storage > File Storage Select the volume you wish to restore from the file list
- Select Snapshot/Recovery List tab
- In the console, simply select the snapshot you want to restore and click Restore.
Disaster Recovery (DR)
Generally, DR refers to a feature that supports replication between zones or regions. SCP file storage’s DR is based on snapshots. It synchronizes file systems between two different regions so that, in the event of a failure, the file system of another region can be used urgently; the file systems reside on physically separate storage devices. DR deletes all snapshots except the initial snapshot and the most recent synchronized snapshot.
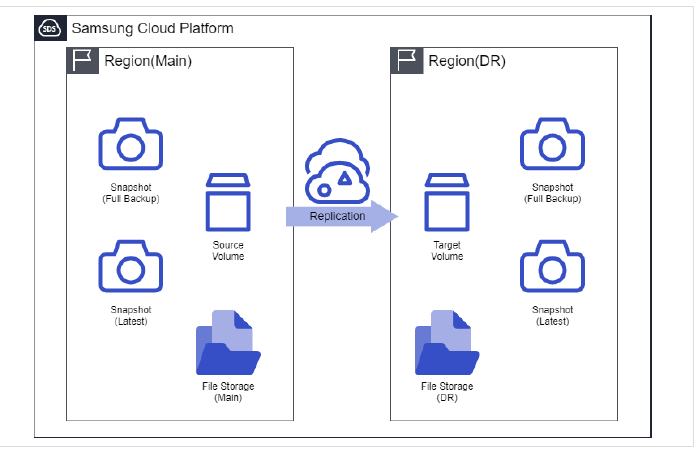
Create snapshot during initial DR configuration
The initial snapshot synchronized from the source file system is created to match the size of the source file system, so the time required for synchronization to complete varies depending on the size of the source file system.
Snapshots created after the initial synchronization is completed are generated only for the parts that have changed, compared with the last synchronized snapshot. This is called an incremental backup, and because the amount of data to be synchronized is smaller than that of a full backup, it takes less time.
What is lag time?
It refers to the time that has not been synchronized since the most recent snapshot was created. The SCP File Storage DR feature currently allows synchronization settings at intervals of 5 minutes, 1 hour, daily, weekly, or monthly.
For example, if it is set to a 5‑minute interval, the lag time cannot exceed 5 minutes.
File Storage Backup
In the SCP File Storage service environment, you can back up the user’s original file system to protect the data.
Disk Backup(D2D)
Disk backup is performed within the same ZONE or from one ZONE to another ZONE. This feature operates using the snapshot function, and the backup retention count refers to the number of snapshots.
In the console, the name is <디스크 백업>. You can configure the backup location, backup volume name, backup schedule (hourly, daily, weekly, monthly), and the number of retained backups (1 to 128). Upon creation, its purpose is displayed as a backup copy.
The backup cannot be mounted and used directly; it can be used following the steps below.
- Pause in synchronization policy
- Perform file-level recovery
- Full recovery from the backup volume to the original volume is performed using SR.
Disk Backup Recovery
D2D File Storage Recovery Procedure Within the Same ZONE
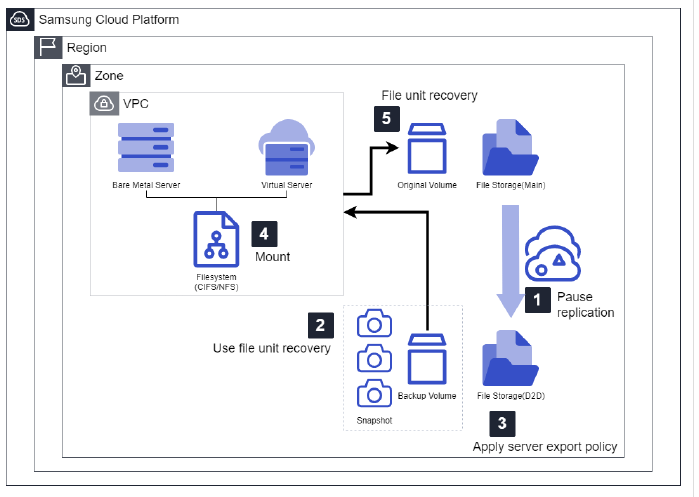
- Pause synchronization policy
- Backup volume Read/Write settings
- Console > File Storage > Disk Backup Synchronization Schedule Stop
- Enable file-level recovery
- Enable the file-level recovery feature to display snapshot versions at a specific point in time when mounting the file system.
- Console > File Storage > Backup Volume > Use File-level Recovery
- Server access control settings
- Select server to mount
- Console > File Storage > Backup Volume > Edit Connected Resources
- mount
- Check mount information
- SCP User Guide > File Storage > How-to guides > Refer to the content for connecting to the server
- File-level recovery at a specific snapshot point
- Locate files that require recovery among the backed-up snapshot versions and perform selective file-level recovery.
- SCP User Guide > File Storage > How-to guides > Refer to file-level recovery content
D2D file storage recovery procedure for another ZONE
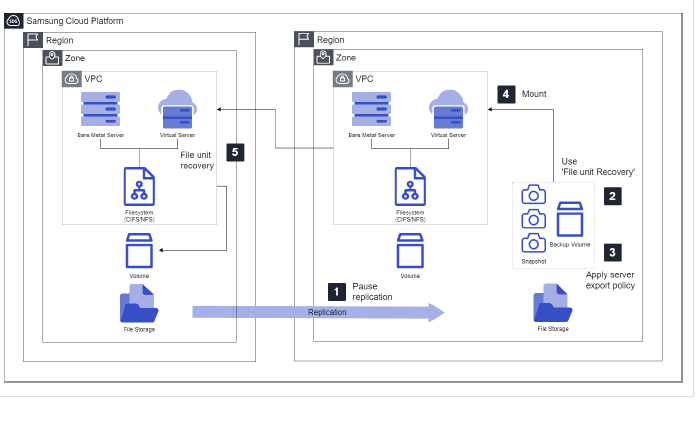
The recovery procedure is the same as the above ZONE procedure, and the following prerequisites are additionally required.
NFS Usage
NFS MOUNT Options
This is a description of the commonly used NFS mount options. By default, if no options are given, the default values are applied and the volume is mounted, and you can view the option values applied to the mounted volume using the mount command in Linux.
To assign options, specify the desired options after -o when executing the mount command, separating each option with ,.
The following is a description of NFS options.
| NFS options | description |
|---|---|
| rsize | Maximum data byte size that an NFS client can receive in a single READ request |
| wsize | Maximum data byte size that an NFS client can transmit in a single WRITE request |
| hard | Set the NFS client recovery behavior after the NFS request timeout expires so that it retries indefinitely until a response is received. Typically, set it to hard for read/write directories. |
| timeo | Set the time, in seconds, that the NFS client waits for a response before retrying an NFS request. |
| retrans | Number of times the NFS client retries a request before attempting additional recovery operations |
| noresvport | Option to have the NFS client use a new TCP port when the network connection is reestablished. |
| _netdev | When registering an NFS volume in /etc/fstab, specify that the device is a network device to prevent mount attempts before the system network is activated. |
NFS Performance Optimization
This is an explanation of the nconnect mount option. You can specify the number of sessions connected over the network between the client and storage devices. Generally, mounting without this option uses a single connection per session. nconnect option can be set from 1 to 16, but the values that provide a meaningful performance improvement are 4 or 8.
However, nconnect is supported on newer OSes, so you should check its availability before using it.
NFS v4
If you want to use File Storage in an SCP environment, only NFSv3 is currently available, and NFSv4 requires a separate SR request.
After the SR request is submitted and the work is completed, the user performs server configuration tasks according to the mount procedure below.
NFSv4 Server Setup
# vi /etc/idmapd.conf
Nobody-User = root
Nobody-Group = root
# vi /etc/idmapd.conf
Nobody-User = root
Nobody-Group = rootSave after configuring as above.
# nfsidmap -c# nfsidmap -cAfter executing the command, verify that the mountpoint has changed to root:root and that the file is Read/Write correctly.