
File Storage
File Storage
Overview
This page is a guide that can be referenced when migrating Local File or NAS(Network-Attached Storage) File to Samsung Cloud Platform (hereafter SCP) File Storage. First, we introduce the purpose-specific Data Migration tools (Tools) and provide detailed guidance on the migration example, including commands.
Migration tool
Depending on the Protocol and Source environment, you can use the following tools. It can be used as a built-in tool on each Linux and Windows OS without any additional installation.
| Data Type | Protocol | Tool | Explanation |
|---|---|---|---|
| File | NFS | Rsync | Used for file migration in a Linux server environment |
| File | CIFS | RoboCopy | Used during file migration in a Windows server environment |
Preliminary work
VPC Endpoint
Create a VPC Endpoint so that the Bastion Host can access the File Storage of SCP v2. A Bastion Host can also be created in an SCP v2 environment, and in that case a VPC Endpoint must be created in the SCP environment rather than the SCP v2 environment.
After creating the VPC Endpoint, perform the vpc endpoint connection operation from the detailed information of the connected File Storage.
Firewall/Security Group
Enable the Bastion Host to communicate with the VPC Endpoint of SCP v2.
| Origin | Destination | Port/Service | type | Description |
|---|---|---|---|---|
| Bastion Host | SCP v2 File Storage VPC endpoint | TCP, UDP common / 111, 300, 302, 304, 2049, 635, 4045, 4046, 4049 | One-way | File Storage Access |
- To configure communication from SCP to the SCP v2 environment, all of the items below must be properly applied.
- Bastion Host security group
- SCP DC/TGW’s Firewall & Routing
- Physical firewall (DC Manager)
- SCP v2 DC/TGW’s Firewall & Routing
File Storage Mount operation
Mount the File Storage of SCP and SCP v2 on the Bastion Host.
Connecting File Storage on a Linux VM
When creating File Storage to connect to a Linux VM, you typically create the File Storage using the NFS protocol. Accessing File Storage from a VM requires permission. In the detailed information of File Storage, click the pencil icon next to the linked resource, select the VM you want to connect to, and click Confirm.
If you connect File Storage from a VM without the above settings, the following error occurs.
- mount.nfs: access denied by server while mounting <Mount 명>
Connect the FIle Storage on the VM using the command below. The mount name to be used in the mount command can be found in the details of File Storage.
Mount command
$ mkdir /data
$ mount -t nfs -o vers=3,noresvport 198.19.64.232:/shae_e7e17de9_120d_494a_90e6_ec9217c4ad60 /data
If the mount command does not execute, verify that the following packages or services are installed and running. Package Installation (Redhat family)
$ yum install nfs-utils
Package installation (Debian-based)
$ apt-get install nfs-common
Enable and start NFS-related daemon
$ systemctl enable rpcbind.service
$ systemctl start rpcbind.service
To automatically mount the File Storage even when the VM is restarted, add the following to the /etc/fstab file. fstab file
$ vi /etc/fstab
198.19.64.232:/shae_e7e17de9_120d_494a_90e6_ec9217c4ad60	/data	nfs	defaults,vers=3,_netdev,noresvport	0	0
Connecting File Storage from a Windows VM
When creating File Storage to connect to a Windows VM, File Storage is typically created using the CIFS protocol. To access File Storage from a VM, you need to be authorized.
- In the detailed information of File Storage, click the pencil icon next to the linked resource, select the VM you want to connect to, and click Confirm.
When accessing File Storage from a Windows VM, an ID/password is required.
- The ID can be found in the Protocol field on the detailed information screen of File Storage: CIFS(ID:xxxx)
- Password is entered when creating a File Storage. When connecting to Files Storage, in Explorer, right-click on My PC and click Map network drive (network drive connection).
- Refer to the detailed information of the File Storage volume to connect, enter the drive and folder, then click Finish: Enter the Mount name in the folder. To set it to automatically reconnect when the server restarts, select Reconnect (Reconnect at sign-in) when logging in.
- On the ID/Password input screen, entering the ID and Pasword connects the File Storage.
Migration Procedure
1. ## Rsync
Rsync is short for Remote Sync and is a representative file migration tool for NFS (Linux, Unix) environments. It is provided as a default package in Linux, and by executing the command you can synchronize (or copy) files or directories between remote and local systems. Various options are provided, and you can leverage them to perform migrations suited to each environment.
Method
#rsync [options] [source] [destination]
Key Options
- v : detailed progress
- a : archive mode
- z : compressed data transmission
- h : human-readable display the number in a readable format
--delete : If there is data in the target directory, delete it
(The delete option is used when synchronizing source and target, and it deletes data in the target directory if present, so please verify before using it.)
Example usage
Ex1> Local File to SCP File Storage Migration
- Mount on the server after creating SCP File Storage
- Using the rsync command for migration (/mig_src -> /mig_tgt)
#rsync -avzh –delete /mig_src/ /mig_tgt » /log/rsync.log
Ex2> AWS EFS to SCP File Storage Migration
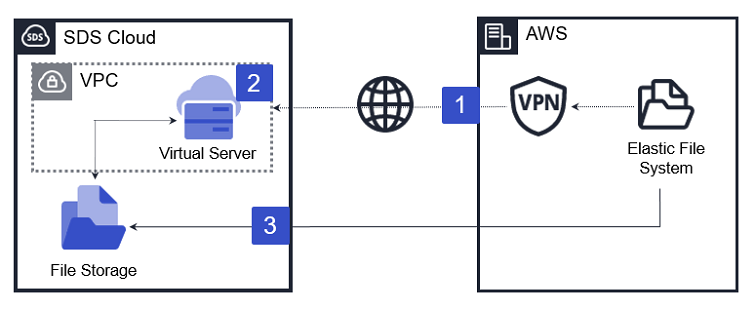
- Using the AWS VPN Service to connect SCP and Network
Open firewall for TCP Port 2049
: SCP Security Group Outbound
: AWS Security Group Inbound - Mount both AWS EFS (Source) and SCP File Storage (Target) on the SCP server
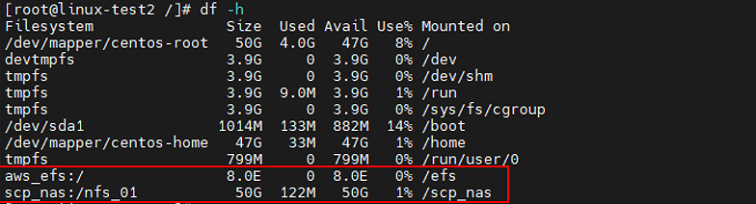
- Migration using rsync command (/efs -> /scp_nas)
#rsync –avzh –delete /efs/ /scp_nas » /log/rsync.log
2. ## RoboCopy
It is a Windows OS built‑in tool that supports migration functionality for local files or network file systems. It is a reliable tool that can be used most easily on Windows and can be executed from the command prompt with a command. Various options are provided, enabling migration that meets multiple conditions.
Method
#robocopy [source] [destination] [options]
Main Options
/MIR : mirroring the directory tree
/W:n : wait time between retries
/R:n : Number of retries for failed copies
/TEE : output to log file and console window
/ETA : display the estimated arrival time of the file being copied
/LOG+:file : output status to log file (append to existing log)
/MT[:n] : copy multithreaded with n threads (default 8, n is between 1 and 128 inclusive)
Additional detailed options can be viewed using the “robocopy /?” command.
Usage example
Ex1> Local to Local
Migrate the mig_src directory on the C drive to the mig_tgt directory on the D drive
>robocopy c:\mig_src d:\mig_tgt /mir /w:3 /r:3 /eta /log+:c:\log.txt
- Ex2> Local to Network Filesystem Migration
- Migrate the mig_src directory to the mig_tgt directory on the CIFS1 server Migration
>robocopy c:\mig_src \CIFS1\mig_tgt /mir /w:3 /r:3 /log+:c:\log.txt
Ex3> NAS FileSystem Migration
Migrate the data of the currently used NAS FileSystem to a new NAS FileSystem
Verify As-Is FileSystem CIFS Share path and To-Be FileSystem CIFS Share path
When mounting as a network drive, you can specify using a drive letter, e.g., Z:, Y:**
>robocopy Z:(Source) Y:(Target) /mir /w:3 /r:3 /eta /mt:64 /log+:c:\log.txt