
Using ZConverter for VM Migration
Using ZConverter for VM Migration
Overview
This document provides the procedures and tasks for using ZConverter as one method to migrate the OS and related data installed on a Virtual Server located in Samsung Cloud Platform to Samsung Cloud Platform v2.
ZConverter is a migration technology that uses Copying and pasting, and it supports continuing operation after migration with the original server’s operating environment and state unchanged.
ZConverter Migration Overview
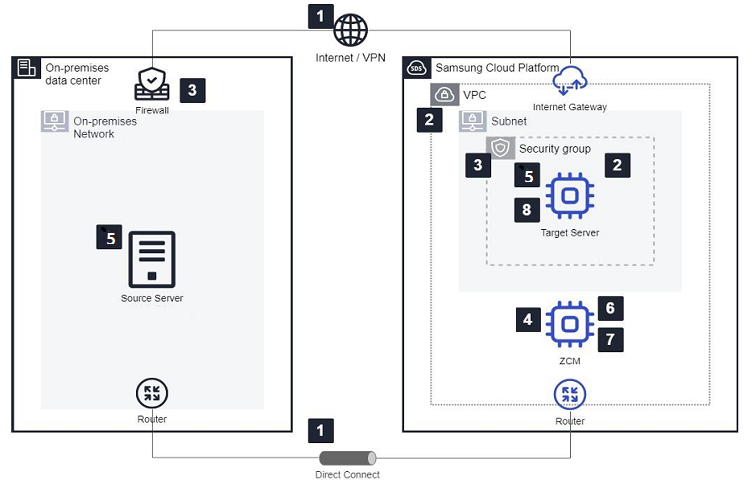
- Connect the network between the Source server environment and the Target server environment (Samsung Cloud Platform).
- Create a VPC in the target server environment and create a target VM for migration.
- Open security groups and firewalls between the Source server, the Target server, and ZCM (ZConverter Cloud Manager, management server).
- Install ZCM.
- OS: Windows 2016 or later
- vCPU: 2Cores
- Memory: 8GB or more
- Disk: 500GB or more recommended
- Install the Agent on the Source server and the Target server.
- In the ZCM portal, use the wizard to connect to the Source server and the Target server.
- Perform migration through the ZCM portal.
- Perform post-processing on the target server.
- IP, recovery of persistent information such as specific users/files/services
- Boot normally with the migrated OS
- Monitor the target server’s normal boot status and the application.
Constraints
- Migration can be performed to the same major version target.
- If the source is Redhat 7.2, the target can be Redhat 7.9.
- If the source is Windows 2022, the target can be Windows 2022.
Preliminary work
- Virtual Server to configure the ZConverter management server (ZCM): configured in the SCP v2 environment
- OS: Windows 2016 or later
- vCPU: 2Cores, Memory: 8GB or more
- Disk: 500GB or more: It may vary depending on the size of the Source Virtual Server for backup image storage.
- Firewall configuration for the management server (ZCM) for migration
| Departure | Destination | Port/Service | type | Explanation |
|---|---|---|---|---|
| User | ZCM(ZConverter Cloud Manager) | TCP/58080 | One-way | ZCM web access |
| Source VM | ZCM | TCP / 50000, 50001, 58080 | One-way | Agent Management |
| Target VM | ZCM | TCP / 50000, 50001, 58080 | One-way | Agent Management |
| Source VM | ZCM | TCP / 139, 445(CIFS) | One-way | Data storage |
| Target VM | ZCM | TCP / 139, 445(CIFS) | One-way | Data storage |
※ List based on the NAS data storage method; for the Basic method, additionally open port 50005 between Source VM and Target VM.
Create Target VM (SCP v2) for migration
- Pre-create a Target VM (TO-BE: SCP v2) with the same major version as the Source VM (AS-IS: SCP).
- OS disk or Data disk partitioning (same configuration as source) is required.
- Additional preparation steps for Linux OS (Only)
- Additional 20GB disk for ZConverter migration: add it last after the partition configuration is completed.
- When installing the Agent on the Source VM (AS-IS) and Target VM (TO-BE), network storage is used via the CIFS protocol. * Therefore, to connect to a CIFS network storage, each server may need to install the cifs-utils (Linux) package or the SMB protocol (Windows).
ZCM installation
- Installation requirements
- OS: Windows 2016 or later / vCPU: 2Cores, Memory: 8GB or more, Additional Disk: 500GB or more recommended ( additional disk required for NAS configuration for incremental sync )
- Installation method
Upload the ZCM installation file to the created Windows server, right-click with the mouse, and click the Run as administrator button to install.
- Installation file (request from the person in charge): ZConverter_CloudManager_Setup_v4.3.2_SCP.exe
- The installation proceeds after the file extraction screen appears, with the CMD window opening several times before completing (the completion message may pass quickly, making it hard to notice).
- Data storage methods include NAS and Basic. * The Basic method requires additional space and sufficient capacity to store VM images on both the Source and Target VMs, and Incremental Sync. is only possible with the NAS method, so we recommend configuring it as NAS.
Installation check:
- Check the three installed apps (Apps & Features): MariaDB, XAMPP, ZConverter Cloud Manager
- Check whether the two services are running: ZConverter Cloud API Service, ZConverter Cloud Manager
ZCM web access (performed locally or remotely)
- Connection URL: http://<IP 주소>:58080
- Contact the person in charge to obtain the ID (e‑mail) and password for login.
ZCM license issuance
- After installation, ZCM ID is required.
- Left menu > Configuration > Setting on the screen, check the ZCM ID and forward it to the responsible person by email.
- In the Left menu > Configuration > License screen, click the Add button to register the license key.
- Installation requirements
Client Agent installation (for Linux OS)
- Installation target: Source/Target VM
- Installation files: ZConverter_CloudSourceClient_Setup_V4.2_Build_4016.tar.gz, ZConverter_CloudTargetClient_Setup_V4.2_Build_4016.tar.gz
- File location: ZCM web’s left menu > Cloud Migration > Samsung, downloadable from the screen
- Installation method
# ls ZConverter_CloudSourceClient_Setup_Last.tar.gz # tar zxvf ZConverter_CloudSourceClient_Setup_Last.tar.gz # cd ZConverter_install_source/ # ./install.sh- Additional settings when installing Source/Target Client Agent: Enter ZCM IP adress and ID (e-mail)
[ Connection type ] 1. Public ZConverter SaaS (http://www.z-cloud.net) 2. Private ZConverter Cloud Manager (ZCM) Select connection type (1/2 or q/skip) : 2 Enter private ZConverter Cloud Manager(ZCM) IP address : xxx.xxx.xxx.xxx Test connection to Private Cloud Manager (ZCM) [xxx.xxx.xxx.xxx] Try to connect [xxx.xxx.xxx.xxx, port 50000] ... [ OK ] Try to connect [xxx.xxx.xxx.xxx, port 50001] ... [ OK ] Please, Enter your ZConverter login account (ex>user@zconverter.com) : ???@?????.com- Additional settings when installing Target Client Agent: specify additional partition
   last device : sdb (E: ID_PATH=pci-0000:03:00.0-scsi-0:0:1:0)
   last device : sdc (E: ID_PATH=pci-0000:03:00.0-scsi-0:0:2:0)
   ----------------------------------------------------------
   1: sda   100G Virtual disk
   2: sdb    10G Virtual disk
   3: sdc    20G Virtual disk
   =======================================================================================================================================
   >> Select the disk to set as ZConverter disk. [default:3]
Client Agent installation (for Windows OS)
- Installation target: Source/Target VM
- Installation files: ZConverter_CloudSourceClient_Setup_V4.2_Build_4008.exe, ZConverter_CloudTargetClient_Setup_V4.2_Build_4008.exe
- File location: can be downloaded from the left menu > Cloud Migration > Samsung screen on the ZCM web.
- Installation method
- Run file from Explorer: With the default settings, pressing the Next button brings up the ZCM configuration screen.
- In the ZCM settings screen, register the ZCM server IP Address and ZCM login ID (e-mail), then press the Check button and select the OK button.
Client Agent installation - CLI method
- Install Source server (Linux) (requires root or sudo privileges, run with sudo ./install.sh)
curl -O http://[ZCM Server IP]:58080/Download/ZConverter_CloudSourceClient_Setup_V4.2_Build_4016.tar.gz tar zxvf ZConverter_CloudSourceClient_Setup_V4.2_Build_4016.tar.gz -C /tmp /tmp/zconverter_install_source/install.sh -s [ZCM Server IP] -u [ZCM user id] - Install Target server (Linux) (requires root or sudo privileges, run with sudo ./install.sh)
curl -O http://[ZCM Server IP]:58080/Download/ZConverter_CloudTargetClient_Setup_V4.2_Build_4016.tar.gz tar zxvf ZConverter_CloudTargetClient_Setup_V4.2_Build_4016.tar.gz -C /tmp /tmp/zconverter_install_target/install.sh -s [ZCM Server IP] -u [ZCM user id] - Install Source Server (Windows)
curl -O http://[ZCM Server IP]:58080/Download/ZConverter_CloudSourceClient_Setup_V4.2_Build_4008.exe ZConverter_CloudSourceClient_Setup_V4.2_Build_4008.exe /zcm [ZCM Server IP] /user [ZCM user id] - Target server installation (Windows)
curl -O http://[ZCM Server IP]:58080/Download/ZConverter_CloudTargetClient_Setup_V4.2_Build_4008.exe
ZConverter_CloudTargetClient_Setup_V4.2_Build_4008.exe /zcm [ZCM Server IP] /user [ZCM user id]
- Install Source server (Linux) (requires root or sudo privileges, run with sudo ./install.sh)
Agent uninstall: run uninstall.sh
※ Agent installation and removal are unrelated to the ZConverter license, and the license is deducted upon the first successful migration execution.
ZConverter migration
- Run ZCM (ZConverter Manager).
- ZCM web access: http://<IP 주소>:58080
- Select the source virtual server.
- Left menu > Cloud Migration > Samsung select
- Register a Source Server > Load a Server list after clicking, select the server that will be the migration target (Source).
- In the Create or select a source image tab, select “create a new image”.
- Disk information of Source Server tab, select the Disk that is the migration target.
- In the Option > Repository tab, select the location to store replicated data: It is recommended to choose NAS for future incremental backups.
- Basic(/ZConverter): Source/Target VM’s local disk
- Advanced > NAS(ZConverter): Local disk of ZCM server (NAS share)
- When you click Next, the NAS authentication screen appears if NAS was selected in the Repository.
- Click the OK button to start authentication: you do not need to enter an ID/Password.
- Select the target virtual server.
- Register a Cloud Instance > List of Cloud instances In the tab, select the server that will be the migration target (Target).
- In Disk information, appropriately map the Disk that is the migration target.
- Linux: Source(/)->Target(/), Source(/boot)→Target(/boot)
- Windows: Source(C:)->Target(C:), Source(D:)→Target(D:)
- After selecting Target Repository, Replication Option, and Other Option, click Next.
- Target Repository: Use the repository selected from Source as is
- Replication Option: Use Target IP and Replication Port as is
- Other Option
- Hypervisor: Select the virtual device driver type for the cloud instance.
- Kernel Update: Select if you want to update the server’s kernel version
- Encryption(AES256): Select if you want to apply data encryption during migration
- Schedule: Select to run the migration at a specified time.
- Select a license for proceeding with the migration process.
- Select the Migration License you want to use, then click the Select button.
- On the Migration Information screen, pre-check the Migration status, and when all checks are complete, select OK.
- You can switch to the Event > Monitoring screen to check the Migration status.
- If you see a blue bar in the Job message, it is in progress.
- If the job message turns green immediately, it is complete.
Application test
Before executing the service Cutover, it is essential to test whether the migrated Target server can provide services normally in the SCP v2 environment.
It is recommended to connect to all target servers via SSH (Linux) or RDP (Windows), test the service’s normal operation for at least two weeks, and resolve any issues.
Cutover
At the predefined date and time, we stop the service on the Source server and launch the service on the Target server that has been migrated to Samsung Cloud Platform.
Incremental Sync
In the source server registration menu, click the Source server to be migrated, then in the Create or select a source image panel, select the Create an incremental image option to repeat the migration configuration process. ZCM images files changed on the Source server after the Initial Sync and transfers them to the Target server.
Database (DB) Replication
Operating systems and applications are migrated using the VM Migration service, and data that undergoes real-time changes such as databases are migrated according to the DB migration guide.
DNS change
In SCP v2, modify the DNS A record’s IP so that the newly assigned public IP of the web server can provide internet services.
So far, we have examined the procedure for migrating a server from the SCP environment to the SCP v2 environment using ZConverter.